


一、概念
PyInstaller将Python应用程序及其所有依赖项捆绑到一个包中。用户无需安装Python解释器或任何模块即可运行打包的应用程序。
- 参数介绍如下

- 参数使用
 -D: 创建包含可执行文件的单文件夹包,同时会有一大堆依赖的 dll 文件,这是默认选项;
 -F: 只生成一个 .exe 文件,如果项目比较小的话可以用这个,但比较大的话就不推荐
- 优势
1.即插即用,可与任何Python 3.6-3.9版配合使用。
2.完全多平台,并使用操作系统支持来加载动态库,从而确保完全兼容。
3.正确捆绑主要的Python软件包,例如numpy,PyQt5,PySide2,Django,wxPython,matplotlib和其他现成的软件包。
4.兼容许多现成的第三方包装。(使外部软件包正常工作所需的所有技巧已经集成。)
5.完全支持PyQt5,PySide2,wxPython,matplotlib或Django之类的库,而无需手动处理插件或外部数据文件。
6.与OS X上的代码签名一起使用。
7.在Windows上捆绑MS Visual C ++ DLL。
- 劣势
只支持torchvision0.3以下,太老了。
二、Windows打包Python程序实例
1.单个文件打包
- 核心源码
#! -- coding: utf-8 --""
"Author: ZhenYuShaCreate Time: 2020-1-20Info: Python打包示例1,单个文件打包 “pyinstaller -F(单个可执行文件) 程序源 -n 程序名 -w(去掉控制台窗口,这在GUI界面时非常有用) -i 图标.ico” “pyinstaller -F test1/Demo_Test1_Python.py”"""
def bubble_sort(arr):
""" 冒泡排序 :param arr: :return: """
for i in range(1, len(arr)):
for j in range(0, len(arr)-i):
if arr[j] > arr[j+1]:
arr[j], arr[j + 1] = arr[j + 1], arr[j]
return arr
if name == 'main': test = [1, 8, 123, 18, 99, 300]
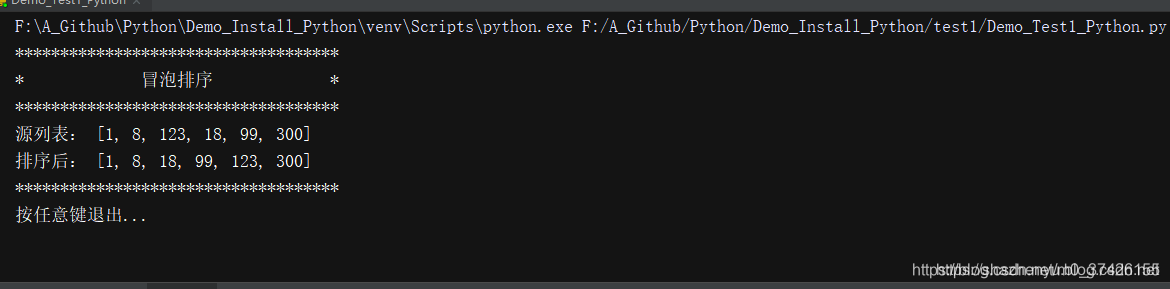
print("********************************")
print("* 冒泡排序 *") print("********************************")
print("源列表:", test)
result = bubble_sort(test)
print("排序后:", result)
print("********************************") input("按任意键退出...")
- 程序运行
- 打包方法
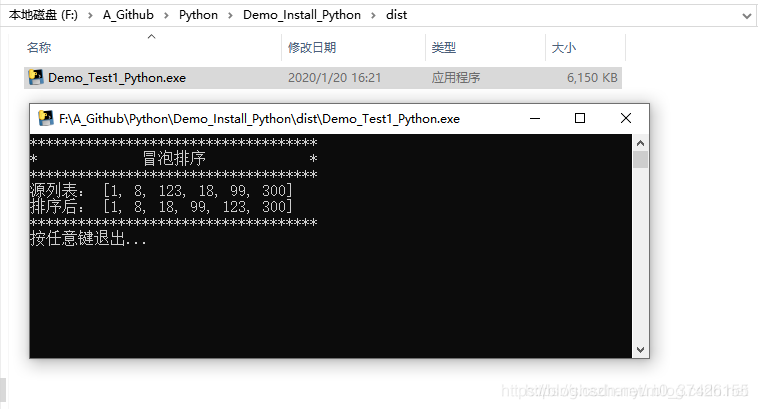
pyinstaller -F test1/Demo_Test1_Python.py
- 打包后效果
2.多个文件打包
- 核心源码
#! -- coding: utf-8 --
"""Author: ZhenYuShaCreate Time: 2020-1-20Info: Python打包示例2,多个文件打包 “pyinstaller -F(单个可执行文件) 程序源 -n 程序名 -w(去掉控制台窗口,这在GUI界面时非常有用) -i 图标.ico” “pyinstaller -F test2/Demo_Test2_Python.py”"""
from test2.Demo_bubble_sort import bubble_sort
from test2.Demo_heap_sort import heap_sort
if name == 'main':
test1 = [1, 8, 123, 18, 99, 300] test2 = test1[:]
print("********************************")
print("* 两个排序 *")
print("********************************")
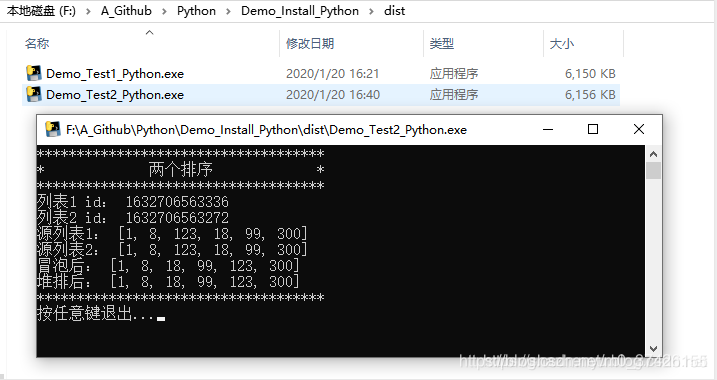
print("列表1 id:", id(test1))
print("列表2 id:", id(test2))
print("源列表1:", test1)
print("源列表2:", test2)
result1 = bubble_sort(test1)
result2 = heap_sort(test1)
print("冒泡后:", result1)
print("堆排后:", result2)
print("********************************")
input("按任意键退出...")
- 程序运行

- 打包命令
pyinstaller -F test2/Demo_Test2_Python.py
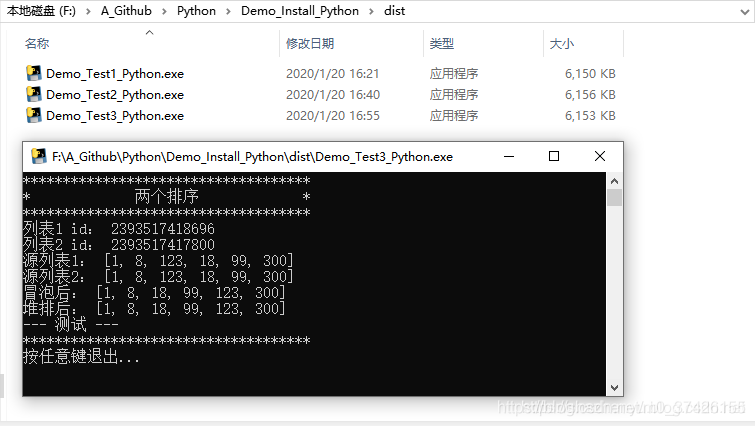
- 打包后效果
3.多层文件打包 - 核心源码
#! -- coding: utf-8 --
"""Author: ZhenYuShaCreate Time: 2020-1-20Info: Python打包示例3,多层文件打包 “pyinstaller -F(单个可执行文件) 程序源 -n 程序名 -w(去掉控制台窗口,这在GUI界面时非常有用) -i 图标.ico” “pyinstaller -F test3/Demo_Test3_Python.py”"""
from test3.sort.Demo_bubble_sort import bubble_sort
from test3.sort.Demo_heap_sort import heap_sort
from test3.Demo_test import Test
if name == 'main':
test1 = [1, 8, 123, 18, 99, 300]
test2 = test1[:]
print("********************************")
print("* 两个排序 *")
print("********************************")
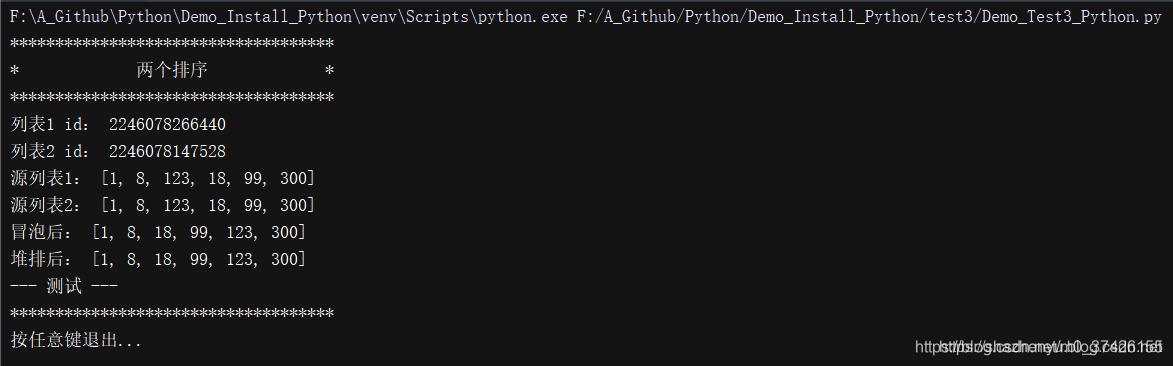
print("列表1 id:", id(test1))
print("列表2 id:", id(test2))
print("源列表1:", test1)
print("源列表2:", test2)
result1 = bubble_sort(test1)
result2 = heap_sort(test1)
print("冒泡后:", result1)
print("堆排后:", result2)
Test.run() print("********************************")
input("按任意键退出...")
- 程序运行
- 打包命令
pyinstaller -F test4/Demo_Test4_Python.py -n Test4 -i test4/test4.ico
- 打包后效果
三、Python Linux打包实例
1,多层文件打包
- 核心源码
#! -- coding: utf-8 --
"""Author: ZhenYuShaCreate Time: 2020-1-20Info: Python打包示例5,多层文件打包修改程序名 linux打包 “pyinstaller -F(单个可执行文件) 程序源 -n 程序名 -w(去掉控制台窗口,这在GUI界面时非常有用) -i 图标.ico” “-p 表示自定义需要加载的类路径(一般情况下用不到)” “pyinstaller -F Demo_Test5_Python.py -n Test5”"""
from sort.Demo_bubble_sort import bubble_sort
from sort.Demo_heap_sort import heap_sort
from Demo_test import Test
if name == 'main':
    test1 = [1, 8, 123, 18, 99, 300]
    test2 = test1[:]
    print("********************************")
    print("*    两个排序    *")
    print("********************************")
    print("列表1 id:", id(test1))
   print("列表2 id:", id(test2))
     print("源列表1:", test1)
     print("源列表2:", test2)
    result1 = bubble_sort(test1)
    result2 = heap_sort(test1)
     print("冒泡后:", result1)
      print("堆排后:", result2)
    Test.run()
    print("********************************")
    input("按任意键退出...")
- 程序运行
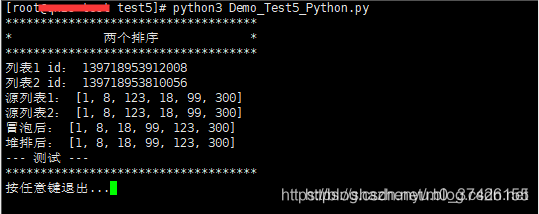
- 打包后效果
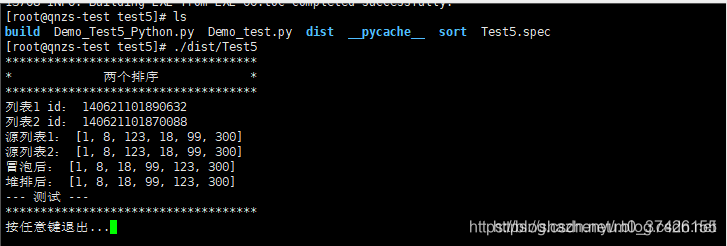
- 注意事项
放在其他linux上时,要chmod +x给他执行权限
执行代码: ./main
- 加密打包
运行时添加一个--key=...即可实现加密。 key值是一个16字符的字符串,可以通过openssl来生成。
	openssl rand -base64 16 | cut -c1-16
python -OO -m PyInstaller -F main.py --name actetm \    --key=openssl rand -base64 16 | cut -c1-16
这里没有使用pyinstaller,而是使用python -m PyInstaller,是为了进行-OO的优化。
四、遇到的问题
-
ModuleNotFoundError: No module named ‘setuptools.extern.six’
解决:pip install --force-reinstall --no-binary :all: pyinstaller
-
OSError: Can’t get source for <function LevelMapper.call at 0x7f1b28aa77a0>. TorchScript requires source access in order to carry out compilation, make sure original .py files are available. Original error: could not get source code.
解决:
1.修改xxx.spec文件如下
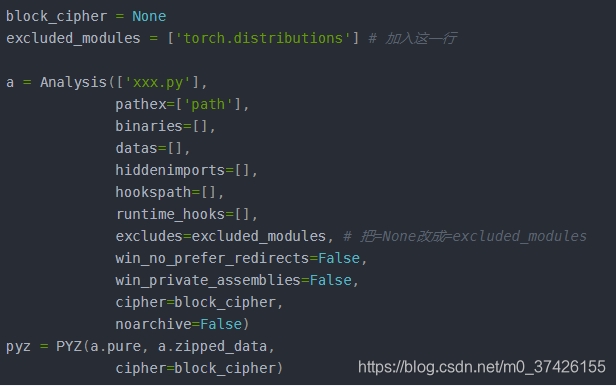
2.重构-pyinstaller your_file.spec
五、其他关于打包的参考教程
uwsgi+nginx:
https://www.bilibili.com/video/BV1qJ41157n4?from=search&seid=8380380880777060682(centos7+anaconda+python+flask+uwsgi)
https://www.bilibili.com/video/BV1qV411f7Pw?from=search&seid=8380380880777060682
https://www.bilibili.com/video/BV1VJ411N7Vf?p=44 (有点磨叽,但是东西多)
nginx(反向代理软件)+gunicorn(常用的WSGI容器,对win支持不太好)+supervisor(对于进程中断比较友好)
https://www.bilibili.com/video/BV1ff4y1R7XE?from=search&seid=8380380880777060682
后面继续完善


 4410
4410


 被折叠的 条评论
为什么被折叠?
被折叠的 条评论
为什么被折叠?
 到【灌水乐园】发言


