


方法一
pt转onnx,onnx转到TensorRT
1.pt转onnx
pytorch自带的函数
import argparse
import onnx

from models.common import *
from utils import google_utils

if __name__ == '__main__':
    parser = argparse.ArgumentParser()
    parser.add_argument('--weights', type=str, default=r'..\runs\exp0\weights\yolov5l.pt', help='weights path')
    parser.add_argument('--img-size', nargs='+', type=int, default=[640, 640], help='image size')
    parser.add_argument('--batch-size', type=int, default=1, help='batch size')
    opt = parser.parse_args()
    opt.img_size *= 2 if len(opt.img_size) == 1 else 1  # expand
    print(opt)

    # Input
    img = torch.zeros((opt.batch_size, 3, *opt.img_size))  # image size(1,3,320,192) iDetection

    # Load PyTorch model
    google_utils.attempt_download(opt.weights)
    model = torch.load(opt.weights, map_location=torch.device('cpu'))['model'].float()
    model.eval()
    model.model[-1].export = True  # set Detect() layer export=True
    y = model(img)  # dry run
    print('\nStarting ONNX export with onnx %s...' % onnx.__version__)
    f = opt.weights.replace('.pt', '.onnx')  # filename
    model.fuse()  # only for ONNX
    torch.onnx.export(model, img, f, verbose=False, opset_version=12, input_names=['images'],output_names=['classes', 'boxes'] if y is None else ['output'])
    # Checks
    onnx_model = onnx.load(f)  # load onnx model
    onnx.checker.check_model(onnx_model)  # check onnx model
    print(onnx.helper.printable_graph(onnx_model.graph))  # print a human readable model
    print('ONNX export success, saved as %s' % f)
2.onnx转TensorRT
onnx转tensorrt工具源码
由于yolov5里面加了一些新的东西,用这个方法要重新写,所以就没选这种方式了。
方法二
pt直接转到TensorRT
参考链接
这个链接里的代码是专门针对yolov5s-1.0做的。
我要转的是yolov5l-2.0,所以选择这个链接
python gen_wts.py这一步可能会遇到类似于以下这样的警告
/home/himap/anaconda3/lib/python3.7/site-packages/torch/serialization.py:657: SourceChangeWarning: source code of class 'torch.nn.modules.conv.Conv2d' has changed. Tried to save a patch, but couldn't create a writable file Conv2d.patch. Make sure it doesn't exist and your working directory is writable.
这可能是你的common.py中修改了一些东西(注释修改了他也会提示)。把文件修改回原来的样子或者,按照提示中的请运行'patch -p0 < Conv2d.patch',运行一下。里面要添加路径/home/himap/anaconda3/lib/python3.7/site-packages/torch/nn/modules/conv.py
记得在yololayer.h中修改类别数和图片大小
编译
这里可能就会遇见找不到opencvconfig.cmake和另外一个opencvxxx.cmake忘记是啥了,不过这就说明你没有安装c++版的opencv。装吧。这个是我的opencv采坑记录。需要的就看看。
[root@localhost build]# cmake ..
-- The C compiler identification is GNU 4.8.5
-- The CXX compiler identification is GNU 4.8.5
-- Check for working C compiler: /usr/bin/cc
-- Check for working C compiler: /usr/bin/cc -- works
-- Detecting C compiler ABI info
-- Detecting C compiler ABI info - done
-- Check for working CXX compiler: /usr/bin/c++
-- Check for working CXX compiler: /usr/bin/c++ -- works
-- Detecting CXX compiler ABI info
-- Detecting CXX compiler ABI info - done
-- Found CUDA: /usr/local/cuda-10.2 (found version "10.2")
embed_platform off
-- OpenCV: CMake version is low (2.8.12.2, required 3.1+). Can't enable C++11 features: https://github.com/opencv/opencv/issues/13000
-- Found OpenCV: /usr/local (found version "4.4.0")
-- Configuring done
-- Generating done
-- Build files have been written to: /usr/local/anaconda/yolov5-master/tensorrt_tool/build
cmake版本不够,重新安装opencv,安装之前把gcc版本升级一下,我是升级到了8。编译之后还是不行,我先不管他,先make,报错了再说。
make编译报错
1.
[root@localhost build]# make
[ 33%] Building NVCC (Device) object CMakeFiles/myplugins.dir//./myplugins_generated_hardswish.cu.o
In file included from /usr/local/anaconda/yolov5-master/tensorrt_tool/hardswish.cu:2:
/usr/local/anaconda/yolov5-master/tensorrt_tool/hardswish.h:6:10: fatal error: NvInfer.h: 没有那个文件或目录
 #include "NvInfer.h"
          ^~~~~~~~~~~
compilation terminated.
CMake Error at myplugins_generated_hardswish.cu.o.cmake:206 (message):
  Error generating
  /usr/local/anaconda/yolov5-master/tensorrt_tool/build/CMakeFiles/myplugins.dir//./myplugins_generated_hardswish.cu.o

make[2]: *** [CMakeFiles/myplugins.dir/./myplugins_generated_hardswish.cu.o] 错误 1
make[1]: *** [CMakeFiles/myplugins.dir/all] 错误 2
解决办法:参考作者回答
有效果,
修改了之后就不报这个问题了。但是问题依然没有完全解决啊。
Scanning dependencies of target myplugins
Linking CXX shared library libmyplugins.so
/opt/rh/devtoolset-8/root/usr/libexec/gcc/x86_64-redhat-linux/8/ld: 找不到 -lcudart
collect2: error: ld returned 1 exit status
make[2]: *** [libmyplugins.so] 错误 1
make[1]: *** [CMakeFiles/myplugins.dir/all] 错误 2
make: *** [all] 错误 2
他还在等你。
有人说安装libgcc.i686.yum install libgcc.i686.尝试了,但是没效果。
可能是软连接的问题吧,
sudo ln -s /usr/local/cuda/lib64/libcudart.so /usr/lib/libcudart.so
解决了之后下一个问题是
编译因为 -Wfatal-errors 而中止。
make[2]: *** [CMakeFiles/yolov5.dir/yolov5.cpp.o] 错误 1
make[1]: *** [CMakeFiles/yolov5.dir/all] 错误 2
make: *** [all] 错误 2
解决方法如下:

这个是源代码问题中的一个回答。
make 结束了,接下来就可以运行了,./yolov5l -s第一句就报错。
(/home/himap/anaconda3) [himap@localhost build]$ ./yolov5l -s
Loading weights: ../yolov5l.wts
[09/14/2020-15:12:24] [E] [TRT] Parameter check failed at: ../builder/Network.cpp::addScale::434, condition: shift.count > 0 ? (shift.values != nullptr) : (shift.values == nullptr)
yolov5l: /usr/local/anaconda/yolov5_2.0-TensorRt-master/yolov5l/common.hpp:263: nvinfer1::IScaleLayer* addBatchNorm2d(nvinfer1::INetworkDefinition*, std::map<std::basic_string<char>, nvinfer1::Weights>&, nvinfer1::ITensor&, std::string, float): Assertion `scale_1' failed.
已放弃(吐核)
->>此处不是吐核,是吐血啊。这里是终极boss了。源码大佬说是网络不匹配的问题。我的网络介于1.0和2.0中间,要自己改源码。
c++源码真的不好玩。大概都看得懂但是细节还是改不来啊啊啊啊啊啊啊啊啊啊啊啊啊啊啊啊`````````
在跟源码大佬狂撕了两天之后终于把代码改好了。
具体修改需要参考节点版网络结构,来修改自己的代码。
查看网络结构你可以使用summary打印也可以使用print直接打印。我更喜欢用summary一点。看着舒服就行。
import torch
from torchsummaryX import summary

from models.experimental import attempt_load

model1_path = r'E:\yolov5-master\runs\exp0\weights\best.pt'
model2_path = r'D:\Install\yolov5l.pt'

model = attempt_load(model1_path, map_location=torch.device('cpu'))
# model.to('cuda').eval()
# print(model)
summary(model, torch.rand((1, 3, 640, 640)))
具体修改思想:
刚开始我以为我的模型是2.0的但是后来看了一下网络之后发现,跟2.0还是有差距,更接近1.0。对比了一下。
我的模型比2.0版本多了3个卷积层,


修改的地方很简单,只有这几个地方(yolov5l.cpp)
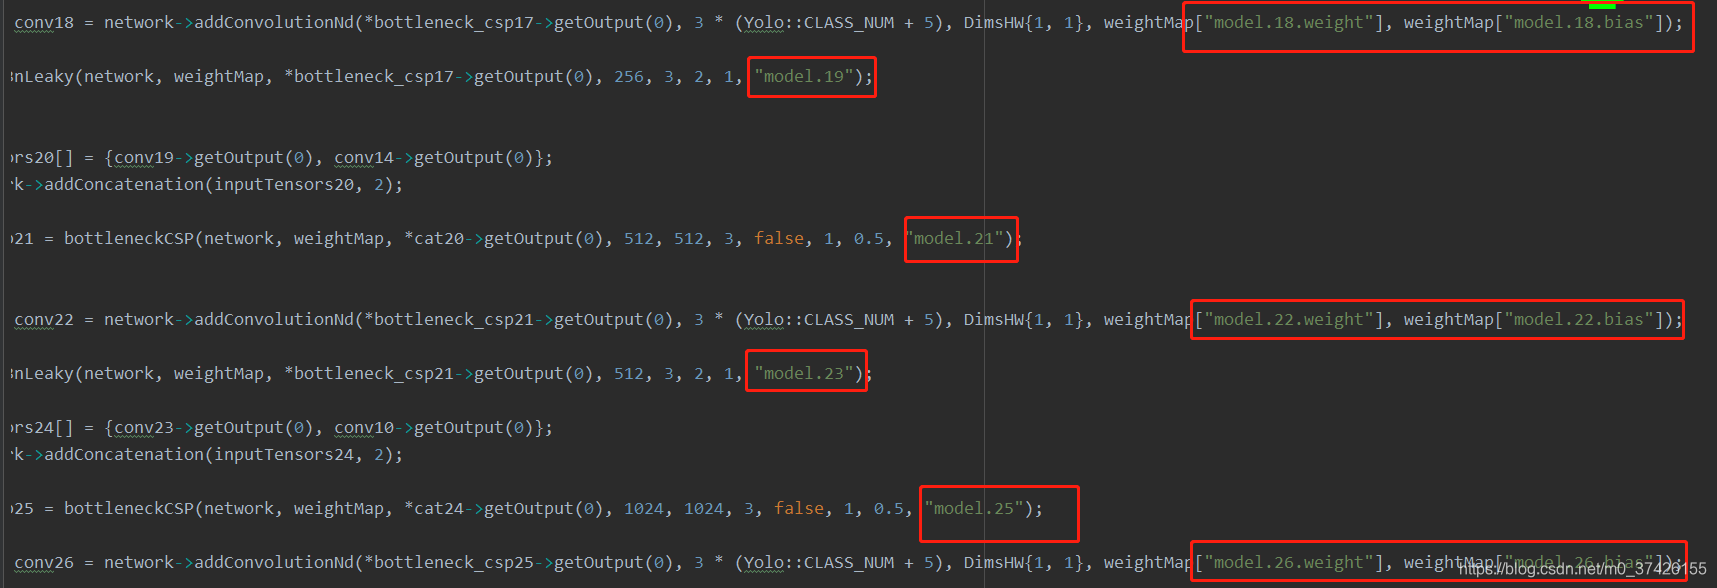
修改之后换上就可以用了。


 2559
2559


 被折叠的 条评论
为什么被折叠?
被折叠的 条评论
为什么被折叠?
 到【灌水乐园】发言


