


引言
笔者之前一直使用Jmeter做接口测试,也围绕Jmeter做了一些功能集成,比如:生成excle结果文件、数据库断言、自动提交缺陷、自动更新案例执行结果至Testlink等。虽说Jmeter简单易上手,但大批量执行测试案例时,响应时间较长,这对向来追求测试效率的笔者而言,无疑是心头之痛。
很早就听说过Rest Assured,TestNg两大框架,也看过一些相关的文章,但苦于各种原因,一直都是浅尝辄止。这两天心血来潮,尝试使用Rest Assured+TestNg来实现数据驱动的接口测试,谁知不“尝(试)”则已,一“尝”惊人,实在是接口测试人员的福音。
框架介绍
Rest Assured
REST Assured是一个可以简化HTTP Builder顶层,基于REST服务的测试过程的Java DSL(针对某一领域,具有受限表达性的一种计算机程序设计语言)。它支持发起POST,GET,PUT,DELETE,OPTIONS,PATCH和HEAD请求,并且可以用来验证和校对这些请求的响应信息。
TestNg
TestNG is a testing framework designed to simplify a broad range of testing needs, from unit testing (testing a class in isolation of the others) to integration testing (testing entire systems made of several classes, several packages and even several external frameworks, such as application servers).ReportNg
ReportNG is a simple HTML reporting plug-in for the TestNG unit-testing framework.实现功能
读取excel测试案例数据。
发送请求。
断言。
生成测试报告。
实现步骤
1、代码结构及案例模板
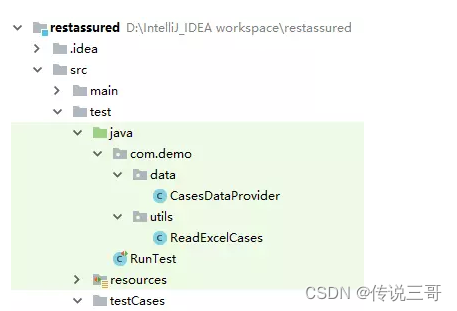
代码结构


案例模板(部分字段预留后续使用)
2、新建maven项目并配置pom.xml
<?xml version="1.0" encoding="UTF-8"?>
  <project xmlns="http://maven.apache.org/POM/4.0.0"
  xmlns:xsi="http://www.w3.org/2001/XMLSchema-instance"
  xsi:schemaLocation="http://maven.apache.org/POM/4.0.0 http://maven.apache.org/xsd/maven-4.0.0.xsd">
  <modelVersion>4.0.0</modelVersion>
  <groupId>org.test.restassured</groupId>
  <artifactId>restassured</artifactId>
  <version>1.0-SNAPSHOT</version>
  <dependencies>
  <dependency>
  <groupId>io.rest-assured</groupId>
  <artifactId>rest-assured</artifactId>
  <version>3.1.0</version>
  <scope>test</scope>
  </dependency>
  <dependency>
  <groupId>org.testng</groupId>
  <artifactId>testng</artifactId>
  <version>6.11</version>
  </dependency>
  <dependency>
  <groupId>net.sourceforge.jexcelapi</groupId>
  <artifactId>jxl</artifactId>
  <version>2.6.12</version>
  </dependency>
  <!-- 依赖reportNg 关联testNg-->
  <dependency>
  <groupId>org.uncommons</groupId>
  <artifactId>reportng</artifactId>
  <version>1.1.4</version>
  <scope>test</scope>
  <exclusions>
  <exclusion>
  <groupId>org.testng</groupId>
  <artifactId>testng</artifactId>
  </exclusion>
  </exclusions>
  </dependency>
  <!-- 依赖Guice -->
  <dependency>
  <groupId>com.google.inject</groupId>
  <artifactId>guice</artifactId>
  <version>4.0</version>
  </dependency>
  </dependencies>
  <build>
  <plugins>
  <!-- 添加插件,添加ReportNg的监听器,修改最后的TestNg的报告 -->
  <plugin>
  <groupId>org.apache.maven.plugins</groupId>
  <artifactId>maven-surefire-plugin</artifactId>
  <version>2.5</version>
  <configuration>
  <properties>
  <property>
  <name>usedefaultlisteners</name>
  <value>false</value>
  </property>
  <property>
  <name>listener</name>
  <value>org.uncommons.reportng.HTMLReporter,org.uncommons.reportng.JUnitXMLReporter</value>
  </property>
  </properties>
  <workingDirectory>target/</workingDirectory>
  <forkMode>always</forkMode>
  </configuration>
  </plugin>
  </plugins>
  </build>
  </project>
3、配置ReportNg监听
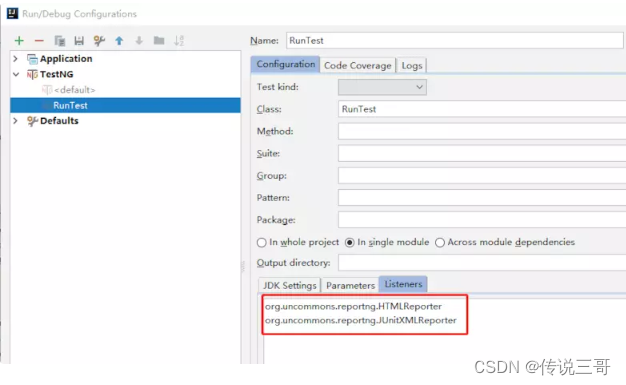
reportNg监听
4、读取案例数据
由于TestNg的@DataProvider注释返回的是二维数组,所以需读取excel案例数据保存到一个二维数组。
public class ReadExcelCases {
  public static Object[][] readCases(String filePath) throws IOException, BiffException {
  InputStream inputStream = new FileInputStream(filePath);
  Workbook rwb = Workbook.getWorkbook(inputStream);
  Sheet sheet = rwb.getSheet(0);
  int rsRows = sheet.getRows(); // 获取总行数
  int rsColums = sheet.getColumns();//获取总列数
  int countY = 0;
  for (int i = 1; i < rsRows; i++) {
  if(sheet.getCell(3, i).getContents().equals("Y"))  //统计需要执行的案例数
  countY++;
  }
  Object[][] cases = new Object[countY][rsColums];
  int x =0;
  for (int i = 1; i < rsRows; i++) {
  if(sheet.getCell(3, i).getContents().equals("Y")){  //执行标识为“Y”才记录数组
  for (int j = 0; j < rsColums; j++) {
  cases[x][j] = sheet.getCell(j, i).getContents();
  }
  x++;
  }
  }
  return cases;
  }
  }
  TestNg的@Test传参有多种方法,具体可百度,本例子使用@DataProvider来传参。
  public class CasesDataProvider {
  @DataProvider(name = "casesProvider")
  public static Object[][] caseProvider() throws IOException, BiffException {
  String filePath = ".\\src\\test\\testCases\\发送短信.xls"; //测试案例相对路径
  Object[][] cases = ReadExcelCases.readCases(filePath);
  return cases;
  }
  }
5、执行案例
public class RunTest {
@BeforeClass
public void setUp() {
RestAssured.baseURI = "http://XX.XXX.XXX.XXX"; //请求IP
RestAssured.basePath = "v1/gateway.do";
RestAssured.port = 8187;
}
@Test(dataProvider = "casesProvider", dataProviderClass = CasesDataProvider.class)
public void runCases(String caseNo, String testPoit, String preResult, String YorN, String tableCheck, String appId, String merchantId, String api, String version,
String phone, String bizTransaction, String acctType) {
String bodyString = "{\n" +
"\t\"appId\":\"" + appId + "\",\n" +
"\t\"api\":\"" + api + "\",\n" +
"\t\"data\":{\n" +
"\t\t\"merchantId\":\"" + merchantId + "\",\n" +
"\t\t\"bizTransaction\":\"" + bizTransaction + "\",\n" +
"\t\t\"phone\":\"" + phone + "\",\n" +
"\t\t\"acctType\":\"" + acctType + "\"\n" +
"\t\t},\n" +
"\t\"version\":\"" + version + "\"\n" +
"}\n";
Response response = given()
.contentType("application/json;charset=UTF-8")
.request()
.body(bodyString)
.post();
response.prettyPrint();//格式化响应报文
//断言
String json = response.asString();
JsonPath jp = new JsonPath(json);
if(response.statusCode() == 200){ //请求成功
Assert.assertEquals(jp.get("message").toString(),preResult);
}else{
Assert.assertEquals(jp.get("data.errMsg").toString(),preResult);
}
}
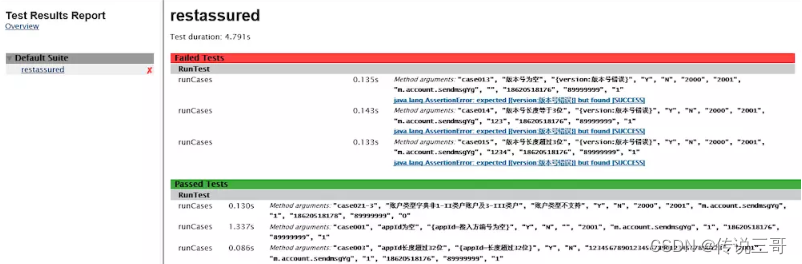
}6、测试报告
当然,ReportNg测试报告支持自定义,百度还是好多资源的,后续笔者再做探究。

测试报告
展望
以上只是Rest Assured+TestNg强大功能的冰山一角,后续笔者再慢慢摸索。另外,既然迈出了这一步,那怎么也得展望一下未来,笔者打算后续搞个接口测试平台玩玩


 1355
1355

 被折叠的 条评论
为什么被折叠?
被折叠的 条评论
为什么被折叠?
 到【灌水乐园】发言


