


修改pom.xml文件,加入下面的依赖
<dependency>
	<groupId>org.springframework.boot</groupId>
	<artifactId>spring-boot-starter-data-jpa</artifactId>
</dependency>
<dependency>
	<groupId>mysql</groupId>
	<artifactId>mysql-connector-java</artifactId>
</dependency>
修改配置文件:
spring:
  datasource:
    driver-class-name: com.mysql.jdbc.Driver
    url: jdbc:mysql://localhost:3306/cxx
    username: root
    password: 123456
  jpa:
    hibernate:
      ddl-auto: create
show-sql: true注意这里的注解:@Entity、@Id、 @GeneratedValue
package com.example.demo.controller;
import javax.persistence.Entity;
import javax.persistence.GeneratedValue;
import javax.persistence.Id;
/**
* 与数据库字段对应
*/
@Entity
public class user {
@Id
@GeneratedValue
private int id;
private String name;
private String type;
public user() {
}
public int getId() {
return id;
}
public void setId(int id) {
this.id = id;
}
public String getName() {
return name;
}
public void setName(String name) {
this.name = name;
}
public String getType() {
return type;
}
public void setType(String type) {
this.type = type;
}
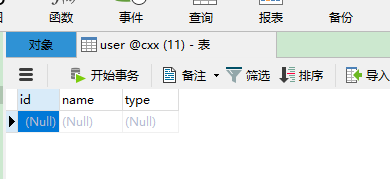
}重新运行项目,会在数据库中根据自己定义的类在数据库中创建对应的表
  jpa:
    hibernate:
      ddl-auto: create
    show-sql: true
ddl-auto:create 每次运行项目都会将原表删除,在重新新建表(数据没了)
ddl-auto:create 每次运行项目会将原表删除,单新建会把元数据也插入进去

实现api接口:
定义仓库接口:
package com.example.demo;


import com.example.demo.controller.user;
import org.springframework.data.jpa.repository.JpaRepository;

public interface UserRepository extends JpaRepository<user,Integer> {
    public <list>user findByName(String name);

}
编写Controller:
package com.example.demo;

import com.example.demo.controller.user;
import org.hibernate.annotations.Parameter;
import org.springframework.beans.factory.annotation.Autowired;
import org.springframework.beans.factory.annotation.Value;
import org.springframework.web.bind.annotation.*;

import java.util.List;
@RestController
public class helloController
{
    @Autowired
    private UserRepository userRepository;

    /**
     * 获取所有用户列表
     * @return
     */
    @GetMapping(value = "/users")
    public List<user> userList(){
        return userRepository.findAll();
    }

    /**
     *
     * @param name
     * @param type
     * 添加用户
     * @return
     */
    @PostMapping(value = "/users")
    public user userAdd(@RequestParam("name") String name,
                        @RequestParam("type") String type){
        user u = new user();
        u.setName(name);
        u.setType(type);
        return userRepository.save(u);
    }

    /**
     * 查询一个用户
     * @return
     */
    @GetMapping(value = "/user/{id}")
    public user userOne(@PathVariable("id") Integer id){
        return userRepository.findOne(id);
    }

    /**
     * 更新一个用户
     */
    @PutMapping(value = "/user/{id}")
    public user userUpdate(@PathVariable("id") Integer id,
                             @RequestParam("name") String name,
                             @RequestParam("type") String type){
        user u = new user();
        u.setId(id);
        u.setName(name);
        u.setType(type);
        return userRepository.save(u);

    }


    /**
     * 删除一条数据
     */
    @DeleteMapping(value = "/user/{id}")
    public void userDelete(@PathVariable("id") Integer id){
        userRepository.delete(id);
    }

    /**
     * 通过年龄查询列表
     * @param name
     * @param type
     * @return
     */
    @GetMapping(value = "/user/name/{name}")
    public user userAdd(@PathVariable("name") String name){
        return userRepository.findByName(name);
    }

}


 2万+
2万+

 被折叠的 条评论
为什么被折叠?
被折叠的 条评论
为什么被折叠?
 到【灌水乐园】发言


