


 本文介绍使用JSF2和PrimeFaces快速搭建前端界面的过程。从添加Maven依赖、配置FacesServlet,到创建托管Bean和编写XHTML页面,一步步引导读者完成登录功能的实现。
引言
以前处理前端请求一直都是用JSP提交表单或者在js代码中使用Ajax将参数发送到后端进行处理,是基于请求响应的,因为springMVC的强大,早已习惯了这种做法,后来学习了vueJS2.0,感觉前端的操作更加简单了。如今公司项目组似乎没有前端工程师,只好选择了使用JSF技术和PrimeFaces框架开发前端界面,之前从来没接触过JSF,不得不赶紧研究了一下,感觉以前都是提倡前后端要尽量分离,而JSF却走了相反的道路,前端页面和后端耦合地非常紧密,大量使用EL表达式到后端取对象数据,是基于事件驱动的,虽说前后端融合在一起了,但是开发效率却提高了。只是在刚开始写入门Demo的时候,遇到了不少坑,在此记录一下配置JSF的一些基本步骤。
JSF2入门Demo
1. Maven下添加JSF2的依赖
看到不少博客教程里都要求添加不少jar包,jsf-api, jsf-impl, standard, jstl等等,然而其实只要jsf-api和jsf-impl两个包就足够了,一个接口,一个实现,都和JSF有关。
<dependency>
    <groupId>com.sun.faces</groupId>
    <artifactId>jsf-api</artifactId>
    <version>2.1.7</version>
</dependency>
<dependency>
    <groupId>com.sun.faces</groupId>
    <artifactId>jsf-impl</artifactId>
    <version>2.1.7</version>
</dependency>
2. 配置web.xml中的FacesServlet
JSF的所有事件都交给FacesServlet来处理。
<servlet>
    <servlet-name>Faces Servlet</servlet-name>
    <servlet-class>javax.faces.webapp.FacesServlet</servlet-class>
    <load-on-startup>1</load-on-startup>
  </servlet>

  <servlet-mapping>
    <servlet-name>Faces Servlet</servlet-name>
    <url-pattern>*.xhtml</url-pattern>
  </servlet-mapping>
3. 编写一个Web bean,并托管
package net.zealot.bean;

import javax.faces.bean.ManagedBean;
import javax.faces.bean.SessionScoped;

@ManagedBean
@SessionScoped
public class UserBean {
    private String username;
    private String password;
    public String getUsername() {
        System.out.println("get username");  //观察一下setter getter的调用顺序
        return username;
    }
    public void setUsername(String username) {
        System.out.println("set username");
        this.username = username;
    }
    public String getPassword() {
        System.out.println("get password");
        return password;
    }
    public void setPassword(String password) {
        System.out.println("set password");
        this.password = password;
    }
}这里要强调一下,这里的ManagedBean是javax.faces.bean.ManagedBean
而不是javax.annotation.ManagedBean
平时ctrl+shift+o按习惯了就可能导错
这里Demo比较简单,暂不使用faces-config.xml来manage bean或导航.
4. faces-config.xml
JSF2之后,faces-config.xml的大部分作用被注解取代,但是在navigation和本地化等方面仍然很有用处,所以务必还是要加上,
<?xml version="1.0" encoding="UTF-8"?>
<faces-config xmlns="http://xmlns.jcp.org/xml/ns/javaee"
    xmlns:xsi="http://www.w3.org/2001/XMLSchema-instance"
    xsi:schemaLocation="http://xmlns.jcp.org/xml/ns/javaee http://xmlns.jcp.org/xml/ns/javaee/web-facesconfig_2_2.xsd"
    version="2.2">
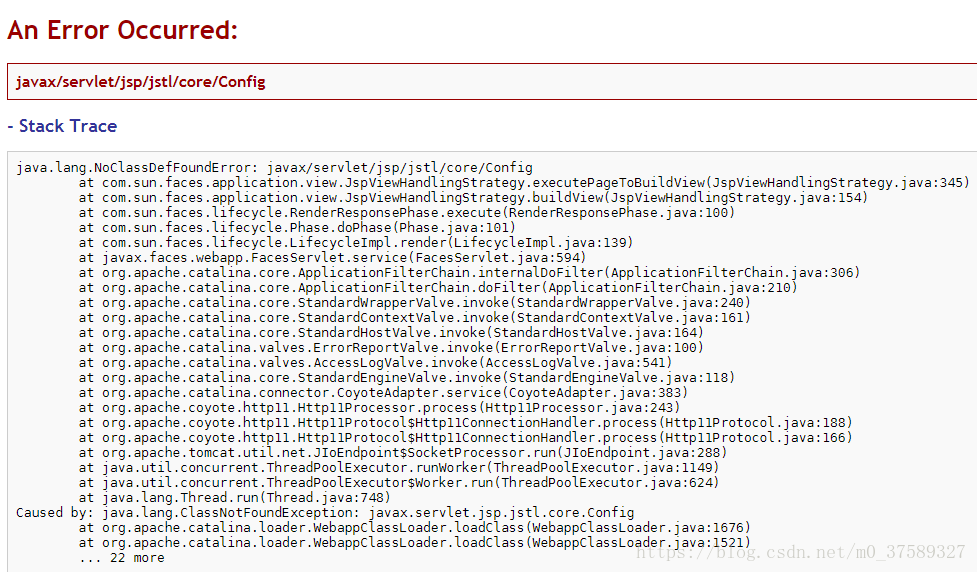
</faces-config>这里注意要将<faces-config>的xmlns写全,最好是IDE自动生成,不然可能出现如下错误:
5. index.xhtml和welcome.xhtml
JSF默认使用xhtml页面,这和html相差不大,就是更标签更严格一点。
index.xhtml
<html xmlns="http://www.w3.org/1999/xhtml"
    xmlns:h="http://java.sun.com/jsf/html"
    xmlns:f="http://java.sun.com/jsf/core">
<!-- 导入h和f前缀所在的命名空间 -->
<h:head>
</h:head>

<h:body>
    <h:form id="login">
        <h:outputLabel for="username">username:</h:outputLabel>
        <h:inputText id="username" value="#{userBean.username}"></h:inputText><br/>
        <h:outputLabel for="password">password:</h:outputLabel>
        <h:inputSecret id="password" value="#{userBean.password}"></h:inputSecret><br/>
        <h:commandButton value="login" action="welcome"></h:commandButton>
    </h:form>
</h:body>
welcome.xhtml
<html xmlns="http://www.w3.org/1999/xhtml"
    xmlns:h="http://java.sun.com/jsf/html"
    xmlns:f="http://java.sun.com/jsf/core">
<h:head></h:head>
<h:body>
    welcome,
    <h:outputText value="#{userBean.username}"></h:outputText>
</h:body>
</html>
#{expression} 和JSP的${expression} 差不多,花括号里的对象必须是@ManagedBean注解标记的类名的首字母小写。
action属性中的跳转页面不需要加后缀名,JSF默认支持xhtml。
command和input这一类标签必须写在< h:form >标签里面,点击才会发送请求。


查看一下控制台:
get username
get password
get username
get password
set username
set password
get username
分析一下,前两个get是index.xhtml调用get显示输入框为空,最后两个set是点击按钮,提交表单调用了set,最后一个get是welcome.xhtml显示username调用了get,那中间两个get是怎么回事? 目前还不清楚。。。


 217
217

 被折叠的 条评论
为什么被折叠?
被折叠的 条评论
为什么被折叠?
 到【灌水乐园】发言


