harbor安装:参考 https://blog.51cto.com/14306186/2514896
1. 安装 docker-compose,从github下载安装包


# 下载
curl -L https://github.com/docker/compose/releases/download/1.25.0/docker-compose-`uname -s`-`uname -m` \
-o /usr/local/bin/docker-compose

# 授权
chmod +x /usr/local/bin/docker-compose

# 查看是否安装成功
docker-compose -v
2. 继续下载 Harbor
可在 Github 搜索 harbor,选择需要的版本下载。右键复制连接地址,使用 wget 命令下载
wget https://storage.googleapis.com/harbor-releases/release-1.7.0/harbor-offline-installer-v1.7.4.tgz执行解压步骤:
# 解压
tar -zxvf harbor-offline-installer-v1.7.4.tgz -C /usr/local
进入harbor目录,修改 harbor.cfg。只需修改 hostname 改为本机ip,登录密码默认 Harbor12345 不用改。
## Configuration file of Harbor
# hostname设置访问地址,可以使用ip、域名,不可以设置为127.0.0.1或localhost
hostname = 115.159.227.249   #这里我先配置我的服务器IP地址
# 访问协议,默认是http,也可以设置https,如果设置https,则nginx ssl需要设置on
ui_url_protocol = http
# mysql数据库root用户默认密码root123,实际使用时修改下
db_password = root123
#Maximum number of job workers in job service
max_job_workers = 3
#Determine whether or not to generate certificate for the registry's token.
#If the value is on, the prepare script creates new root cert and private key
#for generating token to access the registry. If the value is off the default key/cert will be used.
#This flag also controls the creation of the notary signer's cert.
customize_crt = on
#The path of cert and key files for nginx, they are applied only the protocol is set to https
ssl_cert = /data/cert/server.crt
ssl_cert_key = /data/cert/server.key
#The path of secretkey storage
secretkey_path = /data
#Admiral's url, comment this attribute, or set its value to NA when Harbor is standalone
admiral_url = NA
#NOTES: The properties between BEGIN INITIAL PROPERTIES and END INITIAL PROPERTIES
#only take effect in the first boot, the subsequent changes of these properties
#should be performed on web ui
#************************BEGIN INITIAL PROPERTIES************************
#Email account settings for sending out password resetting emails.
#Email server uses the given username and password to authenticate on TLS connections to host and act as identity.
#Identity left blank to act as username.
email_identity =
email_server = smtp.mydomain.com
email_server_port = 25
email_username = sample_admin@mydomain.com
email_password = abc
email_from = admin <sample_admin@mydomain.com>
email_ssl = false
##The initial password of Harbor admin, only works for the first time when Harbor starts.
#It has no effect after the first launch of Harbor.
# 启动Harbor后,管理员UI登录的密码,默认是Harbor12345
harbor_admin_password = Harbor12345
# 认证方式,这里支持多种认证方式,如LADP、本次存储、数据库认证。默认是db_auth,mysql数据库认证
auth_mode = db_auth
#The url for an ldap endpoint.
ldap_url = ldaps://ldap.mydomain.com
#A user's DN who has the permission to search the LDAP/AD server.
#If your LDAP/AD server does not support anonymous search, you should configure this DN and ldap_search_pwd.
#ldap_searchdn = uid=searchuser,ou=people,dc=mydomain,dc=com
#the password of the ldap_searchdn
#ldap_search_pwd = password
#The base DN from which to look up a user in LDAP/AD
ldap_basedn = ou=people,dc=mydomain,dc=com
#Search filter for LDAP/AD, make sure the syntax of the filter is correct.
#ldap_filter = (objectClass=person)
# The attribute used in a search to match a user, it could be uid, cn, email, sAMAccountName or other attributes de
pending on your LDAP/AD  ldap_uid = uid
#the scope to search for users, 1-LDAP_SCOPE_BASE, 2-LDAP_SCOPE_ONELEVEL, 3-LDAP_SCOPE_SUBTREE
ldap_scope = 3
#Timeout (in seconds)  when connecting to an LDAP Server. The default value (and most reasonable) is 5 seconds.
ldap_timeout = 5
# 是否开启自注册
self_registration = on
# Token有效时间,默认30分钟
token_expiration = 30
# 用户创建项目权限控制,默认是everyone(所有人),也可以设置为adminonly(只能管理员)
project_creation_restriction = everyone
#Determine whether the job service should verify the ssl cert when it connects to a remote registry.
#Set this flag to off when the remote registry uses a self-signed or untrusted certificate.
verify_remote_cert = on
#************************END INITIAL PROPERTIES************************
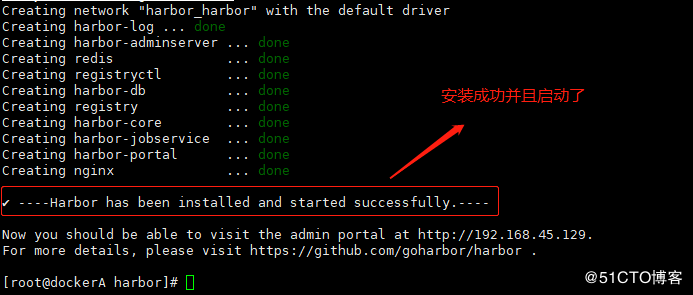
改完成docker配置后,安装harbor
./install.sh 
安装完成,用浏览器可以访问了。harbor安装完成后。ali 是我本地配置的域名,访问端口 80

修改配置,添加配置指向私服仓库,vim /usr/lib/systemd/system/docker.service
//编写docker主配置文件
 ExecStart=/usr/bin/dockerd --insecure-registry 128.57.123.96
修改 /etc/docker/daemon.json,添加仓库配置
{ "insecure-registries":["128.57.123.96"]}重新加载docker配置,重启docker服务。
# 重启docker
systemctl daemon-reload
systemctl restart docker

# 注意:docker重启完成后,harbor的容器都停了,必须切换到harbor安装目录,使用docker-compose工具启动所有容器
cd /usr/local/harbor/
docker-compose start

# 确认80端口在监听
netstat -anpt | grep 80
此时,harbor安装完成。使用密码 Harbor12345登录

创建项目 test

搭建空白镜像
# 如果你本地没有镜像用,或者镜像文件太大,可以自己搭一个空白镜像,用来测试十分方便。方法如下:
1. 在linux测试目录,创建一个hello文件,写入hello
echo hello > hello2. 继续在该测试目录,新建一个Dockerfile,内容如下:
# FROM scratch:表示创建一个空白镜像,不依赖任何其他镜像。此句注释,不需要拷贝

FROM scratch
ADD hello /
3. 构建镜像。docker images 发现该镜像只有5b大小,用来测试非常合适
docker build -t 128.57.123.96/nbmis/esign/quartz:4.2 .
测试本地 docker 镜像上传到 test:docker login 很重要,否则 docker push 时会提示你没有资源访问权限(这里我没有用刚才创建的空白镜像)
# 1. 本机登录docker私服,登录成功提示:Login Succeeded
 docker login -u admin -p Harbor12345 128.57.123.96

# 2. tag给镜像打新标签
 docker tag  goharbor/nginx-photon:v1.7.4  128.57.123.96/test/mynginx:1.0

# 3. 向私服推送镜像,需登录才有权限
 docker push 123.57.128.96/test/mynginx:1.0

# 4. 删除私服镜像,以下分别套入:私服项目名称,镜像名,版本号
curl -u 'admin:Harbor12345' \
-X DELETE \
-H 'Content-Type:application/json' \
'http://128.57.123.96/api/repositories/${projectName}/${appName}/tags/${version}'
登录 harbor,查看我们新建的test项目,看到镜像已经上传成功了

我们再尝试从私服pull镜像到本地,首先删除本地镜像,然后 docker pull 128.57.123.96/test/mynginx:1.0,也能成功!
3. 说明
1) 如果你单个项目的镜像有很多,执行docker push 128.57.123.96/nbmis/esign/quartz,没有指定版本号时会把所有版本的镜像上传

2)如果你测试时,单个项目不同的版本都是通过 docker tag 复制出来的。那这些镜像的 IMAGE ID 都会是同一个。此时如果你把这些镜像都上传到私服,会有如下问题:
当你从 Harbor 删除其中一个版本时,与该版本镜像使用同一个 IMAGE ID 的其他版本也会同时被删除。
3)关于用户和项目:
admin作为系统管理员,能看到所有公开和私有的项目。如果我们创建2个普通用户 user1, user2。这两个用户创建的私有项目,都可以被admin 看到,但这两个普通用户只能看见自己创建的私有项目。


 803
803


 被折叠的 条评论
为什么被折叠?


