


前言
在上一章中我们介绍了MyBatis中的日志增强功能,通过创建JDBC关键模块Connection等的代理增加了日志功能,Connection用于创建客户端与数据库服务器的连接,这个连接是基于TCP/IP的。如果每一次请求都去创建一个连接,将是很耗性能的,同时通过DriverManager获取连接也是比较麻烦的,所以JDBC规范里面同样提出了DataSource的概念。一方面这是一个简单工厂,通过javax.sql.DataSource#getConnection方法就可以获取一个数据库的连接了,这是最基本的实现。另一方面,可以针对连接进行池化管理,既可以减少数据库的连接关闭次数,还可以控制数据库连接的数量。当然在引申一下,其实这个接口在事务与连接之间创建了一个中间层,为开发者将来扩展提供了机会。常见的数据源组件都实现了javax.sql.DataSource这个接口,MyBatis不但能够集成第三方的数据源组件,而且自己也提供了数据源的实现,本文就MyBatis的数据源进行说明。
MyBatis数据源概览
MyBatis数据源的主要实现类都在org.apache.ibatis.datasource包中,如下所示

它们之间的关系如下图所示

如果说DataSource与Connection之间的关系是工厂与产品的关系,那么DataSourceFactory与DataSource之间也是这种关系。这里很明显使用了工厂模式。

UnpooledDataSourceFactory用于创建不带连接池的数据源,实现非常简单,在构造时创建一个空的不带连接池的数据源,获取数据源就返回这个数据源对象即可。
public UnpooledDataSourceFactory() {
    this.dataSource = new UnpooledDataSource();
}

@Override
public DataSource getDataSource() {
    return dataSource;
}
但是通常数据源都需要设置一些参数,比如通常配置如下
<?xml version="1.0" encoding="UTF-8" ?>
<!DOCTYPE configuration
  PUBLIC "-//mybatis.org//DTD Config 3.0//EN"
  "http://mybatis.org/dtd/mybatis-3-config.dtd">
<configuration>
  <environments default="development">
    <environment id="development">
      <transactionManager type="JDBC"/>
      <dataSource type="POOLED">
        <property name="driver" value="${driver}"/>
        <property name="url" value="${url}"/>
        <property name="username" value="${username}"/>
        <property name="password" value="${password}"/>
      </dataSource>
    </environment>
  </environments>
  <mappers>
    <mapper resource="org/mybatis/example/BlogMapper.xml"/>
  </mappers>
</configuration>
这里就配置了driver、url、username和password这些参数,而这些都是在org.apache.ibatis.datasource.unpooled.UnpooledDataSourceFactory#setProperties方法中实现的
private static final String DRIVER_PROPERTY_PREFIX = "driver.";

@Override
public void setProperties(Properties properties) {
    Properties driverProperties = new Properties();

    1. 获取连接池对象的元数据 MetaObject是MyBatis中反射的集大成者 内部包含了对象的各种反射信息
    MetaObject metaDataSource = SystemMetaObject.forObject(dataSource);

	2. 遍历外部传入的各种配置项
    for (Object key : properties.keySet()) {
        String propertyName = (String) key;

        2.1 如果属性名称以driver.开头,则将这个属性值设置到driverProperties属性中,但是key是不包含driver.这个前缀的,比如设置属性driver.name=root,那么就会将name=root设置到driverProperties当中
        if (propertyName.startsWith(DRIVER_PROPERTY_PREFIX)) {
            String value = properties.getProperty(propertyName);
            driverProperties.setProperty(propertyName.substring(DRIVER_PROPERTY_PREFIX_LENGTH), value);

        2.2 如果这个属性不是以driver.开头的,但是这个DataSource实现类中包含有这个属性,就会通过反射将这个值设置到DataSource中,在UnpooledDataSource这个实现类中其实是包含有driver、url这些属性的,在这里会先转换为目标类型的值,然后设置到UnpooledDataSource对象当中
        } else if (metaDataSource.hasSetter(propertyName)) {
            String value = (String) properties.get(propertyName);
            Object convertedValue = convertValue(metaDataSource, propertyName, value);
            metaDataSource.setValue(propertyName, convertedValue);
        } else {
            throw new DataSourceException("Unknown DataSource property: " + propertyName);
        }
    }

    3. 如果driverProperties不为空,通过反射调用数据池实现类的setDriverProperties方法设置属性
    if (driverProperties.size() > 0) {
        metaDataSource.setValue("driverProperties", driverProperties);
    }
}
在上面setProperties这个方法中,与其说是设置UnpooledDataSourceFactory的属性,倒不如说是设置UnpooledDataSource的相关属性。比如在上面我们已经涉及到了如下这些属性了。

其他的属性也可以通过配置文件设置,与上面的没什么不同,倒是registeredDrivers这个属性需要注意一下,这个是在UnpooledDataSource类的静态块中执行的,当类第一次实例化的时候就会执行这个静态块,加载相关的数据库驱动。
static {
	Enumeration<Driver> drivers = DriverManager.getDrivers();
	while (drivers.hasMoreElements()) {
		Driver driver = drivers.nextElement();
		registeredDrivers.put(driver.getClass().getName(), driver);
	}
}
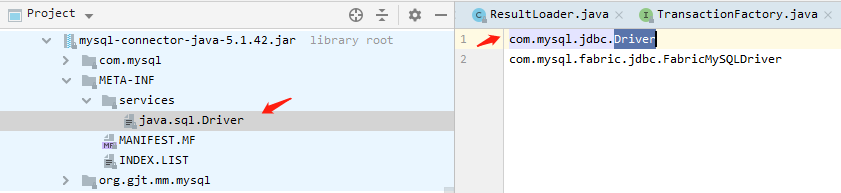
在这里不妨提一下,通过DriverManager获取驱动其实也是SPI机制的使用案例之一。任何一个数据库的驱动都要按照JDBC的规范将Driver的实现类配置在META-INF.services这个路径下面,文件名称为java.sql.Driver,这个名称就是目标接口的名称。比如H2的配置文件如下所示

比如MySQL
在java.sql.DriverManager类中有静态块如下
/**
 * Load the initial JDBC drivers by checking the System property
 * jdbc.properties and then use the {@code ServiceLoader} mechanism
 */
static {
    loadInitialDrivers();
    println("JDBC DriverManager initialized");
}

关于DriverManager加载驱动我们就结束了。通过以上DataSourceFactory的setProperties的操作,UnpooledDataSource的相关配置也完成了,接下来可以获取数据库连接了。主要的实现如下
private Connection doGetConnection(Properties properties) throws SQLException {
	1. 初始化驱动类 保证相关的驱动包存在
	initializeDriver();

    2. 获取连接 JDBC的一套
	Connection connection = DriverManager.getConnection(url, properties);

	3. 一些参数的设置
	configureConnection(connection);
	return connection;
}

private synchronized void initializeDriver() throws SQLException {
	if (!registeredDrivers.containsKey(driver)) {
		Class<?> driverType;
		try {
			if (driverClassLoader != null) {
				driverType = Class.forName(driver, true, driverClassLoader);
			} else {
				driverType = Resources.classForName(driver);
			}
			// DriverManager requires the driver to be loaded via the system ClassLoader.
			// http://www.kfu.com/~nsayer/Java/dyn-jdbc.html
			Driver driverInstance = (Driver) driverType.newInstance();

			这里使用了一个静态代理模式 DriverProxy的功能最后还是交给具体Driver实现的 这里没有做任何处理
			DriverManager.registerDriver(new DriverProxy(driverInstance));
			registeredDrivers.put(driver, driverInstance);
		} catch (Exception e) {
			throw new SQLException("Error setting driver on UnpooledDataSource. Cause: " + e);
		}
	}
}

private void configureConnection(Connection conn) throws SQLException {
	if (autoCommit != null && autoCommit != conn.getAutoCommit()) {
		conn.setAutoCommit(autoCommit);
	}
	if (defaultTransactionIsolationLevel != null) {
		conn.setTransactionIsolation(defaultTransactionIsolationLevel);
	}
}
从以上代码不难看出,UnpooledDataSource这个数据源无非是通过JDBC的一套创建连接,而且是每次getConnection都会返回一个,这也就是为啥它要叫Unpooled。
现在我们再来看看PooledDataSourceFactory,如下所示

完全继承了非池化数据源工厂的那一套。除了创建的dataSource是池化的,同时我们还发现PooledDataSource中还包含了一个UnpooledDataSource。

相关的参数也是设置到这个非池化的对象当中

所以PooledDataSource的参数设置与UnpooledDataSource是一模一样的。下面我们就具体看如何获取连接的。
@Override
public Connection getConnection() throws SQLException {
  return popConnection(dataSource.getUsername(), dataSource.getPassword()).getProxyConnection();
}
注意这里的dataSource是那个非池化的,相关配置也是在它里面。以上的逻辑首先是通过方法org.apache.ibatis.datasource.pooled.PooledDataSource#popConnection获取一个org.apache.ibatis.datasource.pooled.PooledConnection对象,然后再调用org.apache.ibatis.datasource.pooled.PooledConnection#getProxyConnection方法获取一个Connection。需要注意的是PooledConnection并没有实现Connection接口,而是实现了InvocationHandler接口。如果熟悉动态代理的话,应该会反应过来了,这里会涉及创建代理的地方Proxy.newProxyInstance.果不其然,在这个类的构造中我们发现了熟悉的味道。
/*
 * Constructor for SimplePooledConnection that uses the Connection and PooledDataSource passed in
 *
 * @param connection - the connection that is to be presented as a pooled connection
 * @param dataSource - the dataSource that the connection is from
 */
public PooledConnection(Connection connection, PooledDataSource dataSource) {
    this.hashCode = connection.hashCode();

	保存一下真实的连接
    this.realConnection = connection;
    this.dataSource = dataSource;
    this.createdTimestamp = System.currentTimeMillis();
    this.lastUsedTimestamp = System.currentTimeMillis();
    this.valid = true;

    动态代理 将Connection参数进行代理 在上面通过getProxyConnection获取的就是这个proxyConnection
    this.proxyConnection = (Connection) Proxy.newProxyInstance(Connection.class.getClassLoader(), IFACES, this);
}
除了要对Proxy.newProxyInstance敏感之外,我们还需要对执行这个代理方法其实就是执行InvocationHandler的invoke方法一样的敏感。在这里就是org.apache.ibatis.datasource.pooled.PooledConnection#invoke方法。
/*
 * Required for InvocationHandler implementation.
 *
 * @param proxy  - not used
 * @param method - the method to be executed
 * @param args   - the parameters to be passed to the method
 * @see java.lang.reflect.InvocationHandler#invoke(Object, java.lang.reflect.Method, Object[])
 */
@Override
public Object invoke(Object proxy, Method method, Object[] args) throws Throwable {
    String methodName = method.getName();
    1. 如果是执行数据库连接的关闭方法 则会执行PooledDataSource的pushConnection方法
    if (CLOSE.hashCode() == methodName.hashCode() && CLOSE.equals(methodName)) {
        dataSource.pushConnection(this);
        return null;
    } else {
        try {
            if (!Object.class.equals(method.getDeclaringClass())) {
                // issue #579 toString() should never fail
                // throw an SQLException instead of a Runtime
                checkConnection();
            }
            return method.invoke(realConnection, args);
        } catch (Throwable t) {
            throw ExceptionUtil.unwrapThrowable(t);
        }
    }
}
这里除了对数据库连接池的方法进行增强(调用了另一套逻辑)之外,倒也没有其他的,所以最后的重点就落在了popConnection和pushConnection这两个方法了。其实这两个方法也就是实现数据库连接池的关键,当我们需要连接的时候从连接池中取(popConnection),当不需要连接的时候不是真的关闭,而是放到连接池中(pushConnection)。
从连接池获取连接popConnection
在介绍popConnection方法之前,首先介绍一个类org.apache.ibatis.datasource.pooled.PoolState,这和类里面包含两个重要的属性,idleConnections和activeConnections。
protected final List<PooledConnection> idleConnections = new ArrayList<PooledConnection>();
protected final List<PooledConnection> activeConnections = new ArrayList<PooledConnection>();
前者我们称为空闲列表,后者称为活跃列表,数据库连接池首先会将获取的连接通过代理之后放到这个空闲列表当中,如果用户需要获取连接进行数据库操作,就会从空闲列表中拿一个并存放在活跃列表,这个连接我们也称为活跃连接,如果使用完了,又会从活跃列表移到空闲列表中,我们称之为空闲连接。一个真实的连接的代理就在空闲列表与活跃列表中转移。弄懂了这两个属性之后,阅读popConnection方法就会容易很多了。
private final PoolState state = new PoolState(this);

private PooledConnection popConnection(String username, String password) throws SQLException {
    boolean countedWait = false;
    PooledConnection conn = null;
    long t = System.currentTimeMillis();
    int localBadConnectionCount = 0;

    while (conn == null) {

		在上面我们提到的空闲列表和活跃列表都是使用的ArrayList,是线程不安全的,而线程池必须满足多线程安全的,这里通过state做同步
        synchronized (state) {

            if (!state.idleConnections.isEmpty()) {
                // Pool has available connection
                1. 在空闲列表当中还有空闲连接代理 直接从列表中获取一个
                conn = state.idleConnections.remove(0);
                if (log.isDebugEnabled()) {
                    log.debug("Checked out connection " + conn.getRealHashCode() + " from pool.");
                }
            } else {

               2. 空闲列表当中没有空闲连接代理了
                // Pool does not have available connection
                if (state.activeConnections.size() < poolMaximumActiveConnections) {
                    // Can create new connection
                    // poolMaximumActiveConnections = 10
                    2.1 如果活跃列表的数量小于用户设定的最大值(默认最大值为10),可以再往池子里塞连接代理,通过非池化非数据连接池获取一个连接 就是创建一个真实的连接 然后再包装成连接代理
                    conn = new PooledConnection(dataSource.getConnection(), this);
                    if (log.isDebugEnabled()) {
                        log.debug("Created connection " + conn.getRealHashCode() + ".");
                    }
                } else {

                    // Cannot create new connection
                    // int poolMaximumCheckoutTime = 20000
                    2.2 池子已经满了(不能超出用户设定的最大值) 会从活跃连接池中获取第一个 因为列表是有顺序的 第一个连接一定是活跃时间最长的 检查这个连接是不是超过允许的最大活跃时间
                    PooledConnection oldestActiveConnection = state.activeConnections.get(0);
                    long longestCheckoutTime = oldestActiveConnection.getCheckoutTime();
                    if (longestCheckoutTime > poolMaximumCheckoutTime) {
                        // Can claim overdue connection
						2.2.1 如果连接超过了最大活跃时间 首先记录一些统计信息 然后从活跃连接列表中移除,将其中的真实连接进行代理,而原来的代理类作废
                        state.claimedOverdueConnectionCount++;
                        state.accumulatedCheckoutTimeOfOverdueConnections += longestCheckoutTime;
                        state.accumulatedCheckoutTime += longestCheckoutTime;
                        state.activeConnections.remove(oldestActiveConnection);

						移除活跃列表
                        if (!oldestActiveConnection.getRealConnection().getAutoCommit()) {
                            try {
                                非自动提交的 进行回滚操作
                                oldestActiveConnection.getRealConnection().rollback();
                            } catch (SQLException e) {
              /*
                 Just log a message for debug and continue to execute the following
                 statement like nothing happend.
                 Wrap the bad connection with a new PooledConnection, this will help
                 to not intterupt current executing thread and give current thread a
                 chance to join the next competion for another valid/good database
                 connection. At the end of this loop, bad {@link @conn} will be set as null.
               */
                                log.debug("Bad connection. Could not roll back");
                            }
                        }

                        重新包装
                        conn = new PooledConnection(oldestActiveConnection.getRealConnection(), this);
                        conn.setCreatedTimestamp(oldestActiveConnection.getCreatedTimestamp());
                        conn.setLastUsedTimestamp(oldestActiveConnection.getLastUsedTimestamp());

                        原来代理连接作废
                        oldestActiveConnection.invalidate();
                        if (log.isDebugEnabled()) {
                            log.debug("Claimed overdue connection " + conn.getRealHashCode() + ".");
                        }
                    } else {
                        // Must wait

						4. 通过以上方式都无法获取到连接 则必须等待 其他的线程使用连接结束 归还到空闲列表中 通知 然后再进入到while循环继续获取连接
                        try {
                            if (!countedWait) {
                                state.hadToWaitCount++;
                                countedWait = true;
                            }
                            if (log.isDebugEnabled()) {
                                log.debug("Waiting as long as " + poolTimeToWait + " milliseconds for connection.");
                            }
                            long wt = System.currentTimeMillis();
                            state.wait(poolTimeToWait);
                            state.accumulatedWaitTime += System.currentTimeMillis() - wt;
                        } catch (InterruptedException e) {
                            break;
                        }
                    }
                }
            }
            if (conn != null) {
                // ping to server and check the connection is valid or not
				5. 已经获取了连接代理 则尝试连接服务器 判断是否为有效的连接 这里会执行pingConnection方法
                if (conn.isValid()) {
                    5.1 如果连接有效 则先尝试回滚操作 然后添加到活跃列表中
                    if (!conn.getRealConnection().getAutoCommit()) {
                        conn.getRealConnection().rollback();
                    }
                    conn.setConnectionTypeCode(assembleConnectionTypeCode(dataSource.getUrl(), username, password));
                    conn.setCheckoutTimestamp(System.currentTimeMillis());
                    conn.setLastUsedTimestamp(System.currentTimeMillis());
                    state.activeConnections.add(conn);
                    state.requestCount++;
                    state.accumulatedRequestTime += System.currentTimeMillis() - t;
                } else {
                    if (log.isDebugEnabled()) {
                        log.debug("A bad connection (" + conn.getRealHashCode() + ") was returned from the pool, getting another connection.");
                    }
                    5.2 如果连接无效 则将连接作废 继续获取连接
                    state.badConnectionCount++;
                    localBadConnectionCount++;
                    conn = null;
                    if (localBadConnectionCount > (poolMaximumIdleConnections + poolMaximumLocalBadConnectionTolerance)) {
                        if (log.isDebugEnabled()) {
                            log.debug("PooledDataSource: Could not get a good connection to the database.");
                        }
                        throw new SQLException("PooledDataSource: Could not get a good connection to the database.");
                    }
                }
            }
        }

    }

    if (conn == null) {
        if (log.isDebugEnabled()) {
            log.debug("PooledDataSource: Unknown severe error condition.  The connection pool returned a null connection.");
        }
        throw new SQLException("PooledDataSource: Unknown severe error condition.  The connection pool returned a null connection.");
    }

    return conn;
}
整个流程如下图所示:

归还连接到连接池pushConnection
与获取连接相比,归还连接还是比较简单的。
protected void pushConnection(PooledConnection conn) throws SQLException {

	进行同步 防止并发
    synchronized (state) {

        1. 从活跃连接池中移除连接代理
        state.activeConnections.remove(conn);

        2. 检查是否为有效连接 尝试连接数据库
        if (conn.isValid()) {

            如果有效而且空闲列表还有空位的话 则进行统计 然后将真实连接重现包装 归还到空闲列表 并通知其他线程资源可用
            if (state.idleConnections.size() < poolMaximumIdleConnections && conn.getConnectionTypeCode() == expectedConnectionTypeCode) {
                state.accumulatedCheckoutTime += conn.getCheckoutTime();
                if (!conn.getRealConnection().getAutoCommit()) {
                    conn.getRealConnection().rollback();
                }

                重新包装
                PooledConnection newConn = new PooledConnection(conn.getRealConnection(), this);
                添加空闲列表
                state.idleConnections.add(newConn);
                newConn.setCreatedTimestamp(conn.getCreatedTimestamp());
                newConn.setLastUsedTimestamp(conn.getLastUsedTimestamp());
                conn.invalidate();
                if (log.isDebugEnabled()) {
                    log.debug("Returned connection " + newConn.getRealHashCode() + " to pool.");
                }
                通知其他线程有可用的资源了
                state.notifyAll();
            } else {

                空闲列表已经满了
                state.accumulatedCheckoutTime += conn.getCheckoutTime();
                if (!conn.getRealConnection().getAutoCommit()) {
                    真实连接回滚
                    conn.getRealConnection().rollback();
                }
                真实连接关闭 真的关闭了
                conn.getRealConnection().close();
                if (log.isDebugEnabled()) {
                    log.debug("Closed connection " + conn.getRealHashCode() + ".");
                }
                连接代理作废
                conn.invalidate();
            }
        } else {
            if (log.isDebugEnabled()) {
                log.debug("A bad connection (" + conn.getRealHashCode() + ") attempted to return to the pool, discarding connection.");
            }
            state.badConnectionCount++;
        }
    }
}

总结
数据库连接池技术是提升数据库访问效率常用的手段,使用连接池可以提高连接资源的复用性,避免频繁创建、关闭连接池带来的开销,池化技术也是大厂面试高频题。MyBatis内部就带有一个连接池的实现,通过动态代理模式将真实连接包装为一个代理对象,而这个代理对象的close方法真实执行的是将连接归还到数据池中。


 149
149


 被折叠的 条评论
为什么被折叠?
被折叠的 条评论
为什么被折叠?
 到【灌水乐园】发言


