


在上一篇文章中有下面一段代码:
cell = [[UITableViewCell alloc] initWithStyle:UITableViewCellStyleDefault reuseIdentifier:@"cell"];
这里创建cell的时候设置了一个系统style和一个identifier
这里的两个属性就是今天这篇文章的内容:自定义cell和cell复用。
自定义cell
在通常的开发中,系统默认的cell样式并不能满足设计需求,所以自定义cell样式就是很基本的操作。
下面来简单实现一个和微信通讯录类似的cell:下面是全部代码
CustomerCell.h
#import <UIKit/UIKit.h>

NS_ASSUME_NONNULL_BEGIN

@interface CustomerCell : UITableViewCell
//声明两个属性,用于给视图赋值
@property (nonatomic, copy)NSString *title;
@property (nonatomic, copy)UIImage *image;

@end

NS_ASSUME_NONNULL_END
CustomerCell.m
#import "CustomerCell.h"

@implementation CustomerCell
{
    //声明两个视图
    UILabel *titleLabel;
    UIImageView *iconView;
}

//重写init方法
- (id)initWithStyle:(UITableViewCellStyle)style reuseIdentifier:(NSString *)reuseIdentifier{
    //调用父类init方法创建
    self = [super initWithStyle:style reuseIdentifier:reuseIdentifier];
    if (self) {
        //创建成功则t给cell添加需要的子视图
        titleLabel = [[UILabel alloc] init];
        [self.contentView addSubview:titleLabel];

        iconView = [[UIImageView alloc] init];
        [self.contentView addSubview:iconView];
    }

    return self;
}

//重写layoutSubviews方法,给视图设置位置大小
- (void)layoutSubviews{
    iconView.frame = CGRectMake(20, 5, 54, 54);
    iconView.layer.masksToBounds = YES;
    iconView.layer.cornerRadius = 4;
    titleLabel.frame = CGRectMake(80, 5, 100, 30);
}

- (void)setTitle:(NSString *)title{
    titleLabel.text = title;
}

- (void)setImage:(UIImage *)image{
    iconView.image = image;
}

- (void)awakeFromNib {
    [super awakeFromNib];
    // Initialization code
}

- (void)setSelected:(BOOL)selected animated:(BOOL)animated {
    [super setSelected:selected animated:animated];

    // Configure the view for the selected state
}

@end
ViewController.m中调用
#import "ViewController.h"
#import "CustomerCell.h"

@interface ViewController ()<UITableViewDelegate, UITableViewDataSource>//添加协议
{
    //声明tableView和数据源
    UITableView *table;
    NSMutableArray *titleArray;
    NSMutableArray *imageArray;
}
@end

@implementation ViewController

- (void)viewDidLoad {
    [super viewDidLoad];

    [self createDataSource];
    [self createTableView];
}

//创建数据源
- (void)createDataSource{
    //初始化数据源数组
    titleArray = [NSMutableArray arrayWithCapacity:0];
    imageArray = [NSMutableArray arrayWithCapacity:0];
    //循环给数据源中添加元素
    for (int i = 0; i < 14; i++) {
        NSString *string = [NSString stringWithFormat:@"第%d行", i+1];
        [titleArray addObject:string];

        NSString *imageName = [NSString stringWithFormat:@"image_%.2d.jpg", i+1];
        UIImage *image = [UIImage imageNamed:imageName];
        [imageArray addObject:image];
    }
    //刷新视图
    [table reloadData];
}

//创建tableView视图
- (void)createTableView{
    //创建并设置位置大小和风格形式
    table = [[UITableView alloc] initWithFrame:self.view.bounds style:UITableViewStylePlain];
    //设置代理
    table.delegate = self;
    table.dataSource = self;
    //设置纵横滑块不显示
    table.showsVerticalScrollIndicator = NO;
    table.showsHorizontalScrollIndicator = NO;
    [self.view addSubview:table];
}

#define mark --UITableViewDelegate
//设置列表中每个元素的行高,在非动态行高的情况下设置固定值。动态行高的情况需要计算。
- (CGFloat)tableView:(UITableView *)tableView heightForRowAtIndexPath:(NSIndexPath *)indexPath{
    return 64;
}

//设置列表中元素的个数  一般设置为数据源中元素的个数
- (NSInteger)tableView:(UITableView *)tableView numberOfRowsInSection:(NSInteger)section{
    return titleArray.count;
}

//创建tableView中的每一个cell,这里使用复用机制。
- (UITableViewCell *)tableView:(UITableView *)tableView cellForRowAtIndexPath:(NSIndexPath *)indexPath{
    CustomerCell *cell = [tableView dequeueReusableCellWithIdentifier:@"cell"];
    if (cell == nil) {
        cell = [[CustomerCell alloc] initWithStyle:UITableViewCellStyleDefault reuseIdentifier:@"cell"];
    }
    cell.title = titleArray[indexPath.row];
    cell.image = imageArray[indexPath.row];

    return cell;
}

@end
cell复用
//创建tableView中的每一个cell,这里使用复用机制。
- (UITableViewCell *)tableView:(UITableView *)tableView cellForRowAtIndexPath:(NSIndexPath *)indexPath{
    CustomerCell *cell = [tableView dequeueReusableCellWithIdentifier:@"cell"];
    if (cell == nil) {
        cell = [[CustomerCell alloc] initWithStyle:UITableViewCellStyleDefault reuseIdentifier:@"cell"];
    }
    cell.title = titleArray[indexPath.row];
    cell.image = imageArray[indexPath.row];

    return cell;
}
在上面的代码的解释是:调用代理方法创建并使用cell,在每次使用cell的时候先从复用池中去找Identifier为“cell”的cell,找到以后就使用,没有就创建一个新的。如下图:
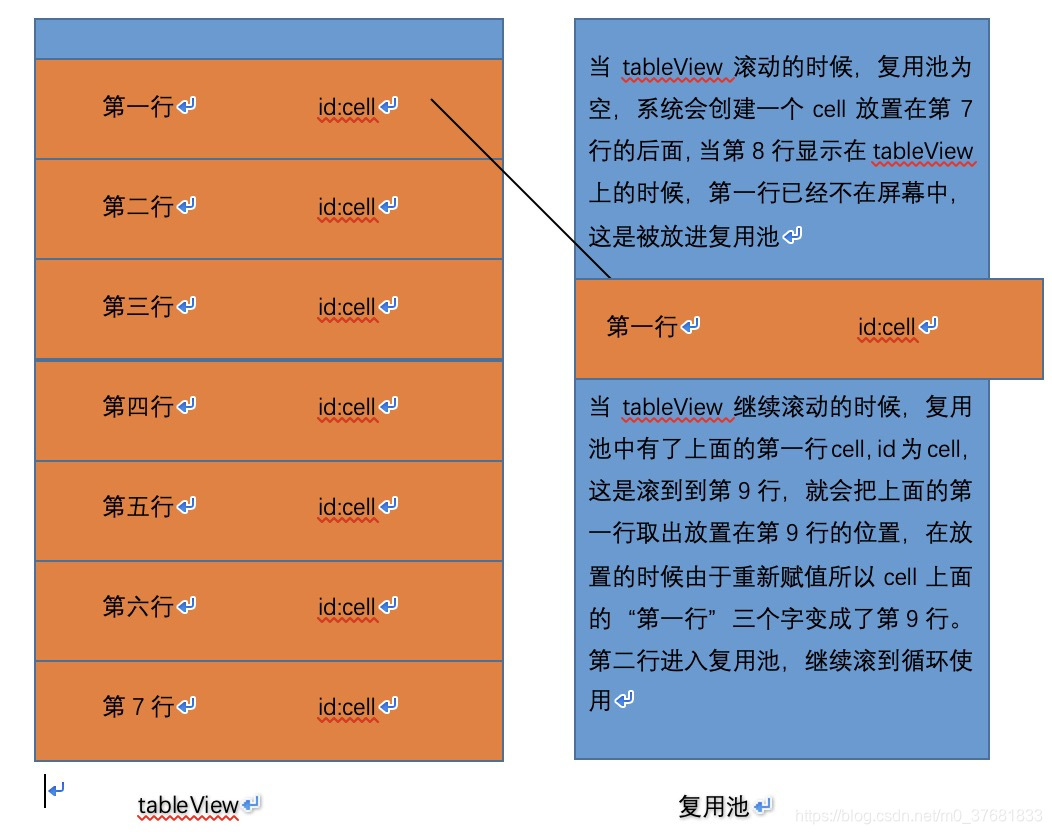
cell的复用机制是复用池的使用,复用池的意思是创建的cell都在池中,每一个cell都有一个Identifier作为标记,在从复用池中取cell的时候会根据Identifier取出,当没有找到的时候才去创建,这样的方式会尽可能少的创建cell以达到优化内存的效果。
复用池的实现是一个字典数组,大致可以理解为:array = [@{@“cell”:cell1, @“Identifier”: @“cell”},@{@“cell”:cell2, @“Identifier”: @“cell”}…];
cell的复用虽然节约了内存,但是有时也会带来一些麻烦,比如在一个带有UITextField的cell上,当cell滚动时,前面输入到textView上的文字会因为复用的问题而消失。这是一个比较严重的问题。在下一篇文章中再去研究带有UITextField的cell如何避免cell复用而带来的问题。


 58
58


 被折叠的 条评论
为什么被折叠?
被折叠的 条评论
为什么被折叠?
 到【灌水乐园】发言


