OCP4.10上英伟达GPU离线安装配置实战

29 篇文章 3 订阅
9 篇文章 0 订阅

1、简介

OpenShift使用各种额外的硬件资源基本都是遵循两步原则实现。

第一个步骤是安装 Node Feature Discover Operator ,并利用这个 Operator 识别 Node 节点硬件中的可识别资源。

第二个步骤是安装相应的 Operator 来支持该资源的特定操作接口。例如 Nvidia GPU 就是通过 Nvidia GPU Operator 来实现 CUDA 的安装与支持。而 Intel 的科学运算资源则通过 OpenVINO 来实现支持。

在本文中,我们将以非常常见的 Nvidia GPU 资源的识别与支持来介绍这一过程。当然在开始之前,您很可能还需要一个准备步骤,准备一个OpenShift环境,确认OpenShift硬件上是否有 Security Boot 设置,如果有,在配置 Node Feature Discover Policy 的时候需要暂时关闭它。

2、安装 NFD Operator

---实现 Node Feature Discover 

安装 NFD Operator 非常简单,只需要通过标准 Operator 安装方法,按照标准导航就可以顺利完成。在安装完 NFD Operator 之后我们可以建立 Policy instance 来按照指定规则识别各个节点上的相应资源。GPU 是 NFD 中已经规划好的标准资源,因此设置起来也非常简单。

首先要找到 NFD Operator


然后点击 NFD Operator 图标进行安装。非常简单的过程后,按照默认安装配置参数, NFD Operator 会生成一个独立的 NameSpace 命名为 openshift-nfd 。并且会为这个 NameSpace 设置正确的 SCC 权限。因此在任何 NameSpace 中,NFD Operator 都会自动出现在 Installed Operator 界面之中。


当 Installed Operator 之中的 NFD Operator 显示 Succeeded 就说明 Operator 已经成功完成了。此时可以通过点击右侧的 NodeFeatureDiscovery 来建立新的 Policy 。


Create NodeFeatureDiscovery 是建立一个新的实例用来搜索指定Labels节点上的各种标准资源。如果是一些特定资源,需要特殊修订的YAML来制定,这一部分就不再这里详细介绍了,大家如果有特殊硬件的检索需求可以到 OpenShift 的官方文档来查看是否可以实现,如何实现。


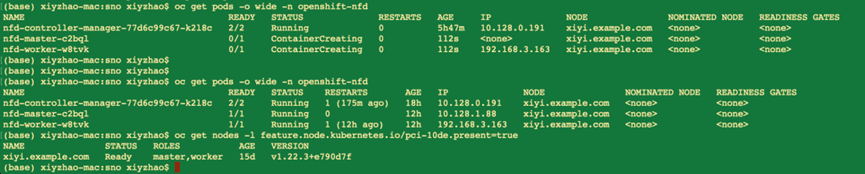
接受所有的默认值,直接完成Operator Instance构建过程,在此配置下OpenShift会自动完成 SCC 的设置过程,令所有的项目都可以访问 NDF 的检索结果,因此后面的GPU Operator 可以直接使用 NDF 下的 Instance 来完成对 GPU 设备的检索和驱动安装等动作。在安装过程中您可以通过命令 

oc get pods -o wide -n openshift-nfd

持续在 openshift-ndf namespace 下看到对应的 PODs 的构建过程。并且可以通过 

oc get nodes -l feature.node.kubernetes.io/pci-10de.present=true

命令来通过 label 找到究竟哪些节点已经通过 Node Feature Discover 过程可以查看 pci 接口上的资源。


3、安装 Nvidia GPU Operator

----Discover GPU and Install CUDA

Nvidia GPU Operator 是由 Nvidia 原厂提供的统对 Kuberenetes 平台上各种 GPU 资源实现统一支持的 Operator 资源。在 OpenShift 上进行了完整的认证,并且作为标准 Red Hat Marketplace Operaort 提供给 OpenShift 用户使用,因此 Nvidia GPU Operator 在 OpenShift 上非常简单,唯一需要注意的就是之前提到过的,在所检索的节点上 BIOS 是否有 Security Boot 设置,由于 Nvidia GPU Operator 会直接操作节点的上的受信软件变更。如果不暂停 Security Boot ,Operator 安装过程会被阻塞住,导致其安装失败。


在安装 Operator 的时候,您将可以看到当前支持的各个版本,通常我会选择 stable ,它会选择供应商提供的最新的可靠版本。另外默认选择选项,还会建立一个新的 NameSpace ,默认会命名为 nvidia-gpu-operator 。


在安装过程中如果出现前面提及过的 Security Boot 问题,会阻塞在这个步骤,虽然在 Installed Operator 中仍然会有 NVIDIA GPU Operator 出现,但状态会是失败。这个状态需要解决掉被阻塞的 Job ,这部分我们将在最后 Debug 手段中详细解释。


4、制作 rhel8 repo 安装源

nvidia gpu operator需要在线下载包,来编译driver,那么在离线场景,我们就需要先准备一个rhel8 的 repo。

subscription-manager  release --list


subscription-manager   repos --disable="*"

subscription-manager   repos \

    --enable="rhel-8-for-x86_64-baseos-rpms" \

    --enable="rhel-8-for-x86_64-baseos-source-rpms" \

    --enable="rhel-8-for-x86_64-appstream-rpms" \

    --enable="rhel-8-for-x86_64-supplementary-rpms" \

    --enable="codeready-builder-for-rhel-8-x86_64-rpms" \

    --enable="rhocp-4.10-for-rhel-8-x86_64-rpms" \

    --enable="rhel-8-for-x86_64-baseos-eus-rpms"


mkdir -p /data/dnf/gaps

cd /data/dnf/gaps


dnf copr enable frostyx/modulemd-tools

dnf install -y modulemd-tools

# 注意,这里需要的包,需要先部署一下gpu operator,然后看看driver的日志,里面装什么包,这里替换成相应的包,不同版本的gpu operator要求不同,所以这里的包也不一样。

rm -rf /data/dnf/gaps/*

cd /data/dnf/gaps/

dnf download --resolve --releasever=8.4 --alldeps \

--repo rhel-8-for-x86_64-baseos-rpms,rhel-8-for-x86_64-appstream-rpms \

kernel-headers.x86_64 kernel-devel.x86_64 kernel-core.x86_64 systemd-udev.x86_64 elfutils-libelf.x86_64 elfutils-libelf-devel.x86_64


subscription-manager   release --set=8.4

dnf download --resolve --releasever=8.4 --alldeps \

--repo rhel-8-for-x86_64-baseos-rpms,rhel-8-for-x86_64-appstream-rpms \

kernel-headers kernel-devel  kernel-core   gcc-8.4.1


subscription-manager  release --set=8

dnf download --resolve --alldeps \

--repo rhel-8-for-x86_64-baseos-rpms,rhel-8-for-x86_64-appstream-rpms \

elfutils-libelf.x86_64 elfutils-libelf-devel.x86_64


# https://access.redhat.com/solutions/4907601

createrepo ./

repo2module . \

    --module-name foo \

    --module-stream devel \

    --module-version 123 \

    --module-context f32

createrepo_mod .


#ocp上bas跳板机诊断命令

oc delete po/`oc get po|grep nvidia-driver-daemonset|awk '{print $1}'`;sleep 5

oc logs -f po/`oc get po|grep nvidia-driver-daemonset|awk '{print $1}'`

#利用ng配置yum源服务器


yum install -y nginx

systemctl enable nginx


cat >/etc/nginx/nginx.conf <<EOF

user nginx;

worker_processes auto;

error_log /var/log/nginx/error.log;

pid /run/nginx.pid;

include /usr/share/nginx/modules/*.conf;

events {

    worker_connections 1024;

}

http {

    include       mime.types;

    default_type  application/octet-stream;

    sendfile        on;

    keepalive_timeout  65;

    server {

    listen 2221;

    server_name localhost;

    location / {

       root  /data/dnf/gaps/;

       autoindex on;

     }

   }

   }

EOF

systemctl restart nginx

5、下载英伟达驱动镜像

默认 nvidia gpu driver pod 是需要联网下载各种包的,这里面还涉及到订阅,非常麻烦,而且离线无法使用。

我们刚才已经做了一个离线的repo仓库,那么我们就需要定制一下driver image,让他直接用离线的repo仓库就好了。

官方driver镜像下载: NVIDIA GPU Driver | NVIDIA NGC


#内部镜像仓库中镜像地址:

registry.ocp4dev.xxxx.com/driver/driver:515.48.07

registry.ocp4dev.xxxx.com/driver/driver:510.73.08

registry.ocp4dev.xxxx.com/driver/driver:470.129.06

##创建离线yum源配置文件 -- repo-config

cat << EOF > ./remote.repo

[gaps]

name=gaps

baseurl=http://192.168.40.220:2221

enabled=1

gpgcheck=0

EOF

oc create configmap repo-config -n gpu-operator-resources --from-file=./remote.repo

##创建 认证配置文件 -- gridd.conf

cat >gridd.conf  <<EOF

# Description: Set License Server Address

# Data type: string

# Format:  "<address>"

ServerAddress=10.50.2.20

EOF

##创建CF  --licensing-config 

oc create configmap licensing-config  -n gpu-operator-resources --from-file=gridd.conf

6、使用英伟达 GPU 创建集群策略实例

使用 Web 控制台创建群集策略

  1. 在 OpenShift 容器平台 Web 控制台的侧边菜单中,选择操作员>已安装的操作员”,然后单击“NVIDIA GPU 操作员
  2. 选择群集策略”选项卡,然后单击“创建群集策略。平台分配默认名称 GPU 群集策略
  3. 驱动程序”部分下提供许可名称,这应在 NVIDIA vGPU 的上述先决条件步骤中创建。例如,请参阅下面的屏幕截图并相应地修改值。ConfigMap


  1. 指定路径、名称和捆绑在“驱动程序”部分下的 NVIDIA vGPU 驱动程序。如果注册表不是公开的,请在驱动程序高级配置部分下指定在先决条件步骤中创建的注册表。repositoryimageversionimagePullSecret


  1. 单击“创建”。

此时,GPU 操作员将继续安装所有必需的组件,以在 OpenShift 4 集群中设置 NVIDIA GPU。请至少等待 10-20 分钟,然后再深入研究任何形式的故障排除,因为这可能需要一段时间才能完成。

  1. NVIDIA GPU 操作员的新部署的集群策略 GPU-集群策略的状态将更改为安装成功时的状态。State:ready


7、检查验证1--查看显卡型号

# 先按照官方文档试试

oc project nvidia-gpu-operator

POD_NAME=$( oc get po --no-headers|grep driver|awk '{print $1}')

oc exec -it $POD_NAME -- nvidia-smi


8、检查验证2—安装TF并运行比对CPU和GPU计算结果

附:TensorFlowdeploy用的yaml

apiVersion: apps/v1
kind: Deployment
metadata:
name: tensorflow-gpu-jupyter
labels:
  app: tensorflow-gpu-jupyter
spec:
replicas: 1
selector: # define how the deployment finds the pods it mangages
  matchLabels:
    app: tensorflow-gpu-jupyter
template: # define the pods specifications
  metadata:
    labels:
      app: tensorflow-gpu-jupyter
  spec:
    nodeSelector:
      kubernetes.io/hostname: 'ocp4uat-worker04.hisense.com'
    containers:
    - name: tensorflow-gpu-jupyter
      image: registry.ocp4uat.hisense.com/driver/tensorflow:latest-gpu-jupyter
      resources:
        limits:
          nvidia.com/gpu: 1
---
apiVersion: v1
kind: Service
metadata:
name: tensorflow-gpu-jupyter
labels:
app: tensorflow-gpu-jupyter
spec:
type: NodePort
ports:
- port: 8888
  targetPort: 8888
  nodePort: 30888
selector:
app: tensorflow-gpu-jupyter
----
apiVersion: v1
kind: Route
apiVersion: route.openshift.io/v1
metadata:
name: tsfl
namespace: demo
labels:
  app: tensorflow-gpu-jupyter
annotations:
  openshift.io/host.generated: 'true'
spec:
host: tsfl-demo.apps.ocp4uat.hisense.com
to:
  kind: Service
  name: tensorflow-gpu-jupyter
  weight: 100
port:
  targetPort: 8888
wildcardPolicy: None

oc create -f ts=deploy.yaml -n demo

0TensorFlow服务访问地址:

http://tsfl-demo.apps.ocp4uat.hisense.com/

登录tokende616b51ccbbc399c2a3237a4c1e1e43ab7965cdeff1af18

##第一次访问下列内容加入到浏览器

192.168.40.201 tsfl-demo.apps.ocp4uat.hisense.com

附件:登录token查询方法:

oc get po -n demo;oc rsh tensorflow-gpu-jupyter-6f6987c4b5-k8nkk $ jupyter notebook list Currently running servers: http://0.0.0.0:8888/?token=de616b51ccbbc399c2a3237a4c1e1e43ab7965cdeff1af18 :: /tf

1、查看当前TensorFlow版本

执行命令

import tensorflow as tf
print(tf.__version__)

输出结果

2.10.0

2、查看当前主机上运行的设备

执行命令

import tensorflow as tf
gpus = tf.config.experimental.list_physical_devices(device_type='GPU')
cpus = tf.config.experimental.list_physical_devices(device_type='CPU')
print(gpus)
print(cpus)

输出结果

[PhysicalDevice(name='/physical_device:GPU:0', device_type='GPU')]
[PhysicalDevice(name='/physical_device:CPU:0', device_type='CPU')]

3、查看GPU是否可用,指定在CPU/GPU上运行

执行命令

import tensorflow as tf

# 指定在cpu上运行

with tf.device('/cpu:0'):
   cpu_a = tf.random.normal([10000, 1000])
   cpu_b = tf.random.normal([1000, 2000])
   cpu_c = tf.matmul(cpu_a, cpu_b)
print("cpu_a:", cpu_a.device)
print("cpu_b:", cpu_b.device)
print("cpu_c:", cpu_c.device)

# 查看gpu是否可用

print(tf.config.list_physical_devices('GPU'))

# 指定在gpu上运行

with tf.device('/gpu:0'):
   gpu_a = tf.random.normal([10000, 1000])
   gpu_b = tf.random.normal([1000, 2000])
   gpu_c = tf.matmul(gpu_a, gpu_b)
print("gpu_a:", gpu_a.device)
print("gpu_b:", gpu_b.device)
print("gpu_c:", gpu_c.device)

输出结果

cpu_a: /job:localhost/replica:0/task:0/device:CPU:0
cpu_b: /job:localhost/replica:0/task:0/device:CPU:0
cpu_c: /job:localhost/replica:0/task:0/device:CPU:0
[PhysicalDevice(name='/physical_device:GPU:0', device_type='GPU')]
gpu_a: /job:localhost/replica:0/task:0/device:GPU:0
gpu_b: /job:localhost/replica:0/task:0/device:GPU:0
gpu_c: /job:localhost/replica:0/task:0/device:GPU:0

4、比较在CPUGPU上的运行时间

执行命令

import tensorflow as tf
import timeit


def cpu_run():
   with tf.device('/cpu:0'):
       cpu_a = tf.random.normal([10000, 1000])
       cpu_b = tf.random.normal([1000, 2000])
       c = tf.matmul(cpu_a, cpu_b)
   return c


def gpu_run():
   with tf.device('/gpu:0'):
       gpu_a = tf.random.normal([10000, 1000])
       gpu_b = tf.random.normal([1000, 2000])
       c = tf.matmul(gpu_a, gpu_b)
   return c


cpu_time = timeit.timeit(cpu_run, number=10)
gpu_time = timeit.timeit(gpu_run, number=10)
print("cpu:", cpu_time, " gpu:", gpu_time)

输出结果

cpu: 0.8687684789983905   gpu: 0.0063395990000572056

5YAML文件内容

kind: Pod
apiVersion: v1
metadata:
  name: tf-notebook
  namespace: demo
  labels:
    app: tf-notebook
  annotations:
    k8s.v1.cni.cncf.io/network-status: |-
      [{
          "name": "openshift-sdn",
          "interface": "eth0",
          "ips": [
              "10.220.16.11"
          ],
          "default": true,
          "dns": {}
      }]
    k8s.v1.cni.cncf.io/networks-status: |-
      [{
          "name": "openshift-sdn",
          "interface": "eth0",
          "ips": [
              "10.220.16.11"
          ],
          "default": true,
          "dns": {}
      }]
    kubectl.kubernetes.io/last-applied-configuration: >
      {"apiVersion":"v1","kind":"Pod","metadata":{"annotations":{},"labels":{"app":"tf-notebook"},"name":"tf-notebook","namespace":"demo"},"spec":{"containers":[{"image":"registry.ocp4uat.hisense.com/driver/tensorflow:latest-gpu-jupyter","name":"tf-notebook","ports":[{"containerPort":8888,"name":"notebook"}],"resources":{"limits":{"nvidia.com/gpu":1}}}],"nodeSelector":{"kubernetes.io/hostname":"ocp4uat-worker04.hisense.com"},"securityContext":{"fsGroup":0}}}
    openshift.io/scc: anyuid
  managedFields:
    - manager: kubectl-client-side-apply
      operation: Update
      apiVersion: v1
      time: '2022-09-13T21:10:27Z'
      fieldsType: FieldsV1
      fieldsV1:
        'f:metadata':
          'f:annotations':
            .: {}
            'f:kubectl.kubernetes.io/last-applied-configuration': {}
          'f:labels':
            .: {}
            'f:app': {}
        'f:spec':
          'f:containers':
            'k:{"name":"tf-notebook"}':
              .: {}
              'f:image': {}
              'f:imagePullPolicy': {}
              'f:name': {}
              'f:ports':
                .: {}
                'k:{"containerPort":8888,"protocol":"TCP"}':
                  .: {}
                  'f:containerPort': {}
                  'f:name': {}
                  'f:protocol': {}
              'f:resources':
                .: {}
                'f:limits':
                  .: {}
                  'f:nvidia.com/gpu': {}
                'f:requests':
                  .: {}
                  'f:nvidia.com/gpu': {}
              'f:terminationMessagePath': {}
              'f:terminationMessagePolicy': {}
          'f:dnsPolicy': {}
          'f:enableServiceLinks': {}
          'f:nodeSelector': {}
          'f:restartPolicy': {}
          'f:schedulerName': {}
          'f:securityContext':
            .: {}
            'f:fsGroup': {}
          'f:terminationGracePeriodSeconds': {}
    - manager: multus
      operation: Update
      apiVersion: v1
      time: '2022-09-13T21:10:30Z'
      fieldsType: FieldsV1
      fieldsV1:
        'f:metadata':
          'f:annotations':
            'f:k8s.v1.cni.cncf.io/network-status': {}
            'f:k8s.v1.cni.cncf.io/networks-status': {}
      subresource: status
    - manager: Go-http-client
      operation: Update
      apiVersion: v1
      time: '2022-09-26T07:25:41Z'
      fieldsType: FieldsV1
      fieldsV1:
        'f:status':
          'f:conditions':
            'k:{"type":"ContainersReady"}':
              .: {}
              'f:lastProbeTime': {}
              'f:lastTransitionTime': {}
              'f:status': {}
              'f:type': {}
            'k:{"type":"Initialized"}':
              .: {}
              'f:lastProbeTime': {}
              'f:lastTransitionTime': {}
              'f:status': {}
              'f:type': {}
            'k:{"type":"Ready"}':
              .: {}
              'f:lastProbeTime': {}
              'f:lastTransitionTime': {}
              'f:status': {}
              'f:type': {}
          'f:containerStatuses': {}
          'f:hostIP': {}
          'f:phase': {}
          'f:podIP': {}
          'f:podIPs':
            .: {}
            'k:{"ip":"10.220.16.11"}':
              .: {}
              'f:ip': {}
          'f:startTime': {}
      subresource: status
spec:
  nodeSelector:
    kubernetes.io/hostname: ocp4uat-worker04.hisense.com
  restartPolicy: Always
  serviceAccountName: default
  imagePullSecrets:
    - name: default-dockercfg-mb498
  priority: 0
  schedulerName: default-scheduler
  enableServiceLinks: true
  terminationGracePeriodSeconds: 30
  preemptionPolicy: PreemptLowerPriority
  nodeName: ocp4uat-worker04.hisense.com
  securityContext:
    seLinuxOptions:
      level: 's0:c26,c5'
    fsGroup: 0
  containers:
    - resources:
        limits:
          nvidia.com/gpu: '1'
        requests:
          nvidia.com/gpu: '1'
      terminationMessagePath: /dev/termination-log
      name: tf-notebook
      securityContext:
        capabilities:
          drop:
            - MKNOD
      ports:
        - name: notebook
          containerPort: 8888
          protocol: TCP
      imagePullPolicy: IfNotPresent
      volumeMounts:
        - name: kube-api-access-4hwtr
          readOnly: true
          mountPath: /var/run/secrets/kubernetes.io/serviceaccount
      terminationMessagePolicy: File
      image: 'registry.ocp4uat.hisense.com/driver/tensorflow:latest-gpu-jupyter'
  serviceAccount: default
  volumes:
    - name: kube-api-access-4hwtr
      projected:
        sources:
          - serviceAccountToken:
              expirationSeconds: 3607
              path: token
          - configMap:
              name: kube-root-ca.crt
              items:
                - key: ca.crt
                  path: ca.crt
          - downwardAPI:
              items:
                - path: namespace
                  fieldRef:
                    apiVersion: v1
                    fieldPath: metadata.namespace
          - configMap:
              name: openshift-service-ca.crt
              items:
                - key: service-ca.crt
                  path: service-ca.crt
        defaultMode: 420
  dnsPolicy: ClusterFirst
  tolerations:
    - key: node.kubernetes.io/not-ready
      operator: Exists
      effect: NoExecute
      tolerationSeconds: 300
    - key: node.kubernetes.io/unreachable
      operator: Exists
      effect: NoExecute
      tolerationSeconds: 300

9、tips

  1. 如果发现nfd不能发现gpu型号,node reboot就好了
  2. 如果发现gpu feature discovery不正常, node reboot就好了

cat /proc/driver/nvidia/version

1、弯路1 -- Security Boot设置问题

整体安装 NFD Operator 和 GPU Operator 的过程非常简单,唯一有可能出现问题的场景就是当节点BIOS设置中包含 Security Boot 设置时,由于节点禁止对受信软件进行 kernal 级别的更改,因此会将安装过程阻塞住。此时我们会看到如下错误提示:

Bundle unpacking failed. Reason: DeadlineExceeded

这个错误并不是说明过程如何被阻塞的,具体的提示会在相应 Pods 的执行日志里面。只有进入Pods 日志才能看到具体日志说明,某个过程在 Kernel 模式安装的过程中超时了。而对于整体 OpenShift 来说,外部 Events 只是说明 Jobs 里面的任务超时了,并没有完成。

由于 Jobs 任务并不会随着 Operator 的 Uninstall 而自动删除,因此在实际操作过程需要将 job 手动内容删除掉。您可以通过如下命令查看阻塞的 Jobs :

oc get job -n openshift-marketplace -o json | jq -r '.items[] | select(.spec.template.spec.containers[].env[].value|contains ("gpu")) | .metadata.name'#这个命令会返回 id :7dd12173271ead6298e9dfb188b12d5e7c9b4d3afc941408e7d98f4f305bd01#我们可以通过这些 id 来删除指定的 Job 。oc delete job 7dd12173271ead6298e9dfb188b12d5e7c9b4d3afc941408e7d98f4f305bd01 -n openshift-marketplace#同时删除相关的 configmapoc delete configmap 7dd12173271ead6298e9dfb188b12d5e7c9b4d3afc941408e7d98f4f305bd01 -n openshift-marketplace

然后我们就可以临时关闭 BIOS 中的 Seurity Boot 设置,然后重新开始 GPU Operator 的安装过程了。

解决手段

原理说明

Security Boot:许多生产场景需要启用 Security Boot 安全启动特性,来要求节点去验证节点仅使用哪些受信任的启动软件,例如 UEFI 固件驱动程序、EFI 应用程序和操作系统。当这种节点有必要操作这些软件时,您可以手动或托管使用 Secure Boot 特性进行部署。

如何手动操作:如果想要手动部署具有安全引导的 OpenShift Container Platform 集群,您必须在每个控制平面节点和每个工作程序节点上启用 UEFI 引导模式和安全引导。只有当安装程序提供的安装使用 Redfish 虚拟媒体时,Red Hat 才支持手动启用 UEFI 的安全启动和安全启动。如果没有安装使用 Redfish 可以手动临时将 Secure Boot 特性关闭,在完成安装之后再重新启动来临时绕过这个设置。

参考资料:

https://access.redhat.com/solutions/6459071

https://github.com/NVIDIA/gpu-operator/issues/266

2、弯路2– openshift的coreos并不支持VGPU

ESXI6下显卡直通设置
1web登录esxi服务器管理地址,选择管理”-“硬件


2、选择要设置直通的显卡应用前面的复选框,然后点击切换直通,点击完成后,点击重新引导主机


3、通过以上方法,已经设置了显卡的直通,下面网虚拟机中添加显卡:

选择虚拟机,然后点击编辑

  选择虚拟硬件”-“添加其他硬件设备”-‘PCI 设备"


找到刚才添加的“PCI设备,然后点击下拉箭头,选择要添加的显卡设备。

4、虚拟机选择,高级设置:


点击配置参数中的高级配置:


添加参数:(PS:此步骤很重要,不添加参数,虚拟机中认不到显卡)
参数键:hypervisor.cpuid.v0 值:FALUSE

然点击确定”-“保存

完成以上操作,显卡直通就设置完成了,在虚拟机中安装显卡驱动就可以了。

10、reference

Simplifying deployments of accelerated AI workloads on Red Hat OpenShift with NVIDIA GPU Operator

How to use entitled image builds to build DriverContainers with UBI on OpenShift

NVIDIA GPU Operator or the Special Resource Operator (SRO) Does Not Function with OCP 4.5 and 4.6 - Red Hat Customer Portal

https://docs.nvidia.com/datacenter/kubernetes/openshift-on-gpu-install-guide/

How to create module data for local repositories with Red Hat Enterprise Linux 8? - Red Hat Customer Portal

NVIDIA Driver Installation Quickstart Guide :: NVIDIA Tesla Documentation

  • 0
    点赞
  • 0
    收藏
    觉得还不错? 一键收藏
  • 打赏
    打赏
  • 0
    评论

“相关推荐”对你有帮助么?

  • 非常没帮助
  • 没帮助
  • 一般
  • 有帮助
  • 非常有帮助
提交
评论
添加红包

请填写红包祝福语或标题

红包个数最小为10个

红包金额最低5元

当前余额3.43前往充值 >
需支付:10.00
成就一亿技术人!
领取后你会自动成为博主和红包主的粉丝 规则
hope_wisdom
发出的红包

打赏作者

力哥讲技术

你的鼓励将是我创作的最大动力

¥1 ¥2 ¥4 ¥6 ¥10 ¥20
扫码支付:¥1
获取中
扫码支付

您的余额不足,请更换扫码支付或充值

打赏作者

实付
使用余额支付
点击重新获取
扫码支付
钱包余额 0

抵扣说明:

1.余额是钱包充值的虚拟货币,按照1:1的比例进行支付金额的抵扣。
2.余额无法直接购买下载,可以购买VIP、付费专栏及课程。

余额充值