


线程:每个应用运行之后就会对应启动一个主线程,通过主线程可以创建多个字线程,各个线程共享主进程的内存空间。
关于线程、进程的解释有一篇有趣而生动的解释( http://www.ruanyifeng.com/blog/2013/04/processes_and_threads.html )
GIL(全局解释器锁)
我们知道多进程(mutilprocess) 和 多线程(threading)的目的是用来被多颗CPU进行访问, 提高程序的执行效率。 但是在python内部存在一种机制(GIL),在多线程 时同一时刻只允许一个线程来访问CPU。
GIL 并不是Python的特性,它是在实现Python解析器(CPython)时所引入的一个概念。就好比C++是一套语言(语法)标准,但是可以用不同的编译器来编译成可执行代码。有名的编译器例如GCC,INTEL C++,Visual C++等。
Python也一样,同样一段代码可以通过CPython,PyPy,Psyco等不同的Python执行环境来执行。像其中的JPython就没有GIL。然而因为CPython是大部分环境下默认的Python执行环境。所以在很多人的概念里CPython就是Python,也就想当然的把 GIL 归结为Python语言的缺陷。所以这里要先明确一点:GIL并不是Python的特性,Python完全可以不依赖于GIL。
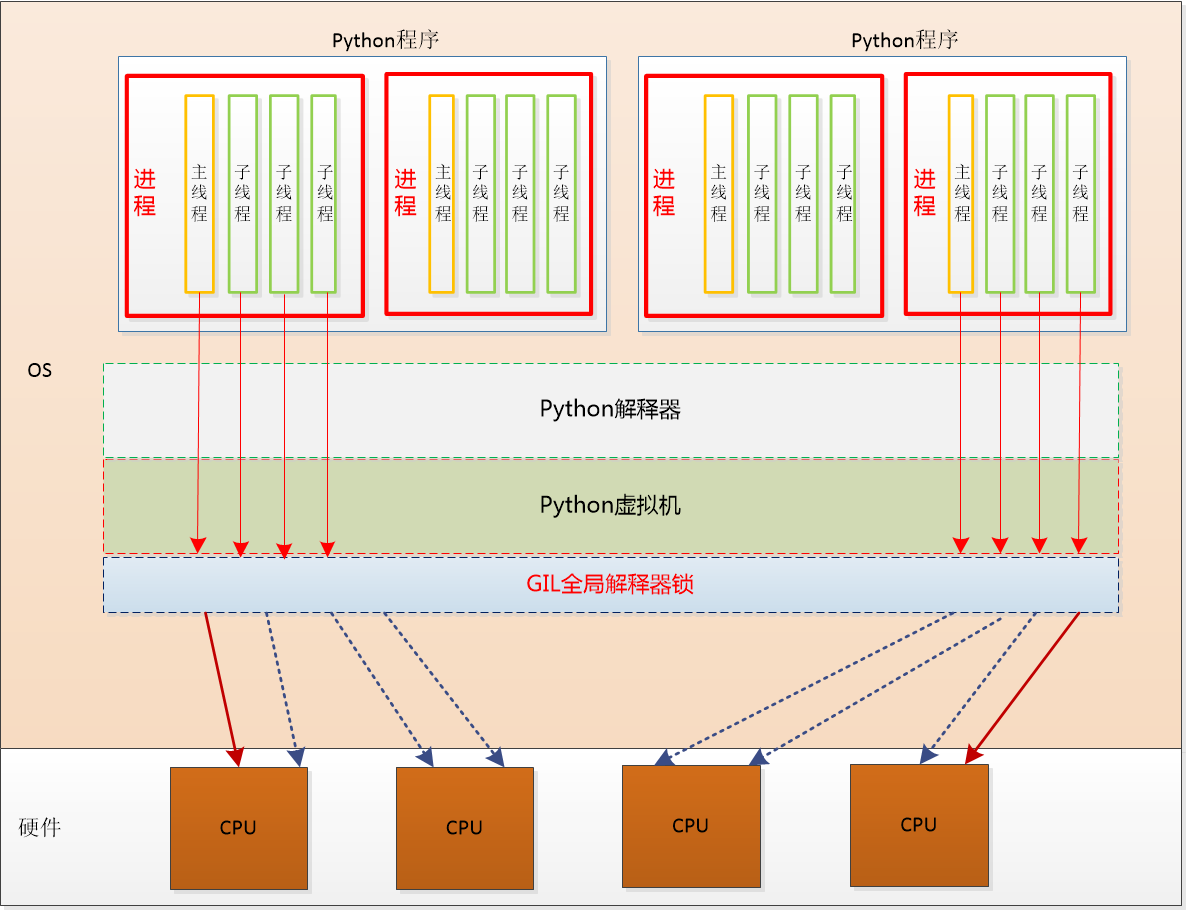
虽然python支持多线程,但是由于GIL的限制,在实际运行时,程序运行后开启多个线程,但在通过GIL后同时也只能有一个线程被CPU执行。
多线程
1)多线程执行方法
import time
from threading import Thread

def do_thread(num):
    print("this is thread %s" % str(num))
    time.sleep(3)

for i in range(5):
    t = Thread(target=do_thread, args=(i,))
t.start()- 1
- 2
- 3
- 4
- 5
- 6
- 7
- 8
- 9
- 10
以上方法就开启了一个5个线程,target用来定义开启线程后要执行的方法,args为参数
线程的其它方法:
1 setName(), getName()
setName(): 给线程设置一个名字
getName(): 获取线程的名称
import time
from threading import Thread

def do_thread(num):
    print("this is thread %s" % str(num))
    time.sleep(3)

for i in range(2):
    t = Thread(target=do_thread, args=(i,))
    t.start()
    t.setName("Mythread_{0}".format(str(i)))
    print(t.getName())

run result:
    this is thread 0
    Mythread_0
    this is thread 1
Mythread_1- 1
- 2
- 3
- 4
- 5
- 6
- 7
- 8
- 9
- 10
- 11
- 12
- 13
- 14
- 15
- 16
- 17
- 18
2 setDaemon()
setDaemon(True/False): 设置创建的子线程为前台线程或后台线程.设置为True则子线程为后台线程。线程默认为前台线程(不设置此方法)
前台线程: 当子线程创建完成后,主线程和子线程(前台线程)同时运行,如果主线程执行完成,而子线程还未完成则等待子线程执行完成以后整个程序才结束。
后台线程: 当子线程创建完成后,如果子线程还未结束,而主线程运行结束则不管子线程了,程序就结束。
此方法设置必须在 start() 方法前进行设置, 看代码:
import time
from threading import Thread

def do_thread(num):
    print("this is thread %s" % str(num))
    time.sleep(3)
    print("OK", str(num))

for i in range(2):
    t = Thread(target=do_thread, args=(i,))
    # 不设置此方法默认前台线程,
    #t.setDaemon(True)
    t.setName("Mythread_{0}".format(str(i)))
    t.start()
    print(t.getName())
run result:
this is thread 0
Mythread_0
this is thread 1
Mythread_1
OK 0
OK 1- 1
- 2
- 3
- 4
- 5
- 6
- 7
- 8
- 9
- 10
- 11
- 12
- 13
- 14
- 15
- 16
- 17
- 18
- 19
- 20
- 21
- 22
import time
from threading import Thread

def do_thread(num):
    print("this is thread %s" % str(num))
    time.sleep(3)
    # 执行到此时主线程执行完了,程序结束,下面的代码不会执行
    print("OK", str(num))

for i in range(2):
    t = Thread(target=do_thread, args=(i,))
    # 设置线程为后台线程
    t.setDaemon(True)
    t.setName("Mythread_{0}".format(str(i)))
    t.start()
    print(t.getName())
run result:
this is thread 0
Mythread_0
this is thread 1
Mythread_1- 1
- 2
- 3
- 4
- 5
- 6
- 7
- 8
- 9
- 10
- 11
- 12
- 13
- 14
- 15
- 16
- 17
- 18
- 19
- 20
- 21
3 join()
join(timeout) : 多线程的 wait(),当主线程执行 子线程.join() 方法后,主线程将等待子线程执行完再接着执行。当加上timeout参数后,如果超过timeout时间不管子线程有没有执行完都将结束等待
看下面两个例子
import time
from threading import Thread

def do_thread(num):
    time.sleep(3)
    print("this is thread %s" % str(num))


for i in range(2):
    t = Thread(target=do_thread, args=(i,))
    t.setName("Mythread_{0}".format(str(i)))
    t.start()
    print("print in main thread: thread name:", t.getName())
run result:
 print in main thread: thread name: Mythread_0
 print in main thread: thread name: Mythread_1
 this is thread 0
this is thread 1 - 1
- 2
- 3
- 4
- 5
- 6
- 7
- 8
- 9
- 10
- 11
- 12
- 13
- 14
- 15
- 16
- 17
- 18
上面无join方法时,主线程执行完print,等待子线程函数中的print执行完成,这个程序退出。 下面我们看看加上join方法后的效果
import time
from threading import Thread

def do_thread(num):
    time.sleep(3)
    print("this is thread %s" % str(num))

for i in range(2):
    t = Thread(target=do_thread, args=(i,))
    t.setName("Mythread_{0}".format(str(i)))
    t.start()
    t.join()
    print("print in main thread: thread name:", t.getName())
run result:
this is thread 0
print in main thread: thread name: Mythread_0
this is thread 1
print in main thread: thread name: Mythread_1- 1
- 2
- 3
- 4
- 5
- 6
- 7
- 8
- 9
- 10
- 11
- 12
- 13
- 14
- 15
- 16
- 17
- 18
当程序运行到join后,将等待子程序执行完成,然后才向下执行。这样真个程序就变成一个单线程的顺序执行了。多线程就没什么鸟用了。
join()与setDaemon()都是等待子线程结束,有什么区别呢:
当执行join()后主线程就停了,直到子线程完成后才开始接着主线程执行,整个程序是线性的
setDaemon() 为前台线程时,所有的线程都在同时运行,主线程也在运行。只不过是主线程运行完以后等待所有子线程结束。这个还是一个并行的执行,执行效率肯定要高于join()方法的。
4 线程锁
线程是内存共享的,当多个线程对内存中的同一个公共变量进行操作时,会导致线程争抢的问题,为了解决此问题,可以使用线程锁。
import time
import threading

def do_thread(num):
    global public_num
    # 加锁
    lock.acquire()
    public_num -= 1
    # 解锁
    lock.release()
    time.sleep(1)
    print("public_num in thread_%s is %s" % (str(num), str(public_num)))

public_num = 100
threads_list = []
lock = threading.Lock()
for i in range(50):
    t = threading.Thread(target=do_thread, args=(i,))
    t.setName("Mythread_{0}".format(str(i)))
    t.start()
    threads.append(t)
 # 等待所有子线程结束
for t in threads:
    t.join()

print("last result of public_num is ", public_num)
- 1
- 2
- 3
- 4
- 5
- 6
- 7
- 8
- 9
- 10
- 11
- 12
- 13
- 14
- 15
- 16
- 17
- 18
- 19
- 20
- 21
- 22
- 23
- 24
- 25
- 26
- 27
5 event()
线程的事件, 用于主线程控制子线程的执行。它的本质就是定义了一个全局的flag标识,并通过一些方法来获取、设置此标识。包括:
wait()方法:当flag标识为False时,wait()方法将阻塞,为True时,wait()不阻塞
set()方法:设置flag标识为True
clear()方法: 设置flag标识为False
初始化时flag标识为False(阻塞状态)
is_set()/isSet() : 判断当前flag标识是否为True
import threading

def do(event):

    print('start')
    # 默认初始化状态为False,到这里就阻塞了
    event.wait()
    print('execute\n')

if __name__ == "__main__":
    event_obj = threading.Event()
    for i in range(10):
        t = threading.Thread(target=do, args=(event_obj,))
        t.start()

    inp = input('input:')
    if inp == 'true':
        # 如果为true,则flag=True,不阻塞,子进程继续运行
        event_obj.set()
    else:
event_obj.clear()- 1
- 2
- 3
- 4
- 5
- 6
- 7
- 8
- 9
- 10
- 11
- 12
- 13
- 14
- 15
- 16
- 17
- 18
- 19
- 20
- 21
event一个模拟红绿灯的实例:
def light():
    linght_time = 0
    if not event.is_set():
        event.set()  # Flag = True, 阻塞
    while True:
        time.sleep(1)
        if linght_time < 10:
            print("Green is on....")
        elif linght_time < 13:
            print("Yellow is on ....")
        elif linght_time < 16:
            print("Red is on ......")
            if event.is_set():
                event.clear()
        else:    # 大于16, 该重新调绿灯了
            linght_time = 0
            event.set()

        linght_time += 1

def car_run(carnum):
    while True:
        time.sleep(2)
        if event.is_set():
            print("car %s is run" % carnum)
        else:
            print("CAR %s IS WAITTING........" % carnum)

if __name__ == "__main__":
    event = threading.Event()
    l = threading.Thread(target=light, )
    l.start()
    for i in range(3):
        c = threading.Thread(target=car_run, args=(str(i), ))
c.start()- 1
- 2
- 3
- 4
- 5
- 6
- 7
- 8
- 9
- 10
- 11
- 12
- 13
- 14
- 15
- 16
- 17
- 18
- 19
- 20
- 21
- 22
- 23
- 24
- 25
- 26
- 27
- 28
- 29
- 30
- 31
- 32
- 33
- 34
- 35
6) Semaphore()
Semaphore信号量管理一个内置的计数器:
每当调用acquire()时内置计数器-1;
调用release() 时内置计数器+1;
计数器不能小于0;当计数器为0时,acquire()将阻塞线程直到其他线程调用release()。
import threading
import time

def do():
    semaphro.acquire()
    print("this is {0} set the semaphore".format(threading.current_thread().getName()))
    time.sleep(2)
    semaphro.release()
    print("\033[1;30mthi is {0} release the semaphore\033[0m".format(threading.current_thread().getName()))


if __name__ == "__main__":
    semaphro = threading.Semaphore(2)
    for i in range(10):
        t = threading.Thread(target=do)
        t.setName("Thread_{0}".format(str(i)))
        t.start()
print("finished")- 1
- 2
- 3
- 4
- 5
- 6
- 7
- 8
- 9
- 10
- 11
- 12
- 13
- 14
- 15
- 16
- 17
- 18
上例中,虽然创建了10个线程,但同时只有2个线程在运行,就是因为在线程中通过Semaphore设置了2个信号量。只有其中一个释放后另其它的线程再能开始执行


 2204
2204

 被折叠的 条评论
为什么被折叠?
被折叠的 条评论
为什么被折叠?
 到【灌水乐园】发言


