


kerberos配置dolphinscheduler
一、如果是之前就安装好了dolphinscheduler
- 那么只需要修改common.properties
- 然后执行./install.sh 即可
一、添加dolphin 用戶
1.所有節點上執行如下命令:
[root@hadoop102 ~]#useradd dolphin -g hadoop
[root@hadoop103 ~]#echo dolphin | passwd --stdin dolphin
[root@hadoop104 ~]#echo 'dolphin  ALL=(ALL)  NOPASSWD: NOPASSWD: ALL' >> /etc/sudoers
二、DolphinScheduler集群模式部署
1.集群规划
集群模式下,可配置多个Master及多个Worker。通常可配置2~3个Master,若干个Worker。由于集群资源有限,此处配置一个Master,三个Worker,集群规划如下。

2.前置准备工作
(1)三台节点均需部署JDK(1.8+),并配置相关环境变量。
(2)需部署数据库,支持MySQL(5.7+)或者PostgreSQL(8.2.15+)。
(3)需部署Zookeeper(3.4.6+)。
(4)三台节点均需安装进程树分析工具psmisc。
[root@hadoop102 ~]$ sudo yum install -y psmisc
[root@hadoop103 ~]$ sudo yum install -y psmisc
[root@hadoop104 ~]$ sudo yum install -y psmisc
3.解压DolphinScheduler安装包
(1)上传DolphinScheduler安装包到hadoop102节点的/opt/software目录
(2)解压安装包到当前目录
注:解压目录并非最终的安装目录
[root@hadoop102 software]$ tar -zxvf apache-dolphinscheduler-2.0.5-bin
(3)修改權限
[root@hadoop102 ~]# chown -R dolphin:hadoop /opt/module/apache-dolphinscheduler-2.0.5-bin
[root@hadoop103 ~]# chown -R dolphin:hadoop /opt/module/apache-dolphinscheduler-2.0.5-bin
[root@hadoop104 ~]# chown -R dolphin:hadoop /opt/module/apache-dolphinscheduler-2.0.5-bin
(4) 提前創建安裝路徑並更改權限(所有節點)
[root@hadoop102 ~]# mkdir /opt/module/dolphinscheduler
[root@hadoop102 ~]# chown -R dolphin:hadoop /opt/module/dolphinscheduler
4. 创建元数据库及用户
DolphinScheduler 元数据存储在关系型数据库中,故需创建相应的数据库和用户。
(1)创建数据库
mysql> CREATE DATABASE dolphinscheduler DEFAULT CHARACTER SET utf8 DEFAULT COLLATE utf8_general_ci;
(2)创建用户
mysql> CREATE USER 'dolphinscheduler'@'%' IDENTIFIED BY 'dolphinscheduler';
注:
若出现以下错误信息,表明新建用户的密码过于简单。
ERROR 1819 (HY000): Your password does not satisfy the current policy requirements
可提高密码复杂度或者执行以下命令降低MySQL密码强度级别。
mysql> set global validate_password_policy=0;
mysql> set global validate_password_length=4;
(3)赋予用户相应权限
mysql> GRANT ALL PRIVILEGES ON dolphinscheduler.* TO 'dolphinscheduler'@'%';
mysql> flush privileges;
5. 配置一键部署脚本
修改解压目录下的conf/config目录下的install_config.conf文件。
[sarah@hadoop102 apache-dolphinscheduler-2.0.5-bin]$ vim conf/config/install_config.conf
# ---------------------------------------------------------
# INSTALL MACHINE
# ---------------------------------------------------------
# A comma separated list of machine hostname or IP would be installed DolphinScheduler,
# including master, worker, api, alert. If you want to deploy in pseudo-distributed
# mode, just write a pseudo-distributed hostname
# Example for hostnames: ips="ds1,ds2,ds3,ds4,ds5", Example for IPs: ips="192.168.8.1,192.168.8.2,192.168.8.3,192.168.8.4,192.168.8.5"
ips="hadoop102,hadoop103,hadoop104"

# Port of SSH protocol, default value is 22. For now we only support same port in all `ips` machine
# modify it if you use different ssh port
sshPort="22"

# A comma separated list of machine hostname or IP would be installed Master server, it
# must be a subset of configuration `ips`.
# Example for hostnames: masters="ds1,ds2", Example for IPs: masters="192.168.8.1,192.168.8.2"
masters="hadoop102,hadoop103"

# A comma separated list of machine <hostname>:<workerGroup> or <IP>:<workerGroup>.All hostname or IP must be a
# subset of configuration `ips`, And workerGroup have default value as `default`, but we recommend you declare behind the hosts
# Example for hostnames: workers="ds1:default,ds2:default,ds3:default", Example for IPs: workers="192.168.8.1:default,192.168.8.2:default,192.168.8.3:default"
workers="hadoop102:default,hadoop103:default,hadoop104:default"

# A comma separated list of machine hostname or IP would be installed Alert server, it
# must be a subset of configuration `ips`.
# Example for hostname: alertServer="ds3", Example for IP: alertServer="192.168.8.3"
alertServer="hadoop102"

# A comma separated list of machine hostname or IP would be installed API server, it
# must be a subset of configuration `ips`.
# Example for hostname: apiServers="ds1", Example for IP: apiServers="192.168.8.1"
apiServers="hadoop102"

# A comma separated list of machine hostname or IP would be installed Python gateway server, it
# must be a subset of configuration `ips`.
# Example for hostname: pythonGatewayServers="ds1", Example for IP: pythonGatewayServers="192.168.8.1"
#pythonGatewayServers="ds1"

# The directory to install DolphinScheduler for all machine we config above. It will automatically be created by `install.sh` script if not exists.
# Do not set this configuration same as the current path (pwd)
installPath="/opt/module/dolphinscheduler"

# The user to deploy DolphinScheduler for all machine we config above. For now user must create by yourself before running `install.sh`
# script. The user needs to have sudo privileges and permissions to operate hdfs. If hdfs is enabled than the root directory needs
# to be created by this user
deployUser="dolphin "

# The directory to store local data for all machine we config above. Make sure user `deployUser` have permissions to read and write this directory.
dataBasedirPath="/tmp/dolphinscheduler"

# ---------------------------------------------------------
# DolphinScheduler ENV
# ---------------------------------------------------------
# JAVA_HOME, we recommend use same JAVA_HOME in all machine you going to install DolphinScheduler
# and this configuration only support one parameter so far.
javaHome="/opt/module/java"

# DolphinScheduler API service port, also this is your DolphinScheduler UI component's URL port, default value is 12345
apiServerPort="12345"

# ---------------------------------------------------------
# Database
# NOTICE: If database value has special characters, such as `.*[]^${}\+?|()@#&`, Please add prefix `\` for escaping.
# ---------------------------------------------------------
# The type for the metadata database
# Supported values: ``postgresql``, ``mysql`, `h2``.
DATABASE_TYPE=mysql

# Spring datasource url, following <HOST>:<PORT>/<database>?<parameter> format, If you using mysql, you could use jdbc
# string jdbc:mysql://127.0.0.1:3306/dolphinscheduler?useUnicode=true&characterEncoding=UTF-8 as example
SPRING_DATASOURCE_URL="jdbc:mysql://hadoop102:3306/dolphinscheduler?useUnicode=true&characterEncoding=UTF-8&serverTimezone=UTC"

# Spring datasource username
SPRING_DATASOURCE_USERNAME="dolphinscheduler"

# Spring datasource password
SPRING_DATASOURCE_PASSWORD="dolphinscheduler"

# ---------------------------------------------------------
# Registry Server
# ---------------------------------------------------------
# Registry Server plugin name, should be a substring of `registryPluginDir`, DolphinScheduler use this for verifying configuration consistency
registryPluginName="zookeeper"

# Registry Server address.
registryServers="hadoop102:2181,hadoop103:2181,hadoop104:2181"

# Registry Namespace
registryNamespace="dolphinscheduler"

# ---------------------------------------------------------
# Worker Task Server
# ---------------------------------------------------------
# Worker Task Server plugin dir. DolphinScheduler will find and load the worker task plugin jar package from this dir.
taskPluginDir="lib/plugin/task"

# resource storage type: HDFS, S3, NONE
resourceStorageType="HDFS"

# resource store on HDFS/S3 path, resource file will store to this hdfs path, self configuration, please make sure the directory exists on hdfs and has read write permissions. "/dolphinscheduler" is recommended
resourceUploadPath="/dolphinscheduler"

# if resourceStorageType is HDFS,defaultFS write namenode address,HA, you need to put core-site.xml and hdfs-site.xml in the conf directory.
# if S3,write S3 address,HA,for example :s3a://dolphinscheduler,
# Note,S3 be sure to create the root directory /dolphinscheduler
defaultFS="hdfs://mycluster:8020"

# if resourceStorageType is S3, the following three configuration is required, otherwise please ignore
s3Endpoint="http://192.168.xx.xx:9010"
s3AccessKey="xxxxxxxxxx"
s3SecretKey="xxxxxxxxxx"

# resourcemanager port, the default value is 8088 if not specified
resourceManagerHttpAddressPort="8088"

# if resourcemanager HA is enabled, please set the HA IPs; if resourcemanager is single node, keep this value empty
yarnHaIps="hadoop102,hadoop103,hadoop104"

# if resourcemanager HA is enabled or not use resourcemanager, please keep the default value; If resourcemanager is single node, you only need to replace 'yarnIp1' to actual resourcemanager hostname
singleYarnIp="yarnIp1"

# who has permission to create directory under HDFS/S3 root path
# Note: if kerberos is enabled, please config hdfsRootUser=
hdfsRootUser="hdfs"

# kerberos config
# whether kerberos starts, if kerberos starts, following four items need to config, otherwise please ignore
kerberosStartUp="true"
# kdc krb5 config file path
krb5ConfPath="/etc/krb5.conf"
# keytab username,watch out the @ sign should followd by \\
keytabUserName="hdfs/hadoop@EXAMPLE.COM"
# username keytab path
keytabPath="/etc/security/keytab/hdfs.keytab"
# kerberos expire time, the unit is hour
kerberosExpireTime="24"

# use sudo or not
sudoEnable="true"

# worker tenant auto create
workerTenantAutoCreate="false"
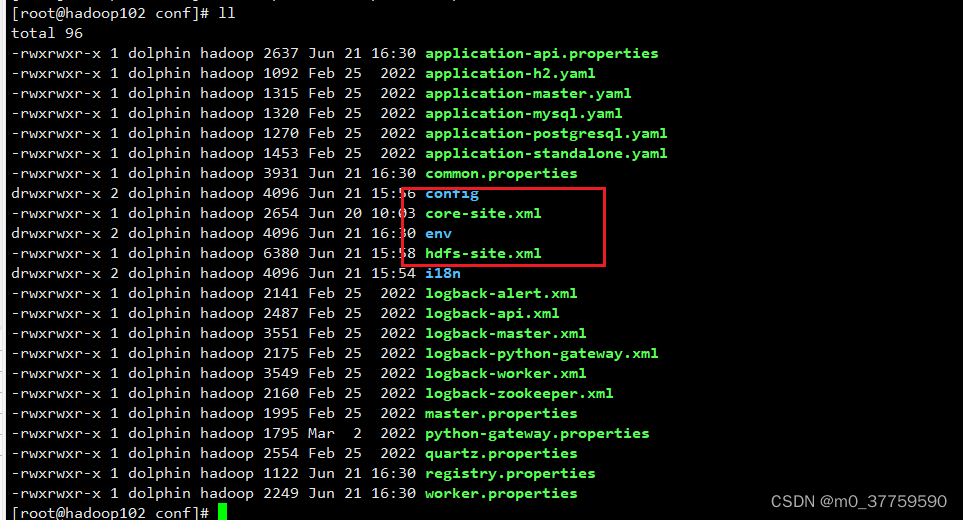
將hadoop中的core-site.xml和hdfs-site.xml文件放入conf目錄中
6 初始化数据库
(1)拷贝MySQL驱动到DolphinScheduler的解压目录下的lib中,要求使用 MySQL JDBC Driver 8.0.16。
[sarah@hadoop102 apache-dolphinscheduler-2.0.5-bin]$ cp /opt/software/mysql-connector-java-8.0.16.jar lib/
(2)执行数据库初始化脚本
数据库初始化脚本位于DolphinScheduler解压目录下的script目录中,即/opt/software/ds/apache-dolphinscheduler-2.0.5-bin/script/。
[sarah@hadoop102 apache-dolphinscheduler-2.0.5-bin]$ script/create-dolphinscheduler.sh
7.修改common配置文件
[root@hadoop102 conf]# vim /opt/module/apache-dolphinscheduler-2.0.5-bin/conf/common.properties
# user data local directory path, please make sure the directory exists and have read write permissions
data.basedir.path=/tmp/dolphinscheduler

# resource storage type: HDFS, S3, NONE
resource.storage.type=HDFS

# resource store on HDFS/S3 path, resource file will store to this hadoop hdfs path, self configuration, please make sure the directory exists on hdfs and have read write permissions. "/dolphinscheduler" is recommended
resource.upload.path=/dolphinscheduler

# whether to startup kerberos
hadoop.security.authentication.startup.state=true

# java.security.krb5.conf path
java.security.krb5.conf.path=/etc/krb5.conf

# login user from keytab username
login.user.keytab.username=hdfs/hadoop@EXAMPLE.COM

# login user from keytab path
login.user.keytab.path=/etc/security/keytab/hdfs.keytab

# kerberos expire time, the unit is hour
kerberos.expire.time=24

# resource view suffixs
#resource.view.suffixs=txt,log,sh,bat,conf,cfg,py,java,sql,xml,hql,properties,json,yml,yaml,ini,js

# if resource.storage.type=HDFS, the user must have the permission to create directories under the HDFS root path
hdfs.root.user=hdfs

# if resource.storage.type=S3, the value like: s3a://dolphinscheduler; if resource.storage.type=HDFS and namenode HA is enabled, you need to copy core-site.xml and hdfs-site.xml to conf dir
fs.defaultFS=hdfs://mycluster:8020

# if resource.storage.type=S3, s3 endpoint
fs.s3a.endpoint=http://192.168.xx.xx:9010

# if resource.storage.type=S3, s3 access key
fs.s3a.access.key=xxxxxxxxxx

# if resource.storage.type=S3, s3 secret key
fs.s3a.secret.key=xxxxxxxxxx

# resourcemanager port, the default value is 8088 if not specified
resource.manager.httpaddress.port=8088

# if resourcemanager HA is enabled, please set the HA IPs; if resourcemanager is single, keep this value empty
yarn.resourcemanager.ha.rm.ids=hadoop102,hadoop103,hadoop104

# if resourcemanager HA is enabled or not use resourcemanager, please keep the default value; If resourcemanager is single, you only need to replace ds1 to actual resourcemanager hostname
yarn.application.status.address=http://yarnIp1:%s/ws/v1/cluster/apps/%s

# job history status url when application number threshold is reached(default 10000, maybe it was set to 1000)
yarn.job.history.status.address=http://yarnIp1:19888/ws/v1/history/mapreduce/jobs/%s

# datasource encryption enable
datasource.encryption.enable=false

# datasource encryption salt
datasource.encryption.salt=!@#$%^&*

# Whether hive SQL is executed in the same session
support.hive.oneSession=false

# use sudo or not, if set true, executing user is tenant user and deploy user needs sudo permissions; if set false, executing user is the deploy user and doesn't need sudo permissions
sudo.enable=true

# network interface preferred like eth0, default: empty
#dolphin.scheduler.network.interface.preferred=

# network IP gets priority, default: inner outer
#dolphin.scheduler.network.priority.strategy=default

# system env path
#dolphinscheduler.env.path=env/dolphinscheduler_env.sh

# development state
development.state=false

#datasource.plugin.dir config
datasource.plugin.dir=lib/plugin/datasource
8. 一键部署DolphinScheduler
(1)启动Zookeeper集群
[sarah@hadoop102 apache-dolphinscheduler-2.0.5-bin]$ zk.sh start
(2)一键部署并启动DolphinScheduler
[sarah@hadoop102 apache-dolphinscheduler-2.0.5-bin]$ ./install.sh
(3)访问DolphinScheduler UI
UI地址为 http://hadoop102:12345/dolphinscheduler
初始用户的用户名为:admin,密码为dolphinscheduler123**
9. DolphinScheduler启停命令
DolphinScheduler的启停脚本均位于其安装目录的bin目录下。
1)一键启停所有服务
./bin/start-all.sh
./bin/stop-all.sh
注意同Hadoop的启停脚本进行区分。
2)启停 Master
./bin/dolphinscheduler-daemon.sh start master-server
./bin/dolphinscheduler-daemon.sh stop master-server
3)启停 Worker
./bin/dolphinscheduler-daemon.sh start worker-server
./bin/dolphinscheduler-daemon.sh stop worker-server
4)启停 Api
```bash
./bin/dolphinscheduler-daemon.sh start api-server
./bin/dolphinscheduler-daemon.sh stop api-server
5)启停 Logger

```bash
./bin/dolphinscheduler-daemon.sh start logger-server
./bin/dolphinscheduler-daemon.sh stop logger-server
6)启停 Alert
./bin/dolphinscheduler-daemon.sh start alert-server
./bin/dolphinscheduler-daemon.sh stop alert-server
三、DolphinScheduler入门
3.1 安全中心配置
安全中心主要有租户管理、用户管理、告警组管理、告警实例管理、Worker分组管理、Yarn 队列管理、环境管理、令牌管理等功能。


注:
名称:DS 执行任务时可以选择的队列名称。
队列值:与名称相对应的 Yarn 调度队列的名称。
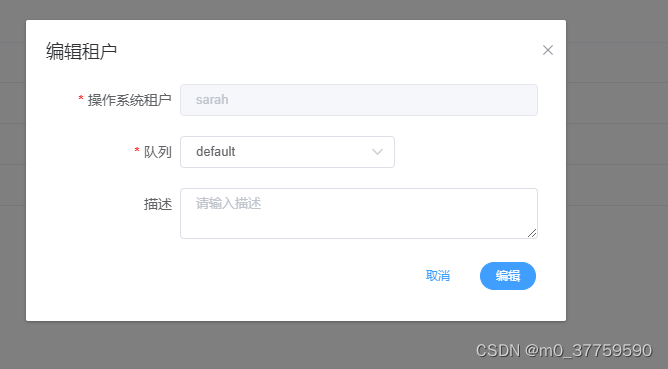
3.1.2 租户管理
租户对应的是Linux的用户,用于worker提交作业所使用的用户。如果linux没有这个用户,默认情况下会导致任务运行失败。可以通过修改 worker.properties 配置文件中参数 worker.tenant.auto.create=true(默认值为 false)实现当 linux 用户不存在时自动创建该用户。worker.tenant.auto.create=true 参数会要求 worker 可以免密运行 sudo 命令。
此处创建一个sarah租户,如下图。
注:
租户编码:租户编码是Linux上的用户,唯一,不能重复。
队列:该租户提交Yarn任务时的默认队列。
3.1.3 用户管理
用户对应的是DolphinScheduler的用户,用于登录DolphinScheduler。用户分管理员用户和普通用户。
管理员有授权和用户管理等权限,没有创建项目和工作流定义的操作的权限。
普通用户可以创建项目和对工作流定义的创建,编辑,执行等操作。
此处创建一个普通用户sarah,如下图。

- 用户名:DolphinScheduler登录账户
- 租户:该用户关联的租户
- 队列:默认为租户所关联的队列。
- 邮件、手机号:主要用于告警通知。
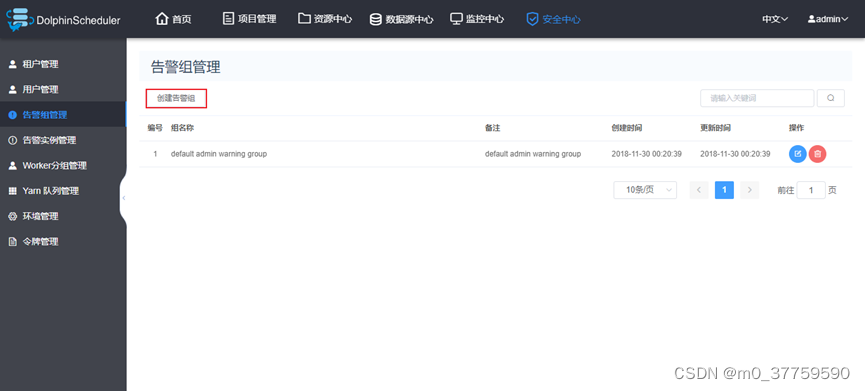
3.1.4 告警实例管理与告警组管理
告警实例与告警组用于任务运行成功或者失败之后的告警通知。一个告警组可包含多个告警实例,一个告警实例,需选择一个告警插件,并配置相应参数,目前支持的告警插件有电子邮件、钉钉、企业微信、飞书等。
此处暂不配置。
3.1.5 Worker分组管理
一个Worker分组由多个Worker组成。在任务执行时,可以将任务分配给指定Worker组,由该组中的Worker节点执行该任务。每个Worker至少属于一个组,默认为default组。Worker所属分组可以调整,调整方式如下:
1)方式一
打开要设置分组的Worker节点上的worker.properties配置文件,修改worker.groups参数,worker.groups参数的值为该Worker节点对应的分组名称,默认为default,如果该worker节点属于多个分组,则多个分组名称以逗号隔开。
示例:
worker.groups=default,test
2)方式二
在Web UI的安全中心的Workder分组管理中修改,如下图所示。

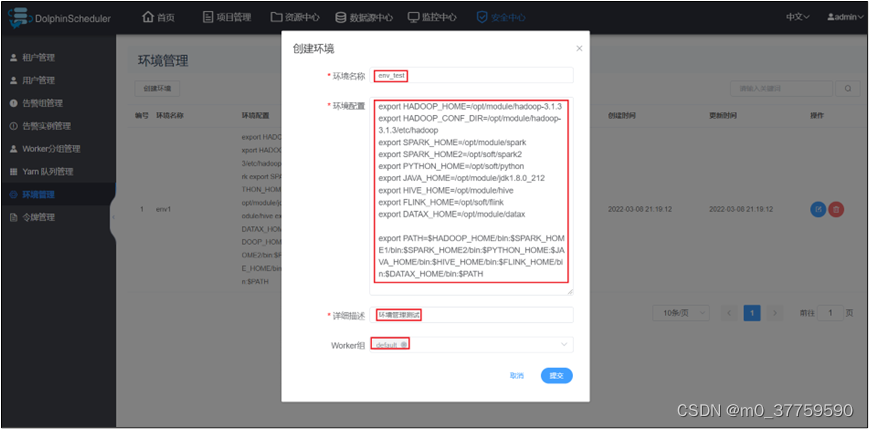
3.1.6 环境管理
此处可配置Worker运行环境(任务运行时所需的环境变量),默认的运行环境由Worker节点中,dolphinscheduler安装目录下的conf/env/dolphinscheduler_env.sh决定。
创建环境的操作如下图所示,环境创建完毕之后,就可供Worker运行任务时选择。
注:
- 环境名称:用户自定义名称。
- 环境配置:与 dolphinscheduler_env.sh 配置格式相同
- 详细描述:环境的详细描述,不能为空,否则无法创建
- Worker组:环境所属的 Worker 组
- 此处暂不做配置
四 DolphinScheduler进阶
4.1 工作流传参
4.1.1 本地参数和全局参数
DolphinScheduler支持对任务节点进行灵活的传参,任务节点可通过${参数名}引用参数值。
1)本地参数
本地参数是指只针对单个任务节点有效的参数。
(1)修改helloworld工作流Node-A节点如下
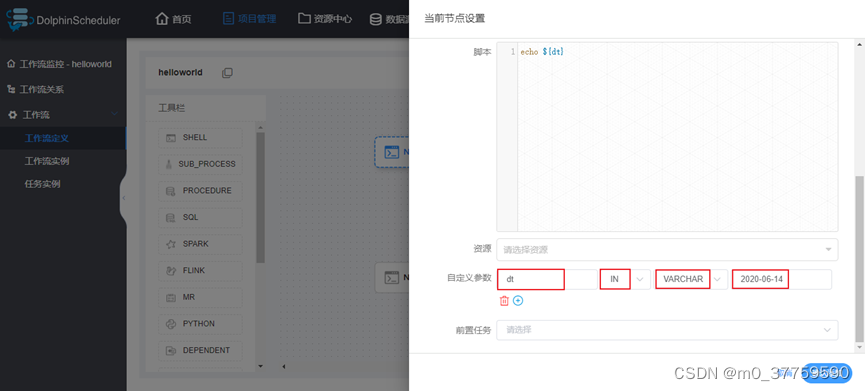
- dt:参数名
- IN/OUT:IN表示向当前节点传参,OUT表示向下游节点传参
- VARCHAR:参数值类型
- 2020-06-14:参数值 保存工作流并运行,查看Node-A输出日志。
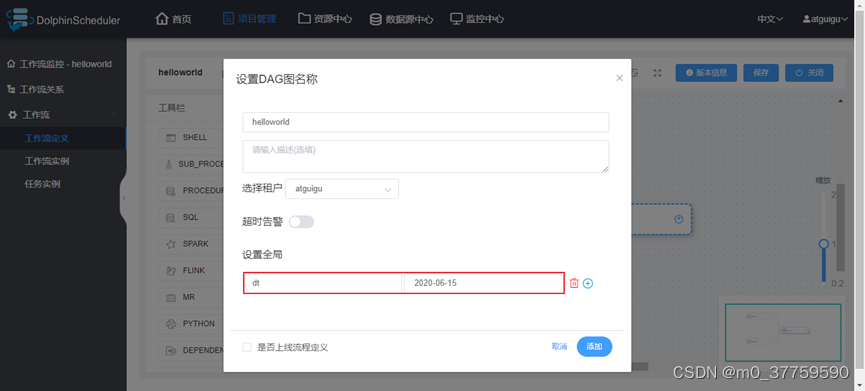
2)全局参数
全局参数是指针对整个工作流的所有任务节点都有效的参数。
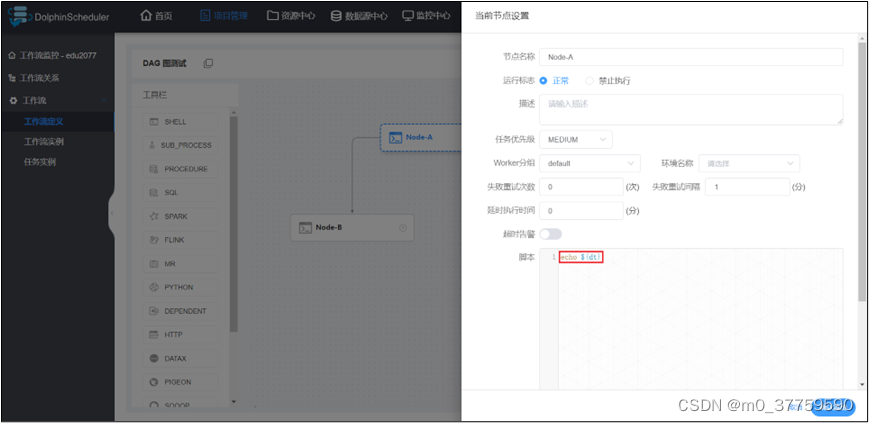
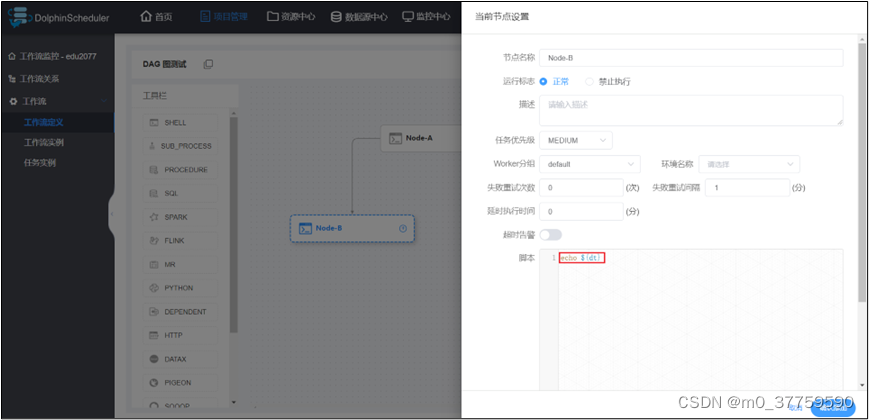
(1)修改helloworld工作流每个任务节点如下
节点A配置
节点B配置
节点C配置
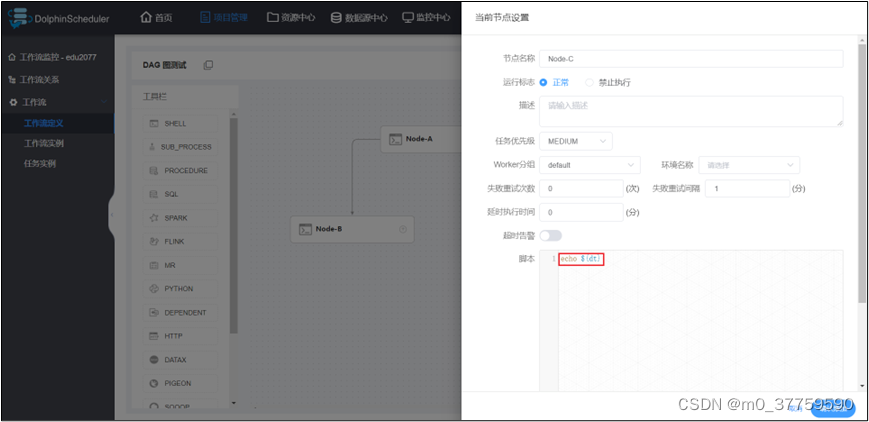 (2)保存工作流,并设置全局参数
(3)执行工作流,查看三个任务节点输出日志。
4.1.2 参数传递
DolphinScheduler支持上游任务节点向下游任务节点传参。目前支持这个特性的任务类型有:Shell、SQL、Procedure。以下案例使用Shell类型的任务节点进行演示。
1)设置上游节点Node-A
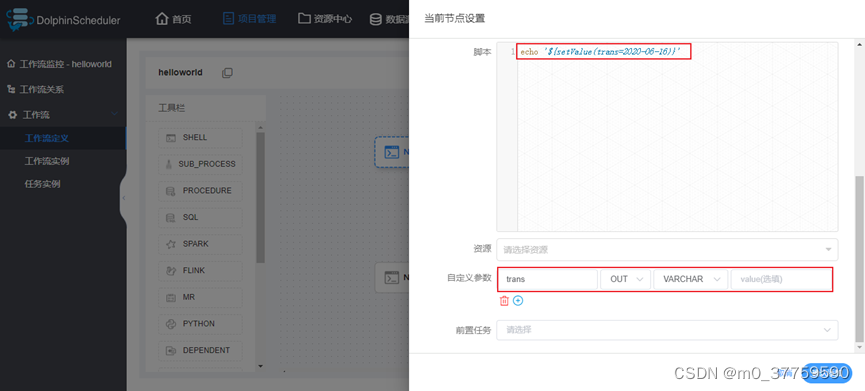
注:echo '${setValue(key=value)}'为固定写法
2)设置下游节点Node-C
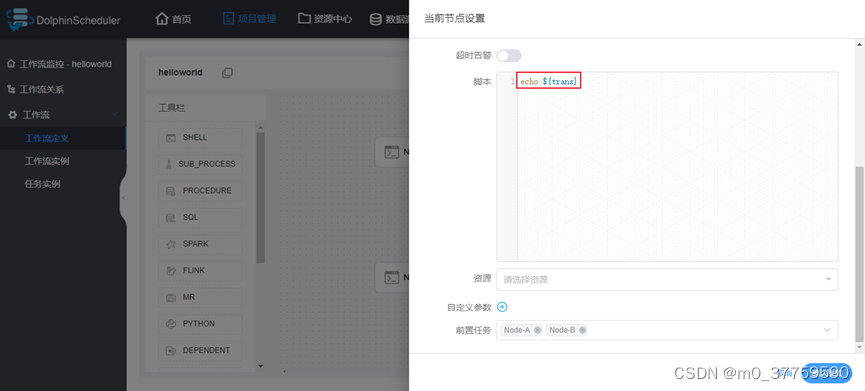
3)查看输出日志
可以看到对应节点日志中输出了其调用参数的值。
4.1.3 参数优先级
一个任务节点引用的参数可能来自三种类型:分别是全局参数 、上游任务传递的参数、本地参数。因为参数的值存在多个来源,当参数名相同时,就需要考虑参数优先级的问题。
DolphinScheduler 参数的优先级从低到高为:
全局参数 <上游任务传递的参数 <本地参数。
在上游任务传递的参数的情况下,由于上游可能存在多个任务向下游传递参数。
当上游传递的参数名称相同时:
下游节点会优先使用值为非空的参数。
如果存在多个值为非空的参数,则按照上游任务的完成时间排序,选择完成时间最早的上游任务对应的参数。
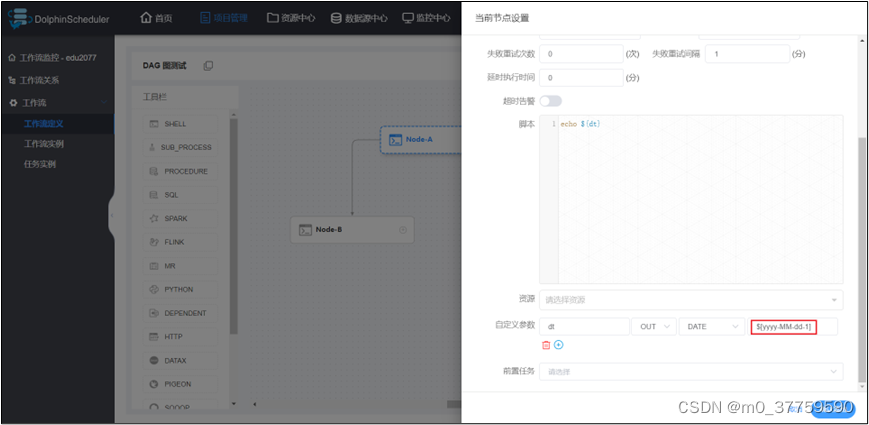
4.1.4 内置参数
DolphinScheduler提供了一些时间相关的系统参数,方便定时调度使用。
1)基础内置参数
变量名 参数 说明
system.biz.date	${system.biz.date}	            定时时间前一天,格式为 yyyyMMdd
system.biz.curdate	${system.biz.curdate}		定时时间,格式为 yyyyMMdd
system.datetime	${system.datetime}		        定时时间,格式为 yyyyMMddHHmmss
2)衍生内置参数
可通过衍生内置参数,设置任意格式、任意时间的日期。
(1)自定义日期格式
可以对 $[yyyyMMddHHmmss] 任意分解组合,如 $[yyyyMMdd], $[HHmmss], $[yyyy-MM-dd]。
(2)使用 add_months() 函数
该函数用于加减月份, 第一个入口参数为[yyyyMMdd],表示返回时间的格式 第二个入口参数为月份偏移量,表示加减多少个月。
参数 说明
$[add_months(yyyyMMdd,12*N)]	后 N 年
$[add_months(yyyyMMdd,-12*N)]	前 N 年
$[add_months(yyyyMMdd,N)]	    后 N 月
$[add_months(yyyyMMdd,-N)]	    前 N 月
(3)直接加减数字
在自定义格式后直接“+/-”数字,单位为“天”。
参数 说明
$[yyyyMMdd+7*N]	    后 N 周
$[yyyyMMdd-7*N]	    前 N 周
$[yyyyMMdd+N]	    后 N 天
$[yyyyMMdd-N]	    前 N 天
$[HHmmss+N/24]	    后 N 小时
$[HHmmss-N/24]	    前 N 小时
$[HHmmss+N/24/60]	后 N 分钟
$[HHmmss-N/24/60]	前 N 分钟
3)配置示例
若执行的脚本需要一个格式为yyyy-MM-dd的前一天日期的参数,进行如下配置即可$[yyyy-MM-dd]
4.2 引用依赖资源
有些任务需要引用一些额外的资源,例如MR、Spark等任务须引用jar包,Shell任务需要引用其他脚本等。DolphinScheduler提供了资源中心来对这些资源进行统一管理。资源中心存储系统可选择本地文件系统或者HDFS等。资源中心除了提供文件资源管理功能,还提供了Hive自定义函数管理的功能。
下面以Shell任务为例,演示如何引用资源中心的其他脚本。
1)在资源中心创建脚本
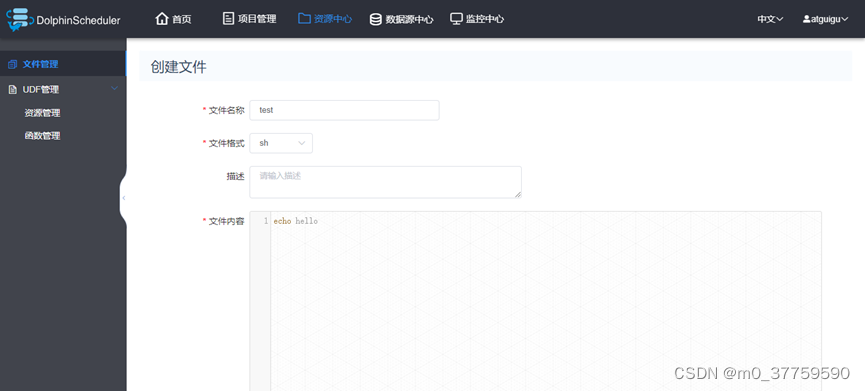
2)配置Shell任务引用脚本
修改工作流节点Node-A,引用上述脚本
3)保存工作流并执行,查看对应节点输出日志。
4.3 告警通知
Dolphinscheduler支持多种告警媒介,此处以电子邮件为例进行演示。
1)准备邮箱
如需使用DolphinScheduler的电子邮件告警通知功能,需要准备一个电子邮箱账号,并启用SMTP服务。此处以 QQ 邮箱为例。
(1)开启 SMTP 服务
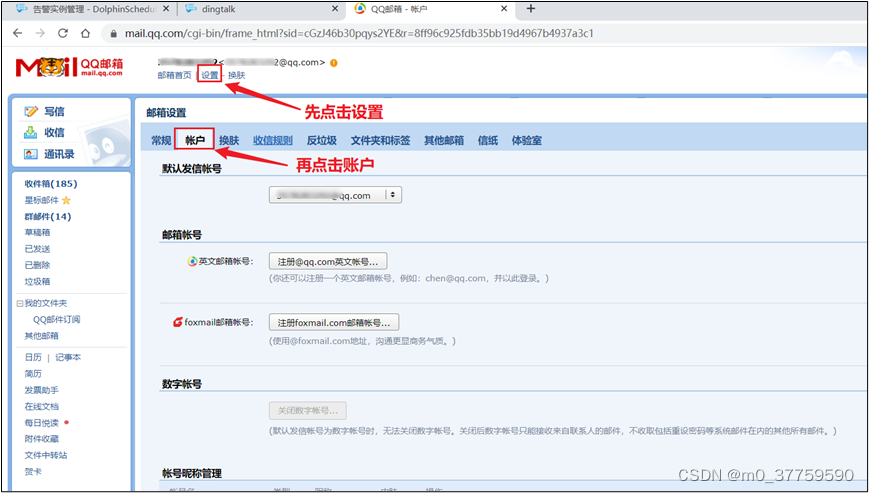
拖动进度条在页面下方找到下图所示内容,开启 POP3/SMTP | IMAP/SMTP 任一服务即可。

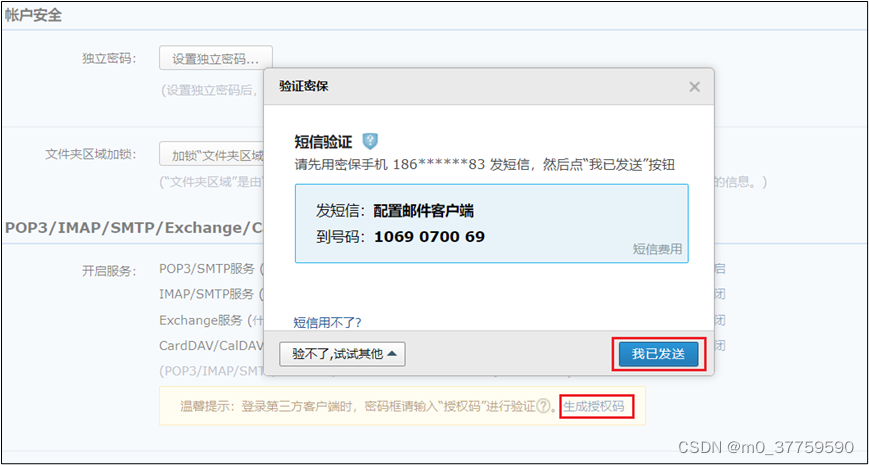
(2)获得授权码
2)DolphinScheduler 配置
(1)切换管理员用户
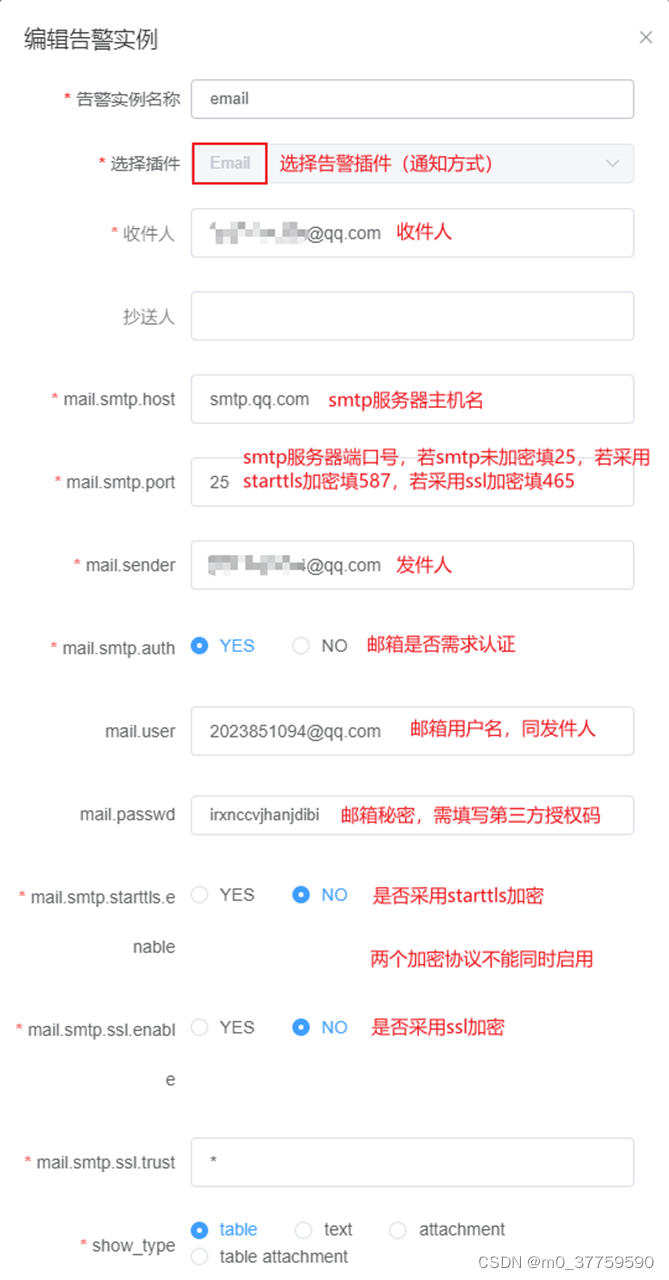
(2)创建告警实例
第一步:点击创建告警实例

第二步:编辑告警实例
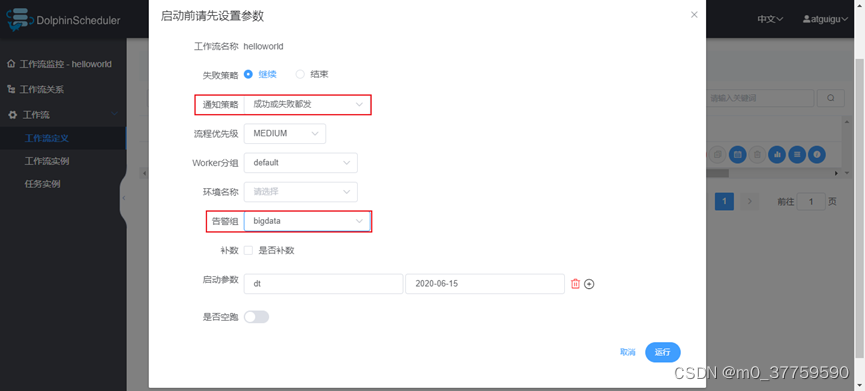
(3)创建告警组
第一步:点击创建告警组
3)测试告警通知
(1)切换普通用户
(2)执行工作流测试
 (3)等待接受邮件
4.4 工作流失败重跑
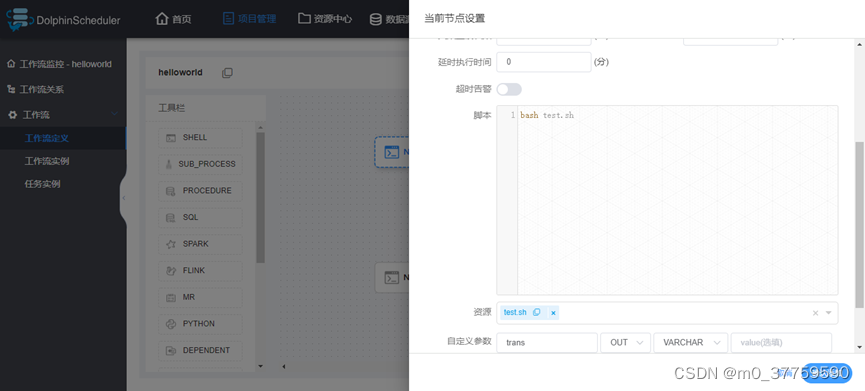
若工作流执行到一半失败了,需要重新启动工作流。重新启动时可选择从起点开始执行,也可选择从断点开始执行。
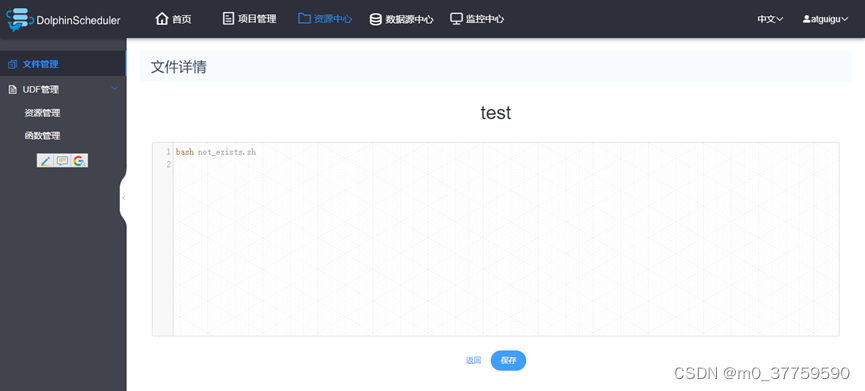
1)模拟失败场景
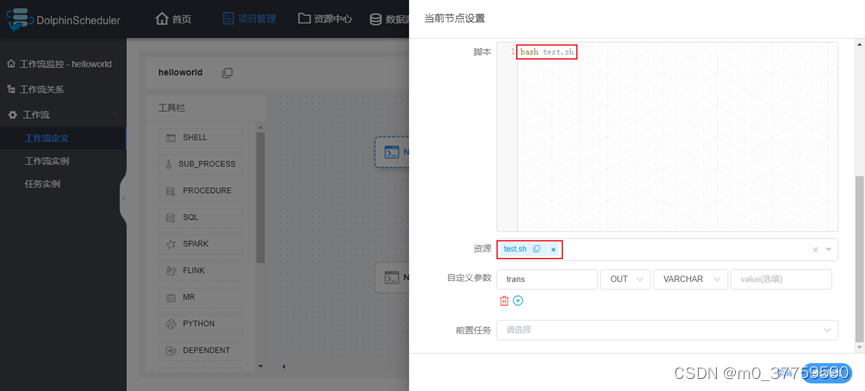
(1)修改Node-A配置如下
(2)修改资源中心的test.sh文件如下
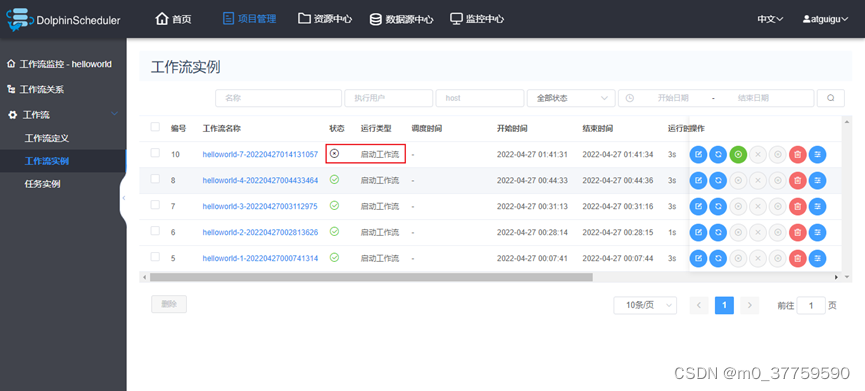
2)运行工作流
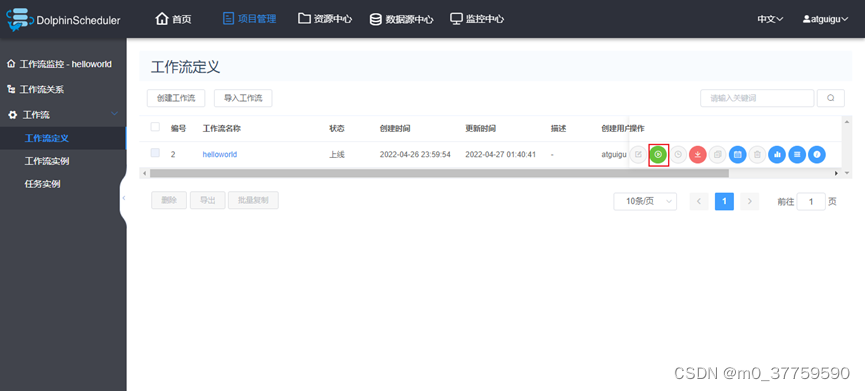
3)查看工作流实例
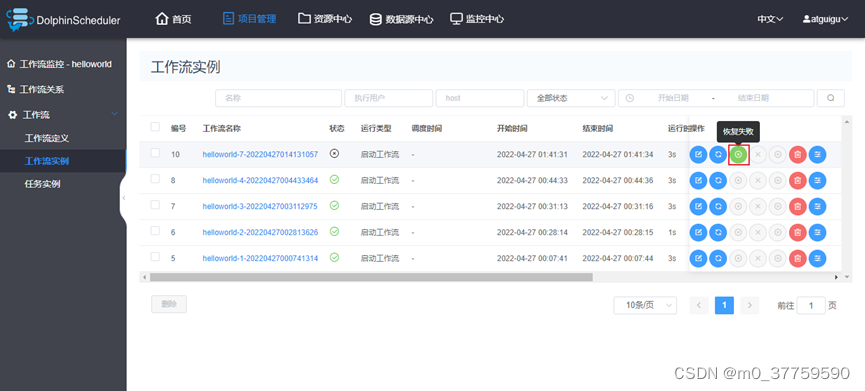
4)工作失败重跑
(1)从起点开始

(2)从断点开始
总结
使用dolphin用户 启动dolphinscheduler,需要更改的地方如下:
1.将hdfs中的dolphinscheduler路径改为dolphinscheduler用户
[hdfs@hadoop103 10112646563616_1]$ hadoop fs -ls /
Found 7 items
drwxr-xr-x   - dolphin hadoop              0 2023-07-04 09:49 /dolphinscheduler
drwxr-xr-x   - hbase   hadoop              0 2023-07-04 07:26 /hbase
drwxr-xr-x   - hive    hadoop              0 2023-06-29 13:31 /origin_data
drwxr-xr-x   - sarah   supergroup          0 2023-07-04 11:04 /spark-history
drwxr-xr-x   - sarah   supergroup          0 2023-06-29 13:38 /spark-jars
drwxrwxrwt   - hdfs    hadoop              0 2023-06-30 14:13 /tmp
drwxrwxr-x   - hdfs    hadoop              0 2023-07-04 10:04 /user
[hdfs@hadoop103 10112646563616_1]$
2.将服务器中的/tmp中有关dolphinscheduler的内容权限改为dolphin用户(所有dolphinscheduler集群所在的节点)
[hdfs@hadoop103 tmp]$ ll |grep dolphin
drwxr-xr-x. 3 dolphin      hadoop        18 Jul  4 09:50 dolphinscheduler
drwxr-xr-x. 2 dolphin      hadoop        42 Jul  4 10:06 hsperfdata_dolphin
drwxr-xr-x. 2 dolphin      hadoop         6 Jul  4 09:54 jna-1837070814
不然会报错:
java.nio.file.NoSuchFileException: /tmp/dolphinscheduler/exec/process/10112641229984/10112646563616_2/5/7/5_7_node.sh
	at sun.nio.fs.UnixException.translateToIOException(UnixException.java:86)
	at sun.nio.fs.UnixException.rethrowAsIOException(UnixException.java:102)
	at sun.nio.fs.UnixException.rethrowAsIOException(UnixException.java:107)
	at sun.nio.fs.UnixFileSystemProvider.newByteChannel(UnixFileSystemProvider.java:214)
	at java.nio.file.Files.newByteChannel(Files.java:361)
	at java.nio.file.Files.createFile(Files.java:632)
	at org.apache.dolphinscheduler.plugin.task.shell.ShellTask.buildCommand(ShellTask.java:146)
	at org.apache.dolphinscheduler.plugin.task.shell.ShellTask.handle(ShellTask.java:96)
	at org.apache.dolphinscheduler.server.worker.runner.TaskExecuteThread.run(TaskExecuteThread.java:189)
	at java.util.concurrent.Executors$RunnableAdapter.call(Executors.java:511)
	at com.google.common.util.concurrent.TrustedListenableFutureTask$TrustedFutureInterruptibleTask.runInterruptibly(TrustedListenableFutureTask.java:125)
	at com.google.common.util.concurrent.InterruptibleTask.run(InterruptibleTask.java:57)
	at com.google.common.util.concurrent.TrustedListenableFutureTask.run(TrustedListenableFutureTask.java:78)
	at java.util.concurrent.ThreadPoolExecutor.runWorker(ThreadPoolExecutor.java:1149)
	at java.util.concurrent.ThreadPoolExecutor$Worker.run(ThreadPoolExecutor.java:624)
	at java.lang.Thread.run(Thread.java:750)
3.在ranger中给dolphin配置相对应的hdfs和hive访问权限


 569
569


 被折叠的 条评论
为什么被折叠?
被折叠的 条评论
为什么被折叠?
 到【灌水乐园】发言


