


绪论
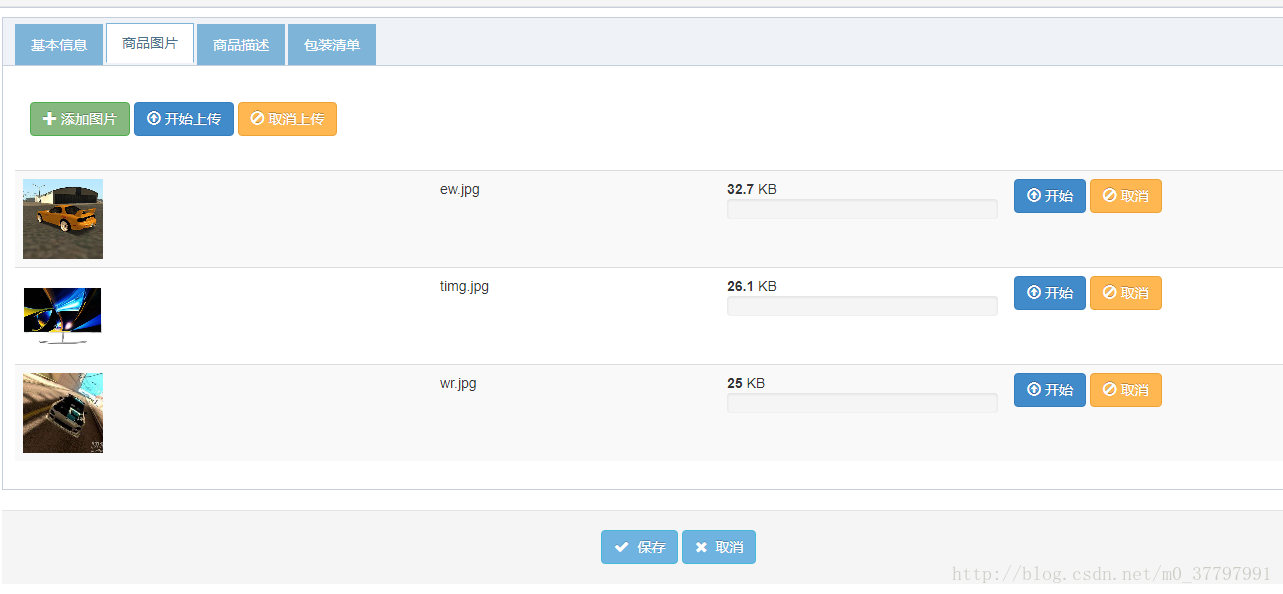
dropzone.js是一个非常强大的图片上传插件,而如今bootstrap的扁平化风格又如些的流行,当然也dropzone.js也有bootstrap风格的主题。本文主要讲如何在spring boot中使用dropzone.js实现图片上传功能。先看看效果:
配置Spring Boot对上传图片支持
在spring boot的启动类中添加bean
//显示声明CommonsMultipartResolver为mutipartResolver
    @Bean(name = "multipartResolver")
    public MultipartResolver multipartResolver() {
        CommonsMultipartResolver resolver = new CommonsMultipartResolver();
        resolver.setDefaultEncoding("UTF-8");
        resolver.setResolveLazily(true);//resolveLazily属性启用是为了推迟文件解析,以在在UploadAction中捕获文件大小异常
        resolver.setMaxInMemorySize(40960);
        resolver.setMaxUploadSize(50 * 1024 * 1024);//上传文件大小 50M 50*1024*1024
        return resolver;
    }
上面的bean是配置multipartResolver,如果使用Spring MVC请添加:
<!-- 图片上传 -->
    <bean id="multipartResolver" class="org.springframework.web.multipart.commons.CommonsMultipartResolver"/>
页面代码css
/*图片上传样式*/
#actions {
  margin: 2em 0;
}
/* Mimic table appearance */
div.table {
  display: table;
}
div.table .file-row {
  display: table-row;
}
div.table .file-row > div {
  display: table-cell;
  vertical-align: top;
  border-top: 1px solid #ddd;
  padding: 8px;
}
div.table .file-row:nth-child(odd) {
  background: #f9f9f9;
}
/* The total progress gets shown by event listeners */
#total-progress {
  opacity: 0;
  transition: opacity 0.3s linear;
}
/* Hide the progress bar when finished */
#previews .file-row.dz-success .progress {
  opacity: 0;
  transition: opacity 0.3s linear;
}
/* Hide the delete button initially */
#previews .file-row .delete {
  display: none;
}
/* Hide the start and cancel buttons and show the delete button */
#previews .file-row.dz-success .start,
#previews .file-row.dz-success .cancel {
  display: none;
}
#previews .file-row.dz-success .delete {
  display: block;
}
页面html
                            <!-- 上传图片上面控制按钮 开始 -->
                            <div id="actions" class="row">

                              <div class="col-lg-7">
                                <!-- The fileinput-button span is used to style the file input field as button -->
                                <span class="btn btn-success fileinput-button">
                                    <i class="glyphicon glyphicon-plus"></i>
                                    <span>添加图片</span>
                                </span>
                                <button type="submit" class="btn btn-primary start">
                                    <i class="glyphicon glyphicon-upload"></i>
                                    <span>开始上传</span>
                                </button>
                                <button type="reset" class="btn btn-warning cancel">
                                    <i class="glyphicon glyphicon-ban-circle"></i>
                                    <span>取消上传</span>
                                </button>
                              </div>

                              <div class="col-lg-5">
                                <!-- The global file processing state -->
                                <span class="fileupload-process">
                                  <div id="total-progress" class="progress progress-striped active" role="progressbar" aria-valuemin="0" aria-valuemax="100" aria-valuenow="0">
                                    <div class="progress-bar progress-bar-success" style="width:0%;" data-dz-uploadprogress></div>
                                  </div>
                                </span>
                              </div>

                            </div>
                            <!-- 上传图片上面控制按钮 结束 -->

                            <!-- 上传图片表格 开始  -->
                            <div class="table table-striped files" id="previews">

                              <div id="template" class="file-row">
                                <!-- This is used as the file preview template -->
                                <div>
                                    <span class="preview"><img data-dz-thumbnail /></span>
                                </div>
                                <div>
                                    <p class="name" data-dz-name></p>
                                    <strong class="error text-danger" data-dz-errormessage></strong>
                                </div>
                                <div>
                                    <p class="size" data-dz-size></p>
                                    <div class="progress progress-striped active" role="progressbar" aria-valuemin="0" aria-valuemax="100" aria-valuenow="0">
                                      <div class="progress-bar progress-bar-success" style="width:0%;" data-dz-uploadprogress></div>
                                    </div>
                                </div>
                                <div>
                                  <button class="btn btn-primary start">
                                      <i class="glyphicon glyphicon-upload"></i>
                                      <span>开始</span>
                                  </button>
                                  <button data-dz-remove class="btn btn-warning cancel">
                                      <i class="glyphicon glyphicon-ban-circle"></i>
                                      <span>取消</span>
                                  </button>
                                  <button data-dz-remove class="btn btn-danger delete">
                                    <i class="glyphicon glyphicon-trash"></i>
                                    <span>删除</span>
                                  </button>
                                </div>
                              </div>

                            </div>
                            <!-- 上传图片表格 结束  -->
页面核心js
/******************商品图片上传START********************/
        // Get the template HTML and remove it from the doument
        var previewNode = document.querySelector("#template");
        previewNode.id = "";
        var previewTemplate = previewNode.parentNode.innerHTML;
        previewNode.parentNode.removeChild(previewNode);
        //index of urls
        var index = 0;
        var myDropzone = new Dropzone(document.body, { // Make the whole body a dropzone
          url: "${request.contextPath}/upload/uploadDropZonePics.do", // Set the url
          thumbnailWidth: 80,
          thumbnailHeight: 80,
          uploadMultiple: true,
          parallelUploads: 20,
          maxFiles: 5,
          //dictMaxFilesExceeded: "最多只能上传5张图片!",
          previewTemplate: previewTemplate,
          autoQueue: false, // Make sure the files aren't queued until manually added
          previewsContainer: "#previews", // Define the container to display the previews
          clickable: ".fileinput-button", // Define the element that should be used as click trigger to select files.
          init: function() {
            this.on("success", function(file, response) {
              // Handle the responseText here. For example, add the text to the preview element:
              var input = document.createElement("input");
              input.type = "hidden" ;
              input.name = "images" ;
              input.value = response.urls[index];
              file.previewTemplate.appendChild(input);
              index ++;
            });
          }
        });

        myDropzone.on("addedfile", function(file) {
            // Hookup the start button
            file.previewElement.querySelector(".start").onclick = function() { myDropzone.enqueueFile(file); };
        });

        // Update the total progress bar
        myDropzone.on("totaluploadprogress", function(progress) {
            document.querySelector("#total-progress .progress-bar").style.width = progress + "%";
        });

        myDropzone.on("sending", function(file) {
            // Show the total progress bar when upload starts
            document.querySelector("#total-progress").style.opacity = "1";
            // And disable the start button
            file.previewElement.querySelector(".start").setAttribute("disabled", "disabled");
        });

        // Hide the total progress bar when nothing's uploading anymore
        myDropzone.on("queuecomplete", function(progress) {
            document.querySelector("#total-progress").style.opacity = "0";
        });
        myDropzone.on("successmultiple", function(files, response) {
            //Initializing index when success
            index = 0;
        });
        myDropzone.on("maxfilesexceeded", function(file) {
            this.removeFile(file);
            reminder("最多只能上传<font color='red'>5</font>张图片!")
        });
        // Setup the buttons for all transfers
        // The "add files" button doesn't need to be setup because the config
        // `clickable` has already been specified.
        document.querySelector("#actions .start").onclick = function() {
            myDropzone.enqueueFiles(myDropzone.getFilesWithStatus(Dropzone.ADDED));
        };
        document.querySelector("#actions .cancel").onclick = function() {
            myDropzone.removeAllFiles(true);
        };
/******************商品图片上传END********************/url参数对应的是fastDFS图片上传的地址,必填。
thumbnailWidth代表的是缩略图的宽度像素。
thumbnailHeight代表的是缩略图的高度像素。
uploadMultiple是否允许一次上传多张。
parallelUploads并行上传,一次最多允许数。
maxFiles最多上传文件数。
previewTemplate预览模板。
在上面js中,我新建了一个hidden的input,用来保存所有返回的图片url:
var input = document.createElement("input");
              input.type = "hidden" ;
              input.name = "images" ;
              input.value = response.urls[index];
              file.previewTemplate.appendChild(input);
后台实现
/**
     * dropzone.js批量上传图片
     *
     * @param pic
     */
    @RequestMapping(value = ("/upload/uploadDropZonePics.do"))
    @ResponseBody
    public UploadResponse uploadDropZonePic(MultipartHttpServletRequest request) {
        log.info("uploadPic uploadDropZonePic start.");
        UploadResponse resp = new UploadResponse();
        try {
            Iterator<String> itr = request.getFileNames();
            List<String> urls = new ArrayList<>();
            while (itr.hasNext()) {
                String uploadedFile = itr.next();
                MultipartFile file = request.getFile(uploadedFile);
                String filename = file.getOriginalFilename();
                byte[] bytes = file.getBytes();

                //上传图片
                UploadFileVo vo = new UploadFileVo();
                vo.setPic(bytes);
                vo.setName(filename);
                vo.setSize(file.getSize());
                String path = uploadService.uploadPic(vo);
                //图片url
                String url = Constants.IMG_URL + path;
                urls.add(url);
            }
            resp.setIsSuccess(true);
            resp.setUrls(urls);
        } catch (IOException e) {
            log.error("uploadDropZonePic io error:{}", e.getMessage(), e);
            resp.setErrorMsg("上传图片失败:" + e.getMessage());
            resp.setError(1);
            log.error("uploadFck error:{}", e.getMessage(), e);
        } catch (BizException e) {
            log.error("uploadDropZonePic biz error:{}", e.getMessage(), e);
            resp.setErrorMsg("上传图片失败:" + e.getMessage());
            resp.setError(1);
            log.error("uploadFck error:{}", e.getMessage(), e);
        } catch (Exception e) {
            log.error("uploadDropZonePic error:{}", e.getMessage(), e);
            resp.setErrorMsg("上传图片失败:" + e.getMessage());
            resp.setError(1);
            log.error("uploadFck error:{}", e.getMessage(), e);
        }
        log.info("uploadDropZonePic end.");
        return resp;
    }


 1695
1695

 被折叠的 条评论
为什么被折叠?
被折叠的 条评论
为什么被折叠?
 到【灌水乐园】发言


