


Eclipse插件开发一:hello word
Eclipse插件开发二:初识hello word的配置信息
Eclipse插件开发三:快捷搜索
Eclipse插件开发四:开发AI助手对话窗口
传统API和流式响应API
DeepSeek本地化部署(windows)
深入理解Java对接DeepSeek
有了上面的基础以后,现在我们可以把我们之前开发的AI助手聊天工具,集成DeepSeek。
说一下大体的思路:
- 制作一个我们自己的jar包,这个jar包含了我们自己所需要的一些列工具类(例如RestTemplate、webflux),当然你也可以使用eclispe提供的基础开发jar包,来实现,而不用自己的jar包。
- 将我们自己制作的jar包,引入到我们的插件工程中
- 在插件工程中使用我们的jar,例如RestTemplate/webflux 发起请求到DeepSeek的接口。
1.制作依赖
创建一个项目,该项目只包含lombok、starter-web,webflux依赖(或者你需要的依赖)的项目,这样做的好处,让maven帮我们处理了各个依赖之间的关系。
例如,你习惯了使用RestTempalte,想在非Sprign,非Maven项目中,完整使用RestTempalte,要是自己单独引包的话,需要日志、json、spring-web,spring-core等依赖,相对就和那麻烦了。
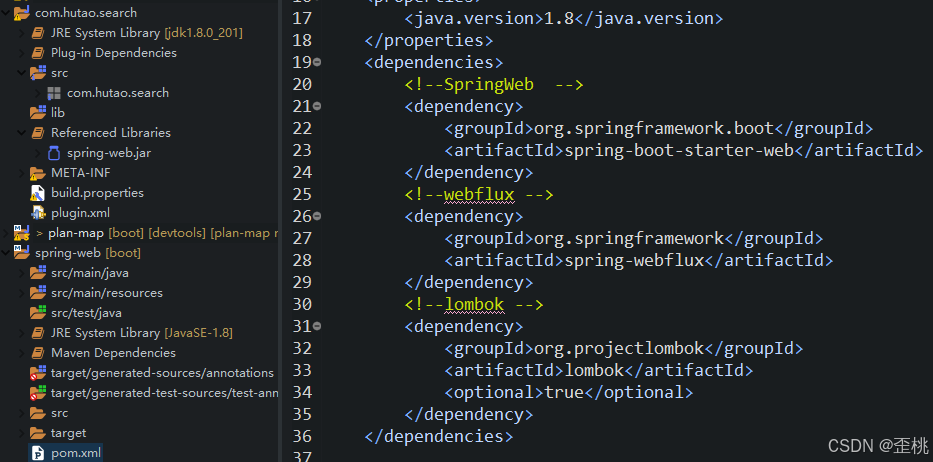
下述是我的完整maven配置文件(注意该文件和我们平时的部署打包的build的配置不一样)
打包部署的jar包和依赖的jar包不一样
Spring Boot 项目 JAR 包:
- 包含项目的编译类文件(BOOT-INF/classes)。
- 包含所有依赖的 JAR 包(BOOT-INF/lib)。 包含 Spring Boot 的启动类加载器(org.springframework.boot.loader),用于启动应用程序。
- 包含META-INF/MANIFEST.MF 文件,指定了主类(Main-Class)和启动类加载器(Start-Class)。
依赖的 JAR 包
- 只包含库的编译类文件和资源文件。
- 不包含其他依赖或启动类加载器。
<?xml version="1.0" encoding="UTF-8"?>
<project xmlns="http://maven.apache.org/POM/4.0.0" xmlns:xsi="http://www.w3.org/2001/XMLSchema-instance"
	xsi:schemaLocation="http://maven.apache.org/POM/4.0.0 https://maven.apache.org/xsd/maven-4.0.0.xsd">
	<modelVersion>4.0.0</modelVersion>
	<parent>
		<groupId>org.springframework.boot</groupId>
		<artifactId>spring-boot-starter-parent</artifactId>
		<version>2.3.10.RELEASE</version>
		<relativePath/> <!-- lookup parent from repository -->
	</parent>
	<groupId>spring-web</groupId>
	<artifactId>spring-web</artifactId>
	<version>0.0.1-SNAPSHOT</version>
	<name>SpringWeb</name>
	<description>SpringWeb所有依赖</description>
	<properties>
		<java.version>1.8</java.version>
	</properties>
		<!--SpringWeb  -->
		<dependency>
			<groupId>org.springframework.boot</groupId>
			<artifactId>spring-boot-starter-web</artifactId>
		</dependency>
		<!--webflux -->
		<dependency>
        	<groupId>org.springframework</groupId>
        	<artifactId>spring-webflux</artifactId>
    	</dependency>
    	<!--lombok -->
		<dependency>
			<groupId>org.projectlombok</groupId>
			<artifactId>lombok</artifactId>
			<optional>true</optional>
		</dependency>
	</dependencies>

	 <build>
        <plugins>
            <!-- 使用 Maven Assembly 插件打包依赖 -->
            <plugin>
                <artifactId>maven-assembly-plugin</artifactId>
                <configuration>
                    <descriptorRefs>
                        <descriptorRef>jar-with-dependencies</descriptorRef>
                    </descriptorRefs>
                </configuration>
                <executions>
                    <execution>
                        <id>make-assembly</id>
                        <phase>package</phase>
                        <goals>
                            <goal>single</goal>
                        </goals>
                    </execution>
                </executions>
            </plugin>
        </plugins>
    </build>

</project>
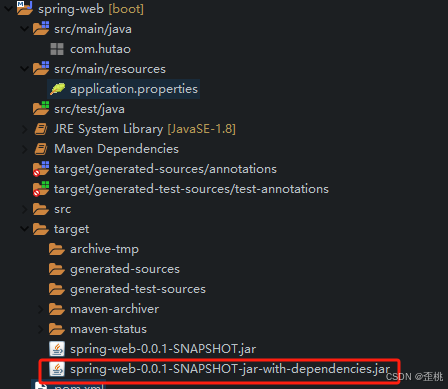
此时我们打包该项目,即可生成如下所示的文件,将文件后缀名删掉(名字太长)以后,我们就可以在其他的项目中引入这个jar包
2.添加依赖
2.1.添加OSGI自带的依赖
其实不仅eclipse,还有其他很多集成平台自带的插件都可以用这种方式,只要是集成环境开发的OSGI架构开发的插件都可以。
以eclipse为例:以此点击:MANIFEST.MF-》Dependencies-》-》add,即可添加OSGI集成环境提供的基础依赖。
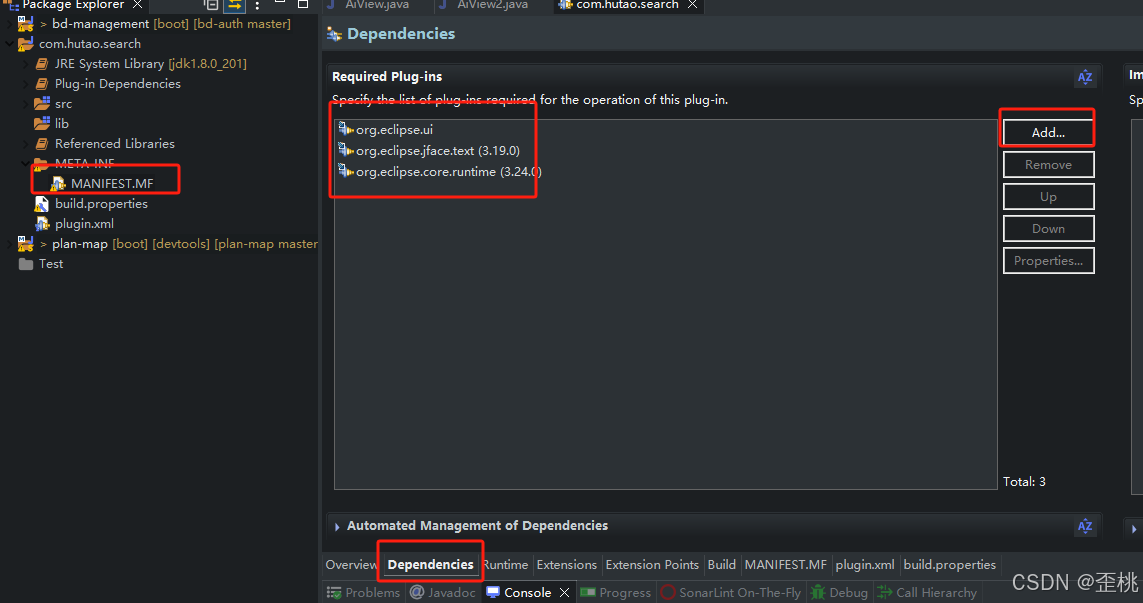
例如http请求的依赖

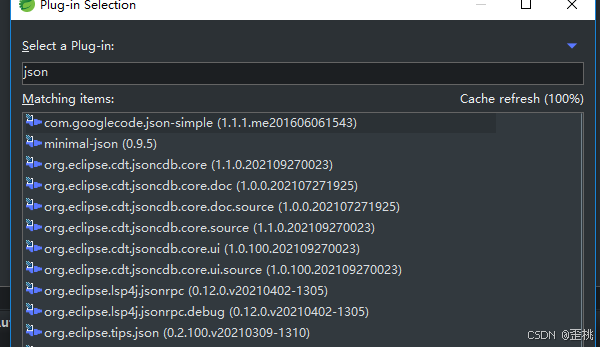
例如json的依赖
2.2.添加自己提供的依赖
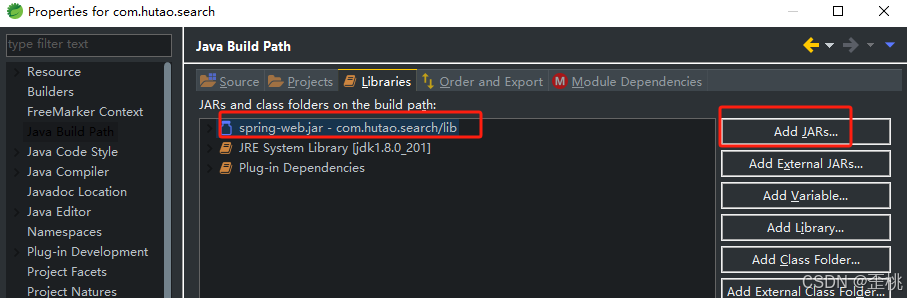
首先在项目的环境配置中,添加你需要的依赖,例如这里,我添加了一个jar包,叫做spring-web.jar
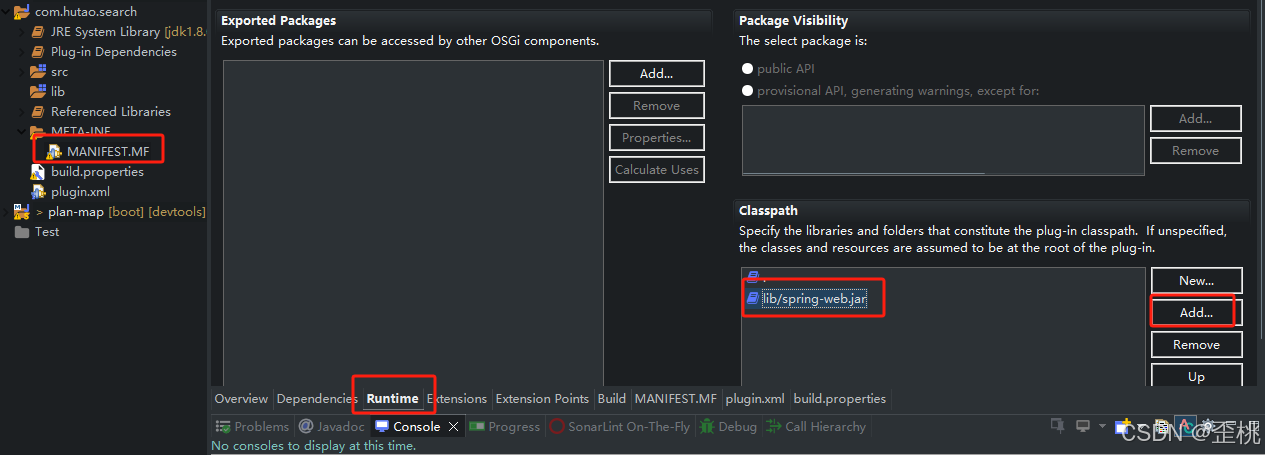
其次,以此点击MANIFEST.MF-》Runtime-》-add,即指定构成插件类路径的库
3.检查依赖是否有问题
很简单,在这个插件项目中,看看能否能正常引入,你可以创建一个Test文件,直接运行main方法,然后比如使用RestTemplate看看能不能正常请求接口。
4.代码改造
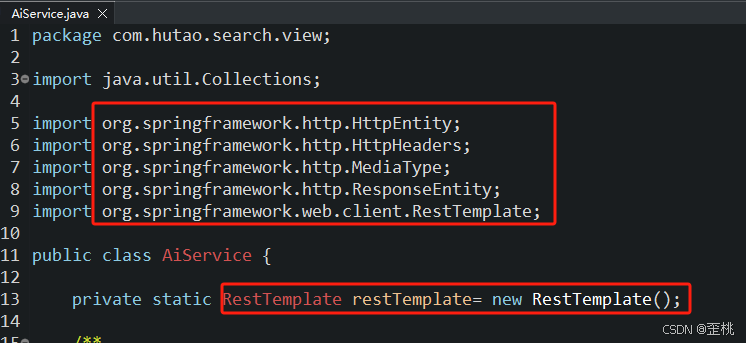
4.1.AiService
AiService包装请求deepSeek,
package com.hutao.search.view;

import java.util.Collections;

import org.springframework.http.HttpEntity;
import org.springframework.http.HttpHeaders;
import org.springframework.http.MediaType;
import org.springframework.http.ResponseEntity;
import org.springframework.web.client.RestTemplate;

import com.fasterxml.jackson.databind.JsonNode;
import com.fasterxml.jackson.databind.ObjectMapper;

public class AiService {

	private static RestTemplate restTemplate= new RestTemplate();

	/**
	 * 官方API
	 */
	/*
	private String url = "https://api.deepseek.com/chat/completions";
	private String model = "deepseek-reasoner";
	private String key = "sk-5bf1074b825a43xxxxxxxxxx0e50eab";
	*/
	/**
	 * 本地化部署API
	 */
	private String url = "http://127.0.0.1:11434/v1/chat/completions";
	private String model = "deepseek-r1:1.5b";


	/**
	 * @description:获取同步阻塞接口的回答:stream: false
	 * @author:hutao
	 * @mail:hutao1@epri.sgcc.com.cn
	 * @date:2025年2月12日 下午4:05:20
	 */
	public String getAiAnswerByBlock(String ask) {

		HttpHeaders headers = new HttpHeaders();
		headers.setContentType(MediaType.APPLICATION_JSON);

		//换成你自己的Key
		//headers.set("Authorization", "Bearer " + key);
		//构建请求参数ChatReq
		Message message = new Message("system", ask);
		ChatReq requestBody = new ChatReq(model, Collections.singletonList(message), false);
		HttpEntity<ChatReq> entity = new HttpEntity<>(requestBody, headers);

		ResponseEntity<String> response = restTemplate.postForEntity(url, entity, String.class);

		if (response.getStatusCode().is2xxSuccessful()) {
			System.out.println("Response: " + response.getBody());
		} else {
			System.out.println("Error: " + response.getStatusCode());
		}

		ObjectMapper objectMapper = new ObjectMapper();
		JsonNode jsonNode;
		try {
			jsonNode = objectMapper.readTree(response.getBody());
			return jsonNode.get("choices").get(0).get("message").get("content").asText();
		} catch (Exception e) {
			e.printStackTrace();
			return "系统繁忙!";
		}
	}
}
4.2.修改系统生成回复为AI回复
只需要将我们之前编写代码,替换下面这一行即可。
// 根据用户输入生成系统回复
//String systemReply = userMessage.equalsIgnoreCase("ABC") ? "yes" : "no";
String systemReply = aiService.getAiAnswerByBlock(userMessage);
4.3.完整代码
实体类
@Data
@AllArgsConstructor
@NoArgsConstructor
public class ChatReq {
	private String model;
	private List<Message> messages;
	private boolean stream;
}
@Data
@AllArgsConstructor
@NoArgsConstructor
public class Message {
	private String role;
	private String content;
}
AiView
package com.hutao.search.view;
import org.eclipse.swt.SWT;
import org.eclipse.swt.custom.ScrolledComposite;
import org.eclipse.swt.events.KeyAdapter;
import org.eclipse.swt.events.KeyEvent;
import org.eclipse.swt.layout.GridData;
import org.eclipse.swt.layout.GridLayout;
import org.eclipse.swt.widgets.Button;
import org.eclipse.swt.widgets.Composite;
import org.eclipse.swt.widgets.Label;
import org.eclipse.swt.widgets.Text;
import org.eclipse.ui.part.ViewPart;

import com.fasterxml.jackson.databind.JsonNode;
import com.fasterxml.jackson.databind.ObjectMapper;
public class AiView extends ViewPart {

	// 和 plugin.xml 中的 id 一致
	public static final String ID = "com.hutao.search.ai.plugin.aiview";

	// 聊天内容容器
	private Composite messageContainer;

	// 用户输入框
	private Text userInput;


	private AiService aiService = new AiService();

	@Override
	public void createPartControl(Composite parent) {
		// 设置父容器的布局
		parent.setLayout(new GridLayout(1, false));

		// 滚动容器,用于容纳聊天内容
		ScrolledComposite scrolledComposite = new ScrolledComposite(parent, SWT.V_SCROLL | SWT.H_SCROLL | SWT.BORDER);
		scrolledComposite.setLayoutData(new GridData(SWT.FILL, SWT.FILL, true, true));
		scrolledComposite.setExpandHorizontal(true);
		scrolledComposite.setExpandVertical(true);

		// 聊天内容容器
		messageContainer = new Composite(scrolledComposite, SWT.NONE);
		messageContainer.setLayout(new GridLayout(1, false));
		scrolledComposite.setContent(messageContainer);
		scrolledComposite.setMinSize(messageContainer.computeSize(SWT.DEFAULT, SWT.DEFAULT));

		// 用户输入区域
		Composite inputArea = new Composite(parent, SWT.NONE);
		inputArea.setLayout(new GridLayout(2, false));
		inputArea.setLayoutData(new GridData(SWT.FILL, SWT.CENTER, true, false));

		// 输入框 - 设置为多行
		userInput = new Text(inputArea, SWT.BORDER | SWT.MULTI | SWT.WRAP | SWT.V_SCROLL);
		GridData inputData = new GridData(SWT.FILL, SWT.FILL, true, true);
		// 设置输入框的高度
		inputData.heightHint = 60;
		userInput.setLayoutData(inputData);
		// 提示信息
		userInput.setMessage("输入消息...");

		// 发送按钮
		Button sendButton = new Button(inputArea, SWT.PUSH);
		sendButton.setText("Send");
		sendButton.setLayoutData(new GridData(SWT.CENTER, SWT.CENTER, false, false));

		// 按钮点击事件
		sendButton.addListener(SWT.Selection, e -> handleUserInput(scrolledComposite));

		// 添加键盘监听器
		userInput.addKeyListener(new KeyAdapter() {
			@Override
			public void keyPressed(KeyEvent e) {
				if (e.keyCode == SWT.CR) { // 检测回车键
					if ((e.stateMask & SWT.CTRL) != 0) {
						// Ctrl + 回车,插入换行
						userInput.append("\n");
					} else {
						// 只按回车,发送消息
						handleUserInput(scrolledComposite);
						e.doit = false; // 防止默认行为(换行)
					}
				}
			}
		});
	}

	/**
	 * 处理用户输入并生成系统回复
	 */
	private void handleUserInput(ScrolledComposite scrolledComposite) {
		String userMessage = userInput.getText().trim(); // 获取用户输入内容
		if (userMessage.isEmpty()) {
			return; // 如果输入为空,直接返回
		}

		// 显示用户消息(靠右)
		appendMessage(userMessage + " :我", SWT.RIGHT);

		// 根据用户输入生成系统回复
		//String systemReply = userMessage.equalsIgnoreCase("ABC") ? "yes" : "no";
		String systemReply = aiService.getAiAnswerByBlock(userMessage);

		// 显示系统回复(靠左)
		appendMessage("AI助手: " + systemReply, SWT.LEFT);

		// 清空输入框
		userInput.setText("");

		// 自动滚动到最新消息
		scrolledComposite.setMinSize(messageContainer.computeSize(SWT.DEFAULT, SWT.DEFAULT));
		scrolledComposite.layout();
		scrolledComposite.setOrigin(0, messageContainer.getSize().y);
	}

	/**
	 * 在聊天窗口中追加消息
	 * @param message 要追加的消息
	 * @param alignment 消息的对齐方式(SWT.LEFT 或 SWT.RIGHT)
	 */
	private void appendMessage(String message, int alignment) {
	    // 单条消息容器
	    Composite messageWrapper = new Composite(messageContainer, SWT.NONE);
	    messageWrapper.setLayout(new GridLayout(1, false));
	    GridData wrapperData = new GridData(SWT.FILL, SWT.CENTER, true, false);
	    wrapperData.horizontalAlignment = alignment == SWT.RIGHT ? SWT.END : SWT.BEGINNING;
	    messageWrapper.setLayoutData(wrapperData);

	    // 消息标签
	    Label messageLabel = new Label(messageWrapper, SWT.WRAP);
	    messageLabel.setText(message);
	    messageLabel.setBackground(messageContainer.getDisplay().getSystemColor(SWT.COLOR_WHITE));

	    // 设置标签的布局数据,使其能够根据宽度自动换行
	    GridData labelData = new GridData(SWT.FILL, SWT.CENTER, true, false);
	    labelData.widthHint = 400; // 可以根据需要调整宽度
	    messageLabel.setLayoutData(labelData);

	    // 调整布局
	    messageContainer.layout();
	}

	@Override
	public void setFocus() {
		userInput.setFocus(); // 将焦点设置到用户输入框
	}
}
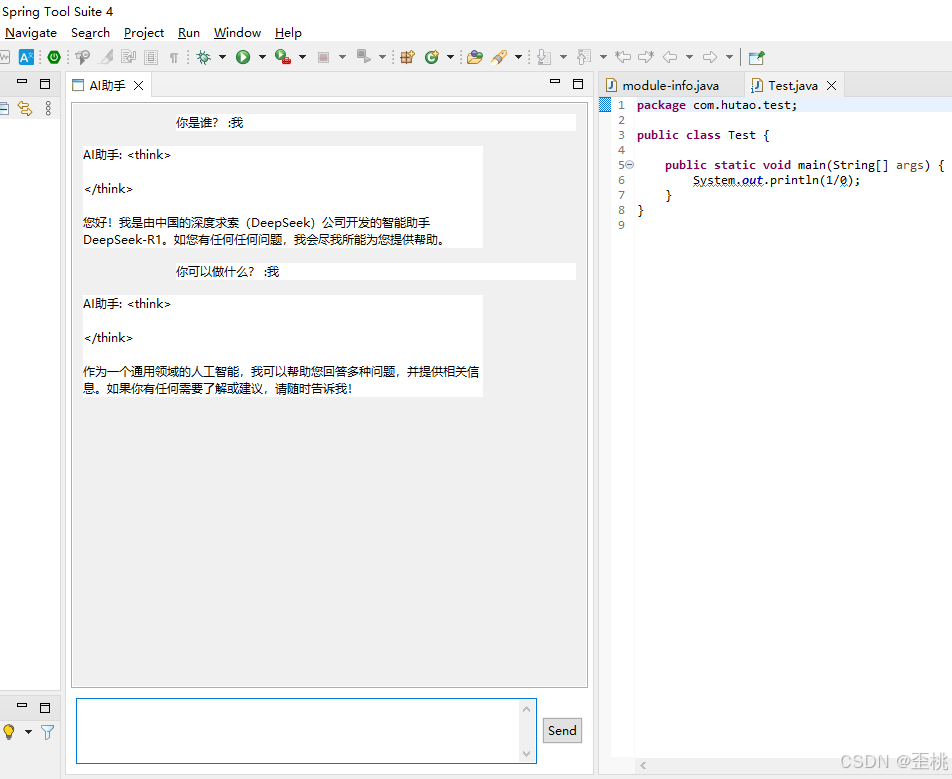
5.效果展示
UI界面很丑,毕竟这块的UI开发我也不熟,具体美观的事,等专研的时候再说了,例子里面我用resttemplate来请求阻塞的,有需要的同学,可以看这篇博客,深入理解Java对接DeepSeek中的WebClient 来替换resttemplate请求。时间有限,我就演示了,后续我用html来写插件的页面的时候,我在详细的介绍,这里就当做一个过渡版本吧。


 被折叠的 条评论
为什么被折叠?
被折叠的 条评论
为什么被折叠?
 到【灌水乐园】发言


