


技能展示:
- 了解LVS-DR群集的工作原理
- 会构建LVS-DR负载均衡群集
2.1 LVS-DR 集群
LVS-DR(
Linux Virtual Server
Director Server
)工作模式,是生产环境中最常用的一种工作模式。
2.1.1.LVS-DR 工作原理
LVS-DR 模式,
Director Server
作为群集的访问入口,不作为网关使用,节点
Director Server 与
Real Server
需要在同一个网络中,返回给客户端的数据不需要经过
Director Server。为了响应对整个群集的访问,
Director Server
与
Real Server
都需要配置
VIP
地址,工作原理如图 2.1
所示。

图
2.1 DR
模式工作原理
2.1.2.数据包流向分析
以下为数据包流向分析步骤。
- 客户端发送请求到 Director Server,请求的数据报文(源 IP 是 CIP,目标 IP 是 VIP)到达内核空间。
- Director Server 和 Real Server 在同一个网络中,数据通过二层数据链路层来传输。
- 内核空间判断数据包的目标 IP 是本机 VIP,此时 IPVS 比对数据包请求的服务是否是集群服务,是集群服务就重新封装数据包。修改源 MAC 地址为 Director Server 的 MAC地址,修改目标 MAC 地址为 Real Server 的 MAC 地址,源 IP 地址与目标 IP 地址没有改变,然后将数据包发送给 Real Server。
- 到达 Real Server 的请求报文的 MAC 地址是自身的 MAC 地址,就接收此报文。数据包重新封装报文(源 IP 地址为 VIP,目标 IP 为 CIP),将响应报文通过 lo 接口传送给物理网卡然后向外发出。
- Real Server 直接将响应报文传送到客户端。
2.1.3.LVS-DR 模式特点
下面是
LVS-DR
模式的特点:
- Real Server 的网关不允许指向 Director Server IP,即不允许数据包经过 Director Server
- Director Server 和 Real Server 必须在同一个物理网络中。
- Real Server 可以使用私有地址,也可以使用公网地址。如果使用公网地址,可以通过互联网对 RIP 进行直接访问。
- 所有的请求报文经由 Director Server,但回复响应报文不能经过 Director Server。
- Real Server 上的 lo 接口配置 VIP 的 IP 地址。
2.2 案例:直接路由模式(LVS-DR)
2.2.1.准备案例环境
在 DR
模式的群集中,
LVS
负载调度器作为群集的访问入口,但不作为网关使用;服务器池中的所有节点都各自接入 Internet
,发送给客户机的
Web
响应数据包不需要经过LVS 负载调度器,如图
2.2
所示。
这种方式入站、出站访问数据被分别处理,因此 LVS
负载调度器和所有的节点服务器都需要配置 VIP
地址,以便响应对整个群集的访问。考虑到数据存储的安全性,共享存储设备会放在内部的专用网络中。
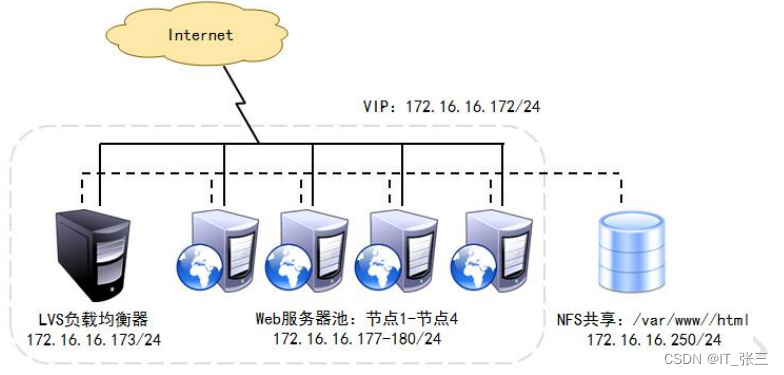
图
2.2
基于
DR
模式的
LVS
负载均衡群集
2.2.2.配置负载调度器
下面是
配置负载调度器的具体步骤。
1. 配置虚拟 IP 地址(VIP)
采用虚接口的方式(ens33
∶
0
),为网卡
ens33
绑定
VIP
地址,以便响应群集访问。配置结果为 ens33 192.168.8.10/24
、
ens33
∶
0 192.168.8.100/24
。
[root@node0 ~]# cd /etc/sysconfig/network-scripts/
[root@node0 network-scripts]# cp ifcfg-ens33 ifcfg-ens33:0
[root@node0 network-scripts]# vim ifcfg-ens33:0
NAME=ens33:0
DEVICE=ens33:0
ONBOOT=yes
IPADDR=192.168.8.100
NETMASK=255.255.255.255

[root@node0 network-scripts]# ifup ifcfg-ens33:0
[root@node0 network-scripts]# ifconfig
ens33: flags=4163<UP,BROADCAST,RUNNING,MULTICAST>  mtu 1500
        inet 192.168.8.10  netmask 255.255.255.0  broadcast 192.168.8.255
        inet6 fe80::aa3a:d990:b5ee:10  prefixlen 64  scopeid 0x20<link>
        ether 00:0c:29:5b:2b:c3  txqueuelen 1000  (Ethernet)
        RX packets 816  bytes 88977 (86.8 KiB)
        RX errors 0  dropped 0  overruns 0  frame 0
        TX packets 641  bytes 72042 (70.3 KiB)
        TX errors 0  dropped 0 overruns 0  carrier 0  collisions 0

ens33:0: flags=4163<UP,BROADCAST,RUNNING,MULTICAST>  mtu 1500
        inet 192.168.8.100  netmask 255.255.255.255  broadcast 192.168.8.100
        ether 00:0c:29:5b:2b:c3  txqueuelen 1000  (Ethernet)

lo: flags=73<UP,LOOPBACK,RUNNING>  mtu 65536
        inet 127.0.0.1  netmask 255.0.0.0
        inet6 ::1  prefixlen 128  scopeid 0x10<host>
        loop  txqueuelen 1000  (Local Loopback)
        RX packets 32  bytes 2592 (2.5 KiB)
        RX errors 0  dropped 0  overruns 0  frame 0
        TX packets 32  bytes 2592 (2.5 KiB)
        TX errors 0  dropped 0 overruns 0  carrier 0  collisions 0

virbr0: flags=4099<UP,BROADCAST,MULTICAST>  mtu 1500
        inet 192.168.122.1  netmask 255.255.255.0  broadcast 192.168.122.255
        ether 52:54:00:de:25:dd  txqueuelen 1000  (Ethernet)
        RX packets 0  bytes 0 (0.0 B)
        RX errors 0  dropped 0  overruns 0  frame 0
        TX packets 0  bytes 0 (0.0 B)
        TX errors 0  dropped 0 overruns 0  carrier 0  collisions 0

[root@node0 network-scripts]#
2. 调整/proc响应参数
- 对于 DR 群集模式来说,由于 LVS 负载调度器和各节点需要共用 VIP 地址,应该关闭 Linux 内核重定向参数响应
- 服务器不是一台路由器,那么它不会发送重定向,所以可以关闭该功能
[root@node0 network-scripts]# vim /etc/sysctl.conf
net.ipv4.conf.all.send_redirects = 0
net.ipv4.conf.default.send_redirects = 0
net.ipv4.conf.ens33.send_redirects = 0

[root@node0 network-scripts]# sysctl -p
net.ipv4.conf.all.send_redirects = 0
net.ipv4.conf.default.send_redirects = 0
net.ipv4.conf.ens33.send_redirects = 0
[root@node0 network-scripts]#
3. 配置负载分配策略
[root@node0 ~]# modprobe ip_vs
[root@node0 ~]# cat /proc/net/ip_vs
IP Virtual Server version 1.2.1 (size=4096)
Prot LocalAddress:Port Scheduler Flags
  -> RemoteAddress:Port Forward Weight ActiveConn InActConn
[root@node0 ~]#
[root@node0 ~]# yum -y install ipvsadm

[root@node0 ~]# ipvsadm -v
ipvsadm v1.27 2008/5/15 (compiled with popt and IPVS v1.2.1)
[root@node0 ~]#

[root@node0 ~]# ipvsadm -A -t 192.168.8.100:80 -s rr
[root@node0 ~]# ipvsadm -a -t 192.168.8.100:80 -r 192.168.8.11:80 -g -w 1
[root@node0 ~]# ipvsadm -a -t 192.168.8.100:80 -r 192.168.8.12:80 -g -w 1
[root@node0 ~]# ipvsadm-save > /etc/sysconfig/ipvsadm
[root@node0 ~]# cat /etc/sysconfig/ipvsadm
-A -t node0:http -s rr
-a -t node0:http -r 192.168.8.11:http -g -w 1
-a -t node0:http -r 192.168.8.12:http -g -w 1
[root@node0 ~]# systemctl start ipvsadm
[root@node0 ~]# systemctl enable ipvsadm
4. 配置存储服务器192.168.8.13
[root@node3 ~]# yum -y install nfs-utils rpcbind
[root@node3 ~]# mkdir -p /opt/wwwroot
[root@node3 ~]# vim /etc/exports
/opt/wwwroot    192.168.8.0/24(rw,sync,no_root_squash)
[root@node3 ~]# systemctl restart rpcbind
[root@node3 ~]# systemctl restart nfs
[root@node3 ~]# systemctl enable rpcbind
[root@node3 ~]# systemctl enable nfs
Created symlink from /etc/systemd/system/multi-user.target.wants/nfs-server.service to /usr/lib/systemd/system/nfs-server.service.
[root@node3 ~]# netstat -anpt | grep rpcbind
tcp        0      0 0.0.0.0:111             0.0.0.0:*               LISTEN      8004/rpcbind
tcp6       0      0 :::111                  :::*                    LISTEN      8004/rpcbind
[root@node3 ~]#
5. 配置节点服务器192.168.8.11
[root@node1 ~]# yum -y install httpd
###配置虚拟IP地址
[root@node1 ~]# cd /etc/sysconfig/network-scripts/
[root@node1 network-scripts]# cp ifcfg-lo ifcfg-lo:0
[root@node1 network-scripts]# vim ifcfg-lo:0
DEVICE=lo
DEVICE=lo:0
IPADDR=192.168.8.100
NETMASK=255.255.255.255
ONBOOT=yes

[root@node1 network-scripts]# ifup lo:0
[root@node1 network-scripts]# ifconfig
ens33: flags=4163<UP,BROADCAST,RUNNING,MULTICAST>  mtu 1500
        inet 192.168.8.11  netmask 255.255.255.0  broadcast 192.168.8.255
        inet6 fe80::7457:78b3:7f51:9a01  prefixlen 64  scopeid 0x20<link>
        ether 00:0c:29:6c:32:f2  txqueuelen 1000  (Ethernet)
        RX packets 21487  bytes 29790262 (28.4 MiB)
        RX errors 0  dropped 0  overruns 0  frame 0
        TX packets 2877  bytes 246265 (240.4 KiB)
        TX errors 0  dropped 0 overruns 0  carrier 0  collisions 0

lo: flags=73<UP,LOOPBACK,RUNNING>  mtu 65536
        inet 127.0.0.1  netmask 255.0.0.0
        inet6 ::1  prefixlen 128  scopeid 0x10<host>
        loop  txqueuelen 1000  (Local Loopback)
        RX packets 32  bytes 2592 (2.5 KiB)
        RX errors 0  dropped 0  overruns 0  frame 0
        TX packets 32  bytes 2592 (2.5 KiB)
        TX errors 0  dropped 0 overruns 0  carrier 0  collisions 0

lo:0: flags=73<UP,LOOPBACK,RUNNING>  mtu 65536
        inet 192.168.8.100  netmask 255.255.255.255
        loop  txqueuelen 1000  (Local Loopback)

virbr0: flags=4099<UP,BROADCAST,MULTICAST>  mtu 1500
        inet 192.168.122.1  netmask 255.255.255.0  broadcast 192.168.122.255
        ether 52:54:00:0b:33:85  txqueuelen 1000  (Ethernet)
        RX packets 0  bytes 0 (0.0 B)
        RX errors 0  dropped 0  overruns 0  frame 0
        TX packets 0  bytes 0 (0.0 B)
        TX errors 0  dropped 0 overruns 0  carrier 0  collisions 0

[root@node1 network-scripts]#

###调整/proc响应参数
[root@node1 network-scripts]# vim /etc/sysctl.conf
net.ipv4.conf.all.arp_ignore = 1
net.ipv4.conf.all.arp_announce = 2
net.ipv4.conf.default.arp_ignore = 1
net.ipv4.conf.default.arp_announce = 2
net.ipv4.conf.lo.arp_ignore = 1
net.ipv4.conf.lo.arp_announce = 2

[root@node1 network-scripts]# sysctl -p
net.ipv4.conf.all.arp_ignore = 1
net.ipv4.conf.all.arp_announce = 2
net.ipv4.conf.default.arp_ignore = 1
net.ipv4.conf.default.arp_announce = 2
net.ipv4.conf.lo.arp_ignore = 1
net.ipv4.conf.lo.arp_announce = 2
[root@node1 network-scripts]#

###配置httpd 挂载测试页
[root@node1 ~]# showmount -e 192.168.8.13
Export list for 192.168.8.13:
/opt/wwwroot 192.168.8.0/24
[root@node1 ~]#
[root@node1 ~]# mount 192.168.8.13:/opt/wwwroot /var/www/html/
[root@node1 ~]# vim /etc/fstab
192.168.8.13:/opt/wwwroot      /var/www/html    nfs     defaults,_netdev   0 0

[root@node1 ~]# systemctl start httpd
[root@node1 ~]# systemctl enable httpd
Created symlink from /etc/systemd/system/multi-user.target.wants/httpd.service to /usr/lib/systemd/system/httpd.service.
[root@node1 ~]#
[root@node1 ~]# vim /var/www/html/index.html
<h1>www.bdqn.com</h1>
6. 配置节点服务器192.168.8.12
[root@node2 ~]# yum -y install httpd

###配置虚拟IP地址
[root@node2 ~]# cd /etc/sysconfig/network-scripts/
[root@node2 network-scripts]#
[root@node2 network-scripts]# cp ifcfg-lo ifcfg-lo:0
[root@node2 network-scripts]# vim ifcfg-lo:0
DEVICE=lo:0
IPADDR=192.168.8.100
NETMASK=255.255.255.255
ONBOOT=yes

[root@node2 network-scripts]# ifup lo:0
[root@node2 network-scripts]# ifconfig
ens33: flags=4163<UP,BROADCAST,RUNNING,MULTICAST>  mtu 1500
        inet 192.168.8.12  netmask 255.255.255.0  broadcast 192.168.8.255
        inet6 fe80::e986:8b82:f6f3:b650  prefixlen 64  scopeid 0x20<link>
        ether 00:0c:29:59:ba:dd  txqueuelen 1000  (Ethernet)
        RX packets 22691  bytes 31861771 (30.3 MiB)
        RX errors 0  dropped 0  overruns 0  frame 0
        TX packets 3769  bytes 307582 (300.3 KiB)
        TX errors 0  dropped 0 overruns 0  carrier 0  collisions 0

lo: flags=73<UP,LOOPBACK,RUNNING>  mtu 65536
        inet 127.0.0.1  netmask 255.0.0.0
        inet6 ::1  prefixlen 128  scopeid 0x10<host>
        loop  txqueuelen 1000  (Local Loopback)
        RX packets 32  bytes 2592 (2.5 KiB)
        RX errors 0  dropped 0  overruns 0  frame 0
        TX packets 32  bytes 2592 (2.5 KiB)
        TX errors 0  dropped 0 overruns 0  carrier 0  collisions 0

lo:0: flags=73<UP,LOOPBACK,RUNNING>  mtu 65536
        inet 192.168.8.100  netmask 255.255.255.255
        loop  txqueuelen 1000  (Local Loopback)

virbr0: flags=4099<UP,BROADCAST,MULTICAST>  mtu 1500
        inet 192.168.122.1  netmask 255.255.255.0  broadcast 192.168.122.255
        ether 52:54:00:7f:56:52  txqueuelen 1000  (Ethernet)
        RX packets 0  bytes 0 (0.0 B)
        RX errors 0  dropped 0  overruns 0  frame 0
        TX packets 0  bytes 0 (0.0 B)
        TX errors 0  dropped 0 overruns 0  carrier 0  collisions 0

[root@node2 network-scripts]#

###调整/proc响应参数
[root@node2 network-scripts]# vim /etc/sysctl.conf
net.ipv4.conf.all.arp_ignore = 1
net.ipv4.conf.all.arp_announce = 2
net.ipv4.conf.default.arp_ignore = 1
net.ipv4.conf.default.arp_announce = 2
net.ipv4.conf.lo.arp_ignore = 1
net.ipv4.conf.lo.arp_announce = 2

[root@node2 network-scripts]# sysctl -p
net.ipv4.conf.all.arp_ignore = 1
net.ipv4.conf.all.arp_announce = 2
net.ipv4.conf.default.arp_ignore = 1
net.ipv4.conf.default.arp_announce = 2
net.ipv4.conf.lo.arp_ignore = 1
net.ipv4.conf.lo.arp_announce = 2
[root@node2 network-scripts]#

###httpd 挂载测试页
[root@node2 ~]# showmount -e 192.168.8.13
Export list for 192.168.8.13:
/opt/wwwroot 192.168.8.0/24
[root@node2 ~]# mount 192.168.8.13:/opt/wwwroot /var/www/html
[root@node2 ~]# vim /etc/fstab
192.168.8.13:/opt/wwwroot           /var/www/html/     nfs   defaults,_netdev 0 0

[root@node2 ~]# systemctl start httpd
[root@node2 ~]# systemctl enable httpd


 319
319


 被折叠的 条评论
为什么被折叠?
被折叠的 条评论
为什么被折叠?
 到【灌水乐园】发言


