


这个是之前看到一个大神写的,当时觉得有点意思就也仿着写了一下,
和大家分享.. 如有说的不对或不恰当的地方,希望读者指出,共同进步

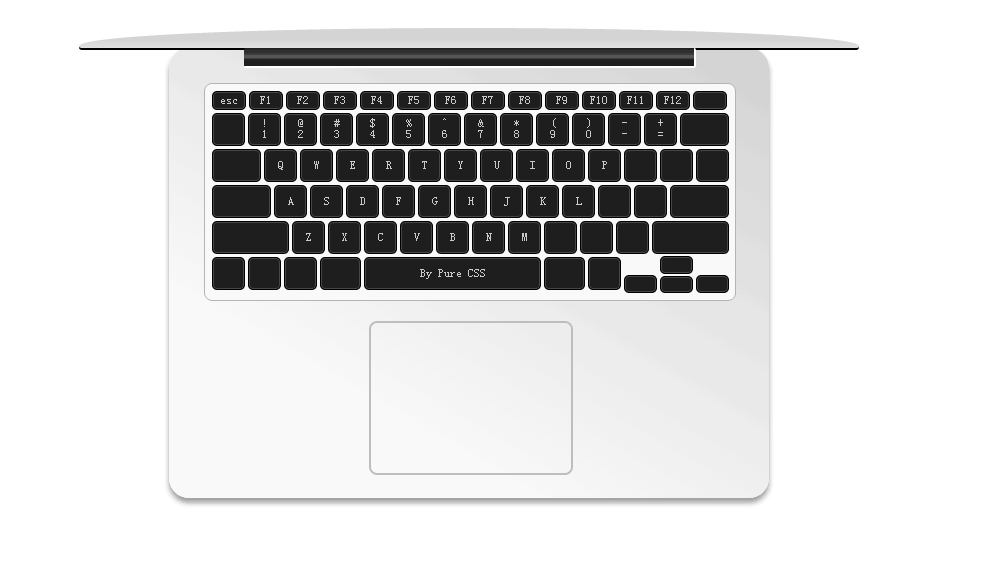
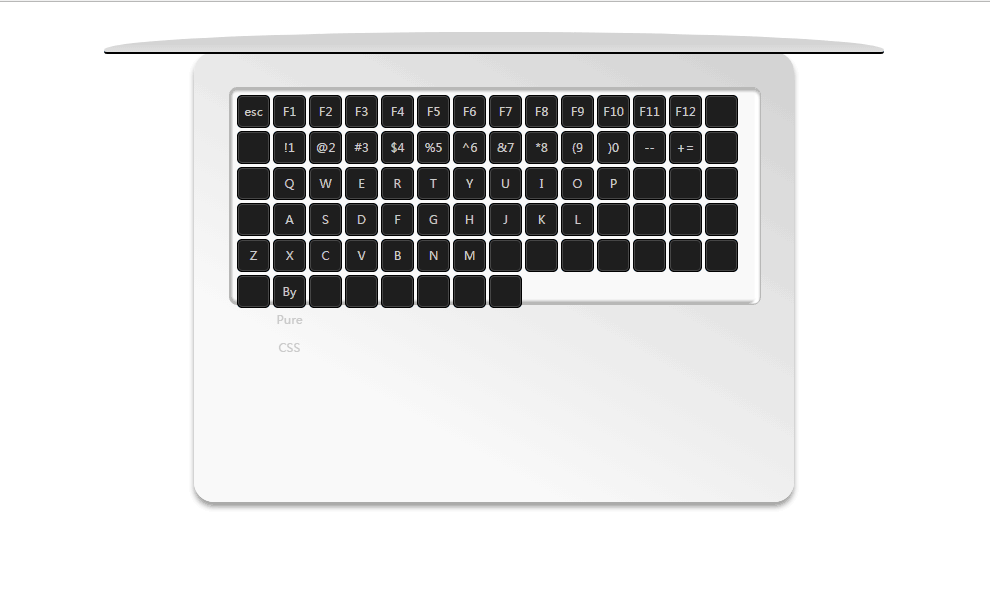
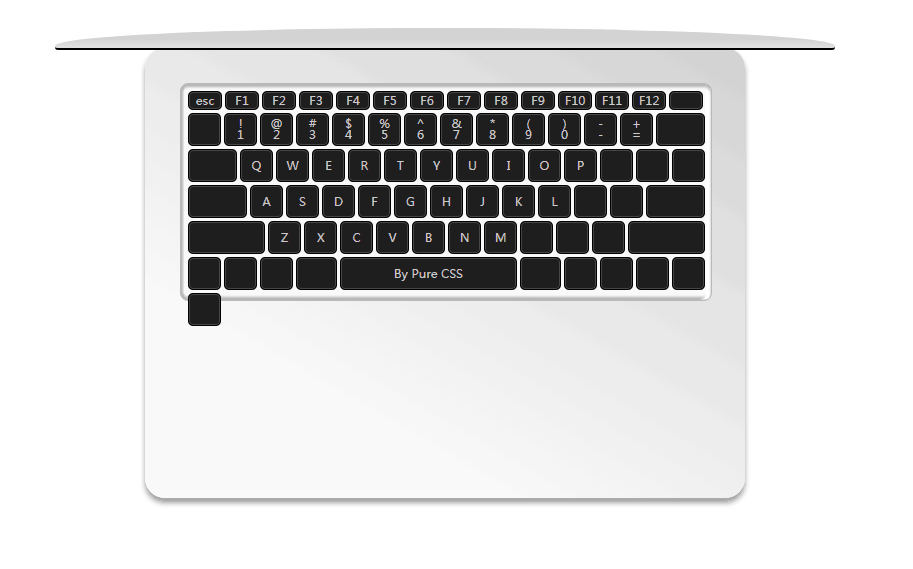
先展示一下效果图:
(1)将html结构布局写出来,就是div嵌套;
<div class="board"><!-- 面板区 -->
<div class="blackbar"></div><!-- 黑色转轴区 -->
<div class="keyboard"></div><!-- 键盘区 -->
<div class="touch"></div><!-- 触摸板区 -->
</div>
<div class="blackbar"></div><!-- 黑色转轴区 -->
<div class="keyboard"></div><!-- 键盘区 -->
<div class="touch"></div><!-- 触摸板区 -->
</div>
(2)在键盘区域插入按键,在keyboard里创建一个列表UL,这是一个痛苦的过程,要注意算清楚“li”也就是按键的数量(一共78个),不然到后面会很麻烦的。
在这里我只举例一个按键的内容,你们可以自行补充:<li>esc</li>
注意上面一排数字键的格式应该这样写:<li><span>!</span><span>1</span></li>
现在就可以开始CSS部分啦~
(3)首先写board的样式:
.board{
margin:0 auto;
padding:0 auto;
width:600px;
height:450px;
margin-top:50px;
border-radius:20px;//将四个角设置为圆角
position:relative;//设置相对定位
box-shadow:0px 5px 6px rgb(160,160,160);//设置边框阴影
background:-webkit-linear-gradient(60deg,rgba(250,250,250,1) 25%,rgba(210,210,210,1)); //设置背景颜色线性渐变
}
margin:0 auto;
padding:0 auto;
width:600px;
height:450px;
margin-top:50px;
border-radius:20px;//将四个角设置为圆角
position:relative;//设置相对定位
box-shadow:0px 5px 6px rgb(160,160,160);//设置边框阴影
background:-webkit-linear-gradient(60deg,rgba(250,250,250,1) 25%,rgba(210,210,210,1)); //设置背景颜色线性渐变
}
插注:linear-gradient(线性渐变):共有三个参数,第一个参数表示线性渐变的方向,top是从上到下、left是从左到右,如果定义成left top,那就是从左上角到右下角。第二个和第三个参数分别是起点颜色和终点颜色。你还可以在它们之间插入更多的参数,表示多种颜色的渐变。
现在图片应该是这样的,可以看到面板大致成型,但是按键还没有设置:
(4)设置盖子样式,这里使用:before伪元素:
.board:before{
content:''; //设置文本内容为无
display:block;//设置为行块元素
width:780px;
height:20px;
border-radius:0 0 3px 3px;
border-top-left-radius:390px 18px;//设置左上角边框的形状
border-top-right-radius:390px 18px;//设置右上角边框的形状
position:absolute;//设置绝对定位
left:-90px;top:-20px;
border-bottom:2px solid rgb(0,0,0);//将盖子设置在面板上方并且居中显示
background:-webkit-linear-gradient(top,rgb(210,210,210) 50%,rgb(225,225,225));//设置背景颜色线性渐变
}
插注::before 伪元素在元素之前添加内容。这个伪元素允许创作人员在元素内容的最前面插入生成内容。默认地,这个伪元素是行内元素,不过可以使用属性 display 改变这一点。
现在图片应该是这样的,可以看到盖子的样子已经出来了,离我们的计划又近一步啦~:
(5)接下来就是设置按键区域的步骤啦~
.keyboard{
position:absolute;//设置绝对定位
width:530px;
height:216px;
left:35px;
top:35px;
border:1px solid rgb(180,180,180);//设置边框
border-radius:8px;//设置边角
background:rgba(250,250,250,1);//设置背景颜色
box-shadow:2px 0px 2px rgb(180,180,180) inset,0px 3px 3px rgb(180,180,180) inset,-5px -0px 1px rgb(255,255,255) inset,0px -3px 3px rgb(180,180,180) inset;//设置内边框阴影
}
现在图片应该是这样的,可以看到按键区域范围已经大致成型,但是按键还没有设置:
(6)接下来设置按键即Li的格式:
ul,li{
list-style:none;//清除li默认样式
margin:0 auto;
padding:0 auto;
display:block;//设置为行块元素
-webkit-user-select:none;//禁止用户选中
-moz-user-select:none;//禁止用户选中
-ms-user-select:none;//禁止用户选中
user-select:none;//禁止用户选中
}
list-style:none;//清除li默认样式
margin:0 auto;
padding:0 auto;
display:block;//设置为行块元素
-webkit-user-select:none;//禁止用户选中
-moz-user-select:none;//禁止用户选中
-ms-user-select:none;//禁止用户选中
user-select:none;//禁止用户选中
}
.keyboard ul{
width:530px;
margin-top:8px;//设置距离上面的外边距
padding-left:8px;//设置内左边距
}
.keyboard ul li{
width:29px;height:29px;
float:left; //设置左浮动,使li浮动到一行
margin-right:5px;//按键左右之间的距离为5px;
margin-bottom:5px;//按键上下之间的距离为5px;
background-color:rgb(30,30,30);//设置按键的背景颜色
color:rgb(200,200,200);//按键字体颜色
text-align:center;//居中显示
line-height:28px;//设置行高,使字体上下居中
font-size:12px;
border-radius:4px;//设置边框四个角
border:1px solid rgb(70,70,70);//设置边框颜色
box-shadow:1px 0px 0px rgb(0,0,0),0px 1px 0px rgb(0,0,0),-1px 0px 0px rgb(0,0,0),0px -1px 0px rgb(0,0,0); //设置四条边框阴影
}
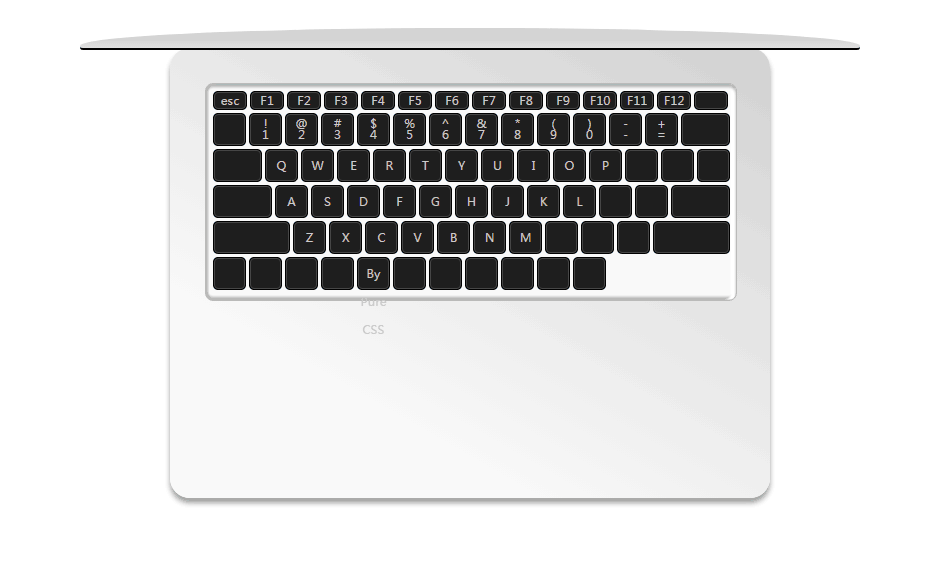
现在图片应该是这样的,可以看到总体效果已经大致成型,距离我们需要的样子只差一点了,细心的朋友应该已经发现有些按键的大小与实际有点区别:
(7)现在开始设置第一排Fn按键的样式高度;
li:nth-child(-n+14):nth-child(n+1){
width:30px;
height:15px;
line-height:15px;
}
width:30px;
height:15px;
line-height:15px;
}
现在图片应该是这样的,可以看到第一排Fn按键样式已经改变:
(8)现在开始设置第二排数字按键的内容样式,使里面的内容上下显示;
li:nth-child(-n+27):nth-child(n+16) span,li:nth-child(40) span,li:nth-child(41) span,li:nth-child(42) span,li:nth-child(53) span,li:nth-child(54) span,li:nth-child(-n+66):nth-child(n+64) span{
display:block;
margin-top:5px;
line-height:0.5;
}
display:block;
margin-top:5px;
line-height:0.5;
}
现在图片应该是这样的,可以看到第二排数字按键内容样式已经改变:
(9)现在设置键盘左右两边比较大的六个按键的样式:
.keyboard ul li:nth-child(28),.keyboard ul li:nth-child(29){
width:45px;
}
.keyboard ul li:nth-child(43),.keyboard ul li:nth-child(55){
width:55px;
}
.keyboard ul li:nth-child(56),.keyboard ul li:nth-child(67){
width:73px;
}
width:45px;
}
.keyboard ul li:nth-child(43),.keyboard ul li:nth-child(55){
width:55px;
}
.keyboard ul li:nth-child(56),.keyboard ul li:nth-child(67){
width:73px;
}
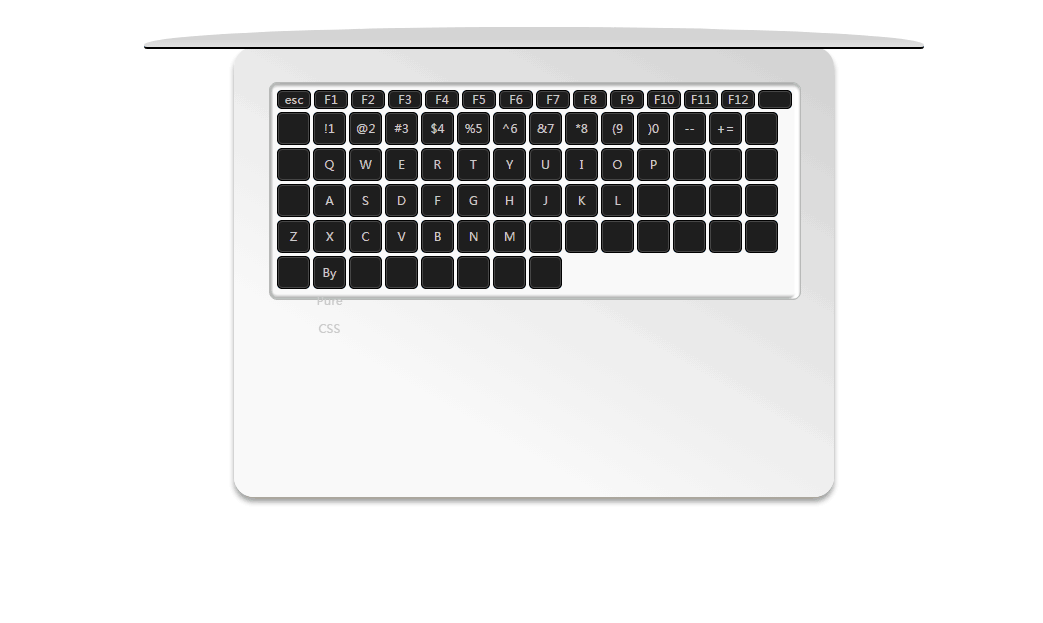
现在图片应该是这样的,可以看到左右两边比较大的六个按键样式已经改变:
(10)设置空格键和其两侧的两个按键的样式:
li:nth-child(-n+74),li:nth-child(n+68){
width:33px;
}
.keyboard ul li:nth-child(72){
width:173px;
}
.keyboard ul li:nth-child(71),.keyboard ul li:nth-child(73){
width:37px;
}
现在图片应该是这样的,可以看到空格键和其两侧的两个按键的样式已经改变:
width:33px;
}
.keyboard ul li:nth-child(72){
width:173px;
}
.keyboard ul li:nth-child(71),.keyboard ul li:nth-child(73){
width:37px;
}
现在图片应该是这样的,可以看到空格键和其两侧的两个按键的样式已经改变:
(11)设置四个光标键的样式:
.keyboard ul li:nth-child(75),.keyboard ul li:nth-child(77),.keyboard ul li:nth-child(78){
margin-top:18px;
height:14px;
}
.keyboard ul li:nth-child(76){
height:13px;
margin-top:19px;
}
.keyboard ul li:nth-child(78){
position:absolute;
bottom:22px;
right:38px;
}
margin-top:18px;
height:14px;
}
.keyboard ul li:nth-child(76){
height:13px;
margin-top:19px;
}
.keyboard ul li:nth-child(78){
position:absolute;
bottom:22px;
right:38px;
}
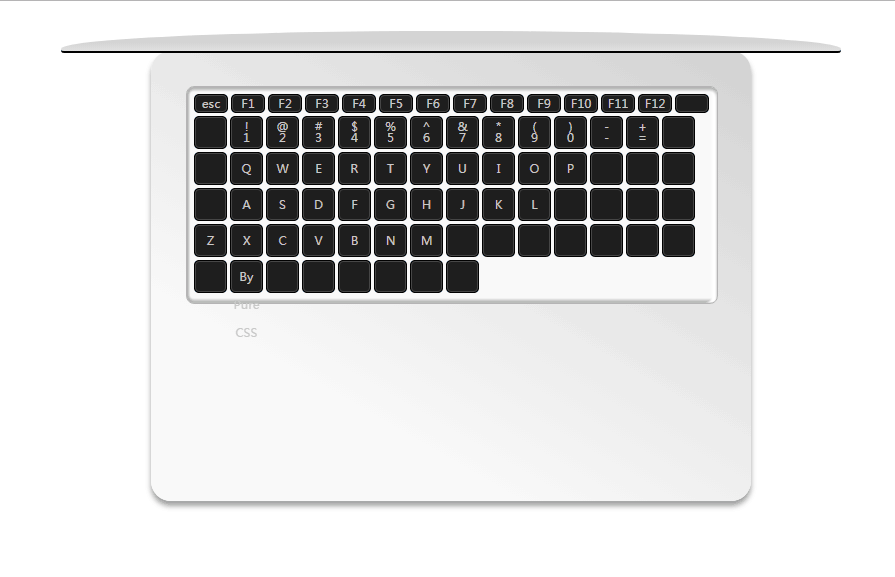
现在图片应该是这样的,可以看到四个光标键样式已经改变:
(12)现在就是设置触摸板的样式了:
.touch{
position:absolute;
width:200px;
height:150px;
border:2px solid rgb(190,190,190);
bottom:23px;
left:200px;
border-radius:8px;
}
position:absolute;
width:200px;
height:150px;
border:2px solid rgb(190,190,190);
bottom:23px;
left:200px;
border-radius:8px;
}
设置好的图片应该如下:
(13)设置好触摸板的样式,有没有朋友总感觉缺点啥,最后一步应该设置黑色转轴区域了:
.blackbar{
width:450px;height:18px;
position:absolute;//设置绝对定位
left:75px;
border-radius:2px;//设置四个角样式
border-bottom:2px solid #fff;//设置底边框样式
border-right:2px solid #fff;//设置右边框样式
background:-webkit-linear-gradient(top,rgb(30,30,30),rgb(60,60,60) 35%,rgb(100,100,100) 50%,rgb(30,30,30) 65%);//设置转轴背景线性渐变
}
width:450px;height:18px;
position:absolute;//设置绝对定位
left:75px;
border-radius:2px;//设置四个角样式
border-bottom:2px solid #fff;//设置底边框样式
border-right:2px solid #fff;//设置右边框样式
background:-webkit-linear-gradient(top,rgb(30,30,30),rgb(60,60,60) 35%,rgb(100,100,100) 50%,rgb(30,30,30) 65%);//设置转轴背景线性渐变
}
效果如下:
到这里我们的模仿Mac Book就算是大功告成啦,有些按键的内容我就偷赖没有填入,这个大家可以自行补充啦~
感谢阅读


 2014
2014

 被折叠的 条评论
为什么被折叠?
被折叠的 条评论
为什么被折叠?
 到【灌水乐园】发言


