


Talk is cheap. Show me the code
第一步,定义一个Bean实现InitializingBean、DisposableBean、BeanPostProcessor、ResourceLoaderAware、BeanFactoryAware、BeanClassLoaderAware接口。
package com.xxx.hyl.bean.lifecycle;

import org.springframework.beans.BeansException;
import org.springframework.beans.factory.*;
import org.springframework.beans.factory.config.BeanPostProcessor;
import org.springframework.context.ApplicationContextAware;
import org.springframework.context.ResourceLoaderAware;
import org.springframework.context.annotation.Bean;
import org.springframework.core.io.ResourceLoader;
import javax.annotation.PostConstruct;
import javax.annotation.PreDestroy;

/**
 * Bean 生命周期演示
 * @author 君战
 **/
public class LifecycleBean implements InitializingBean, DisposableBean,
		BeanPostProcessor,ResourceLoaderAware,BeanFactoryAware, BeanClassLoaderAware {

	@PostConstruct
	public void initForAnnotation() {
		System.out.println(this.getClass().getSimpleName() + " -----> initForAnnotation 方法执行");
	}

	public void customizeInit() {
		System.out.println(this.getClass().getSimpleName() + " -----> customizeInit 方法执行");
	}

	@Override
	public void afterPropertiesSet() throws Exception {
		System.out.println(this.getClass().getSimpleName() + " -----> afterPropertiesSet 方法执行");
	}

	@Override
	public Object postProcessBeforeInitialization(Object bean, String beanName) throws BeansException {
		System.out.println(this.getClass().getSimpleName() + " -----> postProcessBeforeInitialization 方法执行");
		return bean;
	}

	@Override
	public Object postProcessAfterInitialization(Object bean, String beanName) throws BeansException {
		System.out.println(this.getClass().getSimpleName() + " -----> postProcessAfterInitialization 方法执行");
		return bean;
	}

	@Override
	public void destroy() throws Exception {
		System.out.println(this.getClass().getSimpleName() + " -----> destroy 方法执行");
	}

	@PreDestroy
	public void destroyForAnnotation() {
		System.out.println(this.getClass().getSimpleName() + " -----> destroyForAnnotation 方法执行");
	}

	public void customizeDestroy() {
		System.out.println(this.getClass().getSimpleName() + " -----> customizeDestroy 方法执行");
	}


	@Override
	public void setBeanFactory(BeanFactory beanFactory) throws BeansException {
		System.out.println(this.getClass().getSimpleName() + " -----> setBeanFactory 方法执行");
	}

	@Override
	public void setResourceLoader(ResourceLoader resourceLoader) {
		System.out.println(this.getClass().getSimpleName() + " -----> setResourceLoader方法执行");
	}

	@Override
	public void setBeanClassLoader(ClassLoader classLoader) {
		System.out.println(this.getClass().getSimpleName() + " -----> setBeanClassLoader 方法执行");
	}
}
第二步:编写启动类
package com.xxx.hyl.bean.lifecycle;

import org.springframework.context.annotation.AnnotationConfigApplicationContext;
import org.springframework.context.annotation.Bean;
/**
* Bean 生命周期演示启动类
* @author 君战
*/
public class LifecycleBeanDemo {

	public static void main(String[] args) {
		AnnotationConfigApplicationContext context = new AnnotationConfigApplicationContext();
		context.register(LifecycleBeanDemo.class);
		context.refresh();
		// 关闭应用上下文
		context.close();
	}

	@Bean(initMethod = "customizeInit", destroyMethod = "customizeDestroy")
	public LifecycleBean lifecycleBean() {
		return new LifecycleBean();
	}

}
第三步:查看控制台打印结果
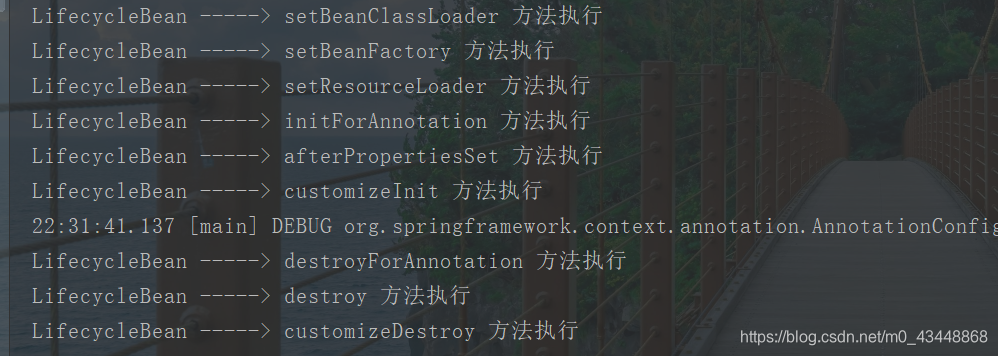
可以看到方法的执行顺序为setBeanClassLoader->setBeanFactory->resourceLoader->initForAnnotation->afterProperties->customizeInit->destroyForAnnotation->destroy->customizeDestroy。
其中Bean实现BeanPostProcessor的postProcessBeforeInitialization和postProcessAfterInitialization方法并未执行。这是因为Bean无法在自己的生命周期内执行自己实现的postProcessBeforeInitialization和postProcessAfterInitialization方法。
底层行为分析
要研究背后的方法逻辑,就必须查看AbstractAutowireCapableBeanFactory的initializeBean方法,在该方法中完成了上述的Bean生命周期相关方法的回调。
该方法的总体逻辑就是先回调Bean实现的XxxAware接口方法(invokeAwareMethods),然后执行BeanPostProcessor实现类的postProcessorBeforeInitialization方法(applyBeanPostProcessorsBeforeInitialization),执行Bean的自定义初始化方法(invokeInitMethods),执行BeanPostProcessor实现类的postProcessAfterInitialization方法(applyBeanPostAfterInitialization)。接下来我们就针对该方法调用到的每一个方法来进行分析。
// AbstractAutowireCapableBeanFactory#initializeBean
protected Object initializeBean(String beanName, Object bean, @Nullable RootBeanDefinition mbd) {
	// 如果 安全管理器不为空,通常为空
	if (System.getSecurityManager() != null) {
		AccessController.doPrivileged((PrivilegedAction<Object>) () -> {
			invokeAwareMethods(beanName, bean);
			return null;
		}, getAccessControlContext());
	} else {
		// 执行invokeAwareMethods方法
		invokeAwareMethods(beanName, bean);
	}

	Object wrappedBean = bean;
	if (mbd == null || !mbd.isSynthetic()) {
		// 执行BeanPostProcessor的postProcessBeforeInitialization方法
		wrappedBean = applyBeanPostProcessorsBeforeInitialization(wrappedBean, beanName);
	}

	try {
		// 执行Bean的初始化方法
		invokeInitMethods(beanName, wrappedBean, mbd);
	}catch (Throwable ex) {
		throw new BeanCreationException(
				(mbd != null ? mbd.getResourceDescription() : null),
				beanName, "Invocation of init method failed", ex);
	}
	if (mbd == null || !mbd.isSynthetic()) {
		// 执行BeanPostProcessor的postProcessAfterInitialization方法
		wrappedBean = applyBeanPostProcessorsAfterInitialization(wrappedBean, beanName);
	}
	return wrappedBean;
}
invokeAwareMethods方法实现很简单,就是通过instanceof关键字来判断传入的Bean是否实现了BeanNameAware、BeanClassLoaderAware、BeanFactoryAware接口,然后调用相应的方法。
注意这三个接口方法的回调顺序为:setBeanName、setBeanClassLoader、setBeanFactory。
// AbstractAutowireCapableBeanFactory#invokeAwareMethods
private void invokeAwareMethods(String beanName, Object bean) {
	if (bean instanceof Aware) {
		if (bean instanceof BeanNameAware) {
			((BeanNameAware) bean).setBeanName(beanName);
		}
		if (bean instanceof BeanClassLoaderAware) {
			ClassLoader bcl = getBeanClassLoader();
			if (bcl != null) {
				((BeanClassLoaderAware) bean).setBeanClassLoader(bcl);
			}
		}
		if (bean instanceof BeanFactoryAware) {
			((BeanFactoryAware) bean).setBeanFactory(AbstractAutowireCapableBeanFactory.this);
		}
	}
}
applyBeanPostProcessorsBeforeInitialization方法实现也比较简单,就是获取当前IoC容器中所有的BeanPostProcess接口实现类,然后调用实现类的postProcessBeforeInitialization方法。@PostConstruct注解标记的方法就是在这里完成调用的,由InitDestroyAnnotationBeanPostrocessor类处理。
不过需要注意的是,如果我们自己实现了BeanPostProcessor接口并重写其postProcessBeforeInitialization方法,那么在该方法中必须返回Bean,不能返回null,因为如果某个BeanPostProcessor实现类的postProcessBeforeInitialization方法返回值为null,那么将结束循环,这可能会导致一些奇奇怪怪的问题发生,例如Bean未被AOP增强。
public Object applyBeanPostProcessorsBeforeInitialization(Object existingBean, String beanName)
		throws BeansException {

	Object result = existingBean;
	for (BeanPostProcessor processor : getBeanPostProcessors()) {
		// @PostConstruct注解标记的初始化方法就是在这里完成调用的,由InitDestroyAnnotationBeanPostProcessor类处理
		Object current = processor.postProcessBeforeInitialization(result, beanName);
		if (current == null) {
			return result;
		}
		result = current;
	}
	return result;
}
在invokeInitMethods方法中,也是首先通过instanceof关键字来判断传入的Bean是否是InitializingBean类型,如果是,则调用其afterPropertiesSet方法。调用Bean指定的的自定义初始化方法(如果有),这个自定义初始化方法的名字是从BeanDefinition中获取。
// AbstractAutowireCapableBeanFactory#invokeInitMethods
protected void invokeInitMethods(String beanName, Object bean, @Nullable RootBeanDefinition mbd)
			throws Throwable {

	boolean isInitializingBean = (bean instanceof InitializingBean);
	if (isInitializingBean && (mbd == null || !mbd.isExternallyManagedInitMethod("afterPropertiesSet"))) {
		if (logger.isTraceEnabled()) {
			logger.trace("Invoking afterPropertiesSet() on bean with name '" + beanName + "'");
		}
		if (System.getSecurityManager() != null) {
			try {
				AccessController.doPrivileged((PrivilegedExceptionAction<Object>) () -> {
					((InitializingBean) bean).afterPropertiesSet();
					return null;
				}, getAccessControlContext());
			} catch (PrivilegedActionException pae) {
				throw pae.getException();
			}
		} else {
			//如果Bean实现的afterPropertiesSet方法
			((InitializingBean) bean).afterPropertiesSet();
		}
	}

	if (mbd != null && bean.getClass() != NullBean.class) {
		// 调用BeanDefinition的getInitMethodName方法来获取自定义初始化方法名
		String initMethodName = mbd.getInitMethodName();
		if (StringUtils.hasLength(initMethodName) &&
				!(isInitializingBean && "afterPropertiesSet".equals(initMethodName)) &&
				!mbd.isExternallyManagedInitMethod(initMethodName)) {
			// 执行Bean的自定义初始化方法
			invokeCustomInitMethod(beanName, bean, mbd);
		}
	}
}
最后就是调用applyBeanPostProcessorsAfterInitialization方法,在该方法中调用所有BeanPostProcessor实现类的postProcessAfterInitialization方法的调用。
public Object applyBeanPostProcessorsAfterInitialization(Object existingBean, String beanName)
			throws BeansException {

	Object result = existingBean;
	for (BeanPostProcessor processor : getBeanPostProcessors()) {
		Object current = processor.postProcessAfterInitialization(result, beanName);
		if (current == null) {
			return result;
		}
		result = current;
	}
	return result;
}
那么,Bean销毁方法是在哪里调用呢?
这个就要查看应用上下文的close方法实现(因为正常情况下,只有在IoC容器关闭时才会去销毁所有的单例Bean),或者也可以查看AbstractAutowireCapableBeanFactory的destroyBean方法。
这里我们就分析下应用上下文的close方法中关于执行单例Bean销毁方法的逻辑。该方法由AutoCloseable接口定义,由AbstractApplicationContext抽象类实现。在该实现中,首先使用synchronized 关键字来进行加锁,执行doClose方法。
// AbstractApplicationContext#close
public void close() {
	synchronized (this.startupShutdownMonitor) {
		doClose();
		// 删除与本次分析无关代码...
}
在doClose方法中,首先判断AtomicBoolean类型变量active的状态是否为true并且调用AtomicBoolean类型变量closed的compareAndSet方法返回为true,如果这两个判断成立,则执行应用上下文关闭逻辑,否则不执行。
在应用上下文关闭逻辑中,调用了destroyBeans方法来销毁所有的单例Bean。
// AbstractApplicationContext#doClose
protected void doClose() {
	// Check whether an actual close attempt is necessary...
	if (this.active.get() && this.closed.compareAndSet(false, true)) {
		// 删除与本次分析无关代码...
		// Destroy all cached singletons in the context's BeanFactory.
		destroyBeans();

		// 删除与本次分析无关代码...
		this.active.set(false);
	}
}
底层是调用ConfigurableListableBeanFactory的destroySingletons方法。
protected void destroyBeans() {
	getBeanFactory().destroySingletons();
}
DefaultListableBeanFactory实现了该方法,在该实现中,首先调用父类的destroySingletons方法。
// DefaultListableBeanFactory#destroySingletons
public void destroySingletons() {
	super.destroySingletons();
	updateManualSingletonNames(Set::clear, set -> !set.isEmpty());
	clearByTypeCache();
}
在其父类DefaultSingletonBeanRegistry定义的destroySingletons方法中,首先通过synchronized 来对singletonObjects(大名鼎鼎的一级缓存)进行加锁,然后将singletonsCurrentlyInDestruction 设置为true,
// DefaultSingletonBeanRegistry#destroySingletons
public void destroySingletons() {
	if (logger.isTraceEnabled()) {
		logger.trace("Destroying singletons in " + this);
	}
	// 使用synchronized关键字来对singletonObjects 进行加锁
	synchronized (this.singletonObjects) {
		this.singletonsCurrentlyInDestruction = true;
	}

	String[] disposableBeanNames;
	synchronized (this.disposableBeans) {// 使用synchronized关键字来对disposableBeans进行加锁
		disposableBeanNames = StringUtils.toStringArray(this.disposableBeans.keySet()); // 将disposableBeans中的keys转换为数组并赋值给disposableBeanNames
	}
	for (int i = disposableBeanNames.length - 1; i >= 0; i--) {// 遍历disposableBeanNames,对于每一个遍历到的beanName都调用destroySingleton方法
		destroySingleton(disposableBeanNames[i]);
	}

	// 删除与本次分析无关代码...
}
DefaultListableBeanFactory实现了destroySingleton方法,在该实现中首先调用父类(DefaultSingletonBeanRegistry的destroySingleton方法),接下来处理自己的逻辑,这部分代码与本次分析无关,完整代码请查看源码。
// DefaultListableBeanFactory#destroySingleton
public void destroySingleton(String beanName) {
	super.destroySingleton(beanName);
	// 删除与本次分析无关代码...
}
在DefaultSingletonBeanRegistry的destroySingleton方法中,首先调用removeSingleton方法,该方法就是根据指定beanName将一级缓存(singletonObjects)、二级缓存(earlySingletonObjects)、三级缓存(singletonFactories)、已注册的单例集合(registeredSingletons)中移除。
接下来首先对disposableBeans进行加锁,然后根据传入的beanName进行移除,得到DisposableBean,调用destroyBean方法。
// DefaultSingletonBeanRegistry#destroySingleton
public void destroySingleton(String beanName) {
	// Remove a registered singleton of the given name, if any.
	removeSingleton(beanName);

	// Destroy the corresponding DisposableBean instance.
	DisposableBean disposableBean;
	synchronized (this.disposableBeans) {
		disposableBean = (DisposableBean) this.disposableBeans.remove(beanName);
	}
	destroyBean(beanName, disposableBean);
}
// DefaultSingletonBeanRegistry#removeSingleton
protected void removeSingleton(String beanName) {
	synchronized (this.singletonObjects) {
		this.singletonObjects.remove(beanName);
		this.singletonFactories.remove(beanName);
		this.earlySingletonObjects.remove(beanName);
		this.registeredSingletons.remove(beanName);
	}
}
在destroyBean方法中,判断传入的DisposableBean是否不等于null,如果判断成立则调用其destroy方法。DisposableBean只是一个接口,实际使用的是DisposableBeanAdapter。
// DefaultSingletonBeanRegistry#destroyBean
protected void destroyBean(String beanName, @Nullable DisposableBean bean) {
	// 删除与本次分析无关代码...
	if (bean != null) {
		try {
			bean.destroy();
		} catch (Throwable ex) {
			if (logger.isWarnEnabled()) {
				logger.warn("Destruction of bean with name '" + beanName + "' threw an exception", ex);
			}
		}
	}
	// 删除与本次分析无关代码...
}
在DisposableBeanAdapter的destroy方法中,首先判断针对当前Bean的DestructionAwareBeanPostProcessor 实现类集合(beanPostProcessors)是否为空,如果不为空则遍历该集合,并调用其postProcessBeforeDestruction方法。
next,判断实例变量invokeDisposableBean是否为true(该变量的值是根据当前Bean是否实现了DisposableBean接口得到),如果该值为true,则调用Bean实现DisposableBean的destroy方法。
最后调用Bean的自定义销毁方法(如果有)。
// DisposableBeanAdapter#destroy
public void destroy() {
	// 调用所有实现了DestructionAwareBeanPostProcessor 接口的 postProcessBeforeDestruction方法。
	// CommonAannotationBeanPostProcessor实现了该接口,在该实现类的postProcessBeforeDestruction方法中完成了@PreDestroy注解标记方法的调用。
	if (!CollectionUtils.isEmpty(this.beanPostProcessors)) {
		for (DestructionAwareBeanPostProcessor processor : this.beanPostProcessors) {
			processor.postProcessBeforeDestruction(this.bean, this.beanName);
		}
	}
	// 如果Bean是一个DisposableBean,则调用其destroy方法
	if (this.invokeDisposableBean) {
		if (logger.isTraceEnabled()) {
			logger.trace("Invoking destroy() on bean with name '" + this.beanName + "'");
		}
		try {
			if (System.getSecurityManager() != null) {
				AccessController.doPrivileged((PrivilegedExceptionAction<Object>) () -> {
					((DisposableBean) this.bean).destroy();
					return null;
				}, this.acc);
			} else {
				((DisposableBean) this.bean).destroy();
			}
		} catch (Throwable ex) {
			String msg = "Invocation of destroy method failed on bean with name '" + this.beanName + "'";
			if (logger.isDebugEnabled()) {
				logger.warn(msg, ex);
			} else {
				logger.warn(msg + ": " + ex);
			}
		}
	}
	// 如果Bean存在自定义销毁方法,则调用其自定义销毁方法。
	if (this.destroyMethod != null) {
		invokeCustomDestroyMethod(this.destroyMethod);
	} else if (this.destroyMethodName != null) {
		Method methodToInvoke = determineDestroyMethod(this.destroyMethodName);
		if (methodToInvoke != null) {
			invokeCustomDestroyMethod(ClassUtils.getInterfaceMethodIfPossible(methodToInvoke));
		}
	}
}
总结
完整的Bean生命周期执行顺序为:
- 调用Bean实现BeanNameAware接口的setBeanName方法。
- 调用Bean实现BeanClassLoaderAware接口的setBeanClassLoader方法。
- 调用Bean实现BeanFactoryAware接口的setBeanFactory方法。
- 调用Bean实现BeanPostProcessor接口的postProcessBeforeInitialization方法(这个说法存在问题,虽然从代码上来看的确是这个顺序,但是Bean无法在自己的实例化生命周期内执行自己实现的postProcessBeforeInitialization方法以及接下来的postProcessAfterInitialization方法,如果我表达的不够清楚,有小伙伴不明白是什么意思可以在评论区给我留言)。除此之外,Bean中添加了@PostConstruct注解的自定义初始化方法也是在这里完成调用的。
- 调用Bean实现InitializingBean的afterPropertiesSet方法。
- 调用Bean定义并声明的自定义初始化方法。
- 调用Bean实现BeanPostProcessor的postProcessAfterInitialization方法。
- 当IoC容器关闭时,首先调用Bean中添加了@PreDestroy注解的自定义销毁方法。
- 调用Bean实现DisposableBean的destroy方法。
- 调用Bean定义并声明的自定义初始化方法。
扩展知识
在Spring IoC容器中,关于Bean的销毁方法除了添加JSR-330规范中提出的@PreDestroy注解以及实现DisposableBean的destroy方法以及自定义销毁方法并声明(@Bean注解的destroyMthod)之外,还可以实现Java的AutoCloseable接口并实现其close方法。在Bean销毁时,Spring IoC容器也是会回调的。
但需要注意的是如果Bean实现了DisposableBean接口,又实现了AutoCloseable接口,那么IoC容器只会执行Bean实现DisposableBean接口的destroy方法。关于这一部分处理逻辑,之后有机会我们再进行探讨。
另外除了调用应用上下文的close方法会触发单例Bean的销毁方法执行之外,还可以调用AutowireCapableBeanFactory的destroyBean方法来触发某个单例Bean的销毁方法的执行,这个方法存在一个问题,它不会执行Bean自定义的销毁方法。请慎用该方法,因为它可能会导致Bean处于不正确的状态。


 255
255

 被折叠的 条评论
为什么被折叠?
被折叠的 条评论
为什么被折叠?
 到【灌水乐园】发言


