


简介
拦截器(Interceptor)是用来改变或者扩展MyBaits原有的功能,例如可以通过拦截器机制来分析项目中存在那些慢SQL(统计SQL执行时间),分页工具PageHelper正是基于该机制来完成的分页。MyBatis对外提供的扩展点共有四个,可以进行拦截的接口和方法如下:
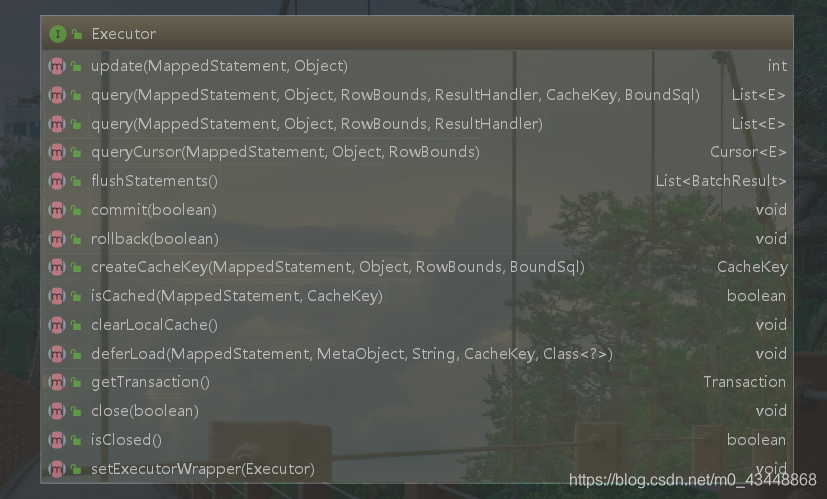
Executor(接口中所有方法都可以拦截)
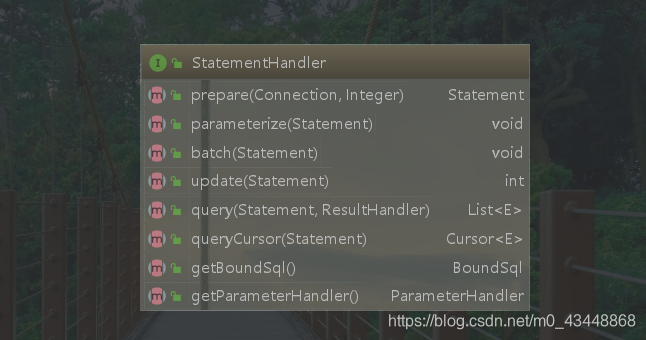
StatementHandler(接口中所有方法都可以拦截)
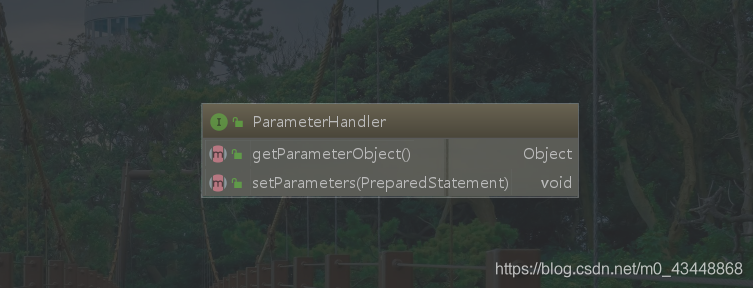
org.apache.ibatis.executor.parameter.ParameterHandler(接口中所有方法都可以拦截)
StatementHandler(接口中所有方法都可以拦截)

怎么用?
这里首先需要熟悉四个东西,分别是Interceptor接口以及Invocation和@Intercepts、@Signature注解。
public interface Interceptor {
  // 该方法就是MyBatis在使用前面提到的四个接口中的方法时进行回调的方法。
  Object intercept(Invocation invocation) throws Throwable;
  // 用来为目标对象创建代理对象的方法,通常不需要覆写。
  default Object plugin(Object target) {
    return Plugin.wrap(target, this);
  }
  // 设置一些属性
  default void setProperties(Properties properties) {
    // NOP
  }

}
Invocation 的定义信息很简单,其共有三个属性,分别为target(目标对象)、method(方法)、args(方法参数)以及相关Getter/Setter方法,还有一个proceed方法,就是执行目标方法。
public class Invocation {

  private final Object target; // 目标对象
  private final Method method; // 执行方法
  private final Object[] args; // 方法参数

  public Invocation(Object target, Method method, Object[] args) {
    this.target = target;
    this.method = method;
    this.args = args;
  }

  public Object getTarget() {
    return target;
  }

  public Method getMethod() {
    return method;
  }

  public Object[] getArgs() {
    return args;
  }

  public Object proceed() throws InvocationTargetException, IllegalAccessException {
    return method.invoke(target, args);
  }

}
@Intercepts和@Signature注解要合在一起来看,@Intercepts注解只有一个属性,即value,其返回值类型是一个@Signature类型的数组。这代表我们可以配置多个@Signature注解。
@Signature注解其实就是一个方法签名,其共有三个属性,分别为:type、method、args。type指接口的class,method指接口中的方法名,args指的是方法参数类型(该属性返回值是一个数组)。
public @interface Intercepts {
  /**
   * 方法签名
   */
  Signature[] value();
}

public @interface Signature {
  /**
   * 用来指定接口类型
   */
  Class<?> type();

  /**
   * 用来指定方法名
   */
  String method();

  /**
   * 用来指定方法参数
   */
  Class<?>[] args();
}
小伙伴们看上面的解释可能还是不太明白,没关系,接下来我们就编码实战!
Talk is cheap. Show me the code
第一步:定义一个类实现MyBatis的Interceptor 接口。通过@Intercepts以及@Signature注解来指定我们要拦截的接口为Executor的query方法,通过指定args,即方法参数类型来确定是哪个query方法。下面的通过@Signature指定的update、commit方法都一样。
package com.tech.mybatis.interceptors;

import org.apache.ibatis.cache.CacheKey;
import org.apache.ibatis.executor.Executor;
import org.apache.ibatis.mapping.BoundSql;
import org.apache.ibatis.mapping.MappedStatement;
import org.apache.ibatis.plugin.Interceptor;
import org.apache.ibatis.plugin.Intercepts;
import org.apache.ibatis.plugin.Invocation;
import org.apache.ibatis.plugin.Signature;
import org.apache.ibatis.session.ResultHandler;
import org.apache.ibatis.session.RowBounds;

import java.util.Arrays;


@Intercepts(
		{@Signature(type = Executor.class, method = "query",
				args = {MappedStatement.class, Object.class, RowBounds.class, ResultHandler.class,
						CacheKey.class, BoundSql.class}),
				@Signature(type = Executor.class, method = "update",
						args = {MappedStatement.class, Object.class}),
				@Signature(type = Executor.class, method = "commit",
						args = {boolean.class})}
)
public class CustomizedInterceptor implements Interceptor {


	@Override
	public Object intercept(Invocation invocation) throws Throwable {
		Object[] args = invocation.getArgs(); // 获取方法参数
		System.out.println("拦截到 " + invocation.getMethod().getName() + " 执行!方法参数为:" + Arrays.toString(args));
		return invocation.proceed();
	}
}
第二步:编写启动类(数据库DDL,JavaDO,Mapper详见附录)。需注意的是一定要将自定义的拦截器注册到MyBatis中,这里我们用代码的方式来添加。
package com.tech.mybatis.interceptors;

import com.alibaba.druid.pool.DruidDataSource;
import com.xxx.spring.entity.TUserDO;
import org.apache.ibatis.plugin.Intercepts;
import org.apache.ibatis.session.SqlSessionFactory;
import org.mybatis.spring.SqlSessionFactoryBean;
import org.mybatis.spring.annotation.MapperScan;
import org.springframework.context.annotation.AnnotationConfigApplicationContext;
import org.springframework.context.annotation.Bean;
import org.springframework.context.annotation.Configuration;
import org.springframework.jdbc.datasource.DataSourceTransactionManager;
import org.springframework.transaction.TransactionManager;
import org.springframework.transaction.annotation.EnableTransactionManagement;

import javax.sql.DataSource;
/***
 * 演示Mybatis拦截器使用{@link Intercepts}
 * @author 君战
 * */
@Configuration
@EnableTransactionManagement
@MapperScan("com.tech.mybatis.interceptors")
public class MyBatisInterceptorDemo {

	public static void main(String[] args) {
		// 创建注解驱动应用上下文
		AnnotationConfigApplicationContext context = new AnnotationConfigApplicationContext();
		context.register(MyBatisInterceptorDemo.class); // 将当前类作为配置类注册
		context.refresh(); // 刷新应用上下文
		TUserMapper userMapper = context.getBean(TUserMapper.class); // 通过应用上下文来获取TUserMapper接口实现类实例
		TUserDO userDO = new TUserDO();
		userDO.setAge(22);
		userDO.setUserName("君战");
		userMapper.insert(userDO); // 执行TUserMapper的insert方法。
	}
	/**
	* 将SqlSession注册到Bean中,MyBatis在为Mapper接口生成代理对象时需要用到
	*/
	@Bean
	public static SqlSessionFactory sqlSessionFactory() throws Exception {
		SqlSessionFactoryBean factoryBean = new SqlSessionFactoryBean();
		factoryBean.setDataSource(dataSource());
		factoryBean.afterPropertiesSet();
		SqlSessionFactory sessionFactory = factoryBean.getObject();
		org.apache.ibatis.session.Configuration configuration = sessionFactory.getConfiguration();
		configuration.addInterceptor(new CustomizedInterceptor()); // 一定要将自定义拦截器添加到Mybatis配置中心Configuration
		return sessionFactory;
	}
	/*
	* 配置数据源
	*/
	@Bean
	public static DataSource dataSource() {
		DruidDataSource dataSource = new DruidDataSource();
		dataSource.setUrl("jdbc:mysql://localhost:3306/study?useSSL=false");
		dataSource.setUsername("root");
		dataSource.setPassword("123456");
		return dataSource;
	}
	/*
	* 配置事务管理,关于事务管理器的作用可以查看我的另一篇博文-
	* 《从源码轻松理解什么是事务传播特性?Spring事务传播是如何实现的?Spring事务传播行为有哪些?》
	* 地址:https://blog.csdn.net/m0_43448868/article/details/112115749
	*/
	@Bean
	public TransactionManager transactionManager() {
		return new DataSourceTransactionManager(dataSource());
	}


}
XML方式注册自定义拦截器。
<plugins>
	<plugin interceptor="com.tech.mybatis.interceptors.CustomizedInterceptor"></plugin>
</plugins>
执行main方法,可以看到控制台已经输出拦截器的打印语句。
拦截到 update 执行!方法参数为:[org.apache.ibatis.mapping.MappedStatement@70cf32e3, com.xxx.spring.entity.TUserDO@5a59ca5e]
21:32:11.117 [main] DEBUG com.tech.mybatis.interceptors.TUserMapper.insert - ==>  Preparing: INSERT INTO t_user VALUES(null,?,?)
21:32:11.160 [main] DEBUG com.tech.mybatis.interceptors.TUserMapper.insert - ==> Parameters: 君战(String), 22(Integer)
21:32:11.171 [main] DEBUG com.tech.mybatis.interceptors.TUserMapper.insert - <==    Updates: 1
拦截到 commit 执行!方法参数为:[true]
了解到MyBatis的拦截器怎么用之后,接下来我们就分析下MyBatis中的拦截器是如何实现的。
MyBatis拦截器机制底层实现分析
我们只需要分析一个扩展点的拦截器机制实现即可,因为其余三个的实现基本一致。这里我们就来分析下Executor扩展点的拦截器机制实现。
在DefaultSqlSessionFactory的openSessionFromDataSource方法中,
// DefaultSqlSessionFactory#openSessionFromDataSource
private SqlSession openSessionFromDataSource(ExecutorType execType, TransactionIsolationLevel level, boolean autoCommit) {
   Transaction tx = null;
   try {
     final Environment environment = configuration.getEnvironment();// 获取MyBatis的环境对象
     final TransactionFactory transactionFactory = getTransactionFactoryFromEnvironment(environment); // 根据环境对象获取事务工厂
     tx = transactionFactory.newTransaction(environment.getDataSource(), level, autoCommit);
     final Executor executor = configuration.newExecutor(tx, execType); // 重点是这里,在创建SqlSession之前首先通过configuration来创建了Executor
     return new DefaultSqlSession(configuration, executor, autoCommit);
   } catch (Exception e) {
     closeTransaction(tx); // may have fetched a connection so lets call close()
     throw ExceptionFactory.wrapException("Error opening session.  Cause: " + e, e);
   } finally {
     ErrorContext.instance().reset();
   }
 }
在newExecutor方法中,创建完Executor 后,会调用interceptorChain的pluginAll方法来对Executor进行增强(如果应用程序定义了拦截器,并且在拦截器的@Intercepts({@Signature(…)})注解中配置的是Executor的某个方法)。
// Configuration#newExecutor
public Executor newExecutor(Transaction transaction, ExecutorType executorType) {
   executorType = executorType == null ? defaultExecutorType : executorType;
   executorType = executorType == null ? ExecutorType.SIMPLE : executorType;
   Executor executor;
   if (ExecutorType.BATCH == executorType) { // 如果是批量Executor
     executor = new BatchExecutor(this, transaction);
   } else if (ExecutorType.REUSE == executorType) { // 如果是可复用的Executor
     executor = new ReuseExecutor(this, transaction);
   } else {// 默认使用SimpleExecutor
     executor = new SimpleExecutor(this, transaction);
   }
   if (cacheEnabled) {
     executor = new CachingExecutor(executor);
   }// 创建完Executor之后,调用interceptorChain的pluginAll方法来对Executor进行增强
   executor = (Executor) interceptorChain.pluginAll(executor);
   return executor;
 }
InterceptorChain 类就定义了一个集合用来存放用户注册的所有Interceptor实现,在pluginAll方法中遍历每一个Interceptor实现类,调用其plugin方法,传入目标对象。
package org.apache.ibatis.plugin;

import java.util.ArrayList;
import java.util.Collections;
import java.util.List;

public class InterceptorChain {

  private final List<Interceptor> interceptors = new ArrayList<>();
  // 遍历用户注册的所有拦截器实现类的plugin方法,注意这是一个链式增强
  public Object pluginAll(Object target) {
    for (Interceptor interceptor : interceptors) {
      target = interceptor.plugin(target);
    }
    return target;
  }
  // 将Interceptor 实现类实例保存进interceptors 集合中
  public void addInterceptor(Interceptor interceptor) {
    interceptors.add(interceptor);
  }
  // 获取一个不可修改的interceptors 集合的副本
  public List<Interceptor> getInterceptors() {
    return Collections.unmodifiableList(interceptors);
  }

}
因为我们没有重写plugin方法,所以执行的是Interceptor接口默认的plugin方法,在默认实现中调用Plugin的wrap方法。
// Interceptor#plugin
default Object plugin(Object target) {
   return Plugin.wrap(target, this);
 }
既然如此,那么我们就着重分析下Plugin类,因为在其wrap方法中基本调用到了该类的所有方法以及使用到了所有属性。需要注意的是该类实现了JDK动态代理中的InvocationHandler接口。
public class Plugin implements InvocationHandler {

  private final Object target; // 目标对象
  private final Interceptor interceptor; // 拦截器对象
  private final Map<Class<?>, Set<Method>> signatureMap; // 方法签名,Key为接口Class,value为方法

  private Plugin(Object target, Interceptor interceptor, Map<Class<?>, Set<Method>> signatureMap) {
    this.target = target;
    this.interceptor = interceptor;
    this.signatureMap = signatureMap;
  }

  public static Object wrap(Object target, Interceptor interceptor) {
    // 首先根据拦截器来获取其关注的类以及类中的方法
    Map<Class<?>, Set<Method>> signatureMap = getSignatureMap(interceptor);
    Class<?> type = target.getClass();
    // 根据用户在@Intercepts中@Signature注解中配置的类型来和目标对象接口进行匹配
    Class<?>[] interfaces = getAllInterfaces(type, signatureMap);
    if (interfaces.length > 0) { // 使用JDK动态代理
      return Proxy.newProxyInstance(
          type.getClassLoader(),
          interfaces,
          new Plugin(target, interceptor, signatureMap));
    }
    return target;
  }

  @Override
  public Object invoke(Object proxy, Method method, Object[] args) throws Throwable {
    try { // 首先根据传入的方法的定义类类型来判断当前拦截器是否感兴趣
      Set<Method> methods = signatureMap.get(method.getDeclaringClass());
      if (methods != null && methods.contains(method)) {// 如果当前拦截器感兴趣,则调用其intercept方法
        return interceptor.intercept(new Invocation(target, method, args));
      }
      return method.invoke(target, args);// 否则直接执行目标方法
    } catch (Exception e) {
      throw ExceptionUtil.unwrapThrowable(e);
    }
  }

  private static Map<Class<?>, Set<Method>> getSignatureMap(Interceptor interceptor) {
    Intercepts interceptsAnnotation = interceptor.getClass().getAnnotation(Intercepts.class); // 获取到拦截器中的@Intercepts注解数据
    if (interceptsAnnotation == null) {
      throw new PluginException("No @Intercepts annotation was found in interceptor " + interceptor.getClass().getName());
    }
    Signature[] sigs = interceptsAnnotation.value(); // 获取@Intercepts注解中的所有@Signature
    Map<Class<?>, Set<Method>> signatureMap = new HashMap<>();
    for (Signature sig : sigs) {// 遍历每一个@Signature注解
      Set<Method> methods = signatureMap.computeIfAbsent(sig.type(), k -> new HashSet<>());
      try {
        Method method = sig.type().getMethod(sig.method(), sig.args()); // 以@Signature注解中配置的type来获取其method,根据@Signature注解中配置的method以及args
        methods.add(method); // 将获取到的方法保存进methods集合中。
      } catch (NoSuchMethodException e) {
        throw new PluginException("Could not find method on " + sig.type() + " named " + sig.method() + ". Cause: " + e, e);
      }
    }
    return signatureMap;
  }

  private static Class<?>[] getAllInterfaces(Class<?> type, Map<Class<?>, Set<Method>> signatureMap) {
    Set<Class<?>> interfaces = new HashSet<>();
    while (type != null) {
    // 获取目标类型的所有接口并遍历,需注意的是这里传递的实际类型(type)是接口实现类,
    // 并不是接口本身。如果是接口本身,那么type.getInterfaces()获取到的接口只有父接口了。
      for (Class<?> c : type.getInterfaces()) {
        if (signatureMap.containsKey(c)) {
        // 如果signatureMap中包含该接口,则将该接口添加到interfaces集合中
          interfaces.add(c);
        }
      }// 如果当前类存在父类,对其父类进行相同的查找
      type = type.getSuperclass();
    }// 最后返回合适的接口
    return interfaces.toArray(new Class<?>[interfaces.size()]);
  }

}
总结
MyBatis中的拦截器机制其实就是基于JDK的动态代理实现,在创建完目标对象后,循环用户注册的所有拦截器实现,然后对每个拦截器的@Intercepts中@Signature注解中配置的类型来和目标对象所实现的接口进行匹配,如果匹配上了,则说明目标对象是当前拦截器所关注的。
在代理对象执行的时候,对目标方法进行拦截判断是不是当前拦截器所关注的方法,如果是则执行拦截器的intercept方法,否则直接执行目标方法。
附录
数据库DDL
CREATE TABLE `t_user` (
  `id` int(11) NOT NULL AUTO_INCREMENT,
  `user_name` varchar(30) DEFAULT NULL,
  `age` int(255) DEFAULT NULL,
  PRIMARY KEY (`id`)
) ENGINE=InnoDB AUTO_INCREMENT=6 DEFAULT CHARSET=utf8;
TUserMapper
package com.tech.mybatis.interceptors;

import com.xxx.spring.entity.TUserDO;
import org.apache.ibatis.annotations.Insert;
import org.apache.ibatis.annotations.Select;
import org.apache.ibatis.annotations.Update;

import java.util.List;

/**
 * @author: 君战
 **/
public interface TUserMapper {


	@Select("SELECT * FROM t_user")
    List<TUserDO> selectAll();

	@Insert("INSERT INTO t_user VALUES(null,#{userName},#{age})")
    Integer insert(TUserDO userDO);

	@Update("UPDATE t_user SET age = #{age} WHERE user_name = #{userName}")
	Integer update(TUserDO userDO);

}
TUserDO
package com.xxx.spring.entity;

/**
 * @author: 君战
 **/
public class TUserDO {

	private Integer id;

	private String userName;

	private Integer age;

	public Integer getId() {
		return id;
	}

	public void setId(Integer id) {
		this.id = id;
	}

	public String getUserName() {
		return userName;
	}

	public void setUserName(String userName) {
		this.userName = userName;
	}

	public Integer getAge() {
		return age;
	}

	public void setAge(Integer age) {
		this.age = age;
	}
}


 1138
1138

 被折叠的 条评论
为什么被折叠?
被折叠的 条评论
为什么被折叠?
 到【灌水乐园】发言


