


提示:文章写完后,目录可以自动生成,如何生成可参考右边的帮助文档
AQS原理
概述
全称是AbstractQueuedStnchronizer,是阻塞式锁和相关同步器工具的框架
特点:
1、用state属性来表示锁的状态(分独占模式和共享模式),子类需要定义如何维护这个状态,控制如何获取锁和释放锁
- getstate:获取state状态
- setState:设置state状态
- compareAndSetState:乐观锁机制设置state状态
2、提供了FIFO的等待队列,类似Monitor的EntryList
3、条件变量来实现等待、唤醒机制、支持多个条件变量。类似于Monitor的WaitSet
子类主要实现这样一些方法(默认抛出UnsupportedOperationException)
- tryAcquire
- tryRelease
- tryAcquireShared
- tryReleasedShared
- isHeldExclusively
获取锁的姿势
//如果获取锁失败
if(!tryAcquire(arg){
   //入队,可以选择阻塞当前队列   park unpark
}
释放锁的姿势
//如果获取锁失败
if(tryRelease(arg){
   //让阻塞线程恢复运行
}
AQS其实定义的是实现锁的原理,下面是我自己写的一个基于装饰者模式不可重入锁的实现示例
/自定义锁,不可重入锁
class Mylock implements Lock {
    //独占锁
    class Mysync extends AbstractQueuedSynchronizer {
        @Override
        protected boolean tryAcquire(int arg) {
            if (compareAndSetState(0, 1)) {
                //加上了锁,设置owner为当前线程
                setExclusiveOwnerThread(Thread.currentThread());
                return true;
            }
            return false;
        }

        @Override
        protected boolean tryRelease(int arg) {
            setExclusiveOwnerThread(null);
            //  state是 volatile修饰的,这里最好把setState写在setExclusiveOwnerThread后面
            setState(0);
            //写屏障可以保证Owner的修改也会被同步到主存,对其他线程可见
            return true;

        }

        //是否持有独占锁
        @Override
        protected boolean isHeldExclusively() {
            return getState() == 1;

        }

        public Condition newCondition() {
            return new ConditionObject();
        }
    }

    private Mysync sync = new Mysync();


    //加锁,不成功进入队列等待
    @Override
    public void lock() {
        sync.acquire(1);
    }

    //加锁,可打断
    @Override
    public void lockInterruptibly() throws InterruptedException {
        sync.acquireInterruptibly(1);
    }

    //尝试加锁
    @Override
    public boolean tryLock() {
        return sync.tryAcquire(1);
    }

    //尝试加锁 超时
    @Override
    public boolean tryLock(long time, TimeUnit unit) throws InterruptedException {
        return sync.tryAcquireNanos(1, unit.toNanos(time));
    }

    //释放锁
    @Override
    public void unlock() {
        sync.release(1);
    }

    // 条件变量
    @Override
    public Condition newCondition() {
        return sync.newCondition();
    }
}
测试一下
@Slf4j(topic = "c.TestAqs")
public class TestAqs {
    public static void main(String[] args) {

        Mylock lock = new Mylock();
        new Thread(()->{
            lock.lock();
            try {
                log.debug("locking");
                Thread.sleep(1000);
            } catch (InterruptedException e) {
                e.printStackTrace();
            } finally {
                log.debug("unlocking");
                lock.unlock();
            }
        },"t1").start();

        new Thread(()->{
            lock.lock();
            try {
                log.debug("locking");
            } finally {
                log.debug("unlocking");
                lock.unlock();
            }
        },"t2").start();

    }

}
19:01:14.944 [t1] DEBUG c.TestAqs - locking
19:01:15.967 [t1] DEBUG c.TestAqs - unlocking
19:01:15.968 [t2] DEBUG c.TestAqs - locking
19:01:15.968 [t2] DEBUG c.TestAqs - unlocking
ReentrantLock 原理
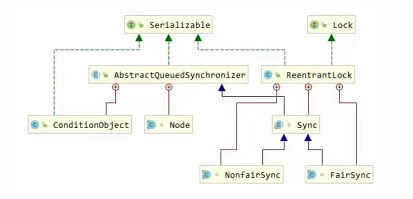
由类图可以看出,ReentrantLock 继承自Lock,也提供了以sync的同步器,这个同步器有两种模式,一个是公平模式,一个是非公平模式,同时这个同步器也是基于AQS原理
加锁流程
先从构造器看,默认为非公平锁实现
 public ReentrantLock() {
        sync = new NonfairSync();
 }
NonfairSync继承自AQS


也就是说同步器有两种实现,一种是公平的,一种是非公平的,公平的满足先进先出(FIFO)
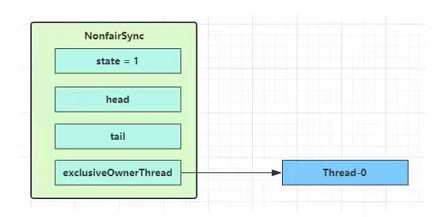
加锁成功
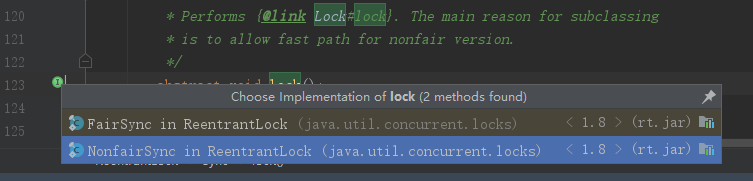
首先看下加锁 lock()源码
abstract void lock();
它有两种实现,一种是公平的,一种是非公平的
1、非公平
 final void lock() {
            //先尝试用compareAndSetState修改state,如果修改成功就是加锁成功
            if (compareAndSetState(0, 1))
                //加锁成功,把owner线程(exclusiveOwnerThread)改为当前线程
                setExclusiveOwnerThread(Thread.currentThread());
            else
                acquire(1);//如果出现竞争,比如state已经被修改为1,当前线程加锁失败,执行此方法
        }
代码执行流程:
- 如果CAS修改state的值为1成功,就意味着加锁成,然后修改exclusiveOwnerThread为当前加锁的线程
- 如果执行失败执行acquire(int arg)方法
如果state是0的话,,没有其他线程与当前线程竞争,那么势必加锁成功
2、公平
final void lock() {
            acquire(1);
}
代码执行流程: 直接执行 acquire(1)方法
3、acquire(int arg)
有以上公平锁和非公平锁的加锁可以看出,非公锁加锁失败后执行acquire方法,公平锁直接执行acquire,acquire方法是独占式的获取锁的流程,我们就对这个方法进行分析
 public final void acquire(int arg) {
        if (!tryAcquire(arg) &&
            acquireQueued(addWaiter(Node.EXCLUSIVE), arg))
            selfInterrupt();
    }
代码执行流程:
首先执行tryAcquire(int arg) 方法
protected boolean tryAcquire(int arg) {
        throw new UnsupportedOperationException();
    }
(1)tryAcquire(int arg) 非公平锁的实现
protected final boolean tryAcquire(int acquires) {
            return nonfairTryAcquire(acquires);
        }

 final boolean nonfairTryAcquire(int acquires) {
            //  获取当前线程对象current
            final Thread current = Thread.currentThread();
          //   获取state的值
            int c = getState();

          //  很多人可能会疑惑,之前非公平的加锁lock() 不是加锁失败了嘛,怎么这里还判断,这是因为
          //  在从lock执行到nonfairTryAcquire方法时,可能有加锁线程已经释放了锁


            if (c == 0) {
           //  如果没线程没有加锁。当前线程直接CAS更改state,CAS操作成功意味着加锁成功
          //   需要修改exclusiveOwnerThread为当前线程,并返回true,意味着加锁成功
                if (compareAndSetState(0, acquires))
                    setExclusiveOwnerThread(current);
                    return true;
                }
            }

            else if (current == getExclusiveOwnerThread()) {
              //   如果已经有线程加锁,就判断加锁的这个线程是不是当前线程,如果是就把state+1,
              //   意味着锁重入行为发生,并返回ture
                int nextc = c + acquires;
                if (nextc < 0) // overflow
                    throw new Error("Maximum lock count exceeded");
                setState(nextc);
                return true;
            }
            return false;
        }
(2)tryAcquire(int arg) 公平锁的实现
 protected final boolean tryAcquire(int acquires) {
           //  同样获取当前线程对象current
            final Thread current = Thread.currentThread();
              //   获取state的值
            int c = getState();
              //   判断是否加锁(不再解释)
            if (c == 0) {

            //    不同的是这一点,公平锁在加锁前会通过hasQueuedPredecessors()方法,判断同步队列中是不是有其他节点,
             //   这是因为公平锁要满足先进先出的特性,要让其他等待时间长的先加锁
                if (!hasQueuedPredecessors() &&
                    compareAndSetState(0, acquires)) {
                    setExclusiveOwnerThread(current);
                    return true;
                }
            }
            //同样下面锁重入的逻辑,不再解释
            else if (current == getExclusiveOwnerThread()) {
                int nextc = c + acquires;
                if (nextc < 0)
                    throw new Error("Maximum lock count exceeded");
                setState(nextc);
                return true;
            }
            return false;
        }
    }
小结:分析了非公平锁和公平锁的加锁流程,可以得知,
- 非公平锁在加锁的时候,不需要判断同步队列中是否有其他节点,只要CAS操作更改state成功了,就意味着当前线程获取到了锁
- 公平锁在加锁的时候,需要判断同步队列中是否有其他节点,也就是先让head节点的后继结点先加锁,以满足先进先出的特性
- 所谓的锁重入,也不过是判断是否是当前线程,如果是当前线程就state+1,实现加锁的重入操作
值得说的是,个人建议,如果没有特殊需求,请用非公平锁,虽然非公平锁可能会发生线程·饥饿,但是非公平锁会带来更少的上下文切换,吞吐量更好
加锁失败
我们之前分析的加锁,都是加锁成功的情况,如果加锁失败呢
还是下面这块代码
static final Node EXCLUSIVE = null;
 public final void acquire(int arg) {
        if (!tryAcquire(arg) &&
            acquireQueued(addWaiter(Node.EXCLUSIVE), arg))
            selfInterrupt();
    }
(1) 首先执行addWaiter,构建同步队列
private Node addWaiter(Node mode) {
         //以当前线程创建节点node
        Node node = new Node(Thread.currentThread(), mode);
        // Try the fast path of enq; backup to full enq on failure
        //如果是第一次添加节点,tail是null执行enq方法
        Node pred = tail;
        if (pred != null) {
           // 把node节点加入队列尾部
            node.prev = pred;
            if (compareAndSetTail(pred, node)) {
                pred.next = node;
                return node;
            }
        }
        enq(node);
        return node;
    }


private Node enq(final Node node) {
        for (;;) {
            Node t = tail;
            if (t == null) { // Must initialize
                if (compareAndSetHead(new Node()))
                    tail = head;
            } else {
                node.prev = t;
                if (compareAndSetTail(t, node)) {
                    t.next = node;
                    return t;
                }
            }
        }
    }
上面enq就是一个死循环形成同步队列的过程,可以自己画图一步一步分析,执行完enq,就是下图这么一个队列
(2) 然后执行acquireQueued
 final boolean acquireQueued(final Node node, int arg) {
        boolean failed = true;
        try {
            boolean interrupted = false;
            for (;;) {
                final Node p = node.predecessor(); //获取当前节点的前驱节点
                if (p == head && tryAcquire(arg)) {//如果前去节点是head,就尝试获取锁
                    setHead(node);
                    p.next = null; // help GC
                    failed = false;
                    return interrupted;
                }
                // shouldParkAfterFailedAcquire判断获取锁失败的线程是否应该park住,
               // 第一次执行时,当前节点的前驱节点waitStatus是默认值0(刚加入同步队列的都是0),
               // 根据下面shouldParkAfterFailedAcquire源码可以得知,该方法会把waitStatus置为-1,并返回fasle
              //因此第一循环parkAndCheckInterrupt不执行
               // 第二次执行到这shouldParkAfterFailedAcquire方法时
                // 根据源码,可知shouldParkAfterFailedAcquire会返回true
                // 因此执行parkAndCheckInterrupt方法,park住当前线程,不让它占用CPU了
                if (shouldParkAfterFailedAcquire(p, node) &&
                    parkAndCheckInterrupt())
                    interrupted = true;
            }
        } finally {
            if (failed)
                cancelAcquire(node);
        }
    }

static final int SIGNAL    = -1;
private static boolean shouldParkAfterFailedAcquire(Node pred, Node node) {
        int ws = pred.waitStatus;
        if (ws == Node.SIGNAL)
            /*
             * This node has already set status asking a release
             * to signal it, so it can safely park.
             */
            return true;
        if (ws > 0) {
            /*
             * Predecessor was cancelled. Skip over predecessors and
             * indicate retry.
             */
            do {
                node.prev = pred = pred.prev;
            } while (pred.waitStatus > 0);
            pred.next = node;
        } else {
            /*
             * waitStatus must be 0 or PROPAGATE.  Indicate that we
             * need a signal, but don't park yet.  Caller will need to
             * retry to make sure it cannot acquire before parking.
             */
            compareAndSetWaitStatus(pred, ws, Node.SIGNAL);
        }
        return false;
    }

private final boolean parkAndCheckInterrupt() {
        LockSupport.park(this);
        return Thread.interrupted();
    }
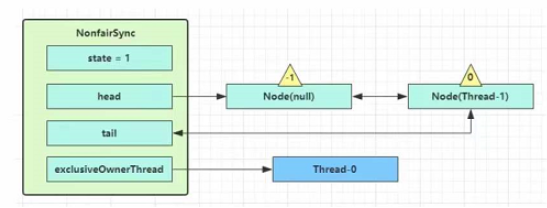
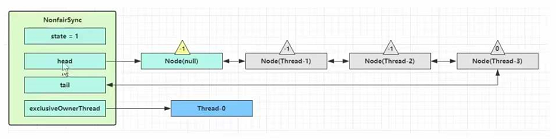
最终第二个线程如果加锁失败就会形成这样:
第一个Node称为Dummy(哑元)或者烧饼,用来占位,不关联线程
小结:加锁失败的线程会被包装成Node节点,构成一个同步队列,线程刚开始会自旋在acquireQueued方法中,但是不是一直在执行死循环,而是循环两次后,被park住,第一循环是修改前驱节点的waitStatus为-1,第二次循环,判断出前驱节点的waitStatus为-1后,会park住当前线程
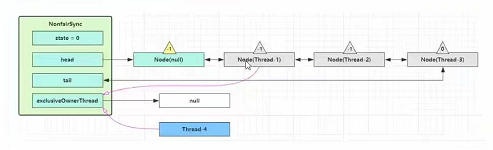
解锁流程
如果有多个线程加锁失败就会变成这个样子:
那怎么解锁呢?看下unlock()源码
 public void unlock() {
        sync.release(1);
    }
解锁最终是执行同步器的release(int arg) 方法,那就分析release(int arg)
 public final boolean release(int arg) {
        if (tryRelease(arg)) {
            Node h = head;
            if (h != null && h.waitStatus != 0)
                unparkSuccessor(h);
            return true;
        }
        return false;
    }
首先执行tryRelease(int arg)
protected boolean tryRelease(int arg) {
        throw new UnsupportedOperationException();
    }
找到ReentrantLock 的实现
 protected final boolean tryRelease(int releases) {
            int c = getState() - releases;//获取当前的state值并减1
            //getExclusiveOwnerThread是获取当前加锁的线程,(还记得之前exclusiveOwnerThread嘛)         如果解锁的不是解锁的线程,直接报错
            if (Thread.currentThread() != getExclusiveOwnerThread())
                throw new IllegalMonitorStateException();
            boolean free = false;
            if (c == 0) {//如果state为-1后为0了,就意味着解锁成功
                free = true;
                setExclusiveOwnerThread(null);
                //修改exclusiveOwnerThread为null,当前没人占有锁
            }
            setState(c); //把state更新为c
            return free;
        }
上述代码的执行逻辑:先判断解锁的线程是不是锁拥有线程,如果不是就抛出异常,如果是,就判断state-1后,是不是为0,如果为0了,说明解锁成功,把锁的拥有者置为null。更新state的值为state-1
如果state-1不等于0.说明当前线程之前发生过重入,那么每次解锁state都减去1,直到state=0,解锁成功
再看release(int arg) ,如果解锁成就会执行if条件内的代码
 public final boolean release(int arg) {
        if (tryRelease(arg)) {
            Node h = head; //获取头节点head,当前场景肯定不会为null呀,因为之前enq创建同步队列的时候,初始化了
            //判断同步队列中是不是有阻塞的线程,如果有就执行unparkSuccessor唤醒线程
            if (h != null && h.waitStatus != 0)
            // 当前waitStatus 为-1,因为之前节点进入同步队列在自旋的时候,第一次自旋就是修改其前驱节点的waitStatus 为-1

                unparkSuccessor(h);
            return true;
        }
        return false;
    }


 private void unparkSuccessor(Node node) {
        /*
         * If status is negative (i.e., possibly needing signal) try
         * to clear in anticipation of signalling.  It is OK if this
         * fails or if status is changed by waiting thread.
         */
        int ws = node.waitStatus;
        if (ws < 0)//把head节点的waitStatus 置为0
            compareAndSetWaitStatus(node, ws, 0);

        /*
         * Thread to unpark is held in successor, which is normally
         * just the next node.  But if cancelled or apparently null,
         * traverse backwards from tail to find the actual
         * non-cancelled successor.
         */
        Node s = node.next;//获取头节点的后继结点,本例肯定不为null呀,因为线程阻塞
        if (s == null || s.waitStatus > 0) {
            s = null;
            for (Node t = tail; t != null && t != node; t = t.prev)
                if (t.waitStatus <= 0)
                    s = t;
        }
        if (s != null)
            //unpark  唤醒当前线程
            LockSupport.unpark(s.thread);
    }
小结:解锁的时候,先调用tryRelease方法释放锁,如果释放锁的线程不是当前锁拥有线程直接抛出异常,如果是,当state=0时,才意味着解锁成功,解锁成功后,就会唤醒同步队列中的head节点的后继结点,唤醒后的节点会重新竞争锁,那就会执行一遍加锁逻辑。如果竞争成功就获得锁,否则加到同步队列尾部
可重入原理
前面分析加锁解锁的时候,也分析了可重入了
总结下来就是
- 加锁时,如果锁已经被获取,且是当前线程获取的话,就实现锁重入,锁重入就是把state加1
- 解锁时,如果解锁的是当前获取锁的线程,就把state-1,如果state变为0,那就是解锁成功,如果state>1,说明之前重入了多次,只有等多次执行释放锁操作之后,如果state为0,就意味锁重入的解锁成功
打断原理
ReentrantLock,如果被打断有什么反应呢?我们直到被阻塞线程如果被打断,必然会抛出InterruptedException异常
不可打断的获取锁
当前线程如果在执行lock()方法时,如果获取失败,经过上面加锁的分析,我知道线程会在自旋中进行park,也就是阻塞,
   final boolean acquireQueued(final Node node, int arg) {
        boolean failed = true;
        try {
            boolean interrupted = false;
            for (;;) {
                final Node p = node.predecessor(); //获取当前节点的前驱节点
                if (p == head && tryAcquire(arg)) {//如果前去节点是head,就尝试获取锁
                    setHead(node);
                    p.next = null; // help GC
                    failed = false;
                    return interrupted;
                }
                // shouldParkAfterFailedAcquire判断获取锁失败的线程是否应该park住,
               // 第一次执行时,当前节点的前驱节点waitStatus是默认值0(刚加入同步队列的都是0),
               // 根据下面shouldParkAfterFailedAcquire源码可以得知,该方法会把waitStatus置为-1,并返回fasle
              //因此第一循环parkAndCheckInterrupt不执行
               // 第二次执行到这shouldParkAfterFailedAcquire方法时
                // 根据源码,可知shouldParkAfterFailedAcquire会返回true
                // 因此执行parkAndCheckInterrupt方法,park住当前线程,不让它占用CPU了
                if (shouldParkAfterFailedAcquire(p, node) &&
                    parkAndCheckInterrupt()) //打断后parkAndCheckInterrupt返回true
                    interrupted = true;
            }
        } finally {
            if (failed)
                cancelAcquire(node);
        }
    }


  private final boolean parkAndCheckInterrupt() {
        LockSupport.park(this); //线程阻塞在这
        return Thread.interrupted();//如果被打断,返回打断标记true,另外interrupted还清除了打断标记,置为false
    }
我们看出来,被打断的线程,只不过从阻塞状态又进行了一次自旋,尝试获取锁,如果失败,还是会继续park阻塞线程
可打断的获取锁
ReentrantLock还有一个可打断的方法lockInterruptibly(),我们重点关注怎么处理打断的
public void lockInterruptibly() throws InterruptedException {
        sync.acquireInterruptibly(1);
    }

  public final void acquireInterruptibly(int arg)
            throws InterruptedException {
        if (Thread.interrupted())
            throw new InterruptedException();//关键代码
        if (!tryAcquire(arg))
            doAcquireInterruptibly(arg);
    }


     private void doAcquireInterruptibly(int arg)
        throws InterruptedException {
        final Node node = addWaiter(Node.EXCLUSIVE);
        boolean failed = true;
        try {
            for (;;) {
                final Node p = node.predecessor();
                if (p == head && tryAcquire(arg)) {
                    setHead(node);
                    p.next = null; // help GC
                    failed = false;
                    return;
                }
                if (shouldParkAfterFailedAcquire(p, node) &&
                    parkAndCheckInterrupt())
                    throw new InterruptedException();//关键代码
            }
        } finally {
            if (failed)
                cancelAcquire(node);
        }
    }
从源码中可以看出,如果线程被打断会直接抛出InterruptedException,同时也会修改打断标记。
总结
lock()不可打断的获取锁,如果获取锁失败的阻塞的线程被打断,不会抛出异常,而是进行一次自旋,尝试获取一次锁,如果获取不到被打断的线程还会继续阻塞
lockInterruptibly()是可以被打断的获取锁的方法,如果被打断,直接抛出InterruptedException异常,同时会修改打断标记为fasle
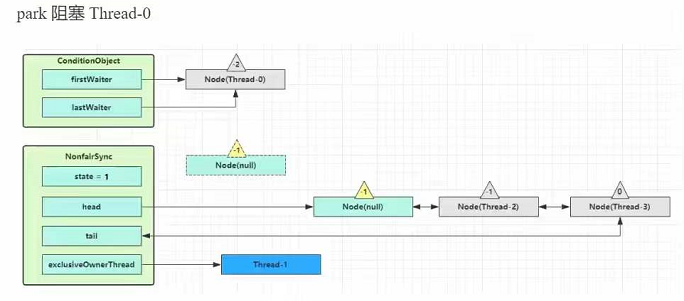
条件变量原理
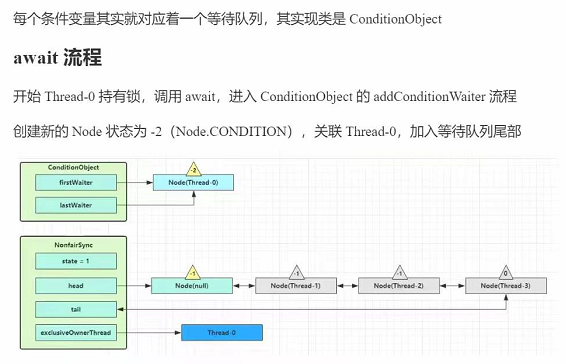
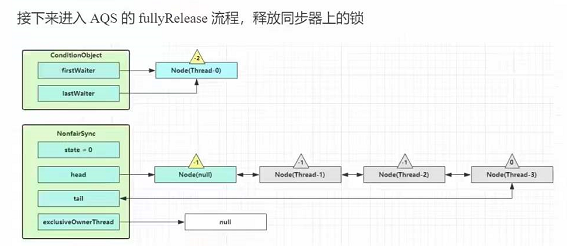
public final void await() throws InterruptedException {
if (Thread.interrupted())
throw new InterruptedException();
Node node = addConditionWaiter();
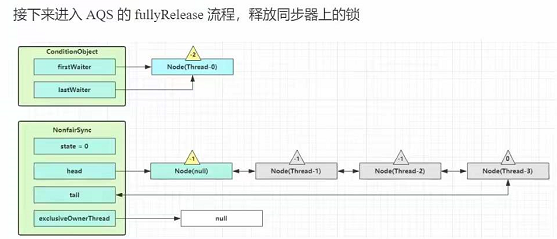
int savedState = fullyRelease(node);
int interruptMode = 0;
while (!isOnSyncQueue(node)) {
LockSupport.park(this);
if ((interruptMode = checkInterruptWhileWaiting(node)) != 0)
break;
}
if (acquireQueued(node, savedState) && interruptMode != THROW_IE)
interruptMode = REINTERRUPT;
if (node.nextWaiter != null) // clean up if cancelled
unlinkCancelledWaiters();
if (interruptMode != 0)
reportInterruptAfterWait(interruptMode);
}
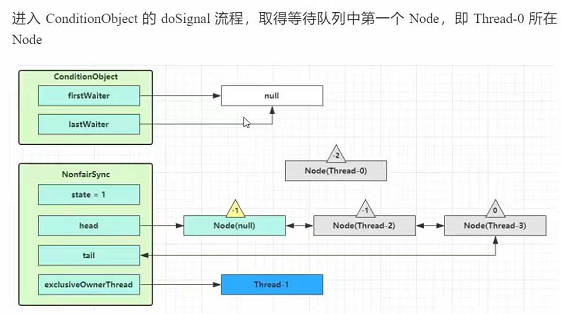
signal流程
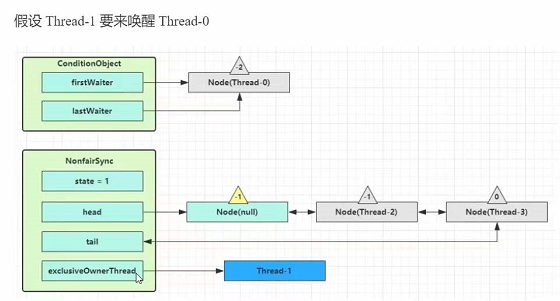

 public final void signal() {
            if (!isHeldExclusively())
                throw new IllegalMonitorStateException();
            Node first = firstWaiter;
            if (first != null)
                doSignal(first);
        }

       /**
         * Removes and transfers nodes until hit non-cancelled one or
         * null. Split out from signal in part to encourage compilers
         * to inline the case of no waiters.
         * @param first (non-null) the first node on condition queue
         */
        private void doSignal(Node first) {
            do {
                if ( (firstWaiter = first.nextWaiter) == null)
                    lastWaiter = null;
                first.nextWaiter = null;
            } while (!transferForSignal(first) &&
                     (first = firstWaiter) != null);
        }

 final boolean transferForSignal(Node node) {
        /*
         * If cannot change waitStatus, the node has been cancelled.
         */
        if (!compareAndSetWaitStatus(node, Node.CONDITION, 0))
            return false;

        /*
         * Splice onto queue and try to set waitStatus of predecessor to
         * indicate that thread is (probably) waiting. If cancelled or
         * attempt to set waitStatus fails, wake up to resync (in which
         * case the waitStatus can be transiently and harmlessly wrong).
         */
        Node p = enq(node);
        int ws = p.waitStatus;
        if (ws > 0 || !compareAndSetWaitStatus(p, ws, Node.SIGNAL))
            LockSupport.unpark(node.thread);
        return true;
    }

private Node enq(final Node node) {
        for (;;) {
            Node t = tail;
            if (t == null) { // Must initialize
                if (compareAndSetHead(new Node()))
                    tail = head;
            } else {
                node.prev = t;
                if (compareAndSetTail(t, node)) {
                    t.next = node;
                    return t;
                }
            }
        }
    }


 712
712


 被折叠的 条评论
为什么被折叠?
被折叠的 条评论
为什么被折叠?
 到【灌水乐园】发言


