


相关文章:
Nacos Spring Boot 快速开始
Nacos Spring Cloud 快速开始 nacos入门例子,里面用到了RestTemplate
springcloud中RestTemplate三种使用方式(LoadBalancerClient、负载均衡、Nacos、Ribbon ) 介绍RestTemplate的常见用法
RestTemplate与Ribbon结合原理(基于spring-cloud-starter-alibaba-nacos-discovery)
1. 前言
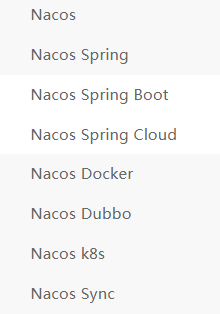
Nacos有很多语法,结合不同的技术,有不同的语法:
本篇是讲述Nacos Spring Boot的用法。
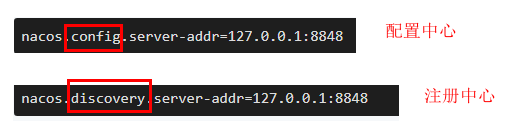
配置中心和注册中心是2个不同的功能模块:
- 配置中心引入 nacos-config-spring-boot-starter
- 注册中心 引入 nacos-discovery-spring-boot-starter
2. Nacos Spring Boot 快速开始
本文主要面向 Spring Boot 的使用者,通过两个示例来介绍如何使用 Nacos 来实现分布式环境下的配置管理和服务发现。
关于 Nacos Spring Boot 的详细文档请参看:nacos-spring-boot-project。
该项目下有多个工程,参见标红的

通过 Nacos Server 和 nacos-config-spring-boot-starter 实现配置的动态变更;
通过 Nacos Server 和 nacos-discovery-spring-boot-starter 实现服务的注册与发现。
2.1 前提条件
您需要先下载 Nacos 并启动 Nacos server。
2.2 启动配置管理
配置管理就是管理参数,放在公共配置中心,具体的业务可以访问这个配置中心,读取关心的参数。
启动了 Nacos server 后,您就可以参考以下示例代码,为您的 Spring Boot 应用启动 Nacos 配置管理服务了。完整示例代码请参考: nacos-spring-boot-config-example,也可参见 nacos-spring-boot-config-example
nacos-examples/nacos-spring-boot-example/nacos-spring-boot-config-example/
1.添加依赖:
<dependency>
    <groupId>com.alibaba.boot</groupId>
    <artifactId>nacos-config-spring-boot-starter</artifactId>
    <version>${latest.version}</version>
</dependency>
注意:版本 0.2.x.RELEASE 对应的是 Spring Boot 2.x 版本,版本 0.1.x.RELEASE 对应的是 Spring Boot 1.x 版本。
完整配置:
<?xml version="1.0" encoding="UTF-8"?>
<project xmlns="http://maven.apache.org/POM/4.0.0"
         xmlns:xsi="http://www.w3.org/2001/XMLSchema-instance"
         xsi:schemaLocation="http://maven.apache.org/POM/4.0.0 http://maven.apache.org/xsd/maven-4.0.0.xsd">
    <parent>
        <groupId>org.springframework.boot</groupId>
        <artifactId>spring-boot-starter-parent</artifactId>
        <version>2.3.2.RELEASE</version>
        <relativePath/> <!-- lookup parent from repository -->
    </parent>
    <modelVersion>4.0.0</modelVersion>

    <artifactId>nacos-spring-boot-config-example</artifactId>

    <properties>
        <nacos-config-spring-boot.version>0.2.1</nacos-config-spring-boot.version>
    </properties>

    <dependencies>
        <dependency>
            <groupId>org.springframework.boot</groupId>
            <artifactId>spring-boot-starter-web</artifactId>
        </dependency>

        <dependency>
            <groupId>org.springframework.boot</groupId>
            <artifactId>spring-boot-starter-actuator</artifactId>
        </dependency>

        <dependency>
            <groupId>com.alibaba.boot</groupId>
            <artifactId>nacos-config-spring-boot-starter</artifactId>
            <version>${nacos-config-spring-boot.version}</version>
        </dependency>

        <dependency>
            <groupId>com.alibaba.boot</groupId>
            <artifactId>nacos-config-spring-boot-actuator</artifactId>
            <version>${nacos-config-spring-boot.version}</version>
        </dependency>
    </dependencies>
</project>
2.在 application.properties 中配置 Nacos server 的地址:
nacos.config.server-addr=127.0.0.1:8848

完整配置:
server.port=8888

nacos.config.server-addr=127.0.0.1:8848

# endpoint http://localhost:8080/actuator/nacos-config
# health http://localhost:8080/actuator/health
management.endpoints.web.exposure.include=*
management.endpoint.health.show-details=always
3.使用 @NacosPropertySource 加载 dataId 为 example 的配置源,并开启自动更新:
dataId 是目标服务的id,例如user 模块调用order模块,那么在user模块中配置dataId =order模块的服务名
package com.alibaba.nacos.example.spring.boot;

import com.alibaba.nacos.spring.context.annotation.config.NacosPropertySource;
import org.springframework.boot.SpringApplication;
import org.springframework.boot.autoconfigure.SpringBootApplication;

/**
 * Document: https://nacos.io/zh-cn/docs/quick-start-spring-boot.html
 * <p>
 * Nacos 控制台添加配置:
 * <p>
 * Data ID:example
 * <p>
 * Group:DEFAULT_GROUP
 * <p>
 * 配置内容:useLocalCache=true
 */
@SpringBootApplication
@NacosPropertySource(dataId = "example", autoRefreshed = true)
public class NacosConfigApplication {

    public static void main(String[] args) {
        SpringApplication.run(NacosConfigApplication.class, args);
    }
}
4.通过 Nacos 的 @NacosValue 注解设置属性值
package com.alibaba.nacos.example.spring.boot.controller;

import com.alibaba.nacos.api.config.annotation.NacosValue;
import org.springframework.stereotype.Controller;
import org.springframework.web.bind.annotation.RequestMapping;
import org.springframework.web.bind.annotation.ResponseBody;

import static org.springframework.web.bind.annotation.RequestMethod.GET;

@Controller
@RequestMapping("config")
public class ConfigController {

    @NacosValue(value = "${useLocalCache:false}", autoRefreshed = true)
    private boolean useLocalCache;

    @RequestMapping(value = "/get", method = GET)
    @ResponseBody
    public boolean get() {
        return useLocalCache;
    }
}

- 被注册 @NacosValue标签的属性,其值会被nacos同步
- autoRefreshed表示自动同步
- ${useLocalCache:false}表示从nacas读useLocalCache属性,如果没找到,赋值false
2.2.1 配置管理项
启动nacos后,在微服务启动前必须先创建配置管理项
参见 Nacos Spring Cloud 快速开始的 “”2.2.1 配置管理项“”章节。
2.2.2 测试
-
启动 NacosConfigApplication,调用 curl http://localhost:8080/config/get,返回内容是 false
此时没有注册过该属性,因此是false
-
通过调用 Nacos Open API 向 Nacos server 发布配置:dataId 为example,内容为useLocalCache=true
curl -X POST "http://127.0.0.1:8848/nacos/v1/cs/configs?dataId=example&group=DEFAULT_GROUP&content=useLocalCache=true" -
再次访问 http://localhost:8080/config/get,此时返回内容为true,说明程序中的useLocalCache值已经被动态更新了。
由于步骤2中已经注册了true值,因此,可以访问到值为true;
2.3 启动服务发现
服务发现就是各个服务把自己注册至注册中心,然后各个服务从注册中心可以感知其他服务。
本节演示如何在您的 Spring Boot 项目中启动 Nacos 的服务发现功能。完整示例代码请参考:nacos-spring-boot-discovery-example,参见 nacos-spring-boot-discovery-example
1.添加依赖
<dependency>
    <groupId>com.alibaba.boot</groupId>
    <artifactId>nacos-discovery-spring-boot-starter</artifactId>
    <version>${latest.version}</version>
</dependency>
注意:版本 0.2.x.RELEASE 对应的是 Spring Boot 2.x 版本,版本 0.1.x.RELEASE 对应的是 Spring Boot 1.x 版本。
2.在 application.properties 中配置 Nacos server 的地址:
nacos.discovery.server-addr=127.0.0.1:8848
使用 @NacosInjected 注入 Nacos 的 NamingService 实例:
@Controller
@RequestMapping("discovery")
public class DiscoveryController {

    @NacosInjected
    private NamingService namingService;

    @RequestMapping(value = "/get", method = GET)
    @ResponseBody
    public List<Instance> get(@RequestParam String serviceName) throws NacosException {
        return namingService.getAllInstances(serviceName);
    }
}

@SpringBootApplication
public class NacosDiscoveryApplication {

    public static void main(String[] args) {
        SpringApplication.run(NacosDiscoveryApplication.class, args);
    }
}
核心代码是namingService.getAllInstances(serviceName),从集合中匹配一个结果,而namingService对应nacos注册中心。
4.启动 NacosDiscoveryApplication,调用 curl http://localhost:8080/discovery/get?serviceName=example,此时返回为空 JSON 数组[]
5.通过调用 Nacos Open API 向 Nacos server 注册一个名称为 example 服务
curl -X PUT 'http://127.0.0.1:8848/nacos/v1/ns/instance?serviceName=example&ip=127.0.0.1&port=8080'
6.再次访问 curl http://localhost:8080/discovery/get?serviceName=example,此时返回内容为:
[
  {
    "instanceId": "127.0.0.1-8080-DEFAULT-example",
    "ip": "127.0.0.1",
    "port": 8080,
    "weight": 1.0,
    "healthy": true,
    "cluster": {
      "serviceName": null,
      "name": "",
      "healthChecker": {
        "type": "TCP"
      },
      "defaultPort": 80,
      "defaultCheckPort": 80,
      "useIPPort4Check": true,
      "metadata": {}
    },
    "service": null,
    "metadata": {}
  }
]


 1492
1492


 被折叠的 条评论
为什么被折叠?
被折叠的 条评论
为什么被折叠?
 到【灌水乐园】发言


