


SpringCloud Alibaba
1.SpringCloud Alibaba
1.1.SpringCloud Alibaba功能
- 服务限流降级:默认支持 WebServlet、WebFlux, OpenFeign、RestTemplate、Spring Cloud Gateway, Zuul, Dubbo 和RocketMQ 限流降级功能的接入,可以在运行时通过控制台实时修改限流降级规则,还支持查看限流降级 Metrics 监控。
- 服务注册与发现:适配 Spring Cloud 服务注册与发现标准,默认集成了 Ribbon 的支持。
- 分布式配置管理:支持分布式系统中的外部化配置,配置更改时自动刷新。
- 消息驱动能力:基于 Spring Cloud Stream 为微服务应用构建消息驱动能力。
- 分布式事务:使用 @GlobalTransactional 注解, 高效并且对业务零侵入地解决分布式事务问题。。
- 阿里云对象存储:阿里云提供的海量、安全、低成本、高可靠的云存储服务。支持在任何应用、任何时间、任何地点存储和访问任意类型的数据。
- 分布式任务调度:提供秒级、精准、高可靠、高可用的定时(基于 Cron 表达式)任务调度服务。同时提供分布式的任务执行模型,如网格任务。网格任务支持海量子任务均匀分配到所有 Worker(schedulerx-client)上执行。
- 阿里云短信服务:覆盖全球的短信服务,友好、高效、智能的互联化通讯能力,帮助企业迅速搭建客户触达通道。
1.2组件
- Sentinel:把流量作为切入点,从流量控制、熔断降级、系统负载保护等多个维度保护服务的稳定性。
- Nacos:一个更易于构建云原生应用的动态服务发现、配置管理和服务管理平台。
- RocketMQ:一款开源的分布式消息系统,基于高可用分布式集群技术,提供低延时的、高可靠的消息发布与订阅服务。
- Dubbo:Apache Dubbo™ 是一款高性能 Java RPC 框架。
- Seata:阿里巴巴开源产品,一个易于使用的高性能微服务分布式事务解决方案。
- Alibaba Cloud OSS: 阿里云对象存储服务(Object Storage Service,简称 OSS),是阿里云提供的海量、安全、低成本、高可靠的云存储服务。您可以在任何应用、任何时间、任何地点存储和访问任意类型的数据。
- Alibaba Cloud SchedulerX: 阿里中间件团队开发的一款分布式任务调度产品,提供秒级、精准、高可靠、高可用的定时(基于 Cron 表达式)任务调度服务。
- Alibaba Cloud SMS: 覆盖全球的短信服务,友好、高效、智能的互联化通讯能力,帮助企业迅速搭建客户触达通道。
2.Nacos
2.1Nacos简介
nacos(NAming COnfiguration Service):服务注册和配置中心
Nacos = Eureka + Config + Bus
替代Eureka做服务注册中心
替代Config做服务配置中心
github地址: https://github.com/alibaba/Nacos
Nacos 地址: https://nacos.io/zh-cn/
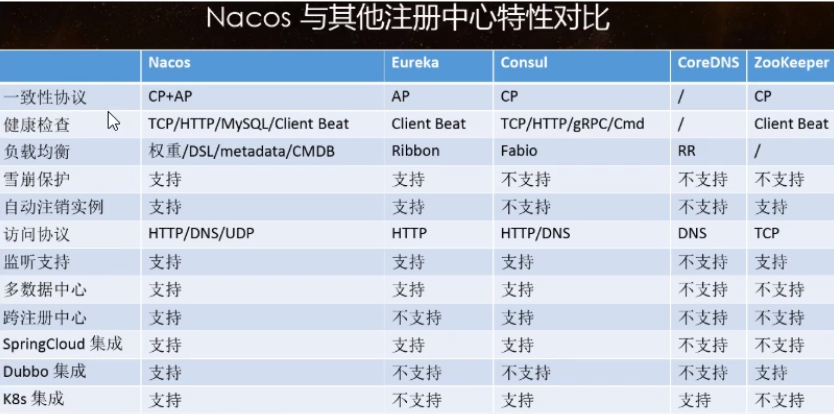
| 服务注册与服务框架 | CAP模型 | 控制台管理 | 社区活跃度 |
|---|---|---|---|
| Eureka | AP高可用 | 支持 | 低(2.x版本闭源) |
| Zookeeper | CP一致 | 支持 | 中 |
| Consul | CP | 支持 | 高 |
| Nacos | AP(可以切换) | 支持 高 |
2.2安装并运行Nacos
- 条件:本地java8和maven环境ok
- 从官网下载Nacos
- 解压安装包,直接运用bin目录下的startup.cmd
- 命令 运行成功后直接访问:http://localhost:8848/nacos
- 结果页面
2.3基于nacos的服务提供者
2.3.1 建父工程
- 建一个名为spring-cloud-alibaba的父工程
- 改pom,进行相应的版本控制
 <properties>
        <project.build.sourceEncoding>UTF-8</project.build.sourceEncoding>
        <maven.compiler.source>1.8</maven.compiler.source>
        <maven.compiler.target>1.8</maven.compiler.target>
        <junit.version>4.12</junit.version>
        <log4j.version>1.2.17</log4j.version>
        <lombok.version>1.16.18</lombok.version>
        <mysql.version>5.1.47</mysql.version>
        <druid.version>1.1.16</druid.version>
        <mybatis.spring.boot.version>1.3.2</mybatis.spring.boot.version>
    </properties>
    <!-- 子模块继承之后,提供作用:锁定版本+子模块不用写groupId和version  -->
    <dependencyManagement>
        <dependencies>
            <!--  springboot 2.2.2    -->
            <dependency>
                <groupId>org.springframework.boot</groupId>
                <artifactId>spring-boot-dependencies</artifactId>
                <version>2.2.2.RELEASE</version>
                <type>pom</type>
                <scope>import</scope>
            </dependency>
            <!--  springcloud cloud Hoxton.SR1   -->
            <dependency>
                <groupId>org.springframework.cloud</groupId>
                <artifactId>spring-cloud-dependencies</artifactId>
                <version>Hoxton.SR1</version>
                <type>pom</type>
                <scope>import</scope>
            </dependency>
            <!--  springcloud cloud alibaba 2.1.0.RELEASE    -->
            <dependency>
                <groupId>com.alibaba.cloud</groupId>
                <artifactId>spring-cloud-alibaba-dependencies</artifactId>
                <version>2.1.0.RELEASE</version>
                <type>pom</type>
                <scope>import</scope>
            </dependency>
            <dependency>
                <groupId>mysql</groupId>
                <artifactId>mysql-connector-java</artifactId>
                <version>${mysql.version}</version>
            </dependency>
            <dependency>
                <groupId>com.alibaba</groupId>
                <artifactId>druid</artifactId>
                <version>${druid.version}</version>
            </dependency>
            <dependency>
                <groupId>org.mybatis.spring.boot</groupId>
                <artifactId>mybatis-spring-boot-starter</artifactId>
                <version>${mybatis.spring.boot.version}</version>
            </dependency>
            <dependency>
                <groupId>log4j</groupId>
                <artifactId>log4j</artifactId>
                <version>${log4j.version}</version>
            </dependency>
            <dependency>
                <groupId>junit</groupId>
                <artifactId>junit</artifactId>
                <version>${junit.version}</version>
            </dependency>
            <dependency>
                <groupId>org.projectlombok</groupId>
                <artifactId>lombok</artifactId>
                <version>${lombok.version}</version>
                <optional>true</optional>
            </dependency>
        </dependencies>
    </dependencyManagement>
    <dependencies>
        <dependency>
            <groupId>org.springframework.boot</groupId>
            <artifactId>spring-boot-starter</artifactId>
        </dependency>

        <dependency>
            <groupId>org.springframework.boot</groupId>
            <artifactId>spring-boot-starter-test</artifactId>
            <scope>test</scope>
        </dependency>
    </dependencies>
2.3.2建立服务的提供者alibaba-provider-payment9001
- 改pom
    <dependencies>
        <!--  SpringCloud alibaba nacos    -->
        <dependency>
            <groupId>com.alibaba.cloud</groupId>
            <artifactId>spring-cloud-starter-alibaba-nacos-discovery</artifactId>
        </dependency>
        <!--  web组件      -->
        <dependency>
            <groupId>org.springframework.boot</groupId>
            <artifactId>spring-boot-starter-web</artifactId>
        </dependency>
        <dependency>
            <groupId>org.springframework.boot</groupId>
            <artifactId>spring-boot-starter-actuator</artifactId>
        </dependency>
        <dependency>
            <groupId>org.springframework.boot</groupId>
            <artifactId>spring-boot-devtools</artifactId>
            <scope>runtime</scope>
            <optional>true</optional>
        </dependency>

        <dependency>
            <groupId>org.springframework.boot</groupId>
            <artifactId>spring-boot-starter-test</artifactId>
            <scope>test</scope>
        </dependency>
    </dependencies>
- 建yml(application.yml)
server:
  port: 9001 #端口号
spring:
  application:
    name: nacos-payment-provider #服务名称
  cloud:
    nacos:
      discovery:
        server-addr: localhost:8848 #配置nacos地址
management:
  endpoints:
    web:
      exposure:
        include: "*" #监控的东西
- 主启动
@SpringBootApplication
@EnableDiscoveryClient
public class AlibabaProviderPayment9001Application {

    public static void main(String[] args) {
        SpringApplication.run(AlibabaProviderPayment9001Application.class, args);
    }

}
- 业务类(PaymentController )
@RestController
public class PaymentController {

    @Value("${server.port}")
    private String serverPort;

    @GetMapping(value = "/payment/nacos/{id}")
    public String getPayment(@PathVariable("id") Integer id) {
        return "nacos registry, serverPort: " + serverPort + "\t id" + id;
    }

}
2.3.4建立服务的提供者alibaba-provider-payment9002
- 改pom
    <dependencies>
        <!--  SpringCloud alibaba nacos    -->
        <dependency>
            <groupId>com.alibaba.cloud</groupId>
            <artifactId>spring-cloud-starter-alibaba-nacos-discovery</artifactId>
        </dependency>
        <!--  web组件      -->
        <dependency>
            <groupId>org.springframework.boot</groupId>
            <artifactId>spring-boot-starter-web</artifactId>
        </dependency>
        <dependency>
            <groupId>org.springframework.boot</groupId>
            <artifactId>spring-boot-starter-actuator</artifactId>
        </dependency>
        <dependency>
            <groupId>org.springframework.boot</groupId>
            <artifactId>spring-boot-devtools</artifactId>
            <scope>runtime</scope>
            <optional>true</optional>
        </dependency>

        <dependency>
            <groupId>org.springframework.boot</groupId>
            <artifactId>spring-boot-starter-test</artifactId>
            <scope>test</scope>
        </dependency>
    </dependencies>
- 建yml(application.yml)
server:
  port: 9002 #端口号
spring:
  application:
    name: nacos-payment-provider #服务名称
  cloud:
    nacos:
      discovery:
        server-addr: localhost:8848 #配置nacos地址
management:
  endpoints:
    web:
      exposure:
        include: "*" #监控的东西
- 主启动
@SpringBootApplication
@EnableDiscoveryClient
public class AlibabaProviderPayment9002Application {

    public static void main(String[] args) {
        SpringApplication.run(AlibabaProviderPayment9001Application.class, args);
    }

}
- 业务类(PaymentController )
@RestController
public class PaymentController {

    @Value("${server.port}")
    private String serverPort;

    @GetMapping(value = "/payment/nacos/{id}")
    public String getPayment(@PathVariable("id") Integer id) {
        return "nacos registry, serverPort: " + serverPort + "\t id" + id;
    }

}
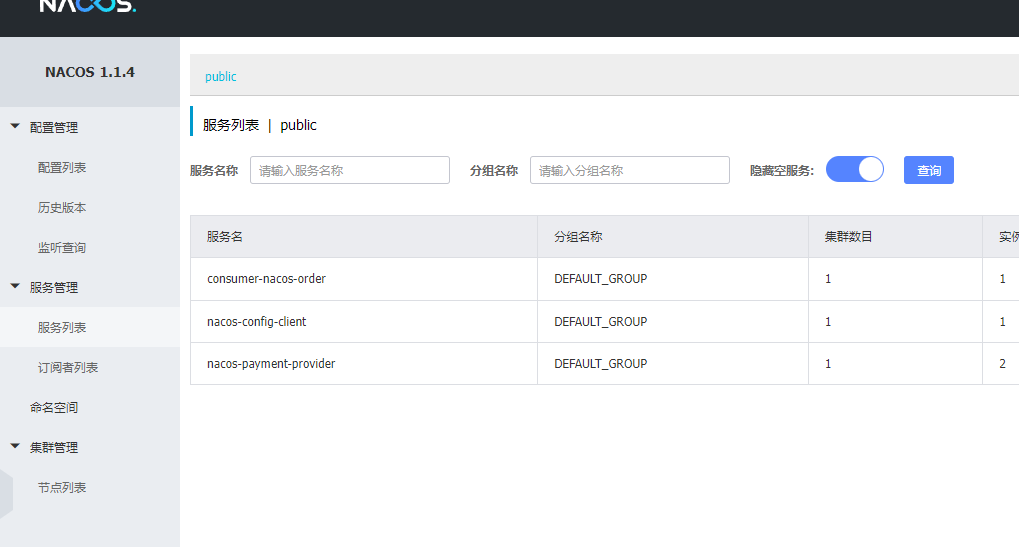
结果查看
分别启动nacos、alibaba-provider-payment9001和alibaba-provider-payment9002
在浏览器上输入网址:http://localhost:8848/nacos/
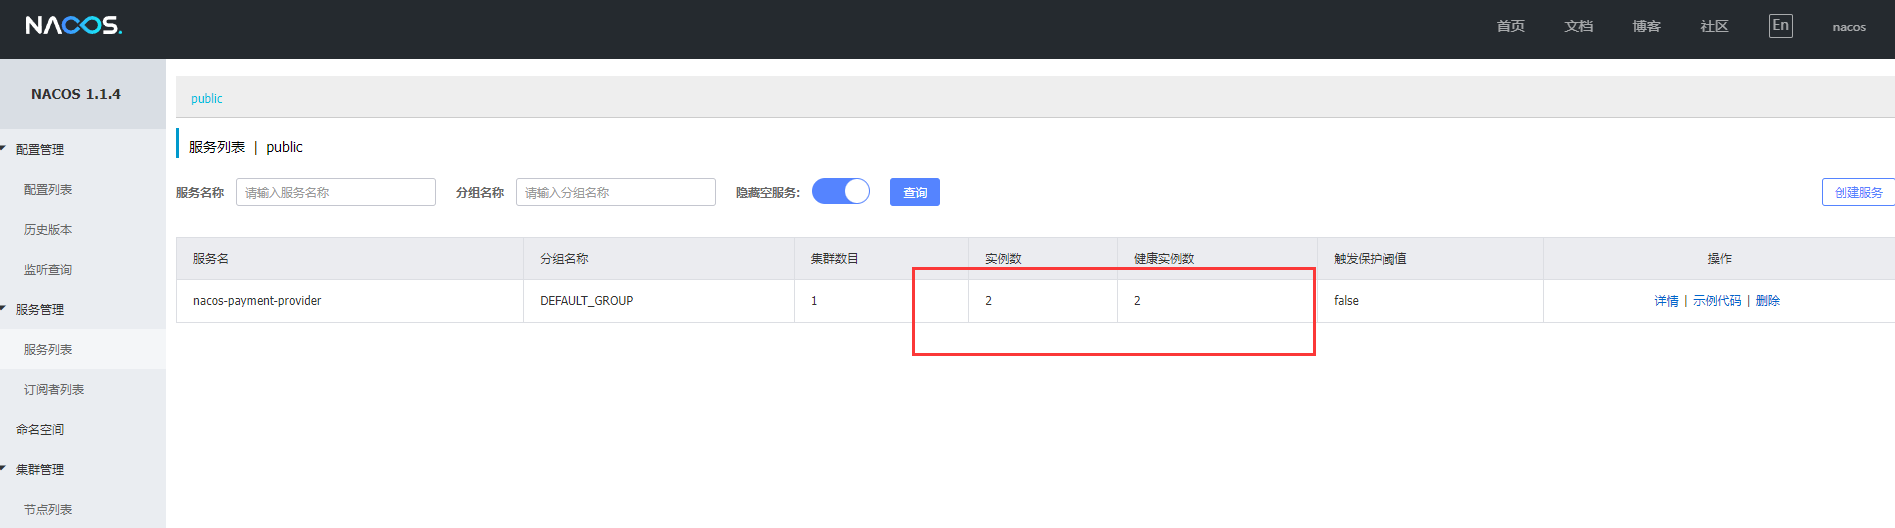
可以看出两个服务的提供者都注册进来了
2.4基于nacos的服务消费者
nacos自带负载均衡机制
- 建立一个名为consumer-nacos-order80的module
- 导入相关的依赖
<dependencies>
        <!--  SpringCloud alibaba nacos    -->
        <dependency>
            <groupId>com.alibaba.cloud</groupId>
            <artifactId>spring-cloud-starter-alibaba-nacos-discovery</artifactId>
        </dependency>
        <!--  web组件      -->
        <dependency>
            <groupId>org.springframework.boot</groupId>
            <artifactId>spring-boot-starter-web</artifactId>
        </dependency>
        <dependency>
            <groupId>org.springframework.boot</groupId>
            <artifactId>spring-boot-starter-actuator</artifactId>
        </dependency>
        <dependency>
            <groupId>org.springframework.boot</groupId>
            <artifactId>spring-boot-devtools</artifactId>
            <scope>runtime</scope>
            <optional>true</optional>
        </dependency>
        <dependency>
            <groupId>org.projectlombok</groupId>
            <artifactId>lombok</artifactId>
        </dependency>
        <dependency>
            <groupId>org.springframework.boot</groupId>
            <artifactId>spring-boot-starter-test</artifactId>
            <scope>test</scope>
        </dependency>
    </dependencies>
- 写yaml
server:
  port: 80
  undertow:
    decode-url:
spring:
  application:
    name: consumer-nacos-order
  cloud:
    nacos:
      discovery:
        server-addr: localhost:8848

server-url:
  nacos-user-service: http://nacos-payment-provider #消费者将要去访问的微服务名称(注册成功进nacos的微服务提供者)
- 主启动
@SpringBootApplication
@EnableDiscoveryClient
public class ConsumerNacosOrder80 {
    public static void main(String[] args) {
        SpringApplication.run(ConsumerNacosOrder80.class,args);
    }
}
- 配置类
@Configuration
public class ApplicationContextConfig {

    @Bean
    @LoadBalanced  //负载均衡
    public RestTemplate getRestTemplate(){
        return new RestTemplate();
    }
}
- controller
@RestController
@Slf4j
public class NacosOrderController {

    @Resource
    private RestTemplate restTemplate;

    @Value("${server-url.nacos-user-service}")
    private String serverUrl;  //在yml里面写的提供者服务路径,  值为:http://nacos-provider


    @GetMapping(value="consumer/payment/nacos/{id}")
    public String paymentInfo(@PathVariable("id") int id)
    {
        return restTemplate.getForObject(serverUrl+"/payment/nacos/"+id,String.class);
    }


}
测试
启动nacos,启动9001,9002和80端口,访问http://localhost/consumer/payment/nacos/111会发现轮询端口9001和端口9002
2.5各种服务中心对比
| 服务注册与服务框架 | CAP模型 | 控制台管理 | 社区活跃度 |
|---|---|---|---|
| Eureka | AP高可用 | 支持 | 低(2.x版本闭源) |
| Zookeeper | CP一致 | 支持 | 中 |
| Consul | CP | 支持 | 高 |
| Nacos | AP(可以切换) | 支持 高 |
| 组件名 | 语言 | CAP | 服务健康检查 | 对外暴露接口 | SpringCloud集合 |
|---|---|---|---|---|---|
| Eureka | java | AP | 可配支持 | HTTP | 已集成 |
| Consul | Go | CP | 支持 | HTTP/DNS | 已集成 |
| Zookeeper | java | CP | 支持 | 客户端 | 已集成 |
Nacos的AP和CP
C是所有节点在同一时间看到的数据是一致的,而A的定义是所有的请求都会收到响应
何时选择使用何种模式?
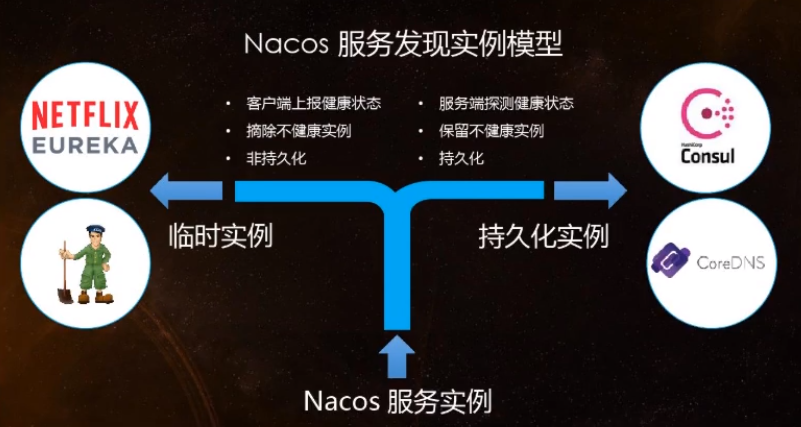
一般来说,如果不需要存储服级的信息且服务实例是通过nacos-client注册,并能够保持心跳上报,那么就可以选择AP模式。当前主流的服务如Spring cloud和Dubbo服务,都适用于AP模式,AP模式为了服务的可用性而减弱了一致性,因此AP模式下只支持注册临时实例。
如果需要在服务级别编辑或者存储配置信息,那么CP是必须,K8S服务和DNS服务则适用于CP模式CP模式下则支持注册持久化实例,此时则是以Raft协议为集群运行模式,该模式下汪册实例之前须先注册服务,如果服务不存在,则会返回错误
切换命令:curl -X PUT '$NACOS_SERVER:8848/nacos/v1/ns/operator/switches?entry=serverMode&value=CP'
2.6nacos作为配置中心
2.6.1 基础配置
- 创建config-nacos-client-3377module
- 改pom
 <dependencies>
        <!--   nacos config     -->
        <dependency>
            <groupId>com.alibaba.cloud</groupId>
            <artifactId>spring-cloud-starter-alibaba-nacos-config</artifactId>
        </dependency>
        <!--  SpringCloud alibaba nacos    -->
        <dependency>
            <groupId>com.alibaba.cloud</groupId>
            <artifactId>spring-cloud-starter-alibaba-nacos-discovery</artifactId>
        </dependency>
        <!--  web组件      -->
        <dependency>
            <groupId>org.springframework.boot</groupId>
            <artifactId>spring-boot-starter-web</artifactId>
        </dependency>
        <dependency>
            <groupId>org.springframework.boot</groupId>
            <artifactId>spring-boot-starter-actuator</artifactId>
        </dependency>
        <dependency>
            <groupId>org.springframework.boot</groupId>
            <artifactId>spring-boot-devtools</artifactId>
            <scope>runtime</scope>
            <optional>true</optional>
        </dependency>
        <dependency>
            <groupId>org.springframework.boot</groupId>
            <artifactId>spring-boot-starter-test</artifactId>
            <scope>test</scope>
        </dependency>
    </dependencies>
- 写yml
Nacos同SpringCloud-config一样,在项目初始化时,要保证从配置中心拉取配置拉取配置后才能保证项目的正常启动
springboot中配置文件的加载时存在优先级顺序的,bootstrap优先级高于application
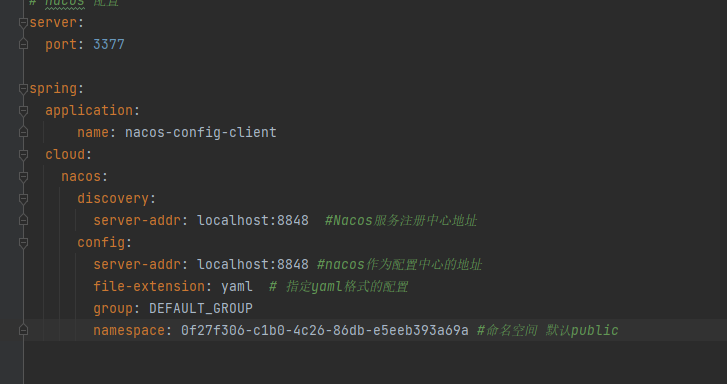
在boostrap.yml中
# nacos 配置
server:
  port: 3377

spring:
  application:
    name: nacos-config-client
  cloud:
    nacos:
      discovery:
        server-addr: localhost:8848  #Nacos服务注册中心地址
      config:
        server-addr: localhost:8848 #nacos作为配置中心的地址
        file-extension: yaml  # 指定yaml格式的配置
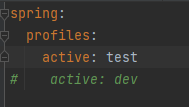
在application.yml中
spring:
  profiles:
    active: dev
- 主启动
@SpringBootApplication
@EnableDiscoveryClient
public class NacosConfig3377 {

    public static void main(String[] args) {
        SpringApplication.run(NacosConfig3377.class,args);
    }
}
- 业务类
@RestController
@RefreshScope //支持nacos的动态刷新功能
public class ConfigCenterController {

    @Value("${config.info}")
    private String configInfo;

    @GetMapping("/config/info")
    public String getConfigInfo()
    {
        return configInfo;
    }
}
nacos同springcloud-config一样,在项目初始化时,要先从配置中心进行配置拉取,拉取配置之后,才能保证项目的正常启动。springboot的配置文件的加载是存在优先级的,bootstrap优先级高于application。(bootstrap中放共性,application中放个性)
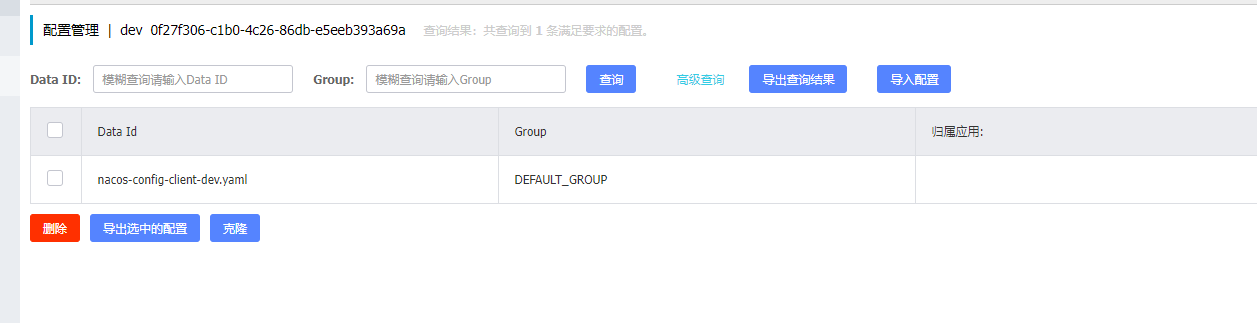
nacos中的dataid的组成格式及与springboot配置文件中的匹配规则:
在 Nacos Spring Cloud 中,dataId 的完整格式如下:(就是说在nacos端我们怎么命名文件的)
${prefix}-${spring.profiles.active}.${file-extension}
prefix默认为spring.application.name的值,也可以通过配置项 spring.cloud.nacos.config.prefix来配置。spring.profiles.active即为当前环境对应的 profile,详情可以参考 Spring Boot文档。 注意:当 spring.profiles.active为空时,对应的连接符 - 也将不存在,dataId的拼接格式变成 ${prefix}.${file-extension}
file-exetension为配置内容的数据格式,可以通过配置项spring.cloud.nacos.config.file-extension来配置。目前只支持 properties和 yaml类型。(注意nacos里必须使用yaml)
综合以上说明,和下面的截图,Nacos 的dataid(类似文件名)应为: nacos-config-client-dev.yaml (必须是yaml)
访问http://localhost:3377/config/info会得到里面的配置信息并且自带刷新功能
2.6.2作为分类配置
2.6.2.1开发中遇到的问题
- 问题一:在实际开发中,通常一个系统会准备dev开发环境、test测试环境,prod生产环境,如何保证指定环境启动服务时能正确的读取到Nacos上响应的环境配置文件呢?
- 问题二:一个大型微服务系统会有很多微服务子项目,每个为项目由会有相应的开发环境,测试环境,预发环境,正式环境,有该如何对微服务的配置进行管理
2.6.2.2namespace命名空间
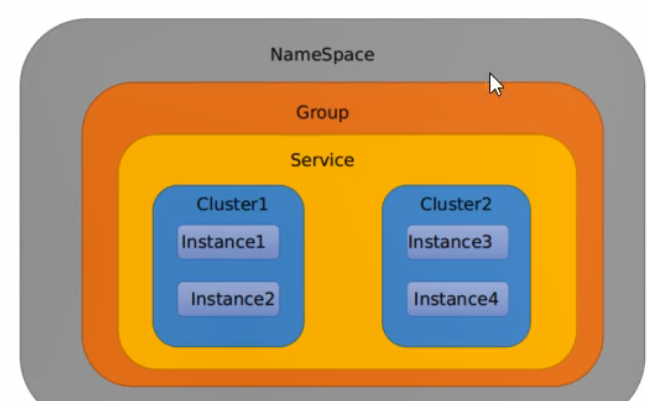
namespace类似于就java里面的package名和类名
最外面的namespace是用于分区部署环境,Group和DataID逻辑上区分为两个目标对象
Nacos的默认命名空间是public,Namespace主要用来实现隔离,比如现在我们有三个环境:开发、生产、测试环境,我们可以创建三个namespace,不同的namespace之间的隔离的
Group默认是DEAFULT_GROUP,Group可以把不同的微服务划分到同一分组里面
Service就是微服务,一个service可以包含多个cluster集群,nacos默认cluster是DEFAULT,Cluster是对指定微服务的一个虚拟划分。比方说为了容灾,将service微服务分别部署在了杭州机房和广州机房,这是就可以给杭州机房的service微服务起一个集群名称HZ给广州的service微服务起一个集群名称GZ,还可以尽量让同一个机房的微服务互相调用,以提升虚拟。最后instance就是微服务的实例
2.6.3常见的分组
3.6.3.1DataID分组方案
- 指定spring.profile.active和配置文件的dataID来,使不同环境下读取不同的配置
- 配置空间+配置分组+新建dev和test两个dataid:就是创建-后不同的两个文件名nacos-config-client-dev.yaml、nacos-config-client-test.yaml
- 通过IDEA里的spring.profile.active属性就能进行多环境下配置文件的读取

- 测试:http://localhost:3377/config/info 配置什么就加载什么
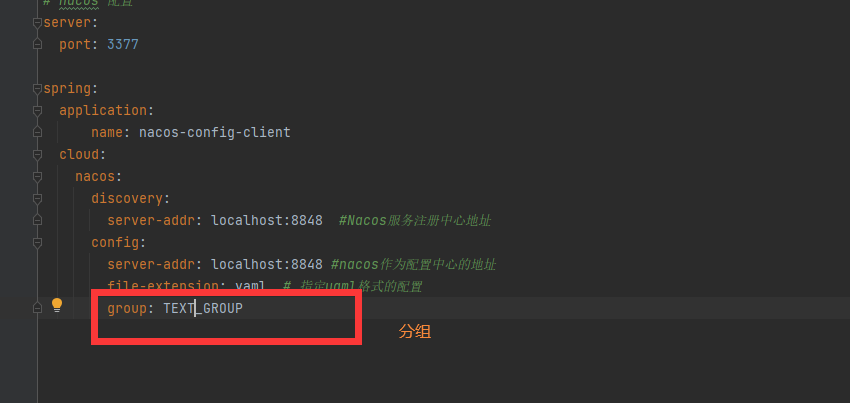
3.6.3.2Group分组方案
- 在nacos创建配置文件时,给文件指定分组。
- 在IDEA中该group内容
- 实现的功能:当修改开发环境时,只会从同一group中进行切换。

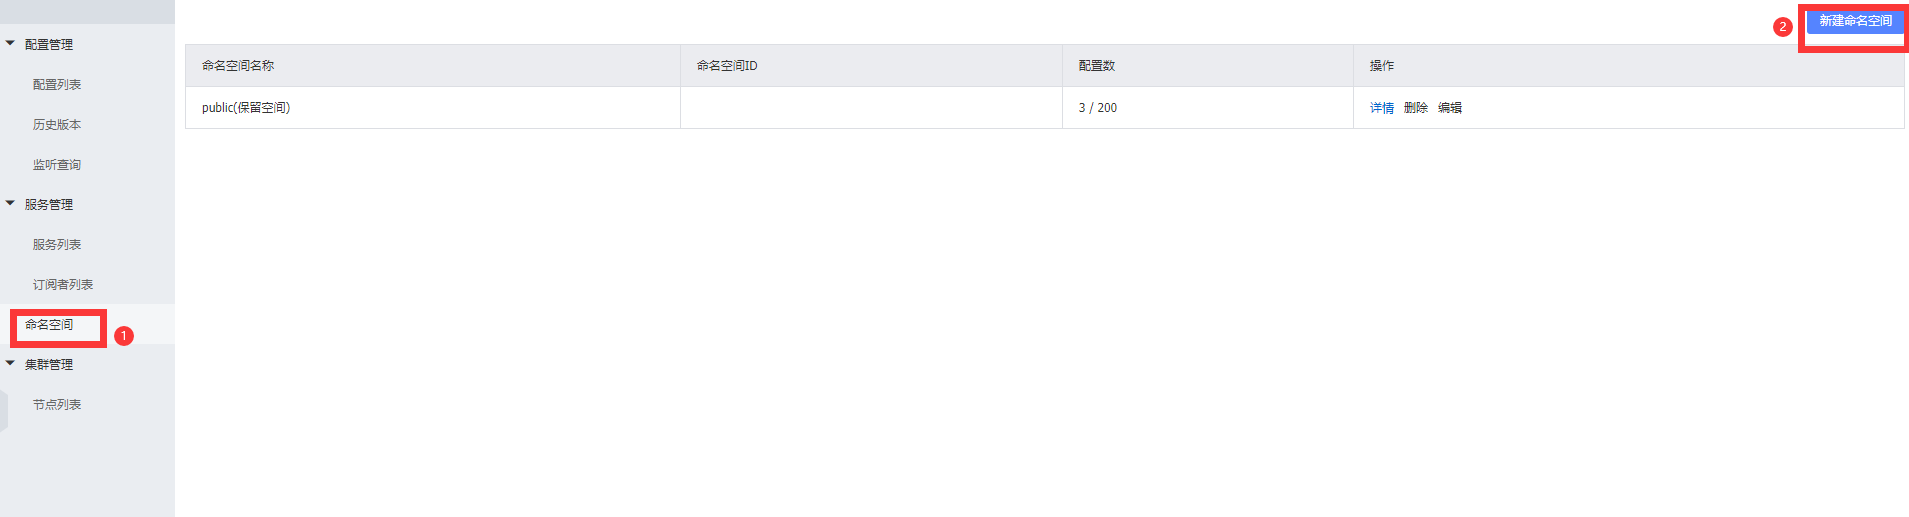
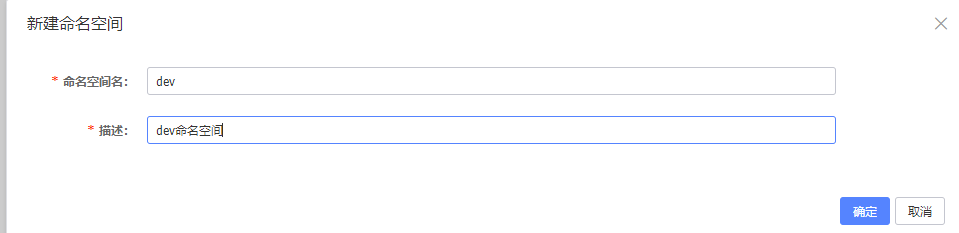
3.6.3.3namesapce分组
- 默认是default这个是不允许删除的,可以创建一个新的命名空间,会自动给创建的命名空间一个流水号。
- 在nacos新建命名空间,自动出现流水号
- 在IDEA的yml中指定命名空间namespace: 流水号
步骤:
- 选择名空间下面的新建命名空间
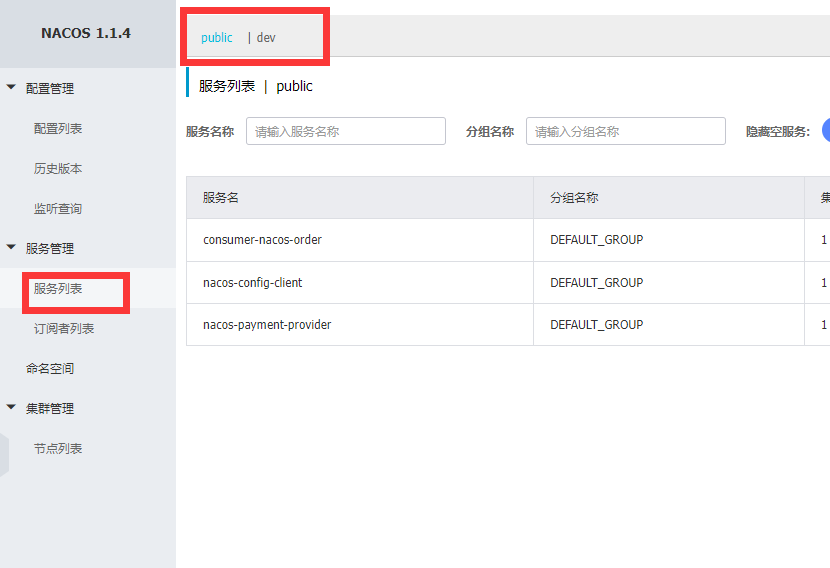
- 输入命名空间名和描述
- 在服务列表中会显示新建的命名空间
- 同上面一样建立服务
- bootstrap.yml配置
访问结果

2.7Nacos集群
默认的nacos使用嵌入式数据库实现数据的存储,所以如果启用多个默认配置下的nacos节点,数据的存储存在一致性问题,Nacos采用了集中式存储的方式来支持集群化部署,目前只支持mysql的存储

2.7.1Nacos支持三种部署模式
单机模式 - 用于测试和单机试用。
集群模式 - 用于生产环境,确保高可用。
多集群模式 - 用于多数据中心场景。
单机模式支持mysql:在0.7版本之前,在单机模式时nacos使用嵌入式数据库(derby,他的pom里有这个依赖)实现数据的存储,不方便观察数据存储的基本情况
2.7.2nacos持久化配置解释
2.7.2.1. Nacos默认自带的是嵌入式数据库Derby
2.7.2.2. Derby到mysql切换
- 找到nacos\conf目录下的SQL脚本

- 执行nacos-mysql.sql脚本
- 修改nacos/conf/application.properties文件(切换数据库),增加支持mysql数据源配置(目前只支持mysql),添加mysql数据源的url、用户名和密码。
# 切换数据库
spring.datasource.platform=mysql

db.num=1
db.url.0=jdbc:mysql://localhost:3306/nacos_devtest?characterEncoding=utf8&connectTimeout=1000&socketTimeout=3000&autoReconnect=true
db.user=root
db.password=123456
- 访问:http://localhost:8848/nacos
2.7.3 Linux版nacos+mysql生产环境配置
预计需要1个nginx+3个nacos注册中心+1个mysql
- 下载linux版本的nacos
- 解压
tar -zvxf nacos-server-1.1.4.tar.gz
3.7.4nacos集群
3.7.4.1 Linux上mysql数据库配置
打开数据库执行nacos\conf目录下的SQL脚本
3.7.4.2.application.properties配置
修改nacos/conf/application.properties文件(切换数据库),增加支持mysql数据源配置(目前只支持mysql),添加mysql数据源的url、用户名和密码。
spring.datasource.platform=mysql

db.num=1
db.url.0=jdbc:mysql://localhost:3306/nacos_devtest?characterEncoding=utf8&connectTimeout=1000&socketTimeout=3000&autoReconnect=true
db.user=root
db.password=123456
3.7.4.3 Linux服务器上nacos的集群配置
- 梳理出3台nacos集群的不同服务器端口
文件备份cp cluster.conf.example cluster.conf
修改集群的地址:vim cluster.conf
主要此时的ip地址一定是hostname -i查找出来的

3.7.4.4编辑nacos的启动脚本start.sh,使他能够接受不同的脚本
集群启动,我们希望类似于其他软件的shell命令,传递不同的端口号启动不同的nacos实例命令: ./startup.sh -p 3333表示启动端口号为3333的nacos服务器实例,和上一步cluster.conf一样
编辑启动文件vim startup.sh
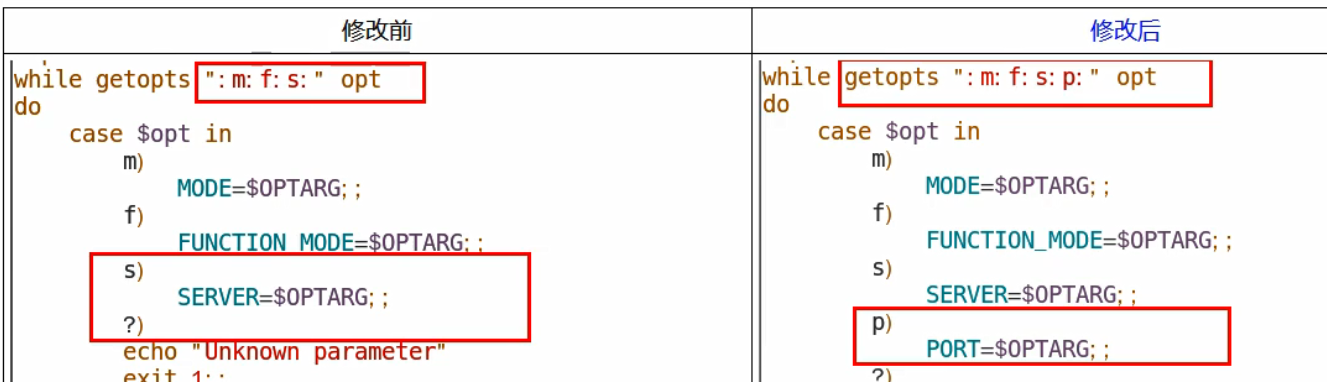

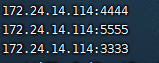
依次执行命令启动3个nacos集群:
./startup.sh -p 3333 表示启动端口号为3333的nacos服务器实例
./startup.sh -p 4444
./startup.sh -p 5555
ps -ef | grep nacos | grep -v grep | wc -
3.7.4.5配置nginx,由他作为负载均衡器
- 修改nginx配置,把他作为负载均衡:
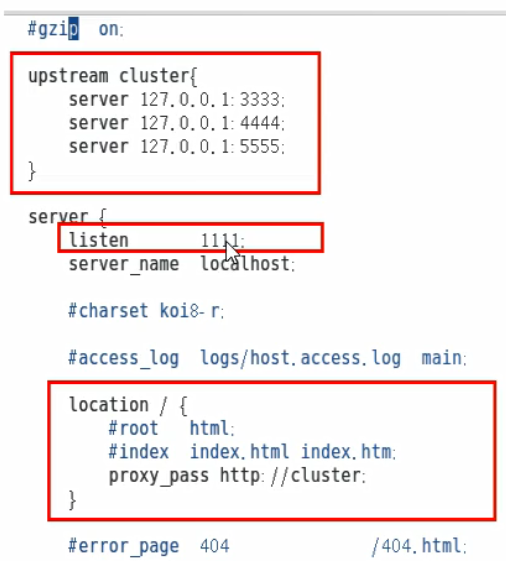
- 启动nginx:
./nginx -c ../conf/nginx.conf - 通过nginx访问:192.168.1.2:1111/nacos/#/login
使用 9002 模块注册进Nacos集群,并获取它上面配置文件的信息application.yml中的server-addr: 192.168.1.2:1111,进行测试。
4. sentinel
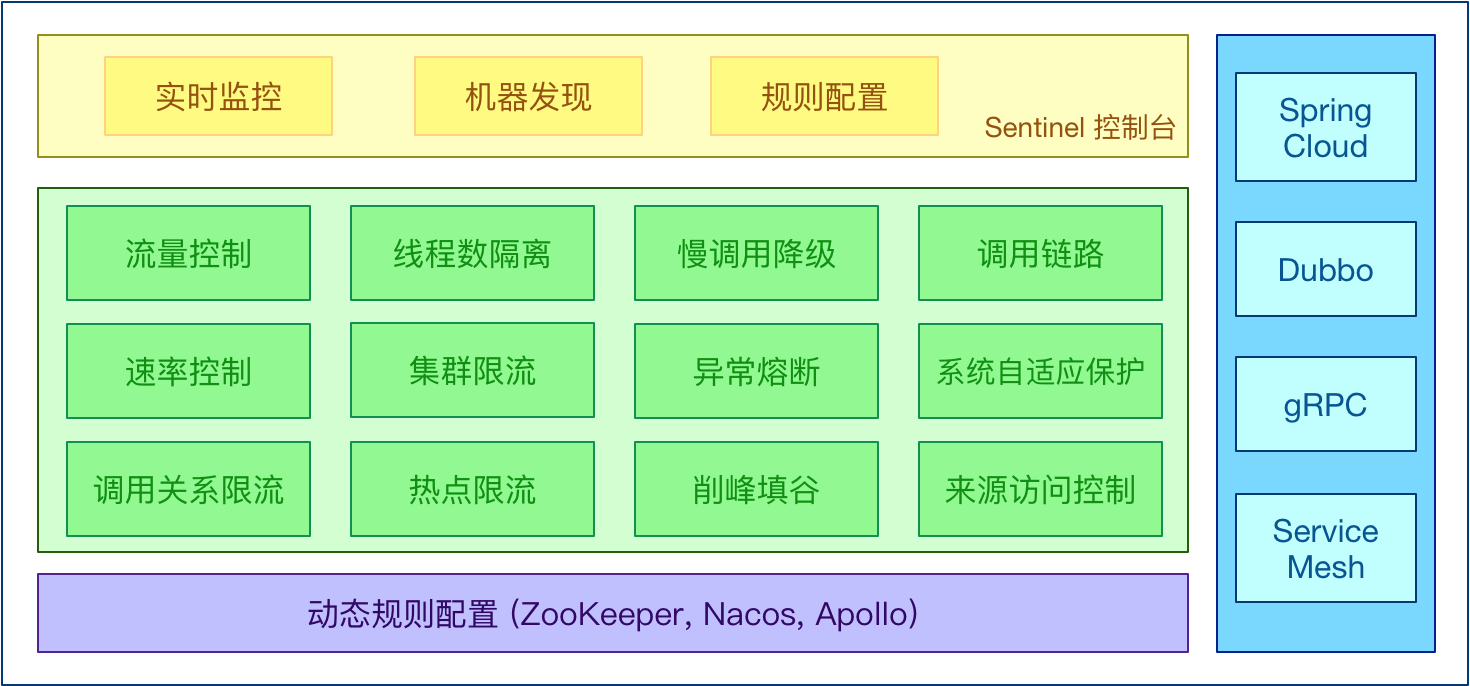
sentinel在 springcloud Alibaba 中的作用是实现熔断和限流。类似于Hystrix豪猪
4.1 sentinel是什么
随着微服务的流行,服务和服务之间的稳定性变得越来越重要。Sentinel 以流量为切入点,从流量控制、熔断降级、系统负载保护等多个维度保护服务的稳定性。
Sentinel 具有以下特征:
- 丰富的应用场景:Sentinel 承接了阿里巴巴近 10 年的双十一大促流量的核心场景,例如秒杀(即突发流量控制在系统容量可以承受的范围)、消息削峰填谷、集群流量控制、实时熔断下游不可用应用等。
- 完备的实时监控:Sentinel 同时提供实时的监控功能。您可以在控制台中看到接入应用的单台机器秒级数据,甚至 500 台以下规模的集群的汇总运行情况。
- 广泛的开源生态:Sentinel 提供开箱即用的与其它开源框架/库的整合模块,例如与 Spring Cloud、Apache Dubbo、gRPC、Quarkus 的整合。您只需要引入相应的依赖并进行简单的配置即可快速地接入 Sentinel。同时 Sentinel 提供 Java/Go/C++ 等多语言的原生实现。
- 完善的 SPI 扩展机制:Sentinel 提供简单易用、完善的 SPI 扩展接口。您可以通过实现扩展接口来快速地定制逻辑。例如定制规则管理、适配动态数据源等。
4.1.sentinel下载
sentinel下载地址为:https://github.com/alibaba/Sentinel/releases
选择相应的版本并进行下载
4.2 sentinel主要特性
4.1.3 sentinel可以干嘛
解决服务使用中的各种问题:服务雪崩,服务降级,服务熔断,服务限流
4.2安装sentinel控制台
4.2.1 sentinel组成部分
- 核心库(Java 客户端)不依赖任何框架/库,能够运行于所有 Java 运行时环境,同时对 Dubbo / Spring Cloud 等框架也有较好的支持。
- 控制台(Dashboard)基于 Spring Boot 开发,打包后可以直接运行,不需要额外的 Tomcat 等应用容器。
4.2.2 下载
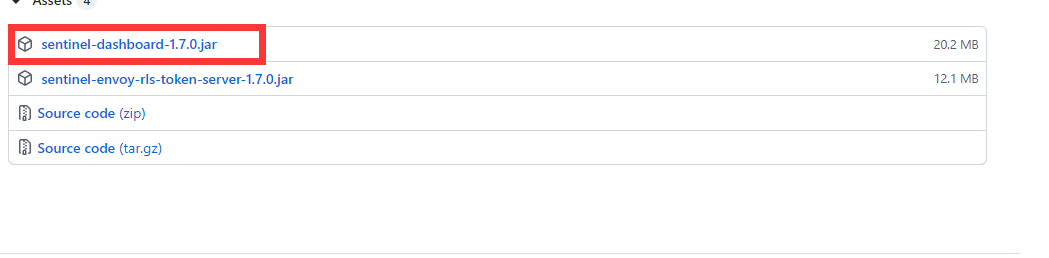
下载地址:https://github.com/alibaba/Sentinel/releases,下载sentinel-dashboard-1.8.2.jar
4.2.3运行命令
前提:java8 运行环境ok,8080端口不能别占用
命令:java -jar sentinel-dashboard-1.8.2.jar

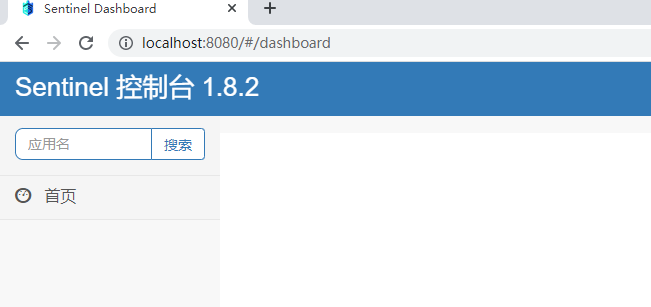
4.2.4访问sentinel界面
访问网址:localhost:8080,用户名和密码都为sentinel
4.3 初始化演示工程
- 启动nacos
- 新建模块 alibaba-sentinel-service8401
pom
 <dependencies>
       <!-- 后续做Sentinel的持久化会用到的依赖 -->
       <dependency>
           <groupId>com.alibaba.csp</groupId>
           <artifactId>sentinel-datasource-nacos</artifactId>
       </dependency>
       <!-- sentinel  -->
       <dependency>
           <groupId>com.alibaba.cloud</groupId>
           <artifactId>spring-cloud-starter-alibaba-sentinel</artifactId>
       </dependency>
       <!-- springcloud alibaba nacos 依赖,Nacos Server 服务注册中心 -->
       <dependency>
           <groupId>com.alibaba.cloud</groupId>
           <artifactId>spring-cloud-starter-alibaba-nacos-discovery</artifactId>
       </dependency>

       <!-- springboot整合Web组件 -->
       <dependency>
           <groupId>org.springframework.boot</groupId>
           <artifactId>spring-boot-starter-web</artifactId>
       </dependency>
       <dependency>
           <groupId>org.springframework.boot</groupId>
           <artifactId>spring-boot-starter-actuator</artifactId>
       </dependency>

       <!-- 日常通用jar包 -->
       <dependency>
           <groupId>org.mybatis.spring.boot</groupId>
           <artifactId>mybatis-spring-boot-starter</artifactId>
       </dependency>
       <dependency>
           <groupId>org.springframework.boot</groupId>
           <artifactId>spring-boot-devtools</artifactId>
           <scope>runtime</scope>
           <optional>true</optional>
       </dependency>
       <dependency>
           <groupId>org.projectlombok</groupId>
           <artifactId>lombok</artifactId>
           <optional>true</optional>
       </dependency>
       <dependency>
           <groupId>org.springframework.boot</groupId>
           <artifactId>spring-boot-starter-test</artifactId>
           <scope>test</scope>
       </dependency>
   </dependencies>
application.yml
server:
  port: 8401
spring:
  application:
    name: alibaba-sentinel-service
  cloud:
    nacos:
      discovery:
        # nacos服务注册中心地址
        server-addr: localhost:8848
    sentinel:
      transport:
        # 配置sentinel dashboard地址
        dashboard: localhost:8080
        # 默认8719端口,加入被占用会自动从8719每次加1扫描,直到扫描未被占用的端口
        port: 8719

management:
  endpoints:
    web:
      exposure:
        include: '*' # 监控的东西
主启动
@SpringBootApplication
@EnableDiscoveryClient
public class AlibabaSentinelService8401Application {

    public static void main(String[] args) {
        SpringApplication.run(AlibabaSentinelService8401Application.class, args);
    }

}
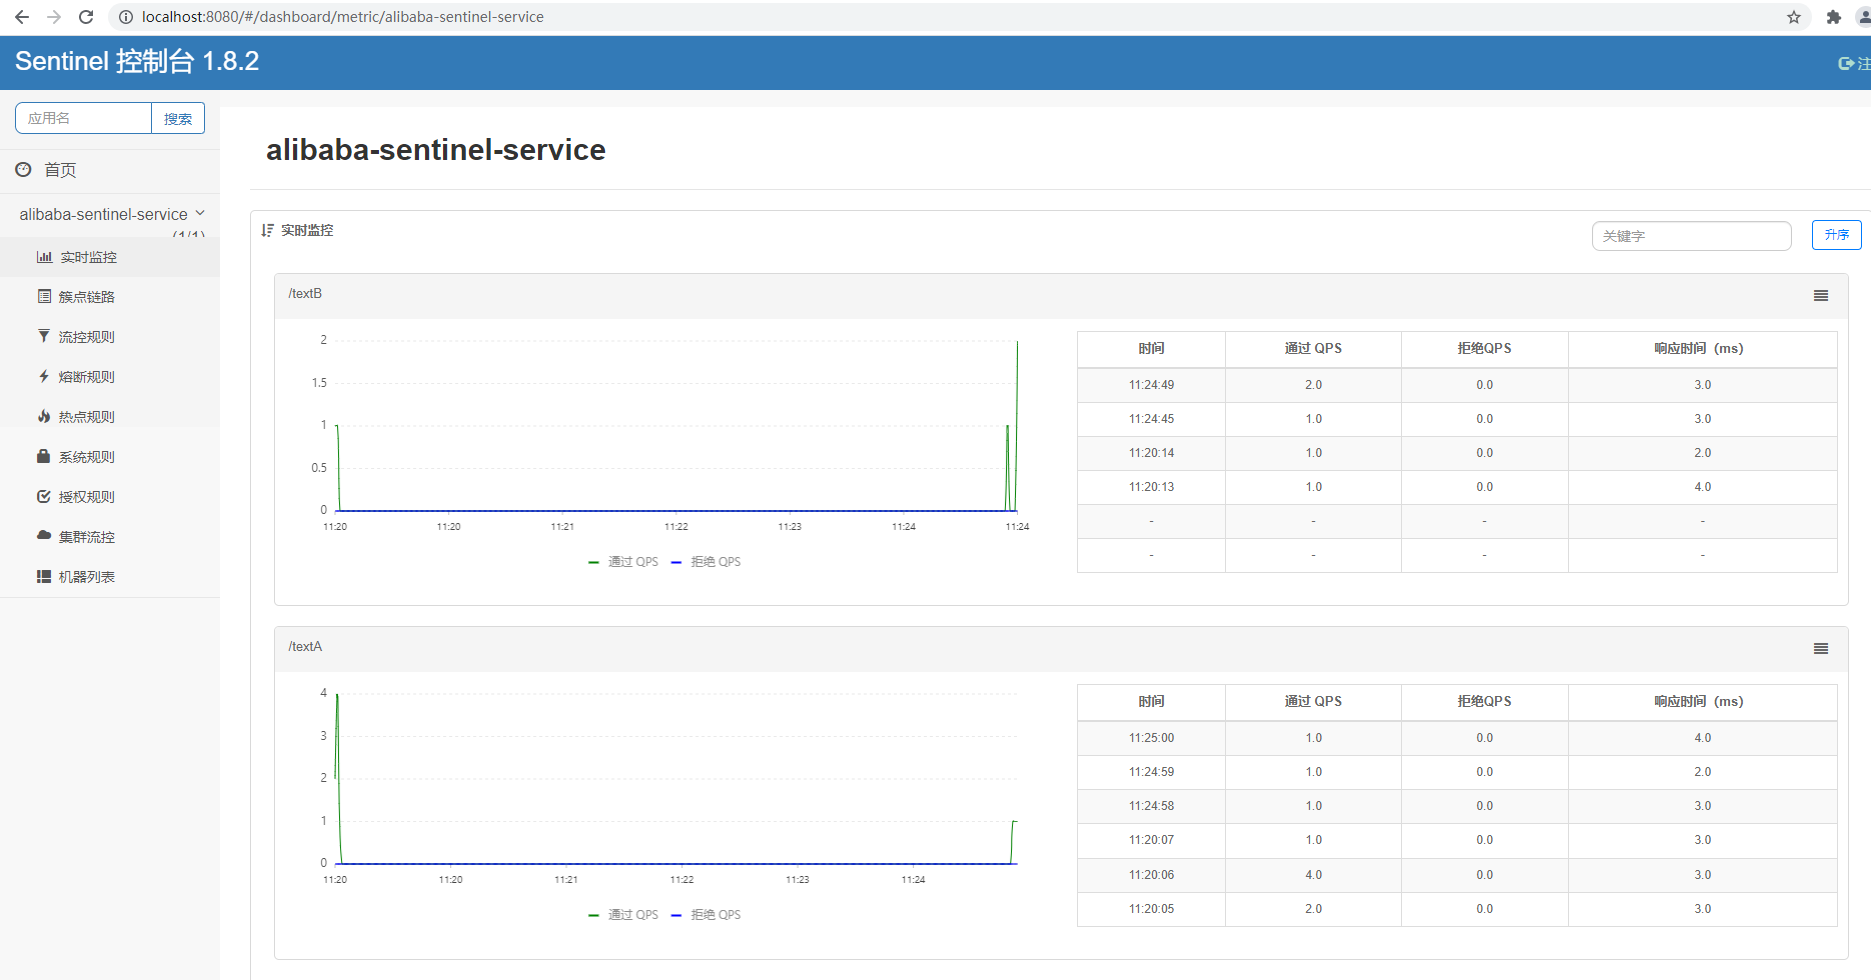
简单的controller测试sentinel的监控
@RestController
public class FlowLimitController {

    @GetMapping("/textA")
    public String textA()
    {
        return "-----------textA";
    }

    @GetMapping("/textB")
    public String textB()
    {
        return "-----------textB";
    }

}
启动sentinel
启动8401
3. 启动8401微服务后台查看sentinel控制台
你会发现什么也没有,因为sentinel采用的是懒加载机制,执行访问一次即可监控到
4.4 流控规则
4.4.1 基本介绍
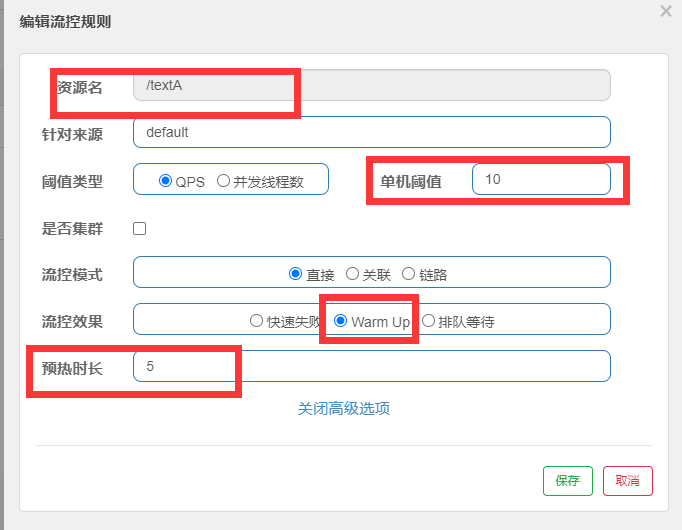
流控规则
- 资源名:唯一名称,默认请求路径
- 针对来源:sentinel可以针对调用者进行限流,填写微服务名,默认default(不区分来源)
- 阈值类型/单机值:
- QPS(每秒钟的请求数量):当调用该api就QPS达到阈值的时候,进行限流
- 线程数.当调用该api的线程数达到阈值的时候,进行限流
- 是否集群:不需要集群
- 流控模式:
- 直接:api达到限流条件时,直接限流。分为QPS和线程数
- 关联:当关联的资到阈值时,就限流自己。别人惹事,自己买单
- 链路:只记录指定链路上的流量(指定资源从入口资源进来的流量,如果达到阈值,就进行限流)【api级别的针对来源】
- 流控效果:
- 快速失败:直接抛异常
- warm up:根据codeFactor(冷加载因子,默认3)的值,从阈值codeFactor,经过预热时长,才达到设置的QPS阈值
重要属性:
| Field | 说明 | 默认值 |
|---|---|---|
| resource | 资源名,资源名是限流规则的作用对象 | |
| count | 限流阈值 | |
| grade | 限流阈值类型,QPS 模式(1)或并发线程数模式(0) | QPS 模式 |
| limitApp | 流控针对的调用来源 | default,代表不区分调用来源 |
| strategy | 调用关系限流策略:直接、链路、关联 | 根据资源本身(直接) |
| controlBehavior | 流控效果(直接拒绝/WarmUp/匀速+排队等待),不支持按调用关系限流 | 直接拒绝 |
| clusterMode | 是否集群限流 | 否 |
4.4.2流控模式–直接失败
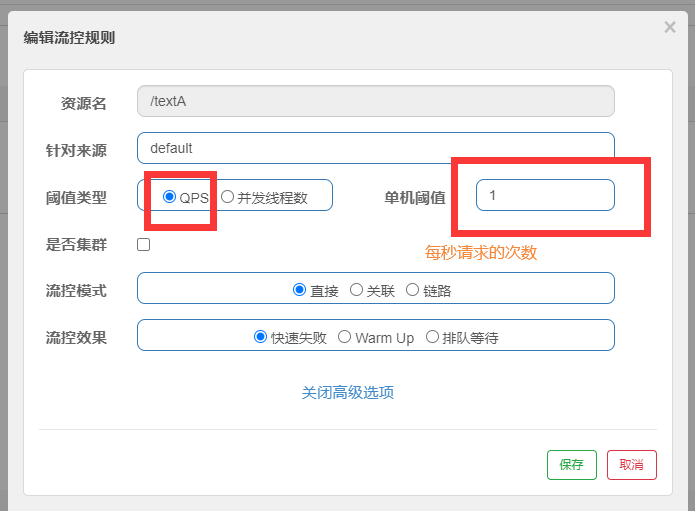
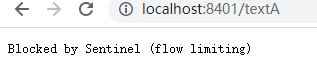
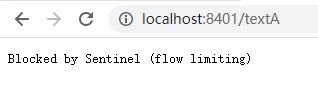
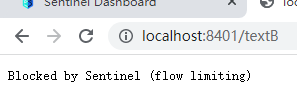
限流表现:当超过阀值,就会被降级。1s内多次刷新网页,localhost:8401/testA,返回Blocked by Sentienl(flow limiting)
QPS和线程数的区别
QPS 类似于银行的保安 :所有的请求到Sentinel 后,他会根据阈值放行,超过报错
线程数类似于银行的窗口:所有的请求会被放进来,但如果阈值设置为1 那么,其他的请求就会报错也就是,银行里只有一个窗口,一个人在办理业务中,其他人跑过来则会告诉你,不行,没到你

4.4.3关联
当关联的资源达到阈值时就限流自己
设置效果
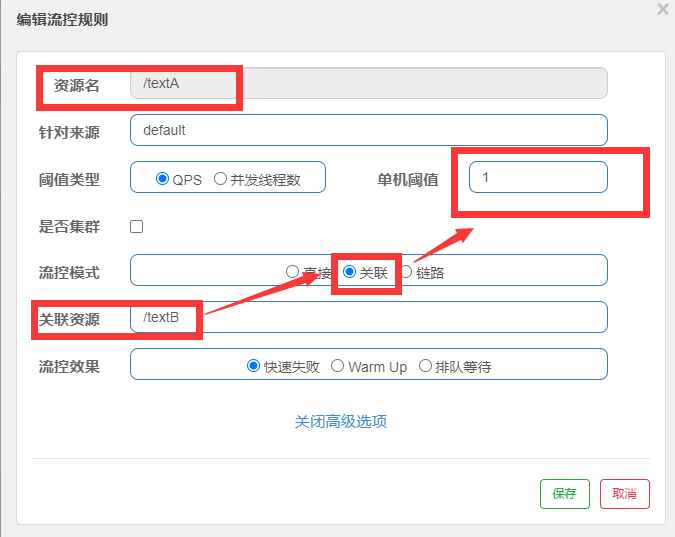
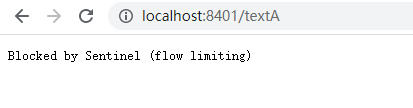
当关联资源/textB的QPS阀值超过1时,就限流/textA的Rest访问地址,当关联资源到阀值后就限制配置好的资源名
用postman高并发运行/textB运行/textA

4.5 流控效果
直接快速失败,默认的流控处理
4.5.1 Warmup(预热)
Warmup方式,即预热/冷启动的方式,当系统长期处于低水位的情况下,当流量突然增加时,直接把系统拉到搞水位可能瞬间把系统压垮,通过“冷启动”,让通过的流量缓慢增加,在一定的时间内逐渐增加到阀值上限,给冷系统一个预热时间,避免冷系统被压垮
公式:阀值除以coldFactor(默认值为3)经过预热时长后会达到阈值
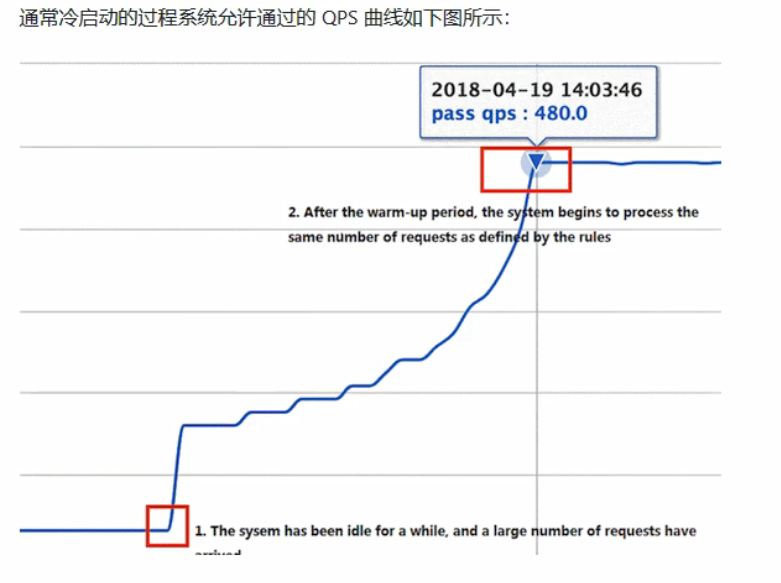
默认coldFactor为3,即请求的QPS从(threshold/3)开始,经过多长的预热时间才逐渐升至设定是QPS阀值
案例:阀值为10 预热时长维护5秒
系统初始化的阀值为10/3约等于3,即阀值刚开始为3,然后经过5秒后阀值才慢慢升高恢复到10
4.5.1 排队等待
匀速排队(Ru1eConstant.CONTROL_BEHAVIOR_RATE_LIMITER)方式会严格控制请求通过的间隔时间,即让请求以均匀的速度通过对应的是漏桶算法。详细文档可以参考流量控制-匀速器模式
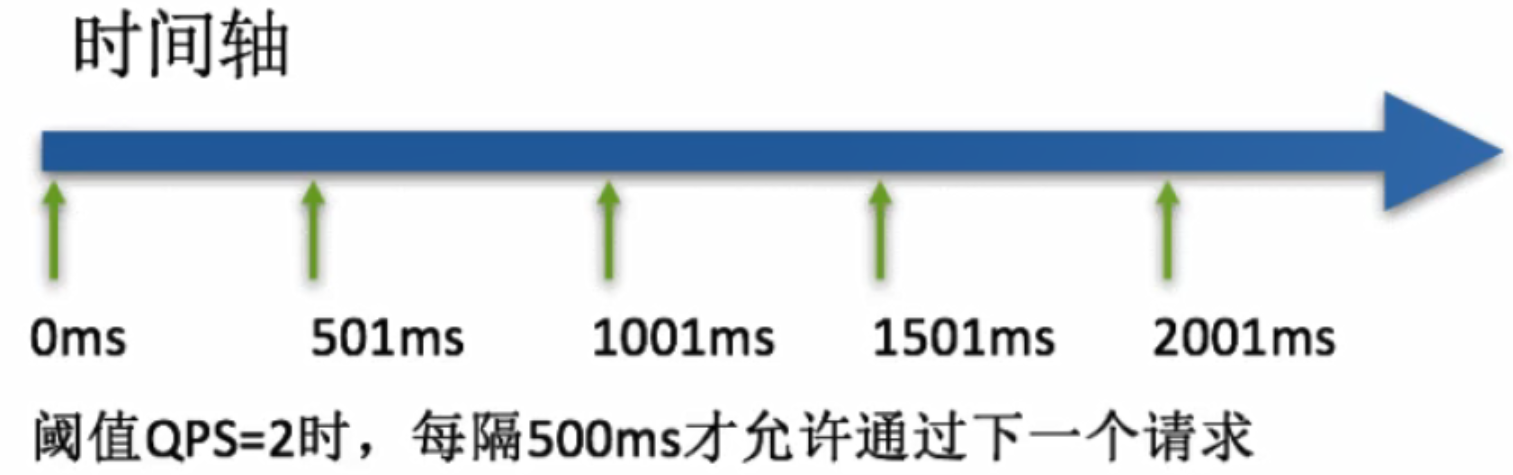
这种方式主要用于处理间隔性突发的流量,例如消息对列。想象一下这样的场景,在某一秒有大量的请求到来,而接下来的月耖则处于空闲状态,我们希系统能够在接下来的空闲期间逐渐处理这些请求,而不是第一秒就拒绝多余的请求
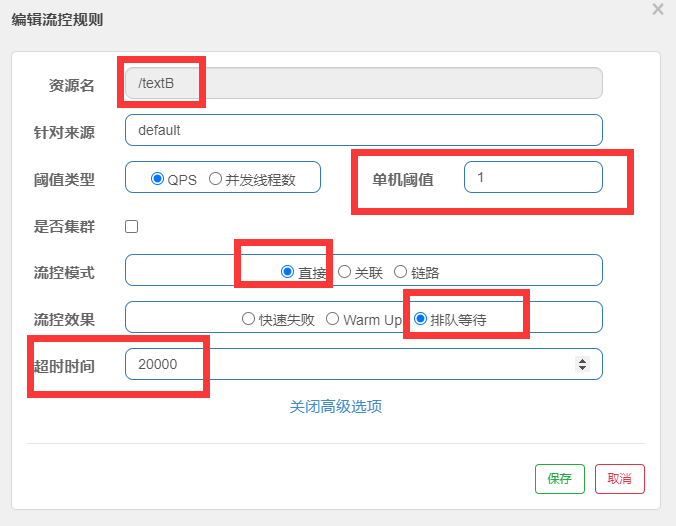
案例
匀速排队,让请求以均匀的速度通过,阀值类型必须设置为QPS,否则无效
设置含义:/terxtB每秒一次请求,超过的话就排队等待,等待的超时时间为20000毫秒
4.6 Sentinel降级
Sentinel熔断降级会在调用链路中某个资源出现不稳定的状态是(例如调用超时或异常比例升高)。对这个资源的调用进行限制,让请求快速失败,避免影响到其他的资源而导致级联错误
当资源降级后,在接下来的降级时间窗口之内,对该资源的调用都会自动熔断
Sentineld的熔断器是没有半开的状态
半开的状态系统自动去检测是否请求异常,没有异常就关闭断路器恢复异常,有异常则继续打开断路器不可用
4.6.1 RT
在controller中加入textC
 @GetMapping("/textC")
    public String textC()
    {
        //暂停几秒钟
        try {
            TimeUnit.SECONDS.sleep(1);
        } catch (InterruptedException e) {
            e.printStackTrace();
        }
        log.info("textC 测试RT");
        return "---------textC";
    }
平均响应时间(DEGRADE_GRADE_RT):当一秒内持续进入5个请求,对应时刻的平均响应时间(秒级)均超过阀值(毫秒为单位)那么在接下来的时间窗口(秒为单位)内对这个方法的调用都会自动熔断。注意:RT最大4900(更大的需要通过-Dcsp.Sentinel.statistic.max.rt=XXXX才能生效)
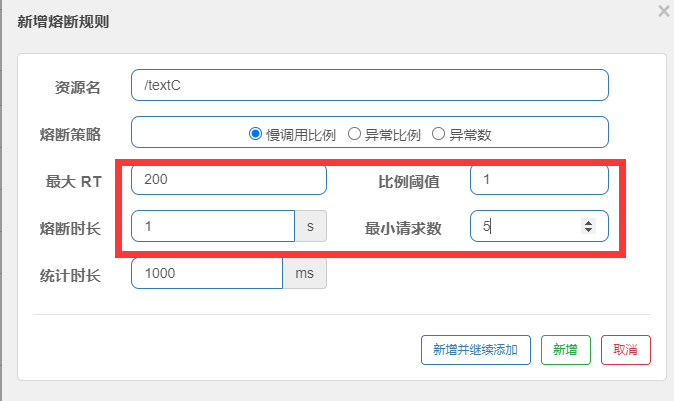
postman发送请求,浏览器访问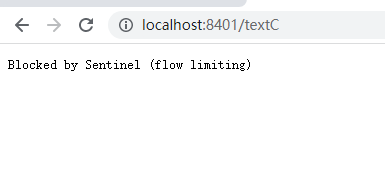
4.6.2异常比例
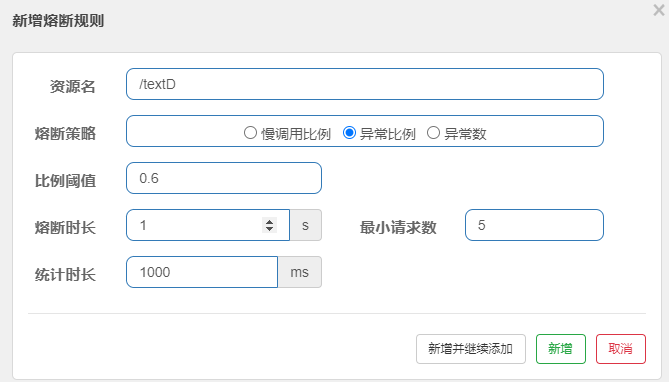
异常比例(DEGRADE-GRADE-EXCEPTION-RATIO):当资源的每秒请求量>=5,并且每秒异常总数占通过的比值超过阈值(DegradeRule中的count)之后,资源进入降级状态,即在接下的时间窗口(DegradeRu1e中的timeWindow,,以s为单位)之内,对这个方法的调用都会自动地返回。异常b阈值范围是[0.0,l.0],代表0%一100%。
- 先写异常的controller
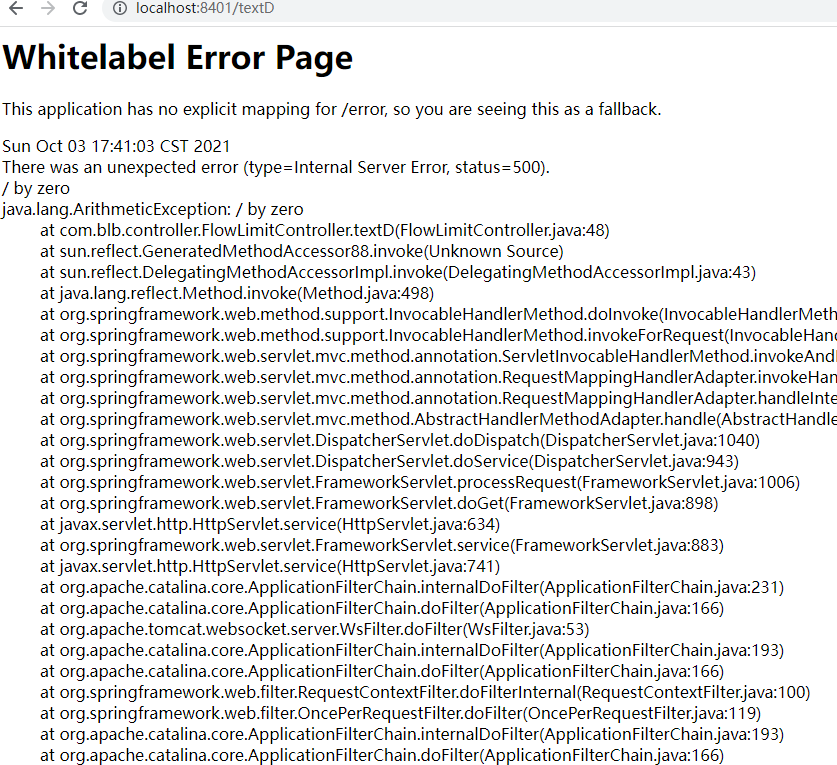
  @GetMapping("/textD")
    public String textD()
    {
        System.out.println("------textD");
        int a=1/0;
        return "---------textD";
    }
- 配置参数
一次请求
多次请求:
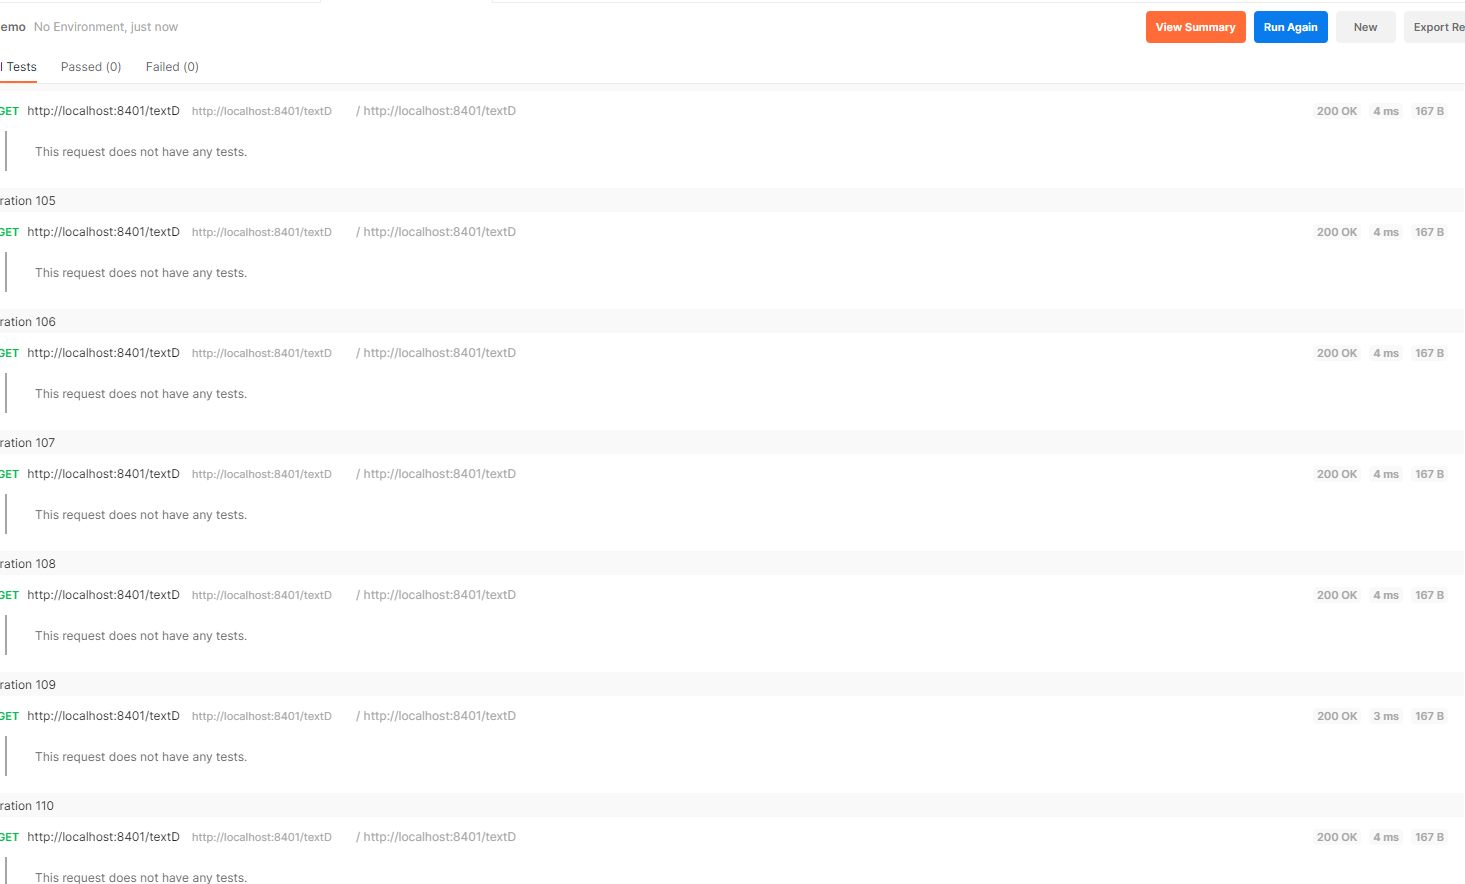

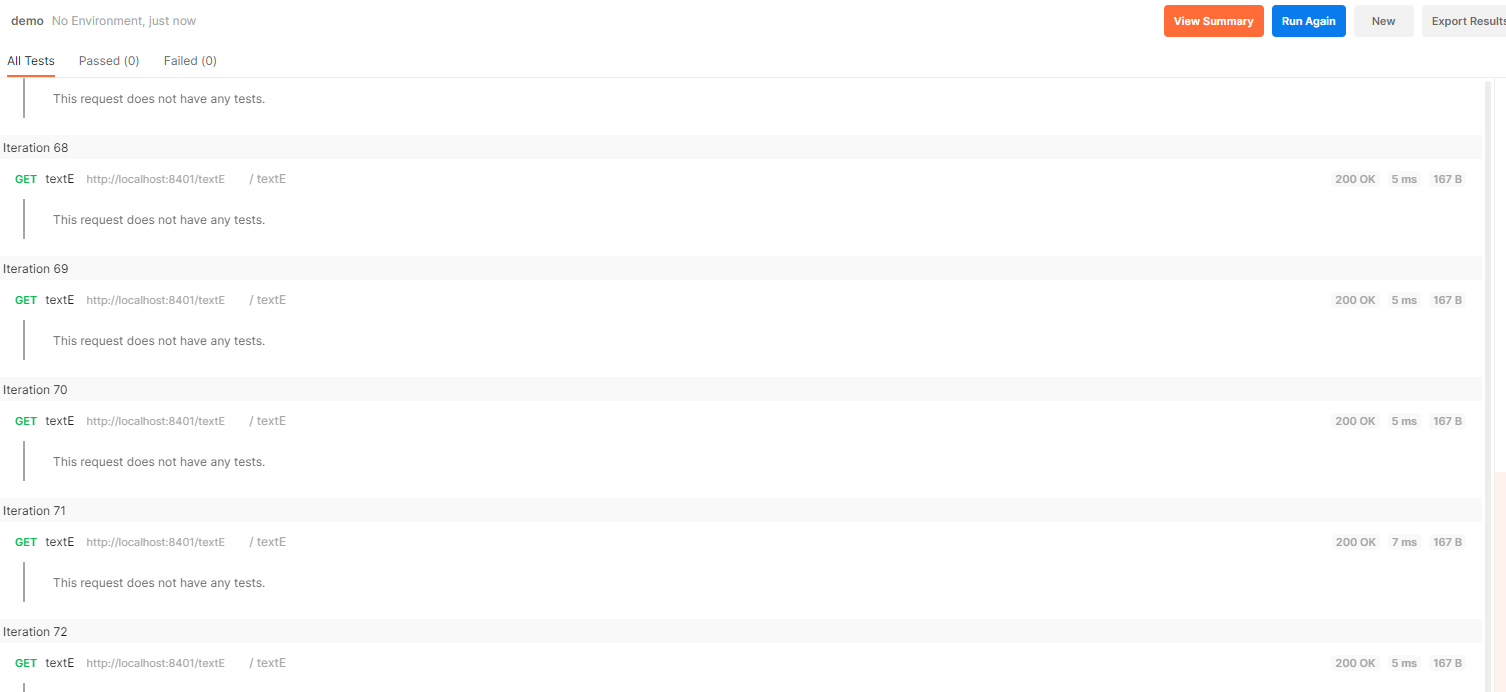
4.6.3 异常数
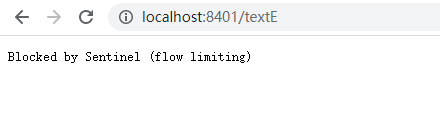
异常数:当资源接近一分钟的异常数目超过超过阀值之后会进行熔断。注意由于统计时间的窗口是分钟级别的,若timeWindow小于60s,则结束熔断后仍可能进入熔断状态(时间窗口一定要大于等于60秒)
测试controller
    //测试异常数
    @GetMapping("/textE")
    public String textE()
    {
        System.out.println("异常数测试");
        int a=1/0;
        return "异常数测试";
    }
设置规则
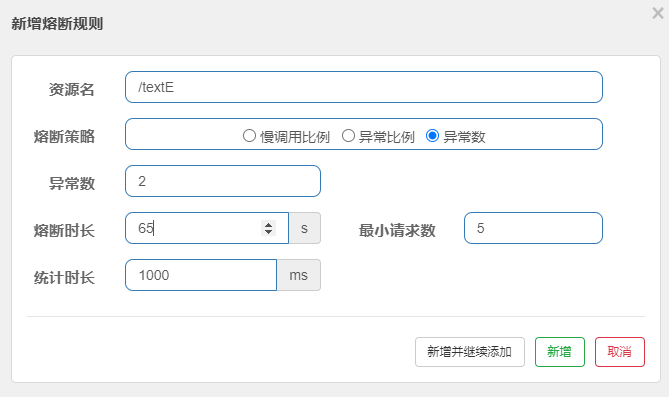
当异常超过两处之后进行熔断降级
一次请求
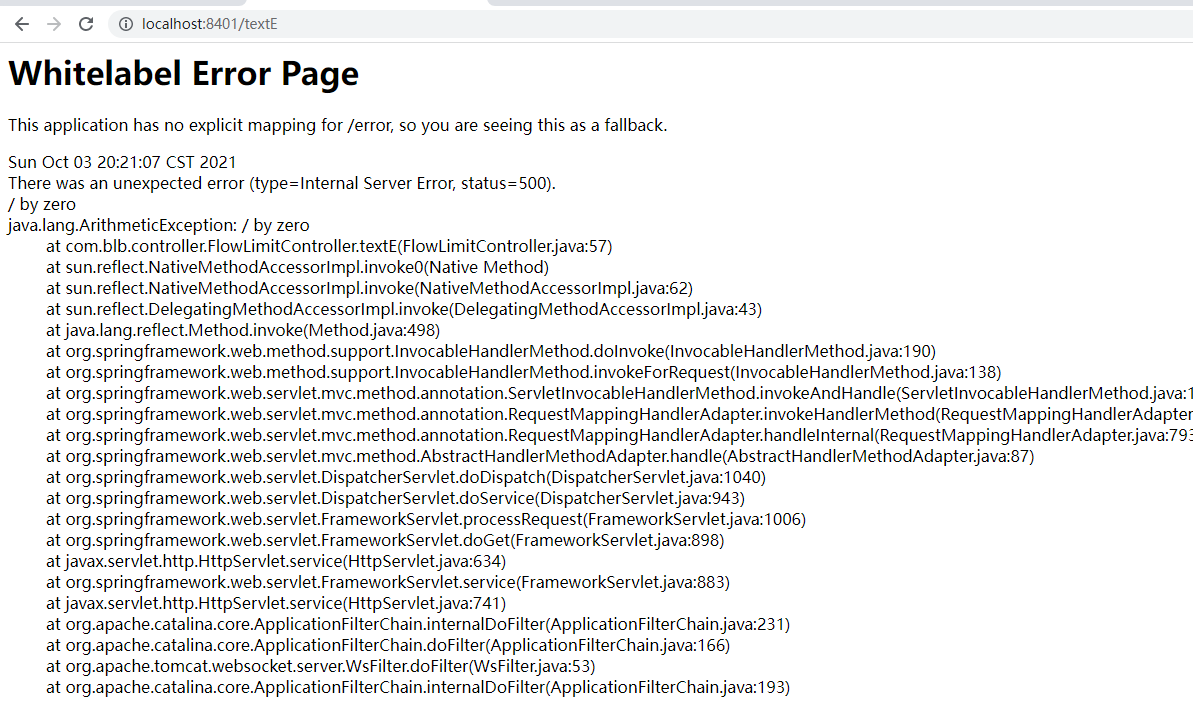
使用postman多次请求
4.7 热点key限流
4.7.1 热点key限流的概念
何为热点?热点即经常访问的数据。很多时候我们希望统计某个热点数据中访问频次最高的TopK数据,并对其访问进行限制。比如:
- 商品ID为参数,统计一段时间内最常购买的商品ID并进行限制
- 用户ID为参数,针对一段时间内频繁访问的用户ID进行限制
参数限流会统计传入参数中的参数,并根据配置流阈值与模式,对包含热点参数的资源调用进行限流。热点参数限流可以看做是一种特殊的流量控制,仅对包含热点参数的资源调用生效。
兜底方法分为系统默认和客户自定义两种,之前的case,限流出问题后,都是用sentinel系统默认的提示Blocked by Sentinel (flow limiting),我们可以定义一个类似于hystrix,某个方法出问题后找到对应的兜底方法
4.7.3 热点限流配置
- controller层
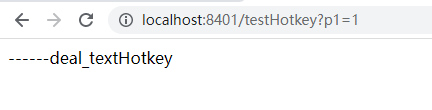
@GetMapping("/testHotkey")
    @SentinelResource(value = "testHotkey",blockHandler = "deal_testHotKey")  //blockHandler为指定处理降级的方法
    //在填写热点限流的 资源名 这一项时,可以填 /testhotkey 或者是 @SentinelResource的value的值
    public String testHotkey(@RequestParam(value = "p1",required = false) String p1,
                             @RequestParam(value = "p2",required = false) String p2)
    {
        return "------testHotKey";
    }

    public String deal_testHotKey(String p1, String p2, BlockException exception)
    {
        return "------deal_textHotkey";
    }
- 配置
请求的参数每秒钟超过一次进行限流
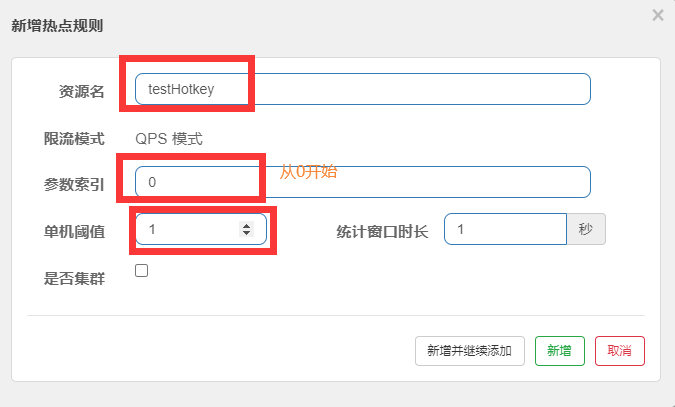
- 启动项目,每秒中多刷新几次出现的效果
4.7.4 参数例外项
上述案例演示了第一个参数p1,当QPS超过一秒一次点击后马上限流,但我们期望p1的参数当他是某个特殊值时,他的限流和平时不一样,假如当p1等于5时,他的阀值可以达到10
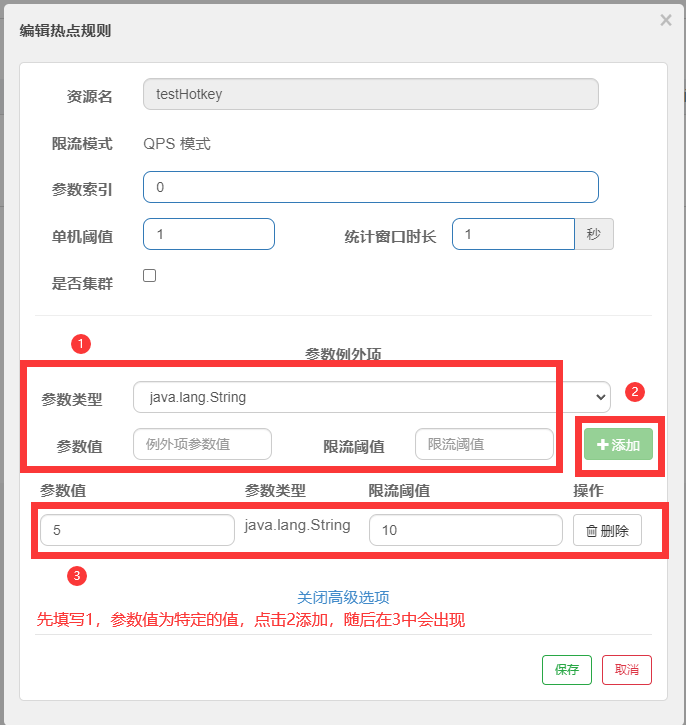
说明:
@SentinelResource :处理的是Sentine1控制台配置的违规情况,有blockHandler方法配置的兜底处理
@RuntimeException:int age=10/0,这个是java运行时报出的运行时异异常RunTimeException,@Sentine1Resource不管
4.8 系统规则
4.8.1 系统自适应限流
Sentinel 系统自适应限流从整体维度对应用入口流量进行控制,结合应用的 Load、CPU 使用率、总体平均 RT、入口 QPS 和并发线程数等几个维度的监控指标,通过自适应的流控策略,让系统的入口流量和系统的负载达到一个平衡,让系统尽可能跑在最大吞吐量的同时保证系统整体的稳定性。
4.8.2 系统规则支持以下的模式
- Load自适应:系统的load作为启发的指标,进行自适应系统保护,当系统的load超过预定的启发值,且系统当前的并发线程数超过估算的系统容量时才会触发系统保护(BBR阶段),系统容量由系统的maxQPSminRT估算得出,设定参考值一般为CPU cores2.5
- CPU usage(1.5.0+版本):当系统CPU的使用率超过阈值即触发保护系统(取值范围0.0-1.0),比较灵敏
- 平均RT:当单台机器上所有入口流量的平均RT达到阀值即触发保护系统,单位是毫秒
- 并发线程数:当单台机器上所有入口流量的并发线程数达到阀值即触发保护系统
- 入口QPS:当单台机器上所有入口流量的QPS达到阀值即触发保护系统
4.8.3测试
设置系统的QPS为1
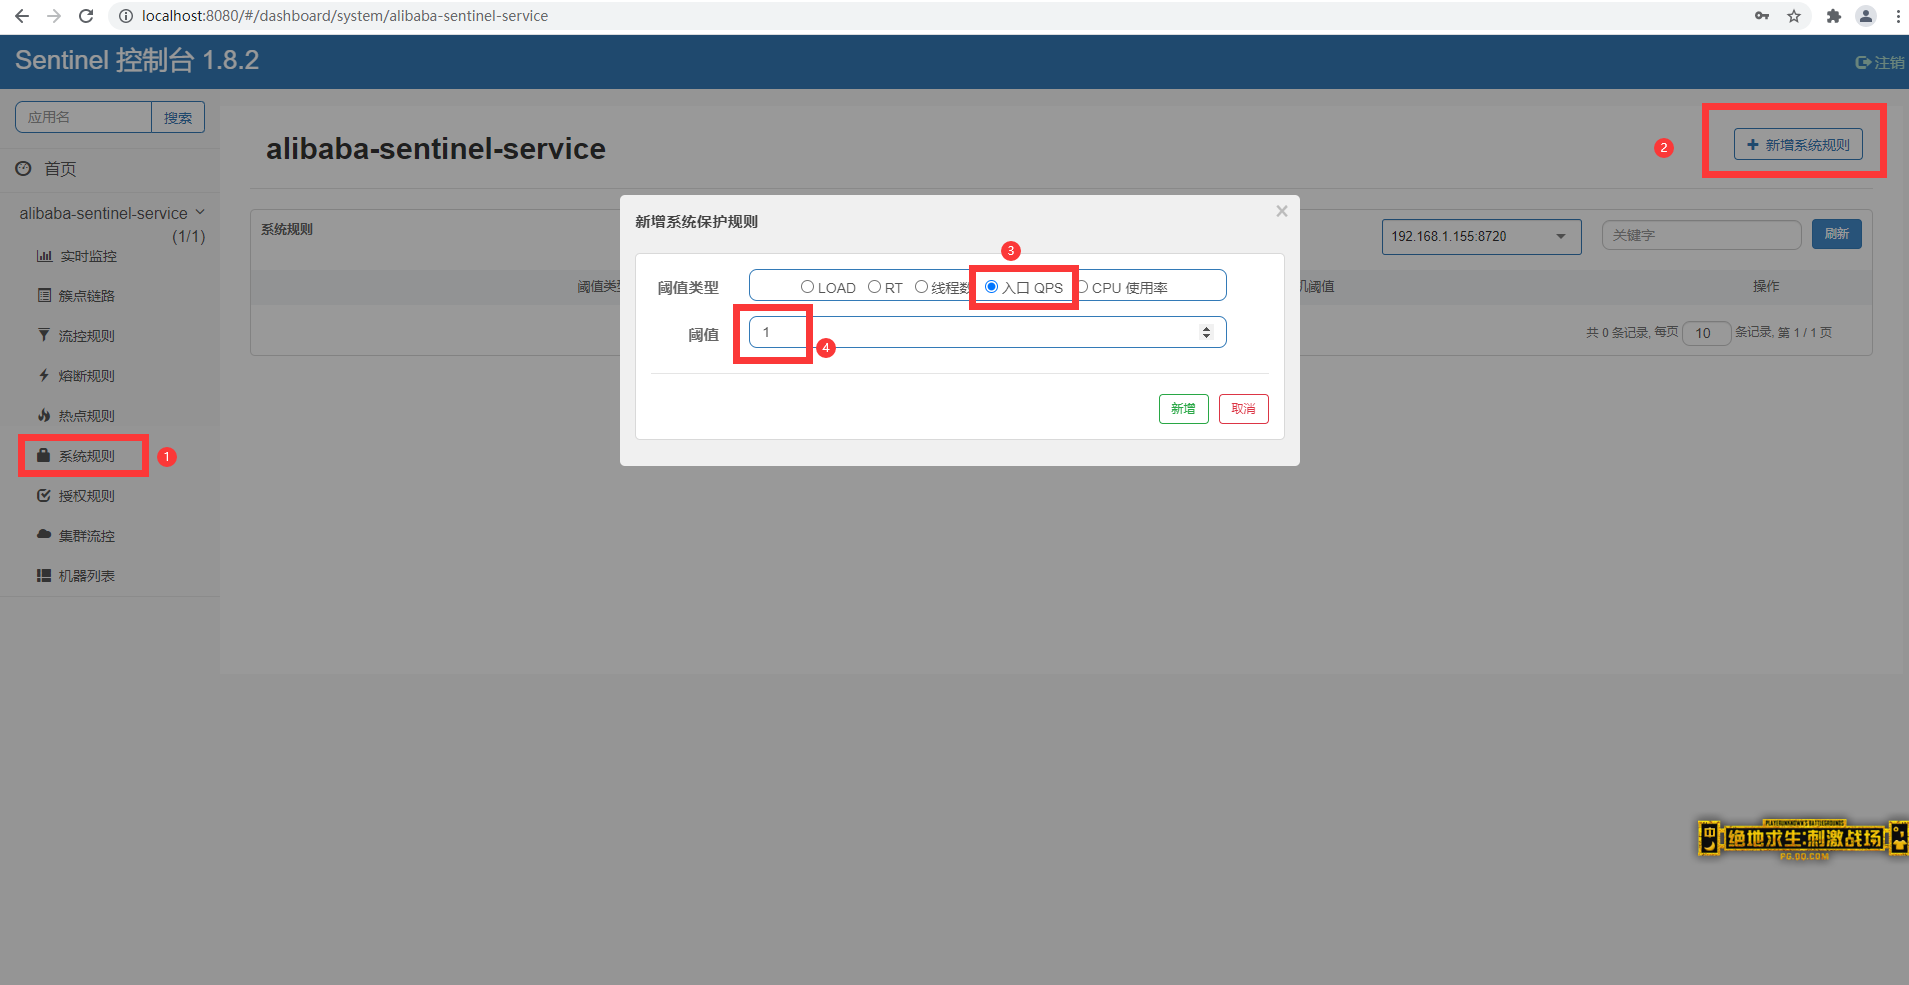
访问频繁
4.9服务熔断
4.9.1创建alibaba-provider-payment9003
- pom
  <dependencies>
        <dependency>
            <groupId>com.alibaba.cloud</groupId>
            <artifactId>spring-cloud-starter-alibaba-nacos-discovery</artifactId>
        </dependency>
        <dependency>
            <groupId>org.springframework.boot</groupId>
            <artifactId>spring-boot-starter</artifactId>
        </dependency>

        <dependency>
            <groupId>org.springframework.boot</groupId>
            <artifactId>spring-boot-starter-test</artifactId>
            <scope>test</scope>
        </dependency>
        <dependency>
            <groupId>org.springframework.boot</groupId>
            <artifactId>spring-boot-starter-web</artifactId>
        </dependency>
    </dependencies>
- yml
server:
  port: 9003
spring:
  application:
    name: nacos-payment-provider
  cloud:
    nacos:
      discovery:
        server-addr: localhost:8848 #配置nacos地址

management:
  endpoints:
    web:
      exposure:
        include: "*" #监控的东西
- 启动类
@SpringBootApplication
@EnableDiscoveryClient
public class AlibabaProviderPayment9003Application {

    public static void main(String[] args) {
        SpringApplication.run(AlibabaProviderPayment9003Application.class, args);
    }

}
- controller
@RestController
public class PaymentController {
    @Value("${server.port}")
    private String serverPort;

    private static HashMap<Integer,Object> hashMap=new HashMap<>();
    static {
        hashMap.put(1,"1");
        hashMap.put(2,"2");
        hashMap.put(3,"3");
    }

    @GetMapping("/paymentSql/{id}")

    public String paymentSql(@PathVariable("id") int id)
    {
        Object o = hashMap.get(id);
        System.out.println(o);
        return serverPort+"----------------------"+o;
    }
}
4.9.2创建alibaba-provider-payment9004
内容和alibaba-provider-payment9004把端口改成9004即可
4.9.3创建consumer-nacos-order84
- pom
   <dependencies>
        <!-- 后续做Sentinel的持久化会用到的依赖 -->
        <dependency>
            <groupId>com.alibaba.csp</groupId>
            <artifactId>sentinel-datasource-nacos</artifactId>
        </dependency>
        <!-- sentinel  -->
        <dependency>
            <groupId>com.alibaba.cloud</groupId>
            <artifactId>spring-cloud-starter-alibaba-sentinel</artifactId>
        </dependency>
        <!-- springcloud alibaba nacos 依赖,Nacos Server 服务注册中心 -->
        <dependency>
            <groupId>com.alibaba.cloud</groupId>
            <artifactId>spring-cloud-starter-alibaba-nacos-discovery</artifactId>
        </dependency>
        <!--  web组件      -->
        <dependency>
            <groupId>org.springframework.boot</groupId>
            <artifactId>spring-boot-starter-web</artifactId>
        </dependency>
        <dependency>
            <groupId>org.springframework.boot</groupId>
            <artifactId>spring-boot-starter-actuator</artifactId>
        </dependency>
        <dependency>
            <groupId>org.springframework.boot</groupId>
            <artifactId>spring-boot-devtools</artifactId>
            <scope>runtime</scope>
            <optional>true</optional>
        </dependency>
        <dependency>
            <groupId>org.projectlombok</groupId>
            <artifactId>lombok</artifactId>
        </dependency>
        <dependency>
            <groupId>org.springframework.boot</groupId>
            <artifactId>spring-boot-starter-test</artifactId>
            <scope>test</scope>
        </dependency>
    </dependencies>
- yml
server:
  port: 84
spring:
  application:
    name: nacos-order-consumer
  cloud:
    nacos:
      discovery:
        server-addr: localhost:8848
    sentinel:
      transport:
        # 配置sentinel dashboard地址
        dashboard: localhost:8080
        # 默认8719端口,加入被占用会自动从8719每次加1扫描,直到扫描未被占用的端口
        port: 8719

server-url:
  nacos-user-service: http://nacos-payment-provider
- 主启动
@SpringBootApplication
@EnableDiscoveryClient
public class ConsumerNacosOrder84Application {

    public static void main(String[] args) {
        SpringApplication.run(ConsumerNacosOrder84Application.class, args);
    }

}
- 配置类
@Configuration
public class ApplicationConfig {

    @Bean
    @LoadBalanced
    public RestTemplate getRestTemplate()
    {
        return new RestTemplate();
    }
}
- controller
@RestController
@Slf4j
public class cricleBreakerController {

    private static final String SERVICE_URL="http://nacos-payment-provider";

    @Resource
    private RestTemplate restTemplate;

    @RequestMapping("/consumer/fallback/{id}")
//    @SentinelResource(value = "fallback",fallback = "handlerFallback") //fallback负责业务异常
//    @SentinelResource(value = "fallback",blockHandler = "handlerFallback")//blockHandler值赋值控制台sentinel配置违规
    @SentinelResource(value = "fallback",fallback ="handlerFallback",blockHandler = "blockHandler")//若block和Handler都进行就配置,则被迫降级而报出的BlockException是只会进入blockHandler处理逻辑
    public String fallback(@PathVariable int id)
    {
        String result = restTemplate.getForObject(SERVICE_URL + "/paymentSql/" + id, String.class, id);
        if(id>=4)
        {
            throw new IllegalArgumentException("非法参数异常");
        }
        if(result==null)
        {
            throw new NullPointerException("空指针异常");
        }
        return result;
    }

    public String handlerFallback(@PathVariable int id,Throwable e)
    {
        return "handlerFallback";
    }
    public String blockHandler(@PathVariable int id, BlockException blockException)
    {
        return "blockHandler";
    }
}
结论
fallback负责业务异常
blockHandler值赋值控制台sentinel配置违规
@SentinelResource(value = “fallback”,fallback =“handlerFallback”,blockHandler = “blockHandler”)若block和Handler都进行就配置,则被迫降级而报出的BlockException是只会进入blockHandler处理逻辑
4.10 sentinel持久化配置
将限流配置规则持久化建nacos保存,只要刷新某个rest地址,sentinel控制台的流控规则就能看到,只要nacos里面的配置不删除,sentinel的流控规则持久有效
4.10.1持久化配置
目前的sentinel 当重启以后,数据都会丢失,和 nacos 类似原理。需要持久化。它可以被持久化到nacos 的数据库中。
在alibaba-sentinel-service8401模块
- pom
<dependency>
    <groupId>com.alibaba.csp</groupId>
    <artifactId>sentinel-datasource-nacos</artifactId>
</dependency>
- yml
spring:
  cloud:
    sentinel:
      datasource:
        ds1:
          nacos:
            server-addr: localhost:8848
            dataId: ${spring.application.name}
            group: DEFAULT_GROUP
            data-type: json
            rule-type: flow
- 去nacos上创建一个dataid ,名字和yml配置的一致,json格式,内容如下:
[
    {
        "resource": "/testA",
        "limitApp": "default",
        "grade": 1,
        "count": 1,
        "strategy": 0,
        "controlBehavior": 0,
        "clusterMode": false
    }
]
resource:资源名称
limitApp:来源应用
grade:阈值类型,0表示线程数,1表示QPS,
count:单机阈值,
strategy:流控模式,0表示直接,1表示关联,2表示链路
controlBehavior:流控效果,0表示快速失败,1表示Warm Up,2表示排队等待;
cIusterM0de是否集群。
启动应用,发现存在 关于 /testA 请求路径的流控规则。
总结: 就是在 sentinel 启动的时候,去 nacos 上读取相关规则配置信息,实际上它规则的持久化,就是第三步,粘贴到nacos上保存下来,就算以后在 sentinel 上面修改了,重启应用以后也是无效的。
5.seate处理分布式事务
单体应用应用被拆成微服务应用,原来的三个模块被拆成三个独立的应用,分别使用三个独立的数据源,业务操作需要三个服务来完成,此时每个服务内部的一致性有本地事务来保证,但全局事务的一致性无法保证
一次事务操作需要跨多个数据源或需要跨多个系统进行远程调用,就会产生分布式事务问题
5.1 seate简介
Seate是一款开源的分布式事务解决方案,致力于微服务构架下提供高性能和简单易用的分布式事务服务
5.2分布式事务处理过程
seate是一个典型的分布式事务处理过程,由一个ID和三组件模型组成
一个ID:全局唯一的事务ID
三组件:
- TC (Transaction Coordinator) - 事务协调者
维护全局和分支事务的状态,驱动全局事务提交或回滚。 - TM (Transaction Manager) - 事务管理器
-定义全局事务的范围:开始全局事务、提交或回滚全局事务。 - RM (Resource Manager) - 资源管理器
管理分支事务处理的资源,与TC交谈以注册分支事务和报告分支事务的状态,并驱动分支事务提交或回滚。
过程
- TM向TC申请开启一个全局事务,全局事务创建成功并生成一个全局唯一的XID;
- XID在微服务调用链路的上下文中传播;
- RM向TC汪册分支事务,将其纳入XID对应全局事务的管辖;
- TM向TC发起针对XID的全局提交或回滚决议;
- TC调度XID下管辖的全部分支事务完成提交或回请求。
5.3 seate下载
地址https://github.com/seata/seata/releases/download/v1.0.0/seata-server-1.0.0.zip
5.4 seate安装
5.4.1下载seata-server-1.0.0.zip解压到指定目录并修改conf目录下的file. conf配置文件
- 备份file.conf文件
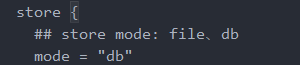
- service模块
将模式改成db
- 配置数据库的信息
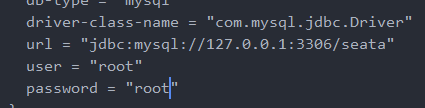
driver-class-name = "com.mysql.jdbc.Driver"
    url = "jdbc:mysql://127.0.0.1:3306/seata"
    user = "root"
    password = "root"
- 创建一个名为seata的数据库
- 在seata下的conf目录选择db_store_sql里面的SQL语句并运行
由于seata-server-1.0.0没有这个SQL语句,器SQL语句如下
DROP TABLE IF EXISTS `branch_table`;
CREATE TABLE `branch_table`  (
  `branch_id` bigint(20) NOT NULL,
  `xid` varchar(128) CHARACTER SET utf8 COLLATE utf8_general_ci NOT NULL,
  `transaction_id` bigint(20) NULL DEFAULT NULL,
  `resource_group_id` varchar(32) CHARACTER SET utf8 COLLATE utf8_general_ci NULL DEFAULT NULL,
  `resource_id` varchar(256) CHARACTER SET utf8 COLLATE utf8_general_ci NULL DEFAULT NULL,
  `branch_type` varchar(8) CHARACTER SET utf8 COLLATE utf8_general_ci NULL DEFAULT NULL,
  `status` tinyint(4) NULL DEFAULT NULL,
  `client_id` varchar(64) CHARACTER SET utf8 COLLATE utf8_general_ci NULL DEFAULT NULL,
  `application_data` varchar(2000) CHARACTER SET utf8 COLLATE utf8_general_ci NULL DEFAULT NULL,
  `gmt_create` datetime(0) NULL DEFAULT NULL,
  `gmt_modified` datetime(0) NULL DEFAULT NULL,
  PRIMARY KEY (`branch_id`) USING BTREE,
  INDEX `idx_xid`(`xid`) USING BTREE
) ENGINE = InnoDB CHARACTER SET = utf8 COLLATE = utf8_general_ci ROW_FORMAT = Dynamic;

-- ----------------------------
-- Table structure for global_table
-- ----------------------------
DROP TABLE IF EXISTS `global_table`;
CREATE TABLE `global_table`  (
  `xid` varchar(128) CHARACTER SET utf8 COLLATE utf8_general_ci NOT NULL,
  `transaction_id` bigint(20) NULL DEFAULT NULL,
  `status` tinyint(4) NOT NULL,
  `application_id` varchar(32) CHARACTER SET utf8 COLLATE utf8_general_ci NULL DEFAULT NULL,
  `transaction_service_group` varchar(32) CHARACTER SET utf8 COLLATE utf8_general_ci NULL DEFAULT NULL,
  `transaction_name` varchar(128) CHARACTER SET utf8 COLLATE utf8_general_ci NULL DEFAULT NULL,
  `timeout` int(11) NULL DEFAULT NULL,
  `begin_time` bigint(20) NULL DEFAULT NULL,
  `application_data` varchar(2000) CHARACTER SET utf8 COLLATE utf8_general_ci NULL DEFAULT NULL,
  `gmt_create` datetime(0) NULL DEFAULT NULL,
  `gmt_modified` datetime(0) NULL DEFAULT NULL,
  PRIMARY KEY (`xid`) USING BTREE,
  INDEX `idx_gmt_modified_status`(`gmt_modified`, `status`) USING BTREE,
  INDEX `idx_transaction_id`(`transaction_id`) USING BTREE
) ENGINE = InnoDB CHARACTER SET = utf8 COLLATE = utf8_general_ci ROW_FORMAT = Dynamic;

-- ----------------------------
-- Table structure for lock_table
-- ----------------------------
DROP TABLE IF EXISTS `lock_table`;
CREATE TABLE `lock_table`  (
  `row_key` varchar(128) CHARACTER SET utf8 COLLATE utf8_general_ci NOT NULL,
  `xid` varchar(96) CHARACTER SET utf8 COLLATE utf8_general_ci NULL DEFAULT NULL,
  `transaction_id` bigint(20) NULL DEFAULT NULL,
  `branch_id` bigint(20) NOT NULL,
  `resource_id` varchar(256) CHARACTER SET utf8 COLLATE utf8_general_ci NULL DEFAULT NULL,
  `table_name` varchar(32) CHARACTER SET utf8 COLLATE utf8_general_ci NULL DEFAULT NULL,
  `pk` varchar(36) CHARACTER SET utf8 COLLATE utf8_general_ci NULL DEFAULT NULL,
  `gmt_create` datetime(0) NULL DEFAULT NULL,
  `gmt_modified` datetime(0) NULL DEFAULT NULL,
  PRIMARY KEY (`row_key`) USING BTREE,
  INDEX `idx_branch_id`(`branch_id`) USING BTREE
) ENGINE = InnoDB CHARACTER SET = utf8 COLLATE = utf8_general_ci ROW_FORMAT = Dynamic;
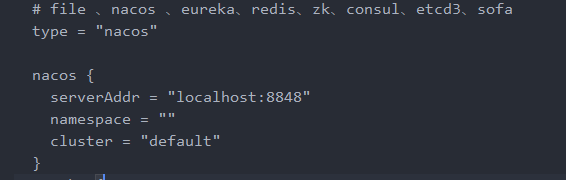
- 修改conf目录下的registry.conf配置文件
指明注册中心为nacos及修改nacos的连接信息
- 先启动nacos
- 启动seata,点击seata-server.bat
出现一下信息说明启动成功


 870
870


 被折叠的 条评论
为什么被折叠?
被折叠的 条评论
为什么被折叠?
 到【灌水乐园】发言


