


什么是Spring MVC
简单而言,Spring MVC是Spring在Spring Container Core和AOP等技术基础上,遵循上述Web MVC的规范推出的web开发框架,目的是为了简化Java栈的web开发。@pdai
简单来说,Spring Web MVC 是一种基于Java 的实现了Web MVC 设计模式的请求驱动类型的轻量级Web 框架,即使用了MVC 架 构模式的思想,将 web 层进行职责解耦,基于请求驱动指的就是使用请求-响应模型,框架的目的就是帮助我们简化开 发,Spring Web MVC 也是要简化我们日常Web 开发的。
一、Spring MVC的请求流程
Spring Web MVC 框架也是一个基于请求驱动的Web 框架,并且也使用了前端控制器模式来进行设计,再根据请求映射 规则分发给相应的页面控制器(动作/处理器)进行处理。
¶ 核心架构的具体流程步骤
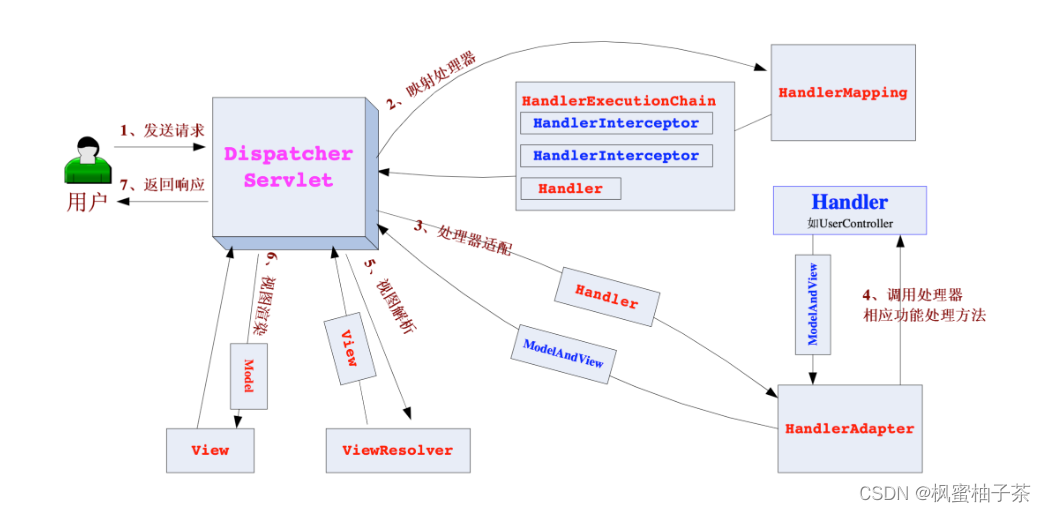
- 首先用户发送请求——>DispatcherServlet,前端控制器收到请求后自己不进行处理,而是委托给其他的解析器进行 处理,作为统一访问点,进行全局的流程控制;
- DispatcherServlet——>HandlerMapping, HandlerMapping 将会把请求映射为 HandlerExecutionChain 对象(包含一 个Handler 处理器(页面控制器)对象、多个HandlerInterceptor 拦截器)对象,通过这种策略模式,很容易添加新 的映射策略;
- DispatcherServlet——>HandlerAdapter,HandlerAdapter 将会把处理器包装为适配器,从而支持多种类型的处理器, 即适配器设计模式的应用,从而很容易支持很多类型的处理器;
- HandlerAdapter——>处理器功能处理方法的调用,HandlerAdapter 将会根据适配的结果调用真正的处理器的功能处 理方法,完成功能处理;并返回一个ModelAndView 对象(包含模型数据、逻辑视图名);
- ModelAndView 的逻辑视图名——> ViewResolver,ViewResolver 将把逻辑视图名解析为具体的View,通过这种策 略模式,很容易更换其他视图技术;
- View——>渲染,View 会根据传进来的Model 模型数据进行渲染,此处的Model 实际是一个Map 数据结构,因此 很容易支持其他视图技术;
- 返回控制权给DispatcherServlet,由DispatcherServlet 返回响应给用户,到此一个流程结束。
二、自实现 SpringMVC
上文已经认识到SpringMvc核心业务逻辑,所以按照此思路,我们依次来实现自己的SpringMvc的DispatcherServlet、HandlerMapping、HandlerAdapter,实现简单的mvc框架。
1、项目准备
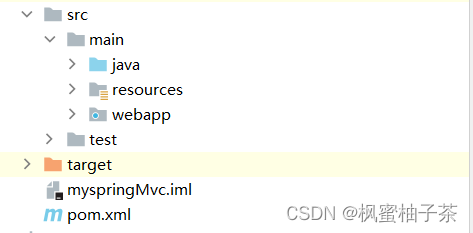
新建一个新的web项目
依赖准备
    <dependencies>
        <dependency>
            <groupId>javax.servlet</groupId>
            <artifactId>javax.servlet-api</artifactId>
            <version>3.1.0</version>
        </dependency>
        <dependency>
            <groupId>org.springframework</groupId>
            <artifactId>spring-context</artifactId>
            <version>5.2.19.RELEASE</version>
        </dependency>
        <dependency>
            <groupId>com.alibaba</groupId>
            <artifactId>fastjson</artifactId>
            <version>1.2.56</version>
        </dependency>
    </dependencies>
配置文件
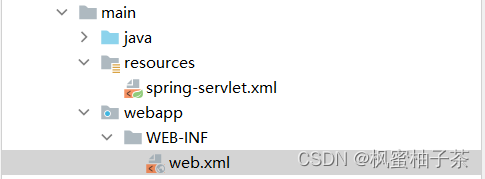
web.xml文件
spring-servlet.xml文件
<?xml version="1.0" encoding="UTF-8"?>
<beans xmlns="http://www.springframework.org/schema/beans"
       xmlns:xsi="http://www.w3.org/2001/XMLSchema-instance"
       xmlns:context="http://www.springframework.org/schema/context"
       xsi:schemaLocation="http://www.springframework.org/schema/beans http://www.springframework.org/schema/beans/spring-beans.xsd http://www.springframework.org/schema/context https://www.springframework.org/schema/context/spring-context.xsd">

    <context:component-scan base-package="com.qiu"/>

    <bean id="/helloServlet" class="com.qiu.springmvc.demo.HelloServlet"/>

</beans>
2、请求处理映射器 HandlerMapping
首先通常的 request请求有多种形式,常见的有以下两种:
a、@Controller注解
b、自定义的Servlet,通过注册到spring容器,由依赖注入使用。
所以,我们至少定义两种处理器
public interface HandlerMapping extends InstantiationAwareBeanPostProcessor {
    Object getHandler(String url);
}
这里继承InstantiationAwareBeanPostProcessor,是为了实现 postProcessAfterInstantiation

这样一来,对象一旦初始化完成,我们就能够将对应的请求对象,加载到各自对应的处理器的Map中,等待后续处理请求。
BeanHandlerMapping
@Component
public class BeanHandlerMapping implements HandlerMapping {

    private static Map<String, Object> map = new HashMap<>();

    @Override
    public boolean postProcessAfterInstantiation(Object bean, String beanName) throws BeansException {
        if (beanName.startsWith("/")) {
            map.put(beanName, bean);
        }
        return HandlerMapping.super.postProcessAfterInstantiation(bean, beanName);
    }

    @Override
    public Object getHandler(String url) {
        return map.get(url);
    }
}
AnnotationHandlerMapping
通过注解的方式,会有很多很多的方法,这些方法对应一个个请求。因此,为了方便处理,我们自定义一个封装对象 RequestMappingInfo 。
public class RequestMappingInfo {
    private Object object;
    private Method method;
    private String url;

    public Object getObject() {
        return object;
    }

    public void setObject(Object object) {
        this.object = object;
    }

    public Method getMethod() {
        return method;
    }

    public void setMethod(Method method) {
        this.method = method;
    }

    public String getUrl() {
        return url;
    }

    public void setUrl(String url) {
        this.url = url;
    }
}
@Component
public class AnnotationHandlerMapping implements HandlerMapping {
private static Map<String, RequestMappingInfo> map = new HashMap<>();
@Override
public Object getHandler(String url) {
return map.get(url);
}
@Override
public boolean postProcessAfterInstantiation(Object bean, String beanName) throws BeansException {
Method[] methods = bean.getClass().getDeclaredMethods();
for (Method method : methods) {
RequestMappingInfo info = createRequestMappingInfo(bean, method);
map.put(info.getUrl(),info);
}
return HandlerMapping.super.postProcessAfterInstantiation(bean, beanName);
}
private RequestMappingInfo createRequestMappingInfo(Object bean, Method method) {
RequestMappingInfo info = new RequestMappingInfo();
if (method.isAnnotationPresent(RequestMapping.class)) {
info.setMethod(method);
info.setObject(bean);
info.setUrl(method.getAnnotation(RequestMapping.class).value());
}
return info;
}
}3、处理适配器 HandlerAdapter
获取到了对应的处理器,但是不同处理器,处理方式也不一样。基于封装的思想,我们要定义适配器类,适配各类处理器实现方式。
public interface HandlerAdapter {
    public boolean support(Object handler);

    public Object handle(HttpServletRequest request, HttpServletResponse response, Object handler) throws Exception;
}
ServletHandlerAdapter
@Component
public class ServletHandlerAdapter implements HandlerAdapter {
    @Override
    public boolean support(Object handler) {
        return handler instanceof Servlet;
    }

    @Override
    public Object handle(HttpServletRequest request, HttpServletResponse response, Object handler) throws Exception {
        ((Servlet) handler).service(request, response);
        return null;
    }
}
AnnotationHandlerAdapter
@Component
public class AnnotationHandlerAdapter implements HandlerAdapter {
    @Override
    public boolean support(Object handler) {
        return handler instanceof RequestMappingInfo;
    }

    @Override
    public Object handle(HttpServletRequest request, HttpServletResponse response, Object handler) throws Exception {
        Map<String, String[]> parameterMap = request.getParameterMap(); //获取请求参数列表
        RequestMappingInfo info = (RequestMappingInfo) handler; //具体方法、url、对象
        Parameter[] parameters = info.getMethod().getParameters(); //具体方法所需参数
        Object[] paramsValue = new Object[parameters.length];
        int index = 0;
        for (Parameter parameter : parameters) {
            for (Map.Entry<String, String[]> entry : parameterMap.entrySet()) {
                if (parameter.getDeclaredAnnotation(RequestParam.class).value().equals(entry.getKey())) {
                    paramsValue[index++] = entry.getValue()[0];
                }
            }
        }
        //通过反射,执行方法
        return info.getMethod().invoke(info.getObject(), paramsValue);
    }
}
4、自定义注解
@RequestMapping
@Target(ElementType.METHOD)
@Retention(RetentionPolicy.RUNTIME)
public @interface RequestMapping {
    String value() default "";
}
@RequestParam
@Target(ElementType.PARAMETER)
@Retention(RetentionPolicy.RUNTIME)
public @interface RequestParam {
    String value() default "";

}5、DispatcherServlet(核心)
先贴代码,下图讲实现思路
@Component
public class Servlet extends HttpServlet {
private String contextConfiguration;
private Collection<HandlerMapping> handlerMappings;
private Collection<HandlerAdapter> handlerAdapters;
@Override
protected void doGet(HttpServletRequest req, HttpServletResponse resp) throws ServletException, IOException {
Object handler = getHandlerMapping(req);
if (handler == null) {
resp.setStatus(404);
return;
}
HandlerAdapter adapter = getAdapterHandler(handler);
Object result = null;
PrintWriter writer = resp.getWriter();
try {
result = adapter.handle(req, resp, handler);
} catch (Exception e) {
e.printStackTrace();
resp.setStatus(500);
}
writer.println(result);
}
@Override
public void init(ServletConfig config) throws ServletException {
super.init(config);
ClassPathXmlApplicationContext context = new ClassPathXmlApplicationContext(config.getInitParameter("contextConfiguration"));
Map<String, HandlerMapping> beans = context.getBeansOfType(HandlerMapping.class);
Map<String, HandlerAdapter> adapterMap = context.getBeansOfType(HandlerAdapter.class);
handlerMappings = beans.values();
handlerAdapters = adapterMap.values();
}
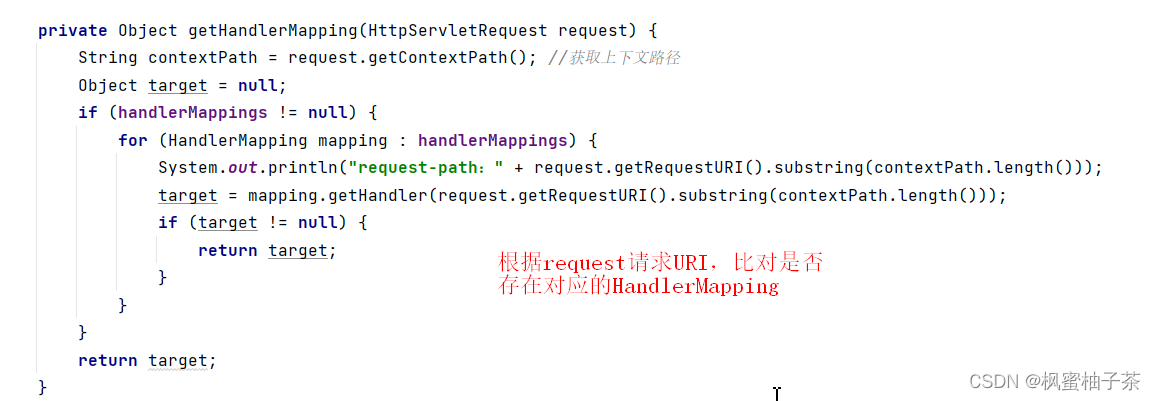
private Object getHandlerMapping(HttpServletRequest request) {
String contextPath = request.getContextPath(); //获取上下文路径
Object target = null;
if (handlerMappings != null) {
for (HandlerMapping mapping : handlerMappings) {
System.out.println("request-path:" + request.getRequestURI().substring(contextPath.length()));
target = mapping.getHandler(request.getRequestURI().substring(contextPath.length()));
if (target != null) {
return target;
}
}
}
return target;
}
private HandlerAdapter getAdapterHandler(Object handler) {
if (handlerAdapters != null) {
for (HandlerAdapter handlerAdapter : handlerAdapters) {
boolean flag = handlerAdapter.support(handler);
System.out.println(flag);
if (flag) {
return handlerAdapter;
}
}
}
return null;
}
} 首先获取到映射器和处理器
Servlet的生命周期,init初始化方法中,加载出spring容器,加载对应的数据。spring配置文件路径来自上文的web.xml文件中。
接下来

返回结果
6、测试请求类
以上已经完成基本框架,接下来编写两种请求类
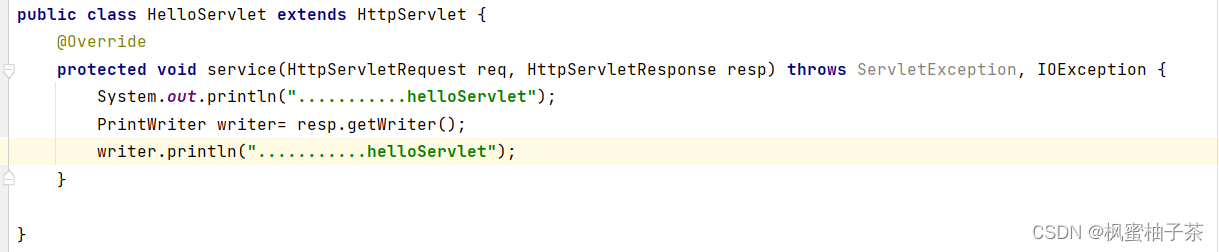
- 自定义的Servlet:
public class HelloServlet extends HttpServlet {
    @Override
    protected void service(HttpServletRequest req, HttpServletResponse resp) throws ServletException, IOException {
        System.out.println("...........helloServlet");
        PrintWriter writer= resp.getWriter();
        writer.println("...........helloServlet");
    }
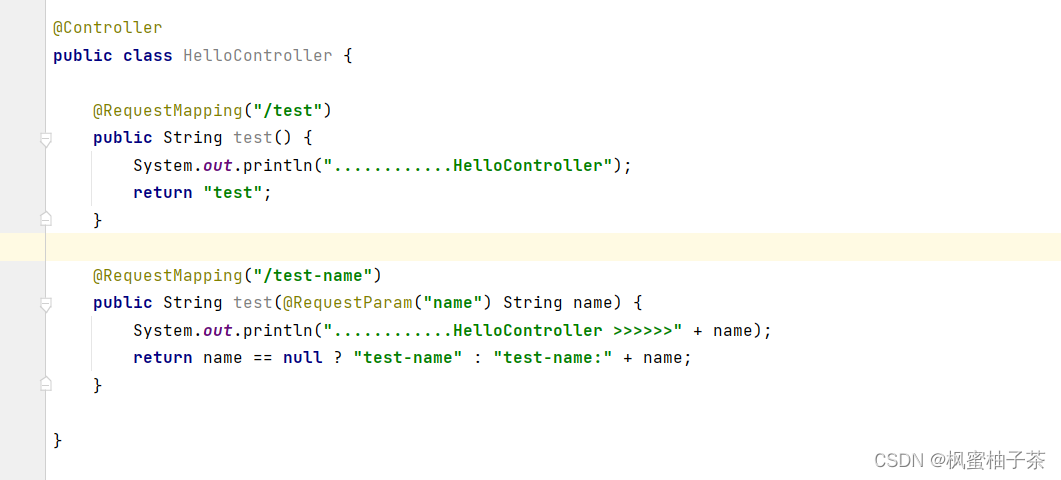
}- 基于注解
@Controller
public class HelloController {

    @RequestMapping("/test")
    public String test() {
        System.out.println("............HelloController");
        return "test";
    }

    @RequestMapping("/test-name")
    public String test(@RequestParam("name") String name) {
        System.out.println("............HelloController >>>>>>" + name);
        return name == null ? "test-name" : "test-name:" + name;
    }

}
三、测试
1、基于注解

 2、Servlet

OK!完结撒花……
SpringMvc - https://www.pdai.tech/md/spring/spring-x-framework-springmvc.html


 1229
1229


 被折叠的 条评论
为什么被折叠?
被折叠的 条评论
为什么被折叠?
 到【灌水乐园】发言


