


目录
1. MyBatis框架
1.1 介绍
MyBatis本是apache的一个开源项目iBatis,2010年这个项目由apache software foundation迁移到了google code,并且改名为MyBatis。2013年11月迁移到Github。
iBATIS一词来源于“internet”和“abatis”的组合,是一个基于Java的持久层框架。iBATIS提供的持久层框架包括SQL Maps和Data Access Objects(DAOs)。
1.2 优势
MyBatis 是一款优秀的持久层Dao框架:
它支持定制化 SQL、存储过程以及高级映射。(SQL写在XML里,从程序代码中彻底分离,降低耦合度,便于统一管理和优化)
MyBatis 避免了几乎所有的 JDBC 代码和手动设置参数以及获取结果集。
MyBatis 可以使用简单的 XML 或注解来配置和映射原生信息,将接口和 Java 的 POJOs(Java实体类)映射成数据库中的记录。(提供XML标签,支持编写动态SQL语句)
2. MyBatis框架简单使用
(1)创建maven项目,在 pom 中引入 JDBC 和 Mybatis 的依赖 jar 包,其中lombok用于以注解的方式使实体类自动生成构造方法和get、set方法,junit用于测试。
    <dependencies>
        <dependency>
            <groupId>mysql</groupId>
            <artifactId>mysql-connector-java</artifactId>
            <version>8.0.28</version>
        </dependency>

        <dependency>
            <groupId>org.mybatis</groupId>
            <artifactId>mybatis</artifactId>
            <version>3.5.9</version>
        </dependency>

        <dependency>
            <groupId>org.projectlombok</groupId>
            <artifactId>lombok</artifactId>
            <version>1.18.24</version>
        </dependency>

        <dependency>
            <groupId>junit</groupId>
            <artifactId>junit</artifactId>
            <version>4.13.2</version>
            <scope>test</scope>
        </dependency>
    </dependencies>
(2) 在src/mian/resources 目录下创建mybatis配置文件
<?xml version="1.0" encoding="UTF-8"?>
<!DOCTYPE configuration PUBLIC "-//mybatis.org//DTD Config 3.0//EN"
        "http://mybatis.org/dtd/mybatis-3-config.dtd">
<configuration>

    <environments default="development">
        <environment id="development">
            <transactionManager type="JDBC"/>
            <!--数据源的配置:name的值固定  value的值要根据客户自己修改-->
            <dataSource type="POOLED">
                <property name="driver" value="com.mysql.cj.jdbc.Driver"/>
                <property name="url" value="jdbc:mysql://localhost:3306/mybatis?serverTimezone=Asia/Shanghai"/>
                <property name="username" value="root"/>
                <property name="password" value="root"/>
            </dataSource>
        </environment>
    </environments>

    <!-- 在此添加映射文件信息,引号中填写映射文件的包名+文件名-->
    <mappers>
        <mapper resource="mapper/UserMapper.xml"/>
    </mappers>
</configuration>
(3)创建实体类
package com.lcy.entity;

import lombok.AllArgsConstructor;
import lombok.Data;
import lombok.NoArgsConstructor;

/**
 * @Author Lcy
 * @Date 2022/6/6
 */
@Data
@AllArgsConstructor
@NoArgsConstructor
public class User{
    //此时应实体类属性与数据库表中的字段名应该一致,后面说明不一致情况下怎么处理
    private int userid;
    private String username;
    private String realname;
}
(4)创建实体类对应的的映射文件(在resources下创建mapper文件夹进行管理,以后实体会很多,对应的映射文件也增多,方便管理,映射文件一般以 实体类名+Mapper 命名)
<?xml version="1.0" encoding="UTF-8" ?>
<!DOCTYPE mapper PUBLIC "-//mybatis.org//DTD Mapper 3.0//EN"
        "http://mybatis.org/dtd/mybatis-3-mapper.dtd">

<!--namespace:对应哪一个实体类,填写实体类完整路径名-->
<mapper namespace="com.lcy.entity.User">

    <!--id:用于标识是哪个sql语句, reasultType:用于表示查询到的结果封装到哪里返回-->
    <select id="selectById" resultType="com.lcy.entity.User">
        select * from user where userid = #{id}
    </select>

</mapper>
(5)测试类
package com.lcy.test;

import com.lcy.entity.User;
import org.apache.ibatis.io.Resources;
import org.apache.ibatis.session.SqlSession;
import org.apache.ibatis.session.SqlSessionFactory;
import org.apache.ibatis.session.SqlSessionFactoryBuilder;
import org.junit.Test;

import java.io.Reader;

/**
 * @Author Lcy
 * @Date 2022/6/6
 */
public class UserMapperTest {
    @Test
    public void selectByIdTest() throws Exception{
        //1.读取mybatis配置文件的内容----未来不需要写tomcat 解析配置文件
        Reader reader = Resources.getResourceAsReader("mybatis-config.xml");
        //2. 获取SqlSessionFactory对象
        SqlSessionFactory sqlSessionFactory = new SqlSessionFactoryBuilder().build(reader);
        //3. 获取SqlSession对象(建立与数据库的连接)----封装了对数据库操作的各种方法
        SqlSession sqlSession = sqlSessionFactory.openSession(true);//参数true 表示自动提交
        //由于是根据id进行查询,怎会返回一个查询结果,返回类型在映射文件resultType设置为User,使用sqlSession调用selectOne方法
        User user = sqlSession.selectOne("selectById", 1);
        System.out.println(user);
        //如果上面没有设置自动提交 则需要增加一步 sqlSession.commit();
        sqlSession.close();
    }
}
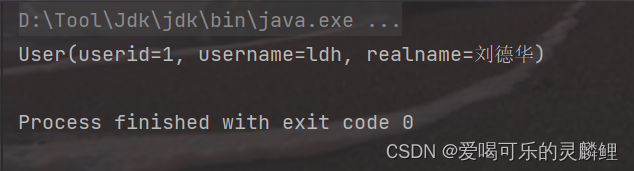
(6)测试结果
3. 企业开发下的mybatis
在企业开发中,往往不会使用sqlSession对象直接调用方法传递参数,以此来得到想要的结果。
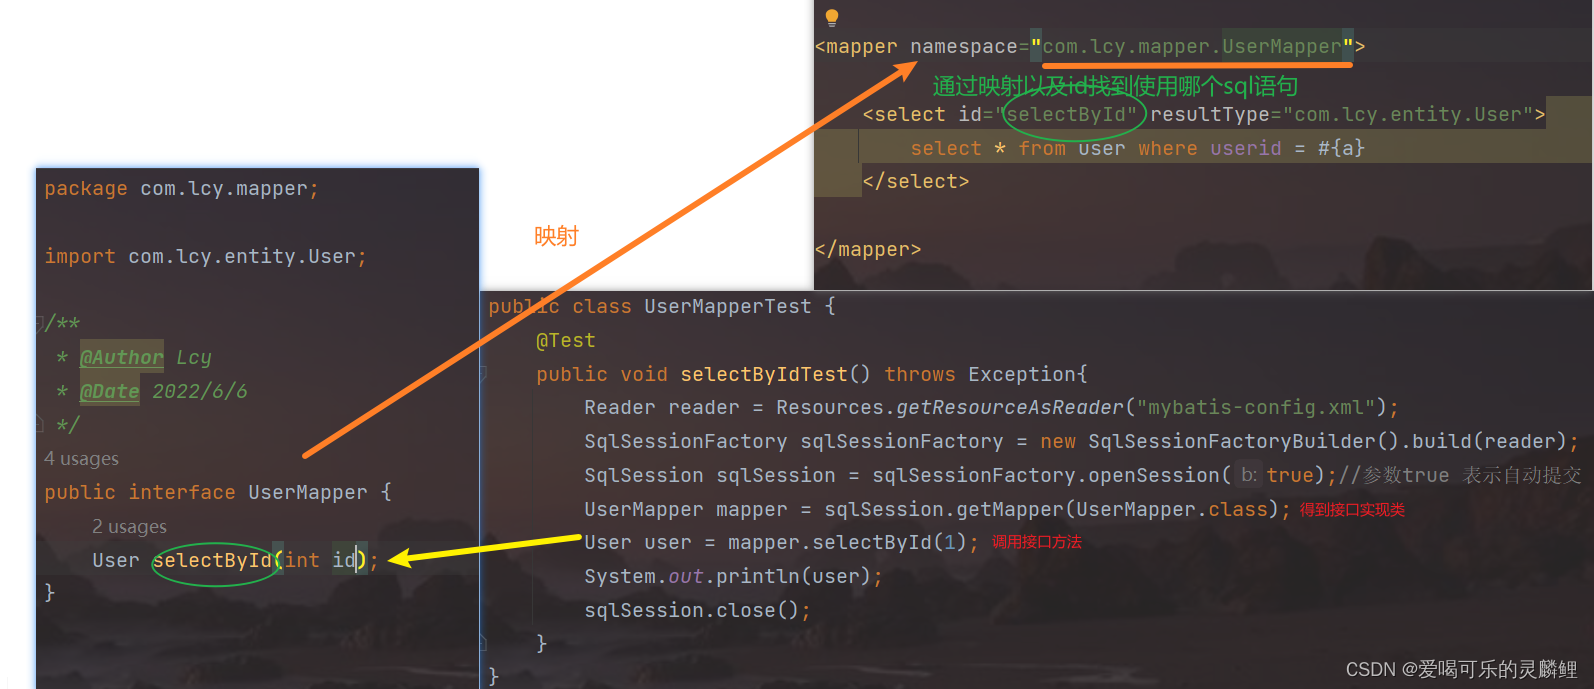
创建实体类后,创建一个接口,让接口与映射文件相关联,而在测试中,通过sqlSession获取接口的实现类,调用接口的中的方法,从而得到结果。
(1) 创建接口
public interface UserMapper {
    User selectById();
}
(2)测试类
package com.lcy.test;

import com.lcy.entity.User;
import com.lcy.mapper.UserMapper;
import org.apache.ibatis.io.Resources;
import org.apache.ibatis.session.SqlSession;
import org.apache.ibatis.session.SqlSessionFactory;
import org.apache.ibatis.session.SqlSessionFactoryBuilder;
import org.junit.Test;

import java.io.Reader;

/**
 * @Author Lcy
 * @Date 2022/6/6
 */
public class UserMapperTest {
    @Test
    public void selectByIdTest() throws Exception{
        Reader reader = Resources.getResourceAsReader("mybatis-config.xml");
        SqlSessionFactory sqlSessionFactory = new SqlSessionFactoryBuilder().build(reader);
        SqlSession sqlSession = sqlSessionFactory.openSession(true);//参数true 表示自动提交
        //获取接口的实现类
        UserMapper mapper = sqlSession.getMapper(UserMapper.class);
        //调用接口方法
        User user = mapper.selectById(1);
        System.out.println(user);
        sqlSession.close();
    }
}
(3) 流程
4. 映射文件获取多个参数
在上面的mybatis框架使用实例中,测试的是通过传递id获取用户对象,由于传递的参数只有一个,所以映射文件的sql语句中直接使用#{id}来把传递的参数进行拼接。
#{} 相当于statement中的占位符,而把参数传入后为#{id}则相当于对占位符进行了赋值,由于传递的参数唯一,因此名字可以随意,必定为传递的数值。
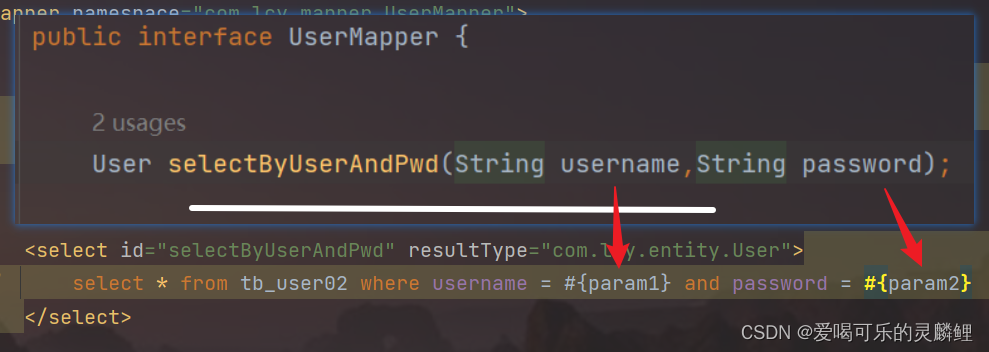
如果传递的参数两个或以上呢?
1. 我们需要在参数处使用@Param()为参数起名。

2. 直接使用 parm1 、 parm2 ... 有序参数列表
5. 添加时如何返回递增的主键值
<!--添加用户
          useGeneratedKeys:设置使用生成的主键
          keyProperty: 赋值给哪个属性
    -->
    <insert id="addUser" parameterType="com.lcy.entity.User"
            useGeneratedKeys="true" keyProperty="userId">
          insert into tb_user values(null,#{username},#{realname})
    </insert>
6. 查询出列名和实体类属性不一致
第一种: 查询时为列名起别名,使其与实体类属性一致
    <select id="findOne" resultType="com.lcy.entity.Student">
        select stu_id id,stu_name name,stu_age age from tb_stu where stu_id=#{id}
    </select>
第二种:使用resultMap完成列和属性之间的映射关系
    <resultMap id="StuMapper" type="com.lcy.entity.Student">
         <!--主键的映射关系 column:列名 property:属性名-->
         <id column="stu_id" property="id"/>
         <!--普通列的映射关系-->
         <result column="stu_name" property="name"/>
         <result column="stu_age" property="age"/>
    </resultMap>

    <!--resultType和ResultMap二者只能用一个-->

    <select id="findOne" resultMap="StuMapper">
        select * from tb_stu where stu_id=#{id}
    </select>
7. 动态Sql
1. 根据用户输入,依据不为空的数据进行查询 使用 where 1=1 与 if 结合使用 或者 where - if 结合使用,可以去掉多余的连接词 and/or
    <select id="findByCondition" resultType="com.lcy.entity.Account">
        select * from account where 1=1
        <if test="name!=null and name!=''">
             and  name=#{name}
        </if>
        <if test="password!=null">
             and  password=#{password}
        </if>
    </select>


<!-- 或者使用where -->

    <select id="findByCondition" resultType="com.lcy.entity.Account">
        select * from account
        <where>
            <if test="name!=null and name!=''">
                 and  name=#{name}
            </if>
            <if test="password!=null">
                 and  password=#{password}
            </if>
        </where>
     </select>
2. 其中可以使用choose-when-otherwise(多条件分支判断,对比 switch-calse-default )
    <select id="findByCondition02" resultType="com.ykq.entity.Account">
        select * from account where 1=1
        <choose>
             <when test="name!=null and name!=''">
                 and  name=#{name}
             </when>
            <when test="money!=null">
                and  money=#{money}
            </when>
            <!-- otherwise表示默认 相当于default -->
            <otherwise>
                and isdeleted=0
            </otherwise>
        </choose>
     </select>
3. 修改时,set-if 结合使用
<!--set:可以帮我们生成关键字 set 并且可以去除最后一个逗号-->
    <update id="update">
          update account
          <set>
             <if test="name!=null and name!=''">
                name=#{name},
             </if>
             <if test="money!=null">
                money=#{money},
             </if>
             <if test="isdeleted!=null">
                 isdeleted=#{isdeleted},
             </if>
             <if test="created!=null">
                  created=#{created},
             </if>
             <if test="updated!=null">
                  updated=#{updated},
             </if>
          </set>
          where id=#{id}
    </update>
4. 如果需要对特定的几个记录进修操作,使用foreach标签
如:select * from user where id in (1,2,3);
    <!-- select * from account where id in(1,2,3)
        如果你使用的为数组array  那么就用array
        如果你使用的为集合 那么就用list
        collection:类型
        item:数组中每个元素赋值的变量名
        open: 以谁开始
        close:以谁结束
        separator:分割符
    -->

    <!--查询-->
    <select id="findByIds" resultType="com.ykq.entity.Account">
        select * from account where id in
        <foreach collection="array" item="id" open="(" close=")" separator=",">
             #{id}
        </foreach>
    </select>

    <!--删除-->
    <delete id="batchDelete">
        <foreach collection="array" item="id" open="delete from account where  id in(" close=")" separator=",">
            #{id}
        </foreach>
    </delete>

    <!--添加-->
    <insert id="saveBatch">
        insert into account(name,isdeleted) values
        <foreach collection="list" item="acc" separator=",">
            (#{acc.name},#{acc.isdeleted})
        </foreach>
    </insert>
8. sql片段
在执行查询语句时不建议使用select *, 而是直接把需要查询的列名列出来,如果查询的操作或者表中的列名过多,则会造成编写麻烦,因此使用sql片段
    <sql id="lcy">
        userid,username,realname
    </sql>

    <select id="selectById" resultType="com.lcy.entity.User">
        select <include refid="lcy"/> from user where userid = #{a}
    </select>
9. 映射文件处理特殊字符
在处理数据时候可能会出现以下情况,如:请查询出在 [ 3,6] 之间的记录,会出现错误:
select * from user where id >= 3 and id <= 6

处理特殊字符方式:
1. 使用转义字符
2. 使用 <![CDATA[sql]]>
例如:<![CDATA[select * from user where userid > 3 and userid < 6]]>
10. 模糊查询
select * from 表名 where 列名 like '%a%'
1. 使用concat进行拼接
select * from 表名 where 列名 like conca('%',#{name},'%')
2. 使用$()进行拼接
select * from account where name like '%${name}%'
$() 与 #{} 的区别:$()相当于字符串拼接,不能防止sql注入
#{}相当于占位符,可以防止sql注入问题,#{}实际使用的PreparedStatement
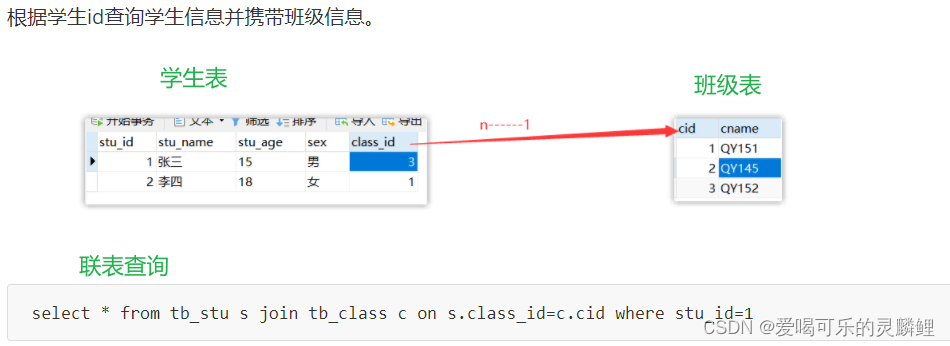
11. 联表查询
 1. 实体类
package com.lcy.entity;

import lombok.AllArgsConstructor;
import lombok.Data;
import lombok.NoArgsConstructor;

/**
 * @Author Lcy
 * @Date 2022/6/1
 */
@Data
@NoArgsConstructor
@AllArgsConstructor
public class Student {
    private int id;
    private String name;
    private int age;
    private String sex;
    //班级类属性
    private Cla cla;
}
2. 映射文件
<?xml version="1.0" encoding="UTF-8" ?>
<!DOCTYPE mapper PUBLIC "-//mybatis.org//DTD Mapper 3.0//EN"
        "http://mybatis.org/dtd/mybatis-3-mapper.dtd">

<mapper namespace="com.lcy.mapper.StudentMapper">
    <resultMap id="stuClaMapper" type="com.lcy.entity.Student">
        <id column="stu_id" property="id"/>
        <result column="stu_name" property="name"/>
        <result column="stu_age" property="age"/>
        <result column="stu_sex" property="sex"/>

        <!--association: 表示一的一方
                 property: 它表示属性名
                 javaType: 该属性名对应的数据类型
        -->

        <association property="cla" javaType="com.lcy.entity.Cla">
            <id column="cla_id" property="id"/>
            <result column="cla_name" property="name"/>
            <result column="cla_tea" property="teacher"/>
        </association>
    </resultMap>

    <select id="selectUnion" resultMap="stuClaMapper">
        select * from tb_stu stu join tb_cla cla on stu.stu_cla = cla.cla_id where stu.stu_id = #{id}
    </select>
</mapper>
12. 分页查询工具PageHelper
PageHelper可以帮助完成分页查询的功能
分页查询的语句为:select * from 表名 [where 条件] limit (page-1)*pageSize, pageSize;
其中page表示第几页,pagesize表示每页显示几个数据;
PageHelper使用:
(1)引入PageHelper的jar包依赖
        <dependency>
            <groupId>com.github.pagehelper</groupId>
            <artifactId>pagehelper</artifactId>
            <version>5.3.0</version>
        </dependency>
(2)在mybatis配置文件中设置拦截器
    <plugins>
        <plugin interceptor="com.github.pagehelper.PageInterceptor"></plugin>
    </plugins>
(3)使用pageHelper
把结果封装到PageInfo类中,可以很轻松的拿到想要的数据:查询出的记录总条数、总页数、对应页码的数据。。。
        PageHelper.startPage(2,5);
        List<User> list = userDao.findAll();
        //把查询的结果封装到PageInfo类中。
        PageInfo<User> pageInfo=new PageInfo<User>(list);
        System.out.println("总条数:"+pageInfo.getTotal());
        System.out.println("总页数:"+pageInfo.getPages());
        System.out.println("当前页码对应的数据:"+pageInfo.getList());
13. Mybatis代码生成器--generator
在使用Mybatis时,肯定要创建表对应的实体类,Mapper接口以及映射文件
而Generator 可以根据表帮你生成实体类,和dao和xml映射文件,就是简单的CRUD,简化了自我操作的复杂。
Generator 使用:
(1)引入mybatis-generator 的jar包依赖
        <dependency>
            <groupId>org.mybatis.generator</groupId>
            <artifactId>mybatis-generator-core</artifactId>
            <version>1.4.0</version>
        </dependency>
(2)在项目下(与pom.xml同级)创建generator配置文件
<?xml version="1.0" encoding="UTF-8"?>
<!DOCTYPE generatorConfiguration
        PUBLIC "-//mybatis.org//DTD MyBatis Generator Configuration 1.0//EN"
        "http://mybatis.org/dtd/mybatis-generator-config_1_0.dtd">

<generatorConfiguration>
<!--    此处填写自己mysql驱动的位置-->
    <classPathEntry location="D:\Tool\Maven\repo\mysql\mysql-connector-java\8.0.28\mysql-connector-java-8.0.28.jar" />

    <context id="DB2Tables" targetRuntime="MyBatis3">

        <!--抑制注释生成-->
        <commentGenerator>
            <property name="suppressDate" value="true"/>
            <property name="suppressAllComments" value="true" />
        </commentGenerator>

<!--    连接数据库的配置信息-->
        <jdbcConnection driverClass="com.mysql.cj.jdbc.Driver"
                        connectionURL="jdbc:mysql://localhost:3306/mybatis?serverTimezone=Asia/Shanghai"
                        userId="root"
                        password="root">
        </jdbcConnection>

        <javaTypeResolver >
            <property name="forceBigDecimals" value="false" />
        </javaTypeResolver>

<!--    生成实体类文件的位置:targetPackage:实体类包名 targetProject:包所处路径-->

        <javaModelGenerator targetPackage="com.lcy.entity" targetProject=".\src\main\java">
            <property name="enableSubPackages" value="true" />
        </javaModelGenerator>

        <!--    生成映射文件的位置:targetPackage:映射文件包名 targetProject:包所处路径-->
        <sqlMapGenerator targetPackage="mapper"  targetProject=".\src\main\resources">
            <property name="enableSubPackages" value="true" />
        </sqlMapGenerator>

        <!--    生成Mapper接口的位置:targetPackage:Mapper接口包名 targetProject:包所处路径-->
        <javaClientGenerator type="XMLMAPPER" targetPackage="com.lcy.mapper"  targetProject=".\src\main\java">
            <property name="enableSubPackages" value="true" />
        </javaClientGenerator>

        <!--数据库表和实体的映射关系
              schema:数据库名称
              tableName: 数据库中表名
              domainObjectName:想要生成对应实体类的类名
              enableUpdateByExample:是否生成复杂的修改操作。。。
        -->
        <table schema="mybatis" tableName="tb_user02" domainObjectName="User" enableCountByExample="false"
            enableDeleteByExample="false" enableSelectByExample="false" enableUpdateByExample="false">
        </table>

    </context>
</generatorConfiguration>
(3)测试生成
package com.lcy.test;

import org.junit.Test;
import org.mybatis.generator.api.MyBatisGenerator;
import org.mybatis.generator.config.Configuration;
import org.mybatis.generator.config.xml.ConfigurationParser;
import org.mybatis.generator.internal.DefaultShellCallback;

import java.io.File;
import java.util.ArrayList;
import java.util.List;

/**
 * @Author Lcy
 * @Date 2022/6/6
 * 不需要记,官网上有 http://mybatis.org/generator/
 */
public class GeneratorTest {
    @Test
    public void generatorTest() throws Exception{
        List<String> warnings = new ArrayList<String>();
        boolean overwrite = true;
        File configFile = new File("generator.xml");
        ConfigurationParser cp = new ConfigurationParser(warnings);
        Configuration config = cp.parseConfiguration(configFile);
        DefaultShellCallback callback = new DefaultShellCallback(overwrite);
        MyBatisGenerator myBatisGenerator = new MyBatisGenerator(config, callback, warnings);
        myBatisGenerator.generate(null);
    }
}
14. Mybatis缓存
缓存:缓存就是数据交换的缓冲区(称作Cache),当某一硬件要读取数据时,会首先从缓存中查找需要的数据,如果找到了则直接执行,找不到的话则从内存中找。
Mybatis缓存:仅针对与查询,当查询数据后,数据会存储在缓存中,以便下次查询相同的数据时直接从缓存中取出,不在从数据库中再次进行查询,提高了查询效率。Mybatis缓存分为一级缓存和二级缓存。
14.1 一级缓存
一级缓存:一级缓存是SqlSession级别的,默认开启。同一个SqlSession查询出数据后会把数据存在缓存中,下次在执行相同的查询操作时,便直接从缓存中读取。

一级缓存失效情况:
1. 不是同一个SqlSession对应的则不是同一个缓存
2. 是同一个SqlSession 但查询的数据不一样(缓存中没有该数据)
3. 是同一个SqlSession 但两次查询之间,实现了增删改任意操作(Mybatis缓存仅仅是为了查询时提高效率,但不会影响查询结果,如果数据库的数据进行改变,则会清空缓存重新查找,保证数据有效)
4. 是同一个SqlSession,但两次查询之间手动清空了缓存(sqlSession.clearCache() )
14.2 二级缓存
二级缓存时SqlSessionFactory级别的,通过同一个SqlSessionFactory创建的SqlSession查询的结果会被缓存,若再次执行相同的查询语句,结果就会从缓存中获取。
二级缓存开启条件:
(1)在核心配置文件中,设置全局配置属性cacheEnabled=“true” 默认为true,不需要设置
<settings>
<!--开启二级缓存-->
<setting name="cacheEnabled" value="true"/>
</settings>
(2)在映射文件中设置标签<cache/>
(3)二级缓存必须在sqlSession关闭或者提交后才有效
(4)查询的数据所转换的实体类类型必须实现序列化接口
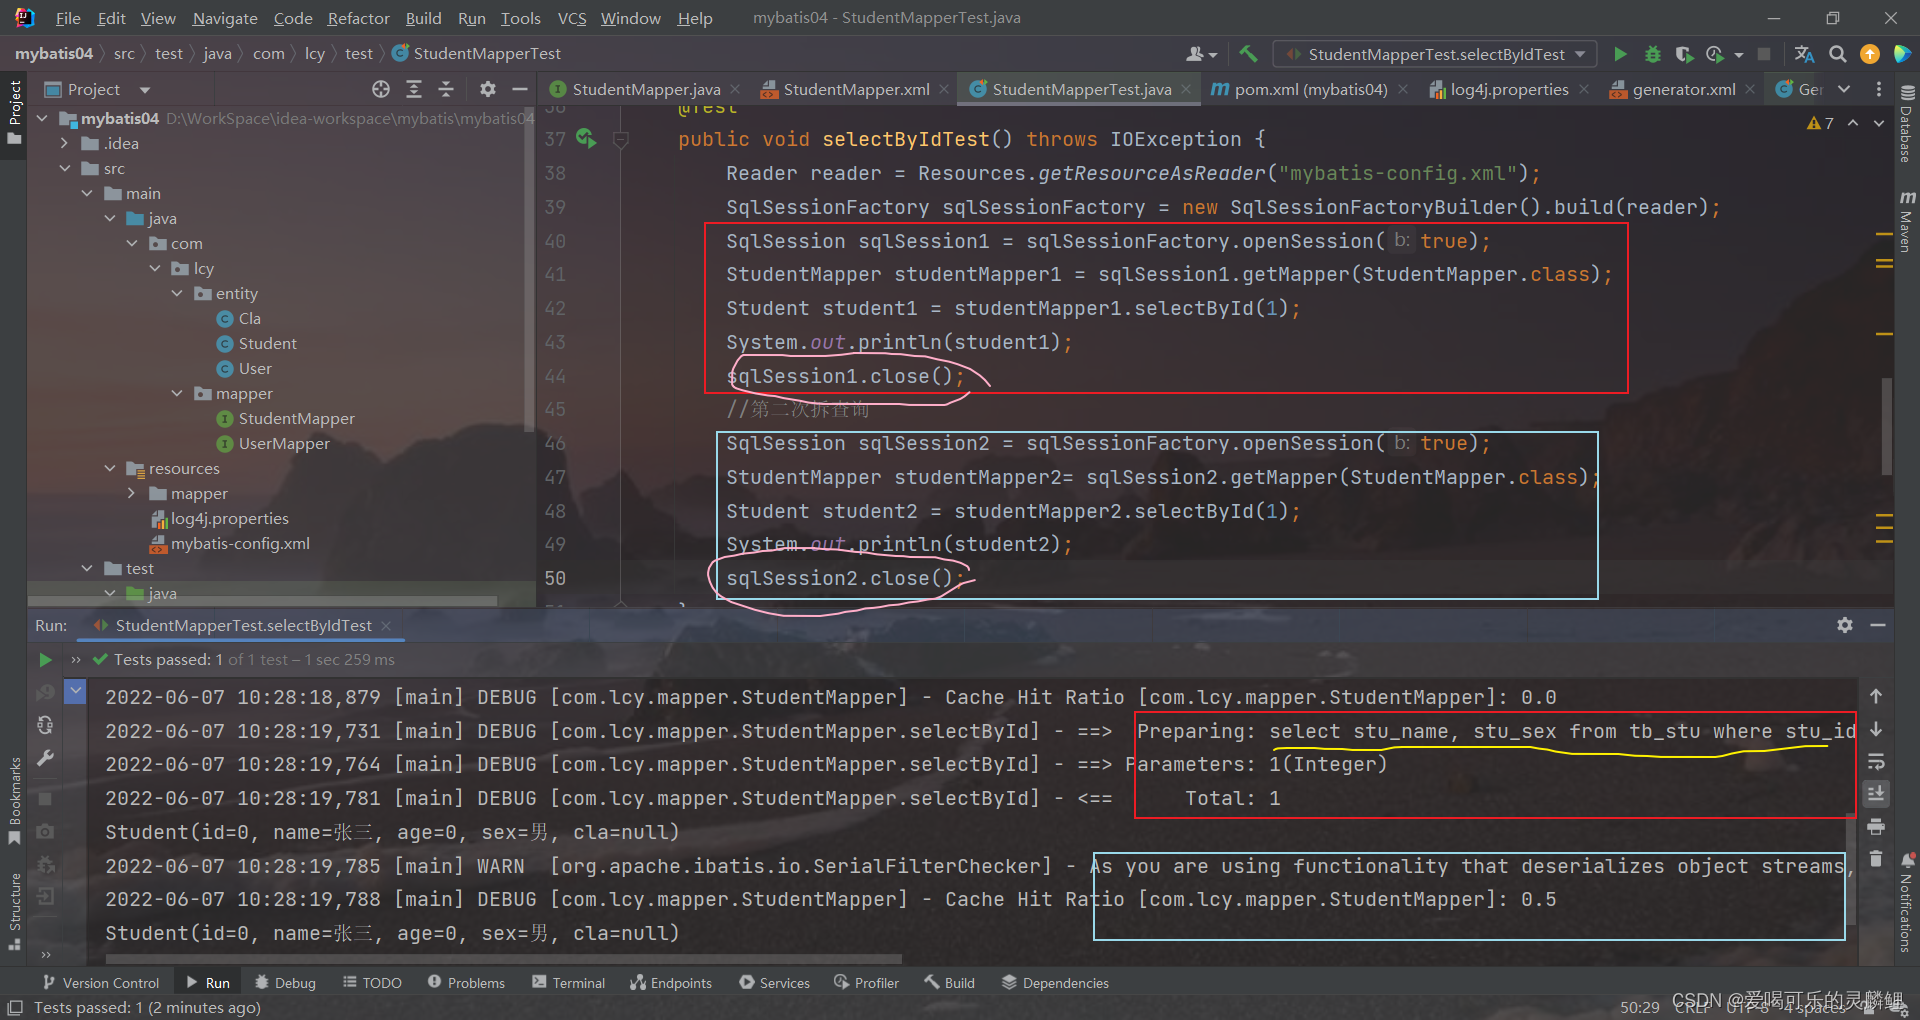
二级缓存失效情况:
在两次查询期间,执行了任意的增删改查,会使一级和二级缓存同时失效!


 546
546


 被折叠的 条评论
为什么被折叠?
被折叠的 条评论
为什么被折叠?
 到【灌水乐园】发言


