


1. 安装Docker、Docker-compose
安装Docker和Docker Compose在CentOS 7上需要按照以下步骤进行操作:
- 首先,安装Docker。可以使用以下命令来安装Docker:
sudo yum install docker
- 安装完成后,启动Docker并设置开机自启动:
sudo systemctl start docker
sudo systemctl enable docker
- 接下来,安装Docker Compose。可以使用以下命令来下载最新版本的Docker Compose:
sudo curl -L "https://github.com/docker/compose/releases/latest/download/docker-compose-$(uname -s)-$(uname -m)" -o /usr/local/bin/docker-compose
- 接着,赋予Docker Compose执行权限并创建软链接:
sudo chmod +x /usr/local/bin/docker-compose
sudo ln -s /usr/local/bin/docker-compose /usr/bin/docker-compose
- 最后,验证Docker Compose是否安装成功:
docker-compose --version
2. 安装Jenkins
2.1. 更新软件包列表:
在终端中执行以下命令,以确保你的系统已更新到最新的软件包列表:
sudo yum update
2.2. 安装 OpenJDK 11:
执行以下命令来安装 OpenJDK 11:
sudo yum install java-11-openjdk-devel
2.3. 验证安装:
安装完成后,可以使用以下命令来验证 Java 是否成功安装,并查看其版本信息:
java -version
2.4. 设置 JAVA_HOME 环境变量:
可以选择设置 JAVA_HOME 环境变量,以便系统和其他应用程序能够找到你的 Java 安装路径。编辑 /etc/profile 或者当前用户的 .bashrc 文件,添加如下行:
export JAVA_HOME=/usr/lib/jvm/java-11-openjdk
export PATH=$JAVA_HOME/bin:$PATH
然后,运行以下命令以使更改生效:
source /etc/profile
2.5. 系统设置设置
系统时间如果和真实时间不一致时执行如下命令:
timedatectl set-timezone Asia/Shanghai
2.6. 更新系统
在开始之前,确保你的系统已经更新到最新版本。你可以使用以下命令更新系统:
sudo yum update
2.7. 添加Jenkins 存储库
下载并安装Jenkins 的最新版本,首先需要添加 Jenkins 的官方存储库。创建一个名为 jenkins.repo 的文件并编辑:
sudo vi /etc/yum.repos.d/jenkins.repo
在文件中添加以下内容:
[jenkins]
name=Jenkins
baseurl=https://pkg.jenkins.io/redhat-stable
gpgcheck=1
2.8. 导入Jenkins 的 GPG 密钥,以验证下载的软件包
sudo rpm --import https://pkg.jenkins.io/redhat-stable/jenkins.io.key
2.9. 安装Jenkins
使用以下命令安装Jenkins:
sudo yum install jenkins
2.10. 启动Jenkins 服务
安装完成后,启动Jenkins 服务并设置它在系统启动时自动启动:
sudo systemctl start jenkins
sudo systemctl enable jenkins
2.11. 配置防火墙
如果系统中启用了防火墙(如Firewalld),则需要允许 Jenkins 使用的端口(默认为 8080)。使用以下命令打开端口:
sudo firewall-cmd --zone=public --add-port=8080/tcp --permanent
sudo firewall-cmd --reload
2.12. 访问Jenkins
现在,你可以通过浏览器访问Jenkins。在浏览器中输入以下地址:
http://your_server_ip_or_domain:8080
2.13. 设置Jenkins
访问Jenkins 网页后,将会要求你解锁 Jenkins。在第一次启动时,Jenkins 会要求你输入初始管理员密码。你可以在服务器上找到该密码并输入。然后,按照屏幕上的指示完成 Jenkins 的设置向导。
2.14. 安装Jenkins插件
完成设置向导后,Jenkins 将会提供一些推荐的插件,你可以选择安装这些插件,也可以选择手动安装所需的插件。
2.14.1. 邮件相关插件

2.14.2. Git相关插件

2.14.3. Ssh插件
![]()
2.14.4. 运行python的插件

2.14.5. 运行robotframework插件
![]()
2.15. 配置任务、配置全局设置:
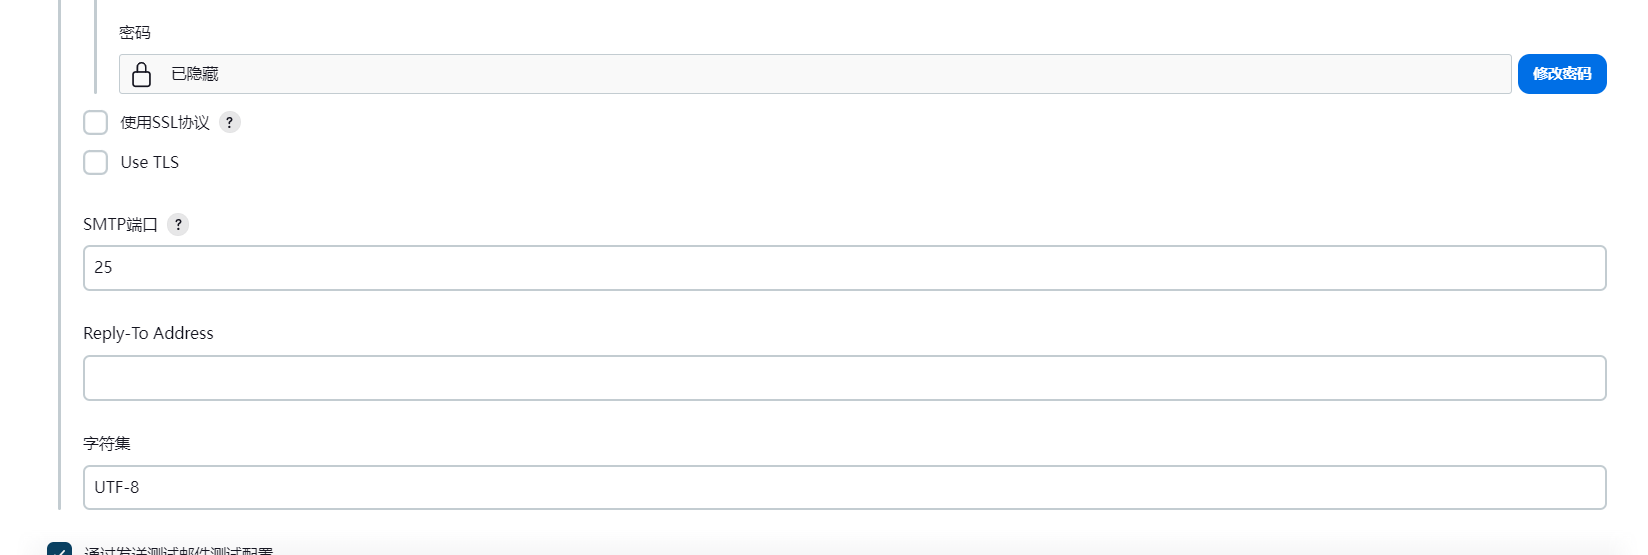
2.15.1. 邮件配置
邮件配置截图

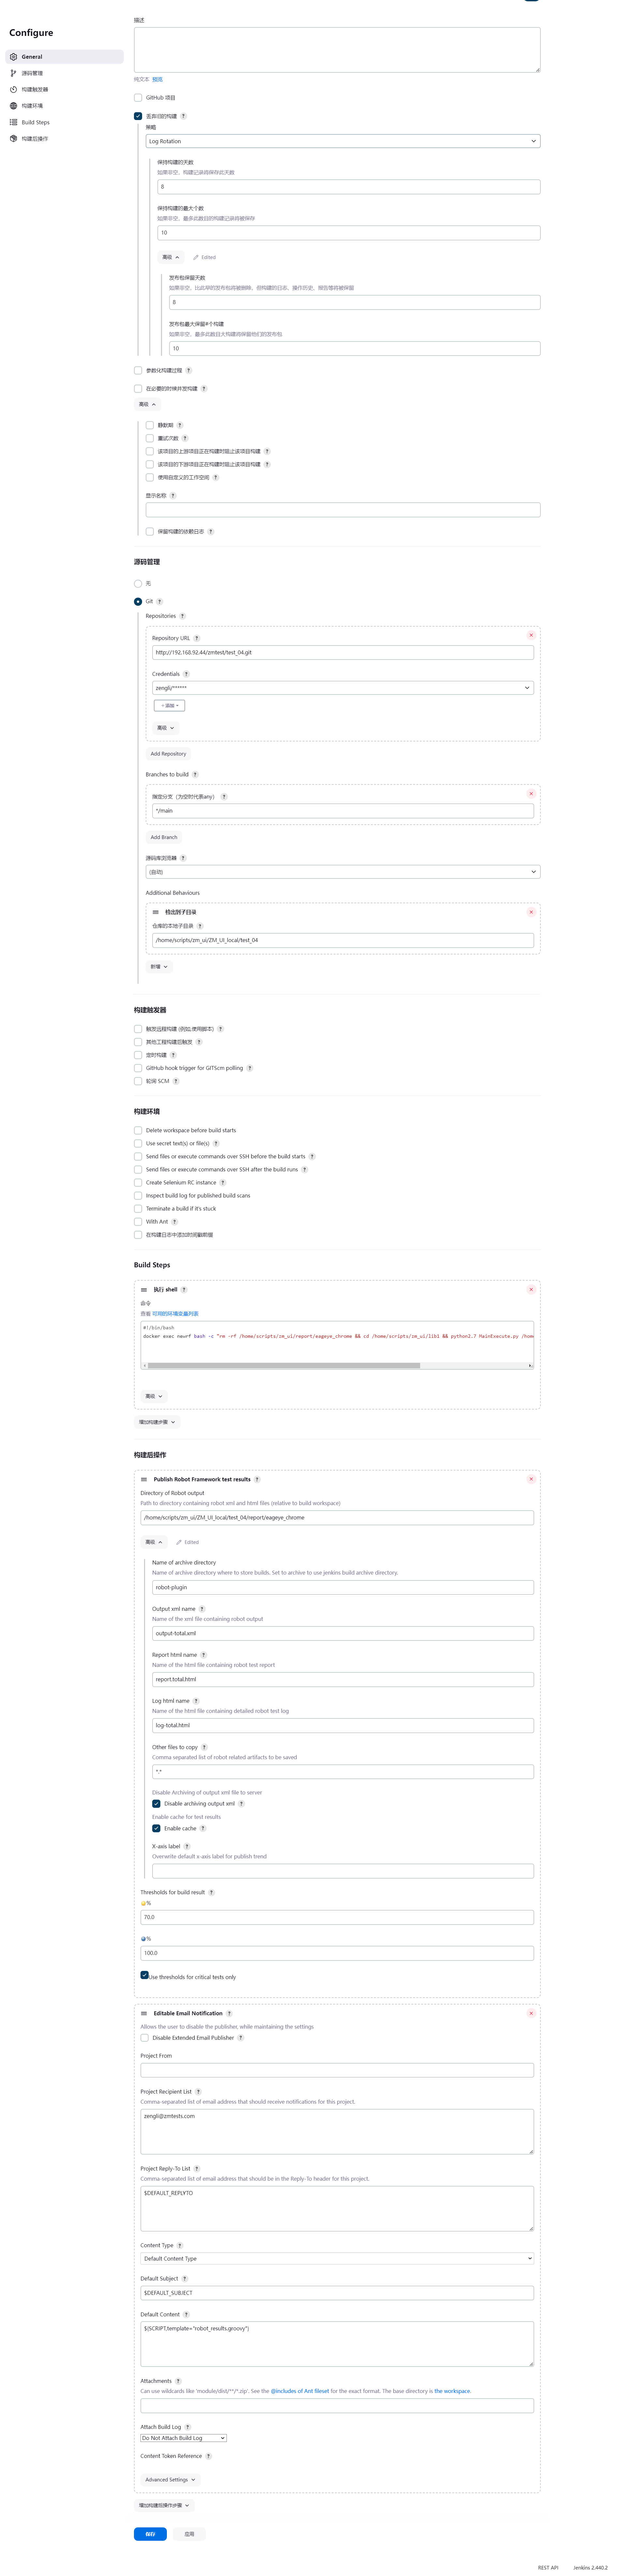
2.15.2. 任务配置
- 执行shell(ui任务):
#!/bin/bash
docker exec newrf bash -c "rm -rf /home/scripts/zm_ui/report/eageye_chrome && cd /home/scripts/zm_ui/lib1 && python2.7 MainExecute.py /home/scripts/zm_ui/鹰眼V9/ 2 chrome yifang eageye_chrome"- 执行shell(接口任务):
#!/bin/bash
docker exec newrf bash -c "rm -rf /home/scripts/zm_ui/report/eageyeEarlyReport_jk && cd /home/scripts/zm_ui/lib1 && robot -d /home/scripts/zm_ui/report/eageyeEarlyReport_jk /home/scripts/zm_ui/鹰眼早报告-JK"
任务配置截图
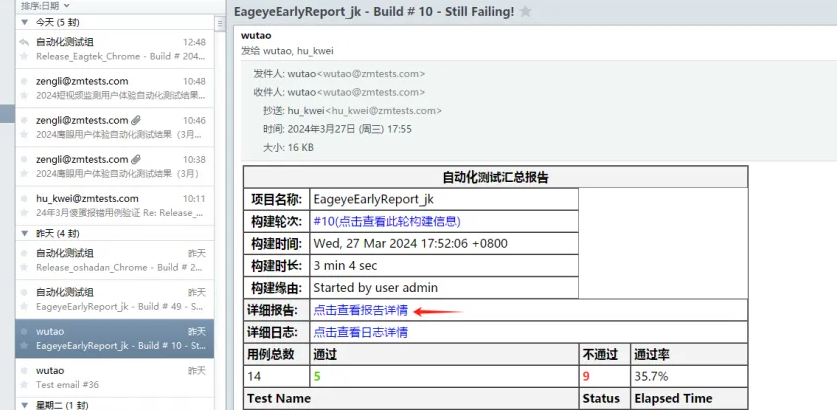
2.16. 配置邮件模板:
把下面的模板文件(robot_result.groovy、robot_result_jk.groovy)放入/var/lib/jenkins/email-templates文件夹中(email-templates文件夹需要自己创建)
<%
 import java.text.DateFormat
 import java.text.SimpleDateFormat
 %>
    <!-- Robot Framework Results -->
<%
 def robotResults = false
 def actions = build.actions // List<hudson.model.Action>
 actions.each() { action ->
  if( action.class.simpleName.equals("RobotBuildAction") ) { // hudson.plugins.robot.RobotBuildAction
   robotResults = true %>
                   <div style="width:100%;float:left">
                    <table cellspacing="0" cellpadding="4" border="1" align="left">
                        <thead>
                            <tr bgcolor="#F3F3F3">
                                <td style="text-align:center" colspan="4"><b>自动化测试汇总报告</b></td>
                            </tr>
							<tr>
								<th>项目名称:</th>
								<td>${project.name}</td>
							</tr>
							<tr>
								<th>构建轮次:</th>
								<td><a href="${rooturl}${build.url}">${build.displayName}(点击查看此轮构建信息)</a></td>
							</tr>
							<tr>
								<th>构建时间:</th>
								<td>${it.timestampString}</td>
							</tr>
							<tr>
								<th>构建时长:</th>
								<td>${build.durationString}</td>
							</tr>
							<tr>
								<th>构建缘由:</th>
								<td><% build.causes.each() { cause -> %> ${cause.shortDescription} <% } %></td>
							</tr>
                            <tr>
                                <td bgcolor="#F3F3F3" style="width:80px"><b>详细报告:</b></td>
                                <td colspan="4"><a href="${rooturl}${build.url}robot/report/report-total.html">点击查看报告详情</a></td>
                            </tr>
							<tr>
                                <td bgcolor="#F3F3F3" style="width:80px"><b>详细日志:</b></td>
                                <td colspan="4"><a href="${rooturl}${build.url}robot/report/log-total.html">点击查看日志详情</a></td>
                            </tr>

                            <tr bgcolor="#F3F3F3">
                                <td><b>用例总数</b></td>
                                <td><b>通过</b></td>
                                <td style="width:60px"><b>不通过</b></td>
                                <td style="width:100px"><b>通过率</b></td>
                            </tr>
                            <tr>
                                <td><%= action.result.overallTotal %></td>
                                <td><b><span style="color:#66CC00"><%= action.result.overallPassed %></span></b></td>
                                <td><b><span style="color:#FF3333"><%= action.result.overallFailed %></span></b></td>
                                <td><%= action.overallPassPercentage %>%</td>
                            </tr>
                            <tr bgcolor="#F3F3F3">
                                <td colspan="2"><b>Test Name</b></td>
                                <td><b>Status</b></td>
                                <td><b>Elapsed Time</b></td>
                            </tr>
                        </thead>
                        <tbody>

<% def suites = action.result.allSuites
   suites.each() { suite ->
    def currSuite = suite
    def suiteName = currSuite.displayName
    // ignore top 2 elements in the structure as they are placeholders
    while (currSuite.parent != null && currSuite.parent.parent != null) {
     currSuite = currSuite.parent
     suiteName = currSuite.displayName + "." + suiteName
    } %>

                            <tr>
                                <td colspan="4"><b><%= suiteName %></b></td>
                            </tr>

<%  DateFormat format = new SimpleDateFormat("yyyyMMdd HH:mm:ss")
    def execDateTcPairs = []
    suite.caseResults.each() { tc ->
      Date execDate = format.parse(tc.starttime)
      execDateTcPairs << [execDate, tc]
    }
    // primary sort execDate, secondary displayName
    execDateTcPairs = execDateTcPairs.sort{ a,b -> a[1].displayName <=> b[1].displayName }
    execDateTcPairs = execDateTcPairs.sort{ a,b -> a[0] <=> b[0] }
    execDateTcPairs.each() {
      def execDate = it[0]
      def tc = it[1]  %>

                            <tr>
                                <td colspan="2"><%= tc.displayName %></td>
                                <td><b><span style="color:<%= tc.isPassed() ? "#66CC00" : "#FF3333" %>"><%= tc.isPassed() ? "PASS" : "FAIL" %></span></b></td>
                                <td><%= tc.getDuration().intdiv(60000)+"分"+(tc.getDuration()-tc.getDuration().intdiv(60000)*60000).intdiv(1000)+"秒" %></td>
                            </tr>
                            <% if(tc.errorMsg != null) {%>
                            <tr>
                                <td ><b><span style="font-size:10px;color:#FF3333">错误描述:</span></b></td>
                                <td colspan="3"><span style="font-size:10px"><%= tc.errorMsg%></span></td>

                            </tr>
                            <%
                             }%>
<%  } // tests
   } // suites %>
                        </tbody>
                    </table>

                     <p style="color:#AE0000;clear:both">*这个是通过Jenkins自动构建得出的报告,仅供参考。</p>
                    </div>
                    <%
  } // robot results
 }
 if (!robotResults) { %>
        <p>No Robot Framework test results found.</p>
<%
 } %>
<%
 import java.text.DateFormat
 import java.text.SimpleDateFormat
 %>
    <!-- Robot Framework Results -->
<%
 def robotResults = false
 def actions = build.actions // List<hudson.model.Action>
 actions.each() { action ->
  if( action.class.simpleName.equals("RobotBuildAction") ) { // hudson.plugins.robot.RobotBuildAction
   robotResults = true %>
                   <div style="width:100%;float:left">
                    <table cellspacing="0" cellpadding="4" border="1" align="left">
                        <thead>
                            <tr bgcolor="#F3F3F3">
                                <td style="text-align:center" colspan="4"><b>自动化测试汇总报告</b></td>
                            </tr>
							<tr>
								<th>项目名称:</th>
								<td>${project.name}</td>
							</tr>
							<tr>
								<th>构建轮次:</th>
								<td><a href="${rooturl}${build.url}">${build.displayName}(点击查看此轮构建信息)</a></td>
							</tr>
							<tr>
								<th>构建时间:</th>
								<td>${it.timestampString}</td>
							</tr>
							<tr>
								<th>构建时长:</th>
								<td>${build.durationString}</td>
							</tr>
							<tr>
								<th>构建缘由:</th>
								<td><% build.causes.each() { cause -> %> ${cause.shortDescription} <% } %></td>
							</tr>
                            <tr>
                                <td bgcolor="#F3F3F3" style="width:80px"><b>详细报告:</b></td>
                                <td colspan="4"><a href="${rooturl}${build.url}robot/report/report.html">点击查看报告详情</a></td>
                            </tr>
							<tr>
                                <td bgcolor="#F3F3F3" style="width:80px"><b>详细日志:</b></td>
                                <td colspan="4"><a href="${rooturl}${build.url}robot/report/log.html">点击查看日志详情</a></td>
                            </tr>

                            <tr bgcolor="#F3F3F3">
                                <td><b>用例总数</b></td>
                                <td><b>通过</b></td>
                                <td style="width:60px"><b>不通过</b></td>
                                <td style="width:100px"><b>通过率</b></td>
                            </tr>
                            <tr>
                                <td><%= action.result.overallTotal %></td>
                                <td><b><span style="color:#66CC00"><%= action.result.overallPassed %></span></b></td>
                                <td><b><span style="color:#FF3333"><%= action.result.overallFailed %></span></b></td>
                                <td><%= action.overallPassPercentage %>%</td>
                            </tr>
                            <tr bgcolor="#F3F3F3">
                                <td colspan="2"><b>Test Name</b></td>
                                <td><b>Status</b></td>
                                <td><b>Elapsed Time</b></td>
                            </tr>
                        </thead>
                        <tbody>

<% def suites = action.result.allSuites
   suites.each() { suite ->
    def currSuite = suite
    def suiteName = currSuite.displayName
    // ignore top 2 elements in the structure as they are placeholders
    while (currSuite.parent != null && currSuite.parent.parent != null) {
     currSuite = currSuite.parent
     suiteName = currSuite.displayName + "." + suiteName
    } %>

                            <tr>
                                <td colspan="4"><b><%= suiteName %></b></td>
                            </tr>

<%  DateFormat format = new SimpleDateFormat("yyyyMMdd HH:mm:ss")
    def execDateTcPairs = []
    suite.caseResults.each() { tc ->
      Date execDate = format.parse(tc.starttime)
      execDateTcPairs << [execDate, tc]
    }
    // primary sort execDate, secondary displayName
    execDateTcPairs = execDateTcPairs.sort{ a,b -> a[1].displayName <=> b[1].displayName }
    execDateTcPairs = execDateTcPairs.sort{ a,b -> a[0] <=> b[0] }
    execDateTcPairs.each() {
      def execDate = it[0]
      def tc = it[1]  %>

                            <tr>
                                <td colspan="2"><%= tc.displayName %></td>
                                <td><b><span style="color:<%= tc.isPassed() ? "#66CC00" : "#FF3333" %>"><%= tc.isPassed() ? "PASS" : "FAIL" %></span></b></td>
                                <td><%= tc.getDuration().intdiv(60000)+"分"+(tc.getDuration()-tc.getDuration().intdiv(60000)*60000).intdiv(1000)+"秒" %></td>
                            </tr>
                            <% if(tc.errorMsg != null) {%>
                            <tr>
                                <td ><b><span style="font-size:10px;color:#FF3333">错误描述:</span></b></td>
                                <td colspan="3"><span style="font-size:10px"><%= tc.errorMsg%></span></td>

                            </tr>
                            <%
                             }%>
<%  } // tests
   } // suites %>
                        </tbody>
                    </table>

                     <p style="color:#AE0000;clear:both">*这个是通过Jenkins自动构建得出的报告,仅供参考。</p>
                    </div>
                    <%
  } // robot results
 }
 if (!robotResults) { %>
        <p>No Robot Framework test results found.</p>
<%
 } %>
3. 安装Git(如果自带则省略)、配置Git把代码拉到本地
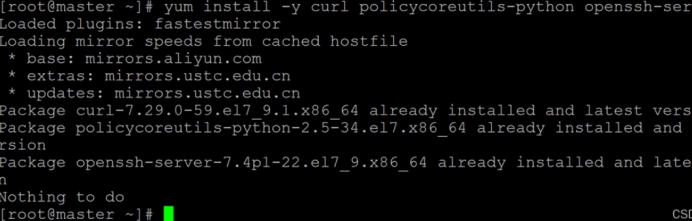
3.1. 安装依赖包
yum install -y curl policycoreutils-python openssh-server
执行截图
3.2. 设置 SSH 开机自启动并启动 SSH 服务
执行截图

systemctl enable sshd
systemctl start sshd
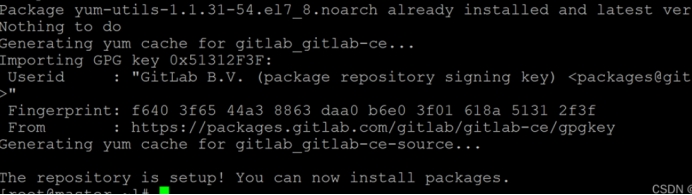
3.3. 添加GitLab 软件包仓库
curl https://packages.gitlab.com/install/repositories/gitlab/gitlab-ce/script.rpm.sh | sudo bash
执行截图
3.4. 安装 GitLab
sudo EXTERNAL_URL=“实例公网 IP 地址”
yum install -y gitlab-ce
执行截图
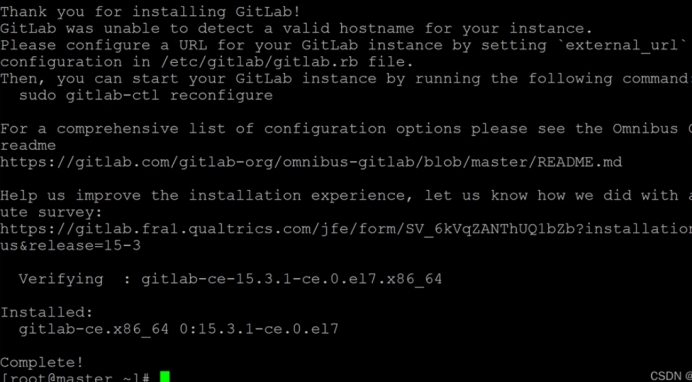
安装的版本:gitlab-ce.x86_64 0:15.3.1-ce.0.el7
安装成功,注意整个安装后,gitLab占了大概有接近3G空间。
完成安装后,你需要设置external_url(如上图说明);
vim /etc/gitlab/gitlab.rb
修改文件中的 external_url=http://192.168.XX.XX”,#你安装软件的服务器 IP ADDR;
然后执行命令:
gitlab-ctl reconfigure
3.5. 修改默认端口号
第一步:修改/etc/gitlab/gitlab.rb文件,如果有如下参数直接修改,如果没有就新增
nginx['listen_port'] = 8088
第二步:修改默认的gitlab nginx的web服务80端 /var/opt/gitlab/nginx/conf/gitlab-http.conf
server { ## HTTPS server
listen *:8088;
第三步:初始化并重启组件:
gitlab-ctl reconfigure
gitlab-ctl restart
3.6. 设置管理员账号密码
获取管理员帐户默认密码
cat /etc/gitlab/initial_root_password

你可以看到 Password:后面的内容就是管理员用户 root 的密码;
访问gitlab 的服务页面,注意:最新版访问地址,直接就是80端口就可以访问了。
http://IP;
会出现如下登录页面:
用户名用 root,密码用上面命令显示的密码登录;
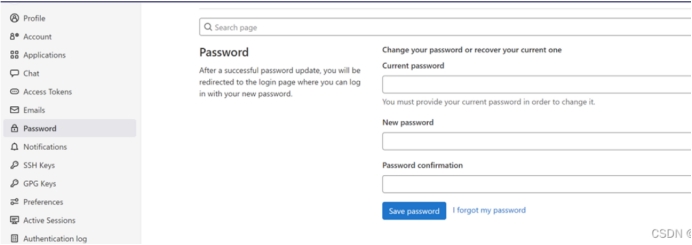
进入后最好更新密码。
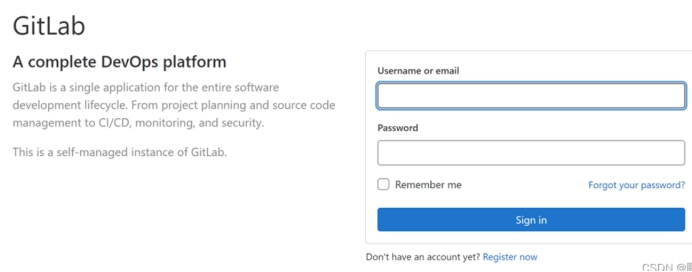
用户名用 root,密码用上面命令显示的密码登录;进入后最好更新密码。
3.7. 更改默认的仓库存储目录(可选)
默认安装时,默认的仓库存储路径在 /var/opt/gitlab/git-data目录下,仓库存储在子目录repositories里面,可以通过修改/etc/gitlab/gitlab.rb文件中git_data_dirs参数来自定义父目录。
vi /etc/gitlab/gitlab.rb
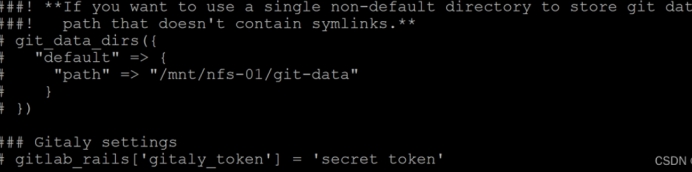
把该注释打开,使用自己的数据盘路径即可。

没有数据下,我们可以这样操作
先关闭应用,然后再重载一下配置,最后启动。
启动:gitlab-ctl start
关闭:gitlab-ctl stop
重启:gitlab-ctl restart
重载配置:gitlab-ctl reconfigure
查看状态:gitlab-ctl status
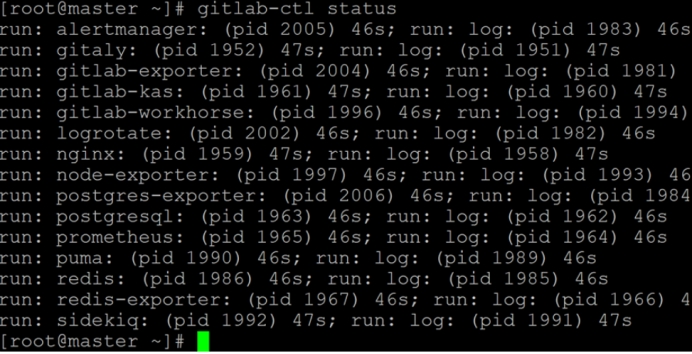
3.8. 创建Project
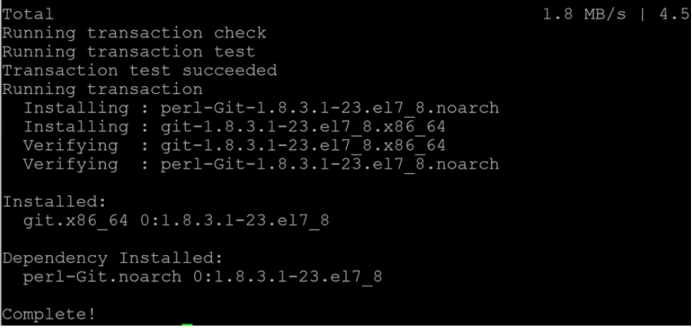
3.8.1. 安装Git工具
yum install -y git
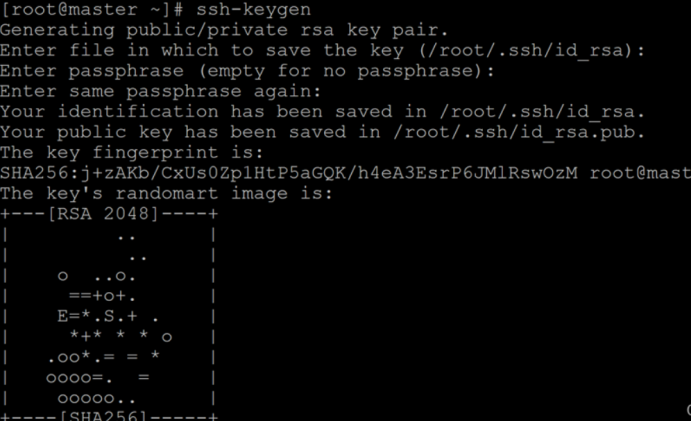
3.8.2. 生成密钥文件
使用ssh-keygen生成密钥文件.ssh/id_rsa.pub。
执行截图
[root@test local]# ssh-keygen
Generating public/private rsa key pair.
Enter file in which to save the key (/root/.ssh/id_rsa):
Enter passphrase (empty for no passphrase):
Enter same passphrase again:
Your identification has been saved in /root/.ssh/id_rsa.
Your public key has been saved in /root/.ssh/id_rsa.pub.
The key fingerprint is:
SHA256:66kFPQg5L+O5EUBC5dyIUlZzyxD/tn+T5zGwNWCF9fs root@test.novalocal
The key's randomart image is:
+---[RSA 2048]----+
|o.=o=.. oo |
| =+ oB . .. . |
|...++.+ o .|
|. . + + . . .|
| + + S . o. |
| . = o + + ..|
| + + ..o E|
| o o o + .o |
| . ..o .. +. |
+----[SHA256]-----+
3.8.3. 获取SSHKEY 公钥
cat .ssh/id_rsa.pub
执行截图

ssh-rsa AAAAB3NzaC1yc2EAAAADAQABAAABAQDnxr79U+gHxvM9Byg/VdZCi7oSk8zEWtJJ8glj+276fj0R4GuMertetQFaqDeuAeSlGi9sUtYCrLLxixJVlc4yAH3yyqCLv+8H3ORP9vaO/cq05NOMOBxwmkMqvuODh0CHdYo18ECcLm8fIP3T8R0daaSISqg3RyPQLbLppfw3F9/JezsjEBa5myRCe/7e8w/0I+LuLJAd1zwRHYe1svpVW5fkuvWB6SkqIB3d90gCVSYx2GXwkQw8Bxuy4Z4zbohmcQVyTv2jPouBJ/VBMGSy3/ryS9DnUhXwzccroOfDAc9ymTS+rLW6ClxW74IGdq3X7Y6o56o6ufo0jbKyYF5J root@test.novalocal
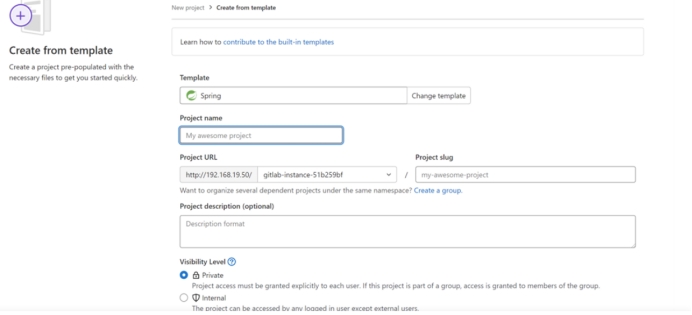
3.8.4. 在GitLab的主页中新建一个Project
在页面上选择 new project 按钮,进入如下页面,可以根据需要创建项目;
我选择了 Create from template 创建项目,这样,创建的项目会默认有项目基础代码。
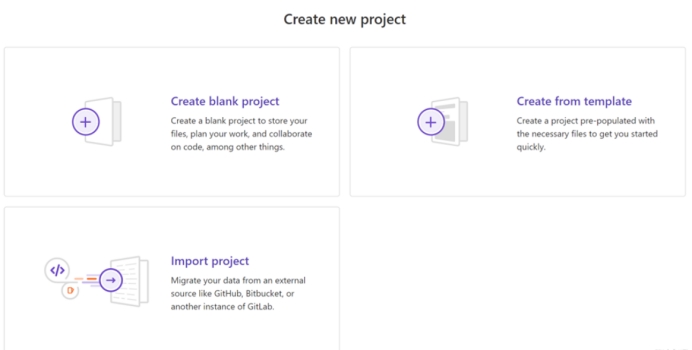
选择了用Spring template 创建项目,输入项目名称后点击 Create Project;
3.8.5. 添加ssh key

选择新建的项目,导入步骤3.8.3中生成的密钥文件内容:
选择 Add SSH key,在如下画面中输入步骤的密钥内容,完成 Add SSH Key;
ssh key添加完成:
3.8.6. 点击项目,查看ssh地址和http地址
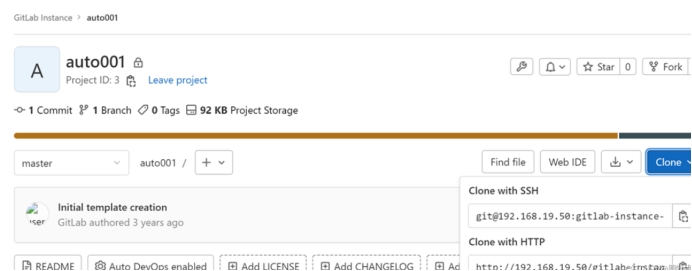
项目地址,该地址在进行clone操作时需要用到:
3.9. 简单配置
3.9.1. 配置使用Git仓库的人员姓名
git config --global user.name “root”
3.9.2. 配置使用Git仓库的人员email填写自己的邮箱
git config --global user.email “support@test.com”
3.9.3. 克隆项目
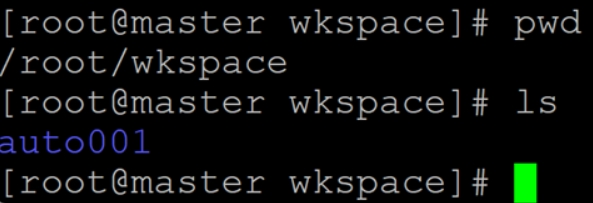
在本地生成同名目录,并且目录中会有所有的项目文件
mkdir /root/wkspace & cd /root/wkspace
执行如下命令,获取项目auto001 的代码;
git clone http://IP/gitlab-instance-51b259bf/auto001.git
执行后会有 /root/wkspace/auto001 目录,目录下放了项目的资源及代码;
4. 部署RF容器
以下操作最好在同一目录中,在宿主机上我们需要先安装python(自带)、RF(假定路径为/python/site-packages/robot,如果不同的话需修改docker-compose文件中的映射路径),从4.4章节开始,我们默认要修改的是宿主机上的RF配置文件(容器中因为做了映射,会自动同步)
4.1. 制作pip安装清单文件
requests==2.22.0
robotframework==3.1.2
robotframework-httplibrary==0.4.2
robotframework-jsonlibrary==0.3.1
robotframework-pabot==0.91
robotframework-requests==0.6.2
robotframework-ride==1.5.2.1
robotframework-selenium2library==3.0.0
robotframework-seleniumlibrary==4.1.0
selenium==3.141.0
soupsieve==1.9.5
urllib3==1.24.1
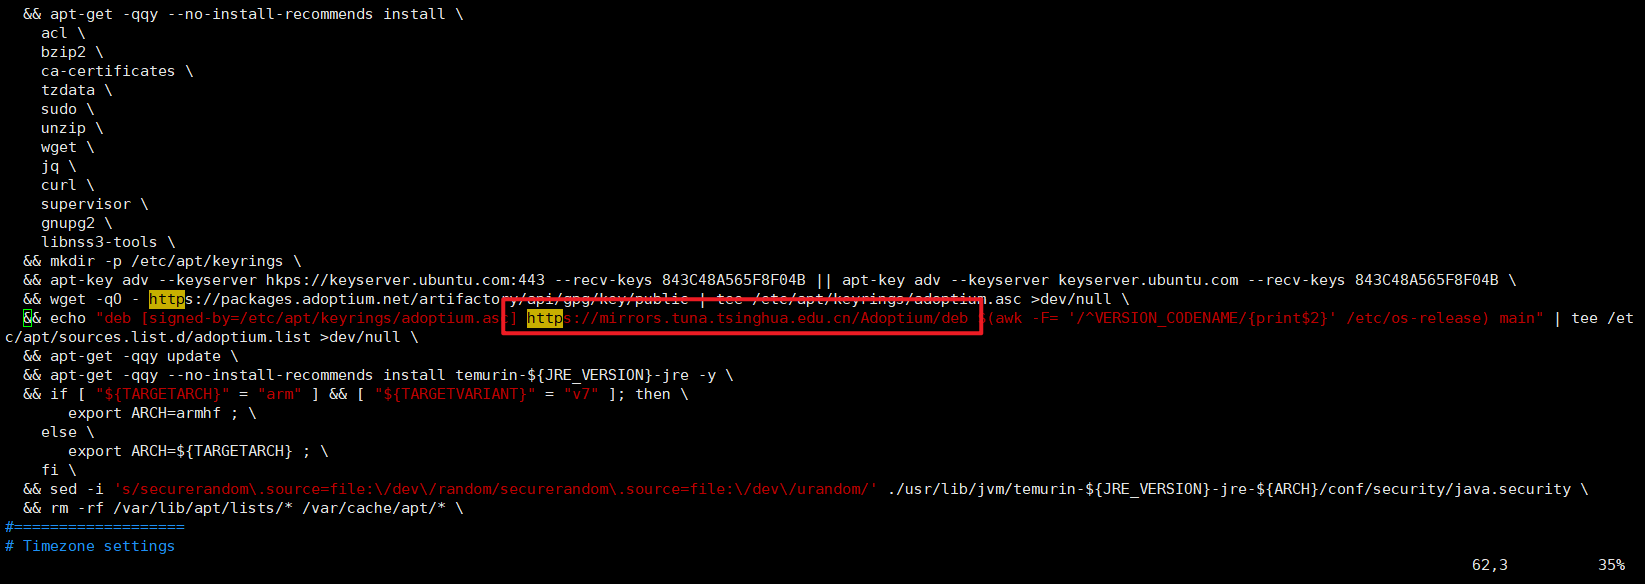
arrow==0.15.54.2. 制作镜像(Dockerfile文件)
# 使用官方的 Python 2.7 镜像作为基础镜
FROM python:2.7-slim

# 设置工作目录
WORKDIR /app

# 复制当前目录下的 requirements.txt 文件到工作目录
COPY requirements.txt .

RUN apt update && pip config set global.index-url https://pypi.tuna.tsinghua.edu.cn/simple
# 使用 pip 安装依赖库
RUN python -m pip install --upgrade pip
RUN pip install --no-cache-dir -r requirements.txt
RUN apt update
RUN apt install -y vim
RUN apt install unzip
# 将当前目录下的所有文件复制到工作目录中
COPY . .
# 执行应用程序
CMD ["tail", "-f", "/dev/null"]
然后使用命令制作镜像包 docker build -t 容器名:latest .
4.3. 制作容器编排文件,启动容器
version: "3"
services:
  robot:
    image: pythonmy-rb
    container_name: pyrobot2.7
    command: tail -f /dev/null
    ports:
      - "8098:8098"
    volumes:
      - /etc/localtime:/etc/localtime:ro
      - /tmp/.X11-unix:/tmp/.X11-unix
      - /home/centos-git/zm_ui:/home/scripts/zm_ui
      - /centos-python/site-packages/robot:/usr/local/lib/python2.7/site-packages/robot
      - /centos-python/site-packages/SeleniumLibrary/keywords:/usr/local/lib/python2.7/site-packages/SeleniumLibrary/keywords
    privileged: true
    environment:
      - DISPLAY=unix:0
      - GDK_SCALE
      - GDK_DPI_SCALE
其中
- /home/scripts/zm_ui:/home/scripts/zm_ui
左边是Jenkins拉取用例脚本的目录,右边是rf容器的用例脚本目录
- /python/site-packages/robot:/usr/local/lib/python2.7/site-packages/robot
- /python/site-packages/SeleniumLibrary/keywords:/usr/local/lib/python2.7/site-packages/SeleniumLibrary/keywords
此处是重试机制需要修改的文件夹,由于重试需要修改第三方库这里直接再本机修改映射到容器内 就不至于每次重启容器都需要重新更改了
使用命令启动rf容器docker-compose -f docker-compose-rf.yml up -d
4.4. 修改CallRobot
由于linux环境下RF没有pybot.bat(之前在Windows环境上使用pybot执行RF),所以直接使用robot方式运行脚本,修改脚本如下(直接改宿主机上面的),要改动的部分标黄底
# -*- coding: utf-8 -*-
import os
import sys
from robot import run_cli,run
from MultiThreadings import MultiThreadings
from GetNowTime import GetNowTime
import Util
import SendEmail
import shutil

reload(sys)
sys.setdefaultencoding("utf8")

class ExecRobot(object):
    def __init__(self,report_name):
        self.report_name = report_name
        #获取当前工作目录
        self.work_path = os.getcwd()
        #获取项目路径下的report路径
        self.save_path = os.path.abspath(os.path.join(os.path.dirname(self.work_path), "report\\" + report_name))
    def exec_pybot(self,project_path,execute_times,browser_type,project_type='yifang'):
        #定义一个字典,存放登录的用户名和密码
        #user_info = {"systemtest06":"u*CCT2"}
        if project_type == 'yifang':
            #user_info = {"systemtest06":"u*CCT2","systemtest07":"g7SdT*","systemtest09":"gpX7*n","systemtest01":"kDm*74"}
            #user_info = {"systemtest06":"u*CCT2","systemtest07":"g7SdT*"}
            user_info = {"systemtest10": "H3*f8m", "systemtest07": "g7SdT*"}
        elif project_type == 'shiwei':
            #user_info = {'systemtest08':"mmW5z*","systemtest09":"yu*3yH","systemtest06":"qg9A4*","systemtest07":"S9*2ac"}
            user_info = {'systemtest08':"mmW5z*","systemtest09":"yu*3yH"}
        elif project_type == 'shadan':
            #user_info = {"zhuoma_hn":"*#VMoPo1ioab*#","zhuoma_cs":"*#VMoPo1ioab*#","zhuoma_yl":"*#VMoPo1ioab*#","zhuoma_us":"*#VMoPo1ioab*#"}
            # user_info = {"zhuoma_cs":"*#VMoPo1ioab*#"}
            # user_info = {"sds_test_zm1":"SfmIHPwt*#","sds_test_zm2":"*#SfmIHPwt*#"}
            user_info = {"sds_test_zm1": "SfmIHPwt*#", "zhuoma_hn": "*#VMoPo1ioab*#"}
        elif project_type == 'ketao':
            #user_info = {"02@qq.com":"111111","03@qq.com":"111111","04@qq.com":"111111","05@qq.com":"111111"}
            user_info = {"02@qq.com":"111111","03@qq.com":"111111"}
        elif project_type == 'oplate':
            #user_info = {"test2@zm.com":"111111","test3@zm.com":"111111","test4@zm.com":"111111","test1@zm.com":"111111"}
            user_info = {"test2@zm.com":"111111","test3@zm.com":"111111"}
        elif project_type == 'shiweihd':
            #user_info = {"test2@zm.com":"111111","test3@zm.com":"111111","test4@zm.com":"111111","test1@zm.com":"111111"}
            user_info = {"zhaokangjian@zmtests.com":"123456789"}
        elif project_type == 'yiling':
            #user_info = {"test2@zm.com":"111111","test3@zm.com":"111111","test4@zm.com":"111111","test1@zm.com":"111111"}
            user_info = {"systemtest09":"gpX7*n"}
        elif project_type == 'yingyan':
            #user_info = {"test2@zm.com":"111111","test3@zm.com":"111111","test4@zm.com":"111111","test1@zm.com":"111111"}
            user_info = {"systemtest08":"Rd*6gW","systemtest06":"u*CCT2"}
        # user_info = {"systemtest06":"u*CCT2"}
        elif project_type == "review":
            user_info = {"systemtest05": "Thq8*M"}
        elif project_type == "dspjc":
            user_info = {"systemtest08": "Rd*6gW","systemtest06": "u*CCT2"}

        cmd_list = []
        try:
            cmd = 'taskkill /F /IM geckodriver.exe'
            os.system(cmd)
        except:
            print "No process found"
        # 启动线程前,先将上次运行所有的报告删除
        Util.clear_all_report(self.save_path)
        i = 1
        for username, password in user_info.items():
            # C:\Python27\python.exe MainExecute.py G:\ZM_Release\鹰击V9 2 chrome yifang egatek_chrome
            # pybot -o ../report/egatek_chrome/output-1.xml -r ../report/egatek_chrome/report-1.html -l ../report/egatek_chrome/log-1.html -v username:systemtest10 -v password:H3*f8m -v browsertype:chrome --retry 2 G:\ZM_Release\鹰击V9
            cmd = r"robot -o ../report/{0}/output-{1}.xml -r ../report/{0}/report-{1}.html -l ../report/{0}/log-{1}.html -v username:{3} -v password:{4} -v browsertype:{6} --retry {2} {5} "\
                .format(self.report_name,i, execute_times, username, password, project_path, browser_type)
            cmd_list.append(cmd)
            i = i + 1
        try:
            MultiThreadings().multi(cmd_list)
        except Exception as e:
            print "fail " + str(e)

    def exec_rebot(self):
        # rebot -N Compatibility -d work/zm_ui/report/egatek_chrome/ -o ../egatek_chrome/output-total.xml -l../egatek_chrome/log-total.html -r ../egatek_chrome/report-total.html ../report/egatek_chrome/output-*.xml
        cmd2 = r"rebot -N Compatibility -d {0} -o ../report/{1}/output-total.xml -l../report/{1}/log-total.html -r ../report/{1}/report-total.html ../report/{1}/output-*.xml" \
            .format(self.save_path,self.report_name)
        os.system(cmd2)


if __name__=="__main__":
    report_name = "egatek_chrome"
    rb=ExecRobot(report_name)
    path = 'E:\ZM_AutoTest_RF\鹰击'
    rb.exec_pybot(path.encode("gbk"),1,'firefox')
    rb.exec_rebot()
4.5. 重试机制
通过改写Robot Framework源代码增加--retry选项,实现test级别的失败用例自动再执行,比如用例失败后,会重新运行N次,直至成功or 耗尽重试次数,生成的日志和报告文件中只会体现最后一次执行的结果。
类似如下命令格式:
robot --retry 3 trainning
具体实现:
- 修改文件/usr/local/lib/python2.7/site-packages/robot/run.py,在USAGE变量里添加retry参数
 -F --extension value     Parse only files with this extension when executing
                          a directory. Has no effect when running individual
                          files or when using resource files. If more than one
                          extension is needed, separate them with a colon.
                          Examples: `--extension txt`, `--extension robot:txt`
                          New in RF 3.0.1. Starting from RF 3.2 only `*.robot`
                          files are parsed by default.
 -N --name name           Set the name of the top level suite. By default the
                          name is created based on the executed file or
                          directory.
-H --retry retry Set the retry times if test failed.- 在run.py文件,RobotFramework类增加make方法,并在开始之前导入库from xml.dom import minidom
def make(self,outxml):
    xmldoc = minidom.parse(outxml)
    suiteElementList = xmldoc.getElementsByTagName('suite')
    mySuite = []
    for suiteElement in suiteElementList:
        if suiteElement.childNodes is not None:
            for element in suiteElement.childNodes:
                if element.nodeName == 'test':
                    mySuite.append(suiteElement)
                    break
    for suite in mySuite:
        testElements = {}
        for element in suite.childNodes:
            if element.nodeName == 'test':
                name = element.getAttribute('name')
                if testElements.get(name) == None:
                    testElements.update({name:[element]})
                else:
                    testElements.get(name).append(element)
        for n,el in testElements.iteritems():
            for i in el[0:-1]:
                textElement = i.nextSibling
                suite.removeChild(i)
                suite.removeChild(textElement)
    savefile = open(outxml,'w')
    root = xmldoc.documentElement
    root.writexml(savefile)
savefile.close()- 调用make函数,在main函数中添加:
self.make(settings.output)
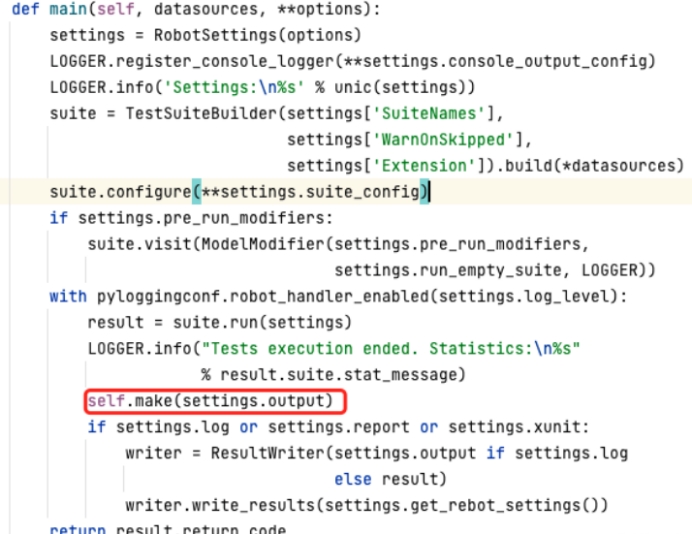
- 打开robot/conf/setting.py文件,修改_cli_opts字典,增加
'Retry': ('retry', 3)
代码截图

- 修改itemlist.py文件 (文件路径:python/site-packages/robot/model/itemlist.py)
def visit(self, visitor):
    for item in self:
        if self.__module__ == 'robot.model.testcase' and hasattr(visitor, "_context"):
            testStatus = ''
            for i in range(0, int(visitor._settings._opts['Retry'])):
                if testStatus != 'PASS':
                    if item.name in visitor._executed_tests:
                        visitor._executed_tests.pop(item.name)
                    item.visit(visitor)
                    testStatus = visitor._context.variables['${PREV_TEST_STATUS}']
                else:
                    break
        else:
            item.visit(visitor)
4.6. 恢复过期的关键字
代码路径:
/usr/local/lib/python2.7/site-packages/SeleniumLibrary/keywords/browsermanagement.py
@keyword
def get_browser_name_and_version(self, browser='firefox'):
    """Get the current browser name and version."""
    if browser == 'chrome':
        browserNameAndVersion = self.driver.capabilities['browserName'] + "_" + self.driver.capabilities[
            'browserVersion']
        print
        browserNameAndVersion
    elif browser == 'firefox':
        browserNameAndVersion = self.driver.capabilities['browserName'] + "_" + self.driver.capabilities[
            'browserVersion']
    else:
        pass
    return browserNameAndVersion
4.7. 加入自定义关键词
代码路径:/usr/local/lib/python2.7/site-packages/SeleniumLibrary/keywords/element.py
@keyword
def scroll_to_target_ele(self, locator):
    """ scrolle Element to target Element"""
    element = self.find_element(locator)
    self.driver.execute_script("arguments[0].scrollIntoView(false);", element)
5. 部署Selenium-Grid容器
5.1. 拉取镜像:
docker pull selenium/hub
docker pull selenium/node-chrome:109.0
docker pull selenium/node-chrome:标签版本号

5.2. 安装容器编排工具docker-compose
sudo apt install docker-compose
5.3. 创建docke-compose.yml文件
touch docker-compose.yml
version: "3"
services:
  chrome01:
    image: selenium/node-chrome:109.0
    shm_size: 2gb
    depends_on:
      - selenium-hub
    ports:
      - "7901:7900"
    environment:
      - SE_EVENT_BUS_HOST=selenium-hub
      - SE_EVENT_BUS_PUBLISH_PORT=4442
      - SE_EVENT_BUS_SUBSCRIBE_PORT=4443
      - SCREEN_WIDTH=1920
      - SCREEN_HEIGHT=1080
      - SCREEN_DEPTH=24
      - SCREEN_DPI=74
      - SE_NODE_SESSION_TIMEOUT=2000
      - E_SESSION_REQUEST_TIMEOUT=2000
      - SE_SESSION_RETRY_INTERVAL=2
      - SE_NODE_MAX_SESSIONS=2
      - SE_NODE_MAX_INSTANCES=2
      - SE_NODE_REGISTER_CYCLE=5000
      - START_XVFB=false
    volumes:
      - /dev/shm:/dev/shm
    chrome01:
    image: chrome-124.0
    shm_size: 2gb
    depends_on:
      - selenium-hub
    ports:
      - "7901:7900"
    environment:
      - SE_EVENT_BUS_HOST=selenium-hub
      - SE_EVENT_BUS_PUBLISH_PORT=4442
      - SE_EVENT_BUS_SUBSCRIBE_PORT=4443
      - SCREEN_WIDTH=1920
      - SCREEN_HEIGHT=1080
      - SCREEN_DEPTH=24
      - SCREEN_DPI=74
      - SE_NODE_SESSION_TIMEOUT=2000
      - E_SESSION_REQUEST_TIMEOUT=2000
      - SE_SESSION_RETRY_INTERVAL=2
      - SE_NODE_MAX_SESSIONS=2
      - SE_NODE_MAX_INSTANCES=2
      - SE_NODE_REGISTER_CYCLE=5000
      - START_XVFB=false
    volumes:
      - /dev/shm:/dev/shm
    privileged: true

  chrome02:
    image: selenium/node-chrome:110.0
    shm_size: 2gb
    depends_on:
      - selenium-hub
    ports:
      - "7902:7900"
    environment:
      - SE_EVENT_BUS_HOST=selenium-hub
      - SE_EVENT_BUS_PUBLISH_PORT=4442
      - SE_EVENT_BUS_SUBSCRIBE_PORT=4443
      - SCREEN_WIDTH=1920
      - SCREEN_HEIGHT=1080
      - SCREEN_DEPTH=24
      - SCREEN_DPI=74
      - SE_NODE_SESSION_TIMEOUT=2000
      - E_SESSION_REQUEST_TIMEOUT=2000
      - SE_SESSION_RETRY_INTERVAL=2
      - SE_NODE_MAX_SESSIONS=2
      - SE_NODE_MAX_INSTANCES=2
      - SE_NODE_REGISTER_CYCLE=5000
      - START_XVFB=false
    volumes:
      - /dev/shm:/dev/shm
    chrome01:
    image: chrome-124.0
    shm_size: 2gb
    depends_on:
      - selenium-hub
    ports:
      - "7901:7900"
    environment:
      - SE_EVENT_BUS_HOST=selenium-hub
      - SE_EVENT_BUS_PUBLISH_PORT=4442
      - SE_EVENT_BUS_SUBSCRIBE_PORT=4443
      - SCREEN_WIDTH=1920
      - SCREEN_HEIGHT=1080
      - SCREEN_DEPTH=24
      - SCREEN_DPI=74
      - SE_NODE_SESSION_TIMEOUT=2000
      - E_SESSION_REQUEST_TIMEOUT=2000
      - SE_SESSION_RETRY_INTERVAL=2
      - SE_NODE_MAX_SESSIONS=2
      - SE_NODE_MAX_INSTANCES=2
      - SE_NODE_REGISTER_CYCLE=5000
      - START_XVFB=false
    volumes:
      - /dev/shm:/dev/shm
    privileged: true

  selenium-hub:
    image: selenium/hub
    container_name: selenium-hub
    ports:
      - "4442:4442"
      - "4443:4443"
      - "4444:4444"
    environment:
      - GRID_MAX_SESSION=4
      - GRID_THROW_ON_CAPABILITY_NOT_PRESENT=true
      - GRID_NEW_SESSION_WAIT_TIMEOUT=-1
      - GRID_BROWSER_TIMEOUT=3000
      - GRID_TIMEOUT=3000
      - GRID_CLEAN_UP_CYCLE=3000
    chrome01:
    image: chrome-124.0
    shm_size: 2gb
    depends_on:
      - selenium-hub
    ports:
      - "7901:7900"
    environment:
      - SE_EVENT_BUS_HOST=selenium-hub
      - SE_EVENT_BUS_PUBLISH_PORT=4442
      - SE_EVENT_BUS_SUBSCRIBE_PORT=4443
      - SCREEN_WIDTH=1920
      - SCREEN_HEIGHT=1080
      - SCREEN_DEPTH=24
      - SCREEN_DPI=74
      - SE_NODE_SESSION_TIMEOUT=2000
      - E_SESSION_REQUEST_TIMEOUT=2000
      - SE_SESSION_RETRY_INTERVAL=2
      - SE_NODE_MAX_SESSIONS=2
      - SE_NODE_MAX_INSTANCES=2
      - SE_NODE_REGISTER_CYCLE=5000
      - START_XVFB=false
    volumes:
      - /dev/shm:/dev/shm
    privileged: true
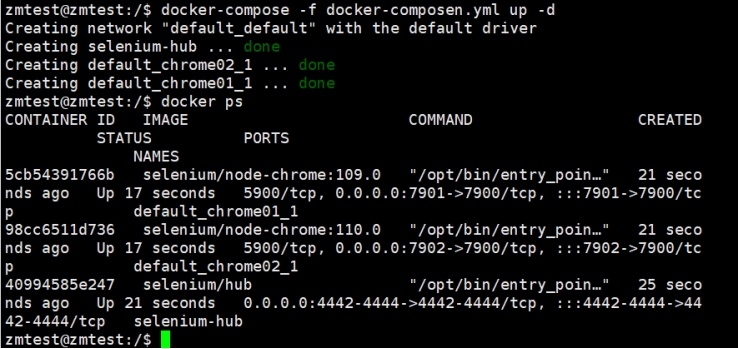
5.4. 启动容器:
docker-compose -f docker-composen.yml up -d
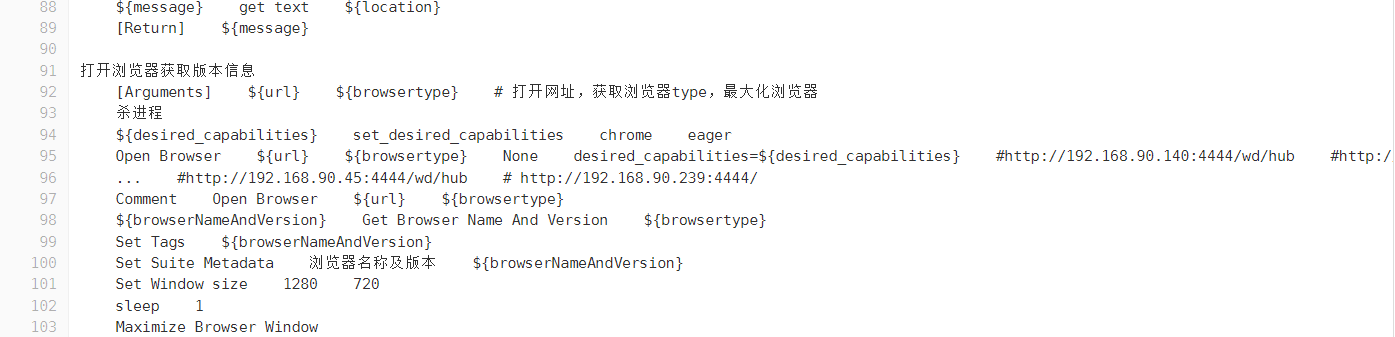
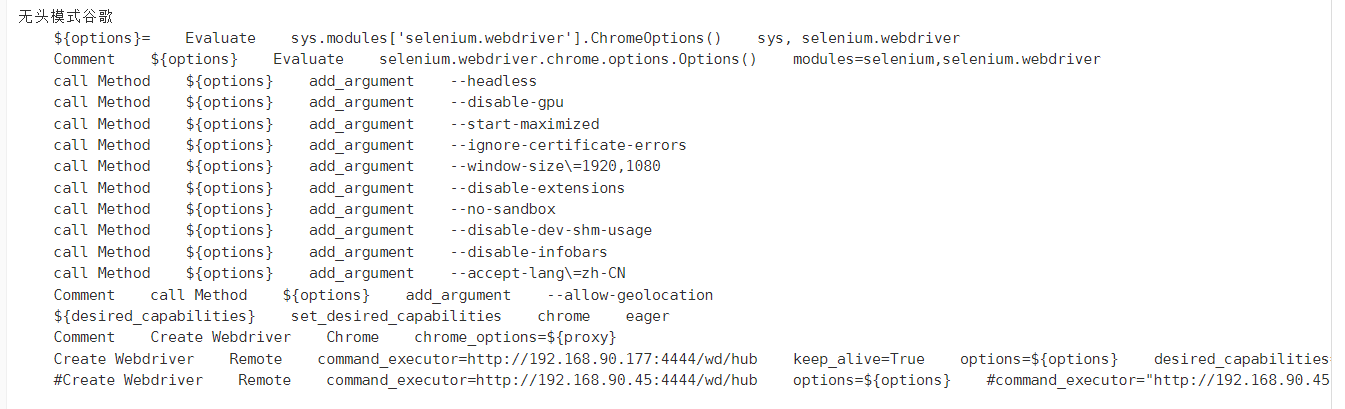
5.5. Jenkins构建自动化项目(此处自动化脚本为无头模式执行,且分布式到部署的节点中执行)
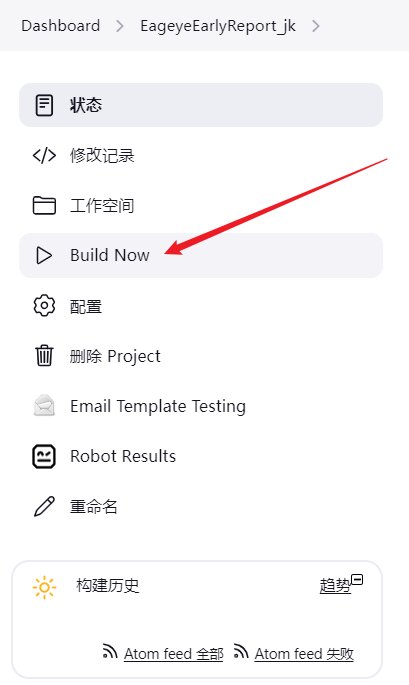
自动化脚本为无头模式执行,且分布式到部署的节点中执行
自动化脚本无头模式打开浏览器执行
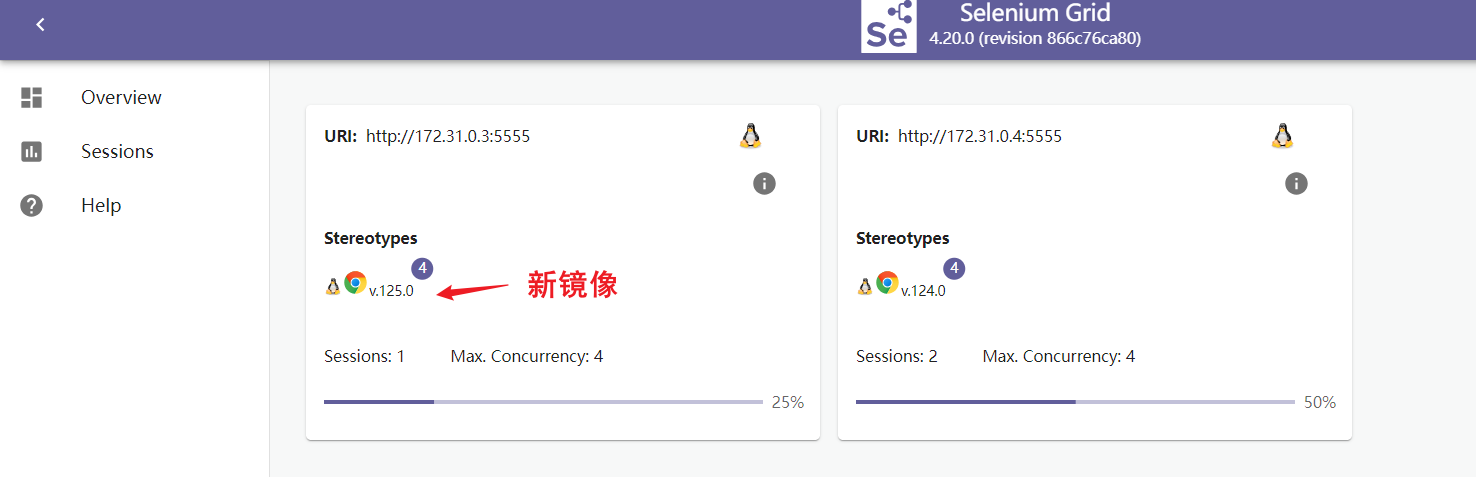
5.6. 然后在selenium-grid查看执行情况:
http://IP:4444/ui#
界面截图
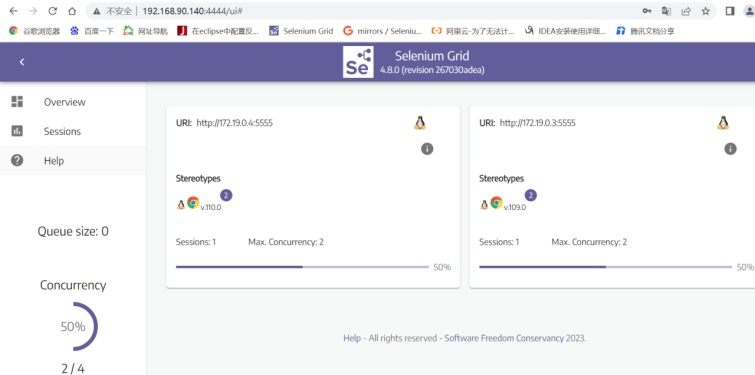
至此步已完成docker+selenium-grid的UI自动化测试环境部署
6. 升级seleniumGrid容器浏览器及驱动
6.1. 什么是dockerfile
Dockerfile是一个包含用于组合映像的命令的文本文档。可以使用在命令行中调用任何命令。 Docker通过读取Dockerfile中的指令自动生成映像。
6.2. dockerfile操作指令
| 指令 | 含义 |
| FROM[镜像] | 指定新镜像所基于的镜像,第一条指令必须为FROM指令,每创建一个镜像就需要一条FROM指令。例如centos:7。from有两层含义:①开启一个新的镜像②必须写的一行指令 |
| MAINTAINER[名字] | 说明新镜像的维护人信息(可写可不写) |
| RUN命令 | 每一条RUN后面跟一条命令,在所基于的镜像上执行命令,并提交到新的镜像中,RUN必须大写 |
| COPY[源文件/目录][目标文件/目录] | 将本地主机上的文件/目录复制到目标地点,源文件/目录要与dockerfile在相同的目录中,copy只能用于复制,add复制的同时,如果复制的对象是压缩包,ADD还可以解压,copy比add节省资源 |
6.3. 升级策略(浏览器及驱动下载地址)
采取的更新方式是根据原有镜像升级浏览器及驱动先下载linux版本浏览器和驱动,放入/opt目录下,再根据dockerfile文件,对原有的镜像进行驱动和浏览器的替换。
谷歌浏览器下载地址:
https://dl.google.com/linux/direct/google-chrome-stable_current_amd64.deb
谷歌浏览器驱动下载地址:
http://npm.taobao.org/mirrors/chromedriver/<指定驱动版本>/chromedriver_linux64.zip
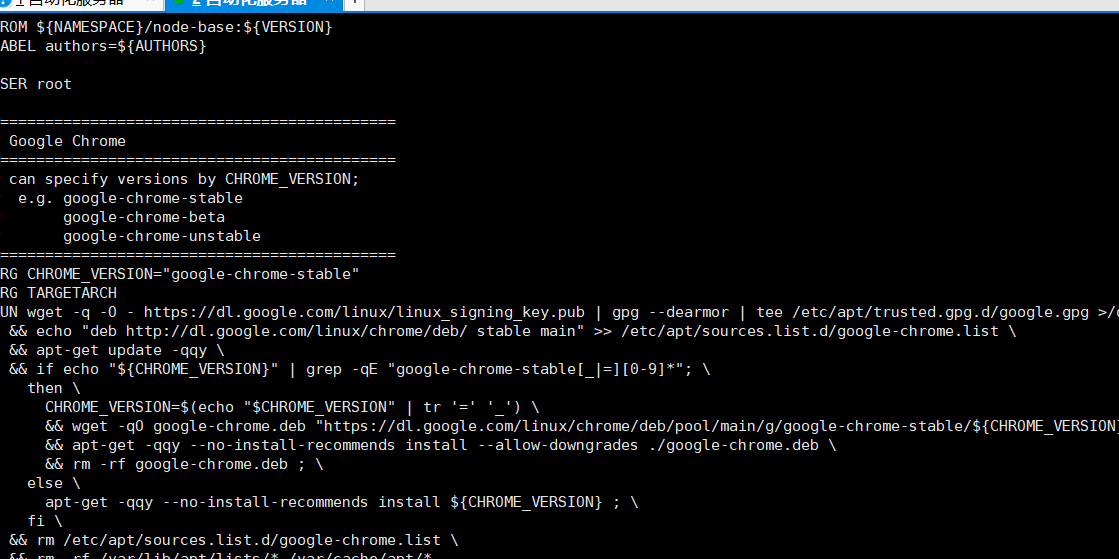
6.4. 执行Dockerfile,根据原有的镜像生成更新浏览器及驱动的新镜像
#FROM selenium/node-chrome:112.0.1
FROM chrome-110.0              #指定新镜像所基于的镜像,基于该镜像进行生成新镜像,根据实际情况修改
COPY chromedriver /bin/         #将本地chrome 移入至指定镜像的/bin/目录中
COPY google-chrome-stable_current_amd64.deb /tmp/    #将本地浏览器安装文件移入至指定镜像的/tmp/目录

RUN sudo dpkg -i /tmp/google-chrome-stable_current_amd64.deb#执行谷歌浏览器安装操作
RUN sudo sed -i '10 i\export LANGUAGE="zh_CN.UTF-8"' /opt/google/chrome/google-chrome #修改浏览器默认语言设置,防止执行自动化时打开的是语言为英文浏览器
执行Doockerfile文件(默认根据当前目录下的dockerfile):
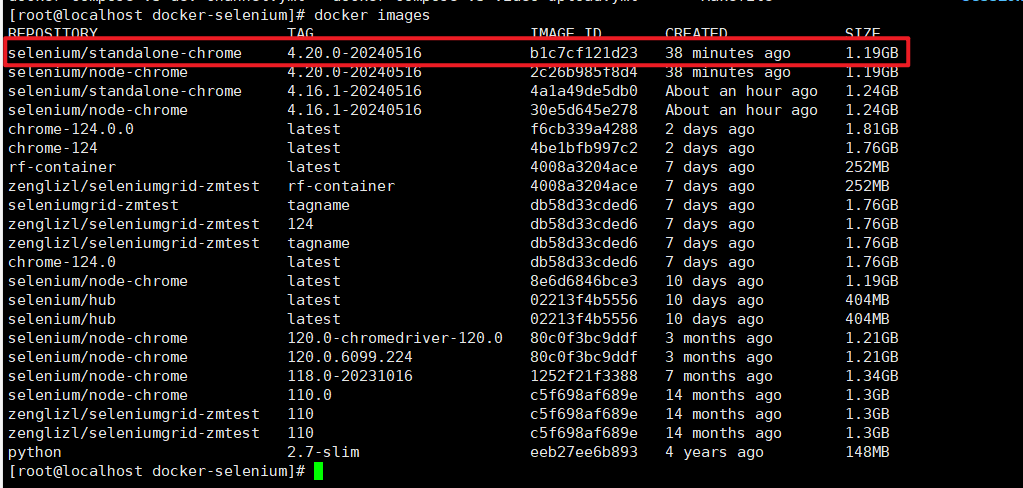
sudo docker build -t 新镜像名 .
执行成功后界面截图

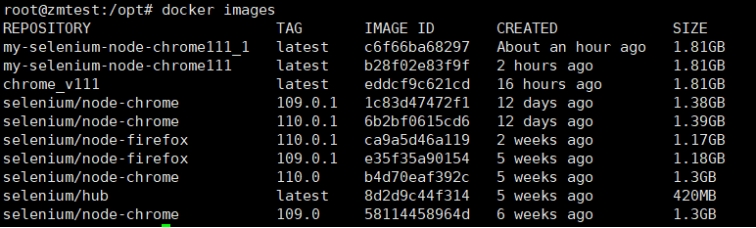
查看生成的镜像
docker images
6.5. 使用shell脚本实现半自动化更新浏览器及对应驱动
(文件放在/opt目录下,如果需要放在其他文件夹需要修改shell脚本中的文件夹)
Shell脚本如下所示:
#!/bin/bash

rm -rf chromedriver
rm -rf chromedriver-linux64.zip
rm -rf google-chrome-stable_current_and64.deb
rm -rf LICENSE.chromedriver
rm -rf chromedriver-linux64

# Specify the browser and driver versions you want to download
BROWSER_VERSION=$1
#if u want call the method u just Incoming parameters
#112.0
DRIVER_VERSION=$2
#112.0.5615.28

# Specify the URL to download the browser and driver
BROWSER_URL=https://dl.google.com/linux/direct/google-chrome-stable_current_amd64.deb
DRIVER_URL=https://storage.googleapis.com/chrome-for-testing-public/$DRIVER_VERSION/linux64/chromedriver-linux64.zip

# Specify the path to the local directories where the browser and driver will be installed
BROWSER_PATH=/home/docker/google-chrome-stable_current_amd64.deb
DRIVER_PATH=/home/docker/chromedriver

# Remove the existing browser and driver
echo "Removing existing browser and driver..."
sudo rm -rf $BROWSER_PATH
sudo rm -rf $DRIVER_PATH

# Download the browser and driver
echo "Downloading browser and driver..."
wget $BROWSER_URL -P /home/docker
wget $DRIVER_URL -P /home/docker


# Install the browser and driver
echo "Installing browser and driver..."
sudo unzip chromedriver-linux64.zip
cp /home/docker/chromedriver-linux64/chromedriver /home/docker

# Build the Docker image
echo "Building Docker image..."

sudo docker build -t chrome-$BROWSER_VERSION .
在/opt目录下执行更新并生成新的镜像命令
bash update_chrome.sh BROWSER_VERSION DRIVER_VERSION
执行完毕后,生成名为chrome-$BROWSER_VERSION的镜像
需要注意的是,浏览器在官网只能找到最新版本,需要自己查看最新版浏览器的版本号,查找出对应的驱动版本,修改对应的BROWSER_VERSION和DRIVER_VERSION即可。
(最好是用root权限执行):bash update_chrome.sh BROWSER_VERSION DRIVER_VERSION即可直接完成新镜像制作。
每次更新浏览器的时候只需要在/opt目录下执行update_chrome.sh文件即可完成更新,需要注意修改脚本版本号即可完成最新浏览器版本的镜像生成。
6.6. 修改节点浏览器默认系统语言
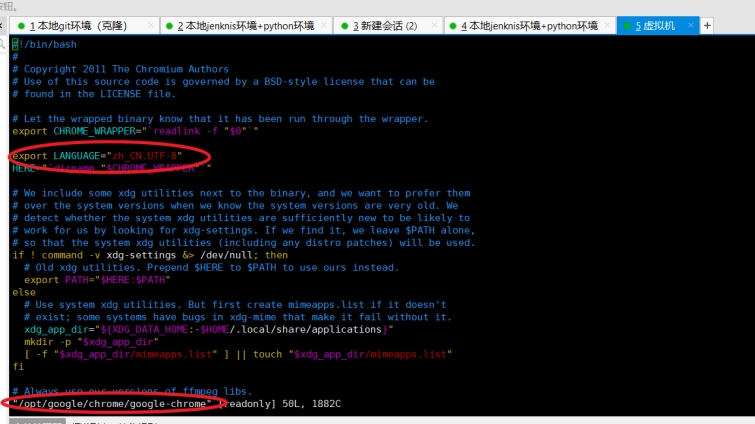
再容器子节点容器内部进入/opt/google/chrome/google-chrom文件中添加如下代码即可完成对浏览器默认语言设置的修改。
export LANGUAGE="zh_CN.UTF-8"
6.7. GitHub拉取项目进行更新(推荐)
- 安装git
- 克隆项目
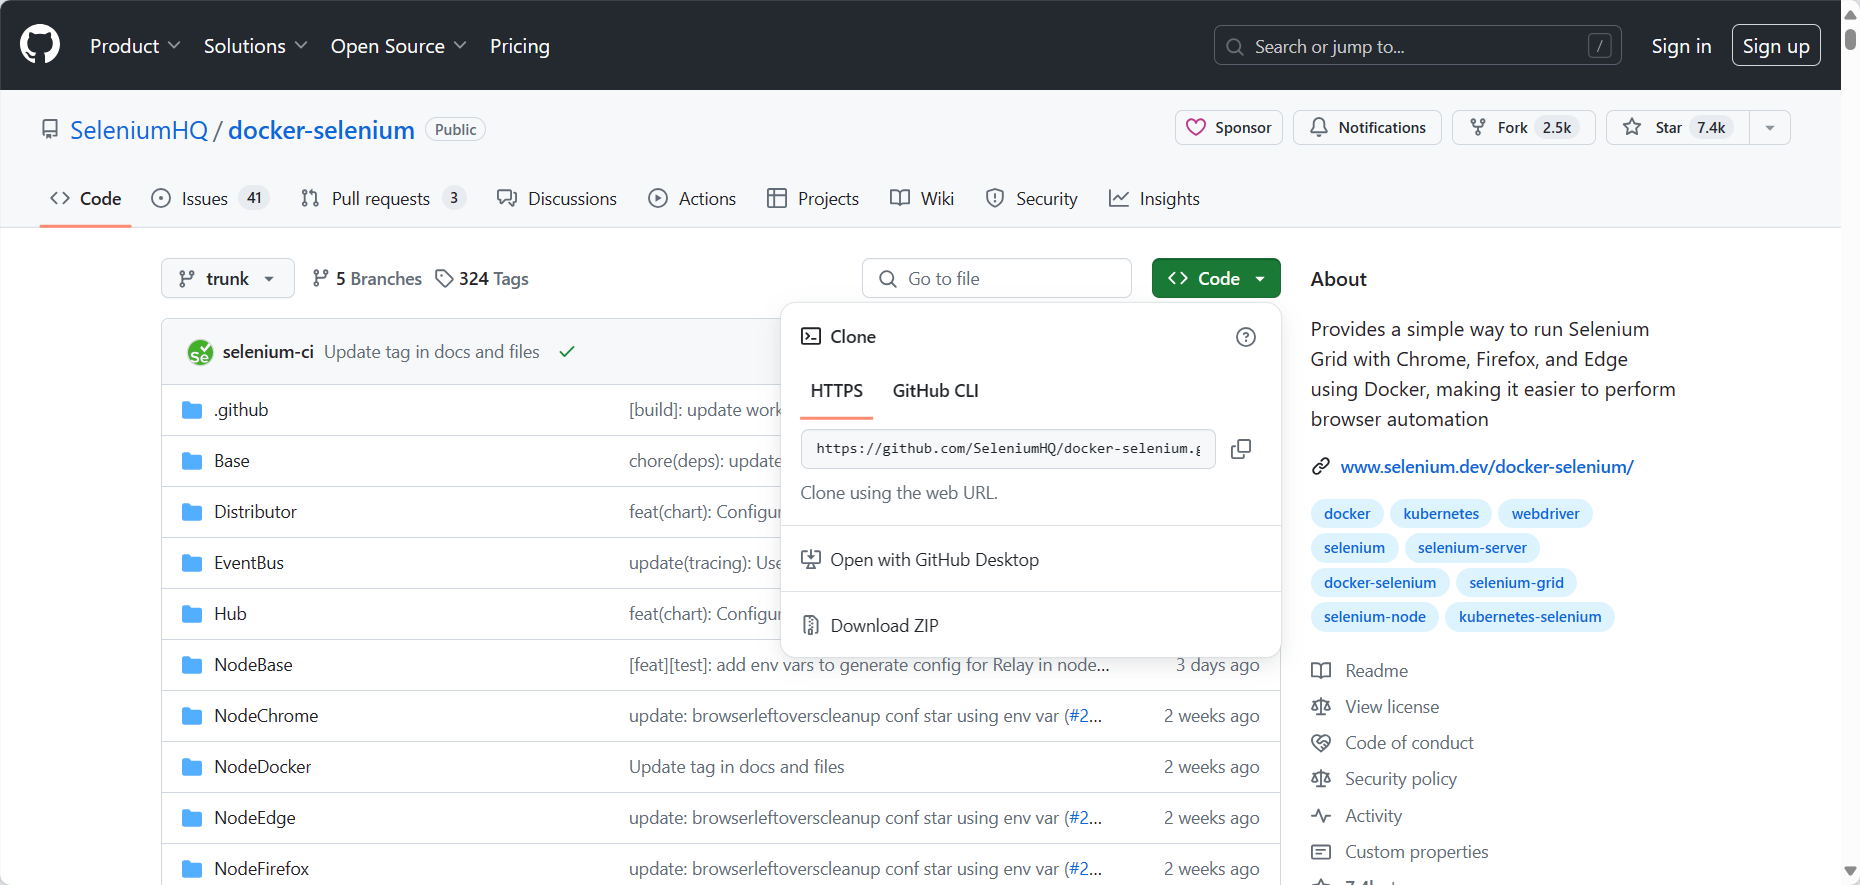
- 克隆好项目后,需要修改/docker-selenium/NodeChrome/Dockerfile文件的链接地址
https://dl-ssl.google.com/linux/linux_signing_key.pub改为https://dl.google.com/linux/linux_signing_key.pub即可
- 随后执行
VERSION=$SELENIUM_VERSION make chrome_upgrade_version
VERSION=4.20.0 make chrome_upgrade_version
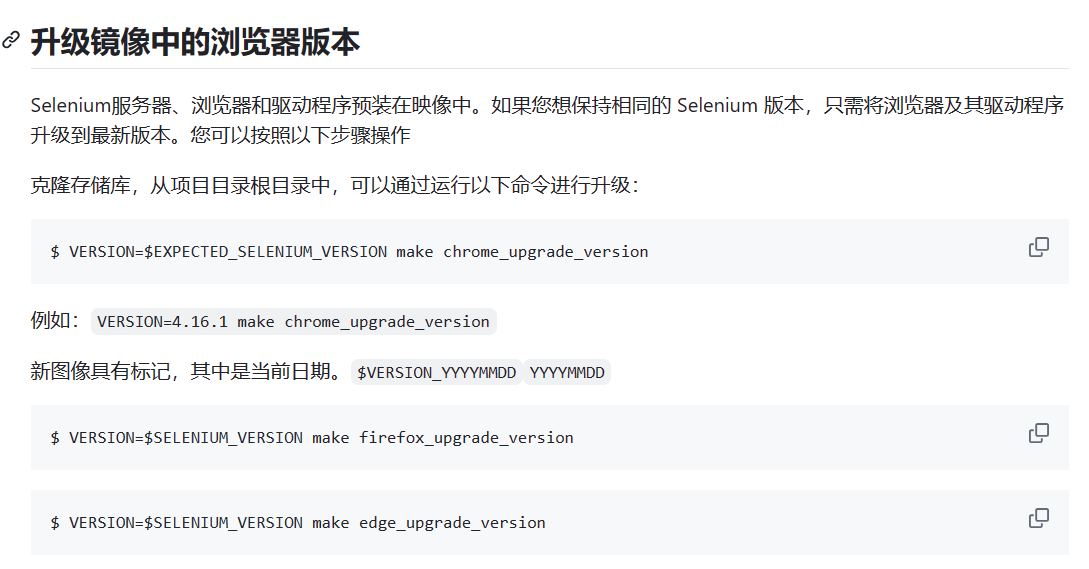

指定浏览器
修改此处
7. 所有环境在Jenkins联调时出现的问题汇总:
7.1. Jenkins权限不足导致构建失败
报错如下图所示:

问题原因:
权限不足导致Jenkins构建脚本失败。
解决办法:
- 添加jenkins用户到用户组:
-a<追加> 必须与-G选项一起使用,把用户追加到某些组中。
-G<群组> 修改用户所属的附加群组
sudo usermod -a -G docker jenkins
- 修改/var/run/docker.sock文件的权限
sudo chmod -R 777 /var/run/docker.sock
- 修改仓库读写权限
sudo chmod 777 /home/centos-git
7.2. Jenkins打开robotframework报告失败,下图所示:
打开失败:
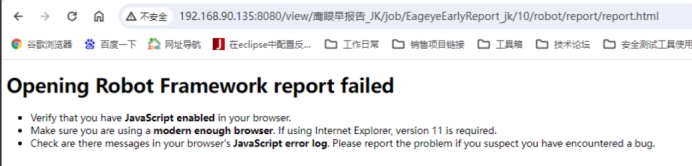
解决办法:
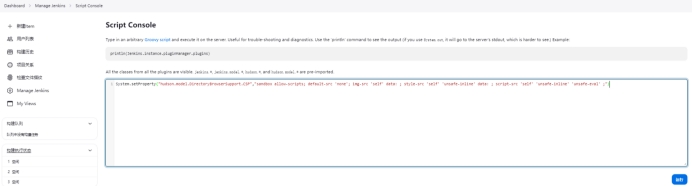
在管理jenkins-->脚本命令行输入如下脚本:
System.setProperty("hudson.model.DirectoryBrowserSupport.CSP","sandbox allow-scripts; default-src 'none'; img-src 'self' data: ; style-src 'self' 'unsafe-inline' data: ; script-src 'self' 'unsafe-inline' 'unsafe-eval' ;")
7.3. 生成的结果报告页面图片加载失败,下图所示

解决办法:
进入Manage Jenkins->Script console,输入如下命令并进行执行
System.setProperty("hudson.model.DirectoryBrowserSupport.CSP", "")
当输入命令,并运行后,如果为空,则说明配置好了
7.4. Jenkins执行完毕后生成报告出现错误,遇到ascii码报错
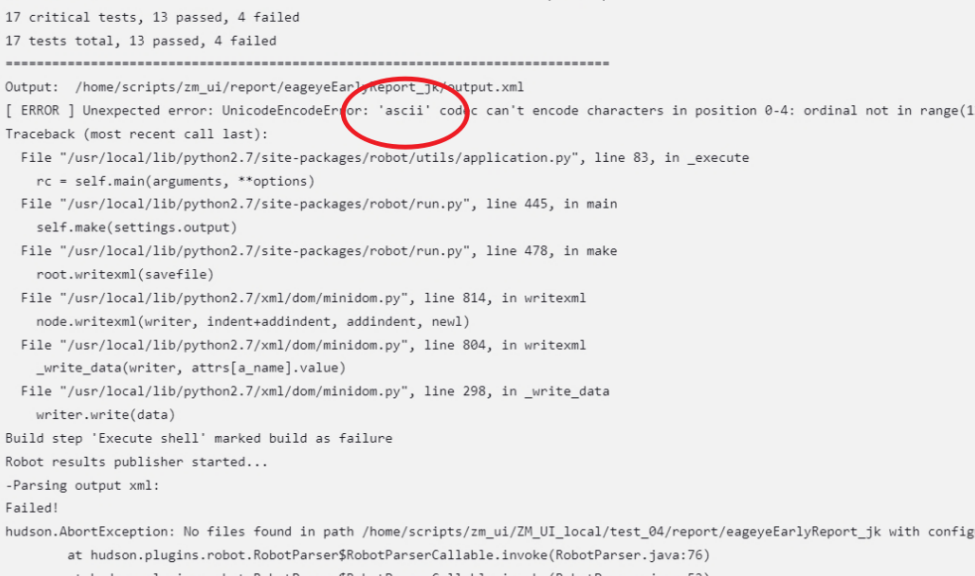
解决办法:
在/usr/local/lib/python2.7site-packages/robot/utils/application.py中显式指定编码
import sys
reload(sys)
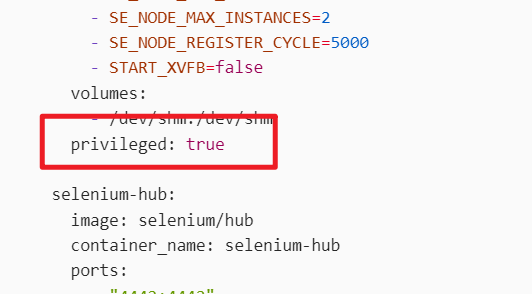
sys.setdefaultencoding('utf-8')7.5. Docker容器内报错权限不足:ls: cannot open directory ‘.‘: Permission denied
解决办法:在编排文件中添加privileged: true


 624
624


 被折叠的 条评论
为什么被折叠?
被折叠的 条评论
为什么被折叠?
 到【灌水乐园】发言


