


spring-cloud-alibaba(六)Sentinel 篇
下载Sentinel
选择适配的组件版本,
https://github.com/alibaba/Sentinel/releases/download/1.8.1/sentinel-dashboard-1.8.1.jar
启动
java -jar sentinel-dashboard-1.8.1.jar
默认8080 端口启动成功

访问 http://localhost:8080/
账号密码都是:sentinel

登录完成:

sentinel 监控子模块
新建项目 springcloud-sentinel
更改pom文件
<?xml version="1.0" encoding="UTF-8"?>
<project xmlns="http://maven.apache.org/POM/4.0.0"
         xmlns:xsi="http://www.w3.org/2001/XMLSchema-instance"
         xsi:schemaLocation="http://maven.apache.org/POM/4.0.0 http://maven.apache.org/xsd/maven-4.0.0.xsd">
    <parent>
        <artifactId>sunflower</artifactId>
        <groupId>com.yc</groupId>
        <version>0.0.1-SNAPSHOT</version>
    </parent>
    <modelVersion>4.0.0</modelVersion>

    <artifactId>springcloud-sentinel</artifactId>


    <dependencies>
        <!-- nacos -->
        <dependency>
            <groupId>com.alibaba.cloud</groupId>
            <artifactId>spring-cloud-starter-alibaba-nacos-discovery</artifactId>
        </dependency>
        <!-- 做持久化处理 后期会用到-->
        <dependency>
            <groupId>com.alibaba.csp</groupId>
            <artifactId>sentinel-datasource-nacos</artifactId>
        </dependency>
        <!-- sentinel-->
        <dependency>
            <groupId>com.alibaba.cloud</groupId>
            <artifactId>spring-cloud-starter-alibaba-sentinel</artifactId>
        </dependency>
        <!-- openfegin-->
        <dependency>
            <groupId>org.springframework.cloud</groupId>
            <artifactId>spring-cloud-starter-openfeign</artifactId>
        </dependency>
        <!-- web-->
        <dependency>
            <groupId>org.springframework.boot</groupId>
            <artifactId>spring-boot-starter-web</artifactId>
        </dependency>
        <dependency>
            <groupId>org.springframework.boot</groupId>
            <artifactId>spring-boot-starter-actuator</artifactId>

        </dependency>
    </dependencies>
</project>
**
**
server:
  port: 8401
spring:
  application:
    name: spring-cloud-sentinel
  cloud:
    nacos:
      discovery:
        server-addr: localhost:8848
        username: nacos
        password: nacos
    sentinel:
      transport:
        dashboard: localhost:8080
        port: 8719 # Sentinel api端口,默认8719,如果被占用了会自动从8719开始依次+1扫描。直至找到未被占用的端口
management:
  auditevents:
    enabled: true
添加主启动类
@SpringBootApplication
@EnableDiscoveryClient
public class SentinelMain8401 {
    public static void main(String[] args) {
        SpringApplication.run(SentinelMain8401.class, args);
    }
}
编写controller
@RestController
public class SentinelController {
    @RequestMapping("/testA")
    public String testA(){
        return "testA";
    }
    @RequestMapping("/testB")
    public String testB(){
        return "testB   ";
    }
}
启动项目
查看nacos

查看sentinel 还是空空如也

sentinel 使用的是懒加载。需要请求一下controller
访问 http://localhost:8401/testA http://localhost:8401/testB

流控模式
直接:api达到限流条件时,直接限流
关联:当关联的资源达到限流时,就限流自己
链路:只记录指定链路上的流量(指定资源从入口资源进来的流量,如果达到阈值,就进行限流)
新增流控QPS规则
QPS (每秒的请求数量) : 当调用该api的QPS达到阈值的时候进行限流
为testA 设置QPS 每秒一次请求数

sentinel 中流控规则中显示

测试访问每2秒刷新testA 和狂点testA

sentinel 实时监控

进行对testA设置QPS之后 每秒只能有一个请求.超过之后会被sentinel进行流控
testB不收任何影响
新增流控线程规则

更改controller
 @RequestMapping("/testA")
    public String testA() {
        try {
            //阻塞0.8秒
            TimeUnit.MILLISECONDS.sleep(800);
        } catch (InterruptedException e) {
            e.printStackTrace();
        }
        return "testA";
    }
进行访问测试

流控模式: 关联
关联:当关联的资源达到限流时,就限流自己(就相当于支付的接口快要崩溃了,就限制下单的接口)

更改conreoller
 @RequestMapping("/testA")
    public String testA() {
 //取消睡眠的代码
        return "testA";
    }
使用postman 模拟并发密集访问testB
postMan创建 集合


点击Run New Collection之后,同时使用浏览器访问testA

流控模式: 预热
公式
– 阈值除以 冷启动因子(默认是3 ) 经过预热时长才会达到阈值

WarmUp 中的 冷启动因子默认是 3
单机阈值为: 10
WarmUp 模式
预热时长 5秒
解释为: 10/3 目前的阈值是3 预热五秒之后才会达到10 (当阈值首次达到3 之后才会触发预热。如果前期阈值一直达不到3 就不会触发预热)
测试访问 http://localhost:8401/testA 前六秒都是每秒点击一次,之后猛点7秒,发现流控效果。(前几秒是会出现异常的。后面阈值就会达到10)
降级规则
配置RT 慢调用降级

 @RequestMapping("/testD")
    public String testD() {

        try {
            TimeUnit.MILLISECONDS.sleep(3000);
            System.out.println(
            "=-========================"
            );
        } catch (InterruptedException e) {
            e.printStackTrace();
        }
        return "testD";
    }
1.调用:一个请求发送到服务器,服务器给与响应,一个响应就是一个调用。
2.RT:响应时间,指系统对请求作出响应的时间。
3.慢调用:当调用的时间(响应的实际时间)>设置的RT的时,这个调用叫做慢调用。
4.慢调用比例:在所以调用中,慢调用占有实际的比例,= 慢调用次数 / 调用次数
5.比例阈值:自己设定的 , 慢调用次数 / 调用次数=比例阈值
统计时长:时间的判断依据
最小请求数:设置的调用最小请求数
使用jemtem 进行压力测试,同时访问http://localhost:8401/testD


配置异常比例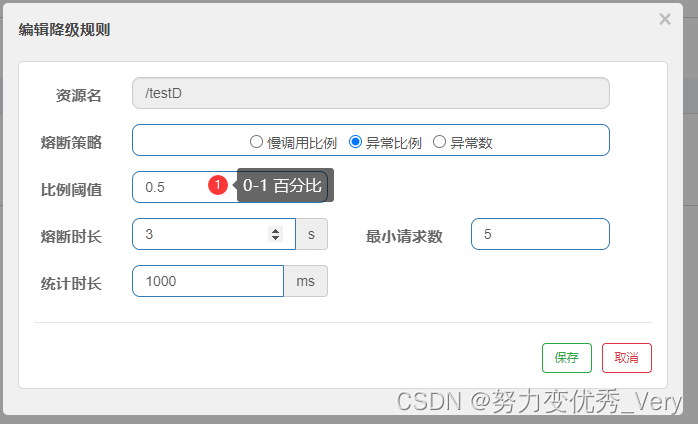
随机抛出异常
  @RequestMapping("/testE")
    public String testE() {
            int a =(int)(1+Math.random()*(10-1+1));
            if (a>3){
                int as=10/0;
            }
            System.out.println(a);

        return "testE";
    }
新增热点限流规则

//@SentinelResource : value = "testF"对应的是限流规则里面的 资源名  blockHandler = "blocktestF"限流规则出发后的兜底方法
 @RequestMapping("/testF")
 @SentinelResource(value = "testF",blockHandler = "blocktestF")
    public String testF(@RequestParam(value = "p1",required = false)String p1,@RequestParam(value = "p2",required = false)String p2) {
        System.out.println(p1 +  p2);
        return p1+p2;
    }


// testF 的兜底方法,要求参数一致,同时加上 BlockException  参数
    public String blocktestF(String p1, String p2, BlockException e) {


        System.out.println(p1 +  p2);

        return "BlockException···";
    }
进行一秒一次访问和猛点访问 http://localhost:8401/testF?p1=e 查看效果

新增热点限流规则 参数例外项
当参数索引中的参数满足指定值时,使用新的限流规则 – (当 参数索引等于0 的参数,值为 ‘ buxianliu ’ 时 ,新的阈值= 200)

点击③ 添加

访问 http://localhost:8401/testF?p1=buxianliu 没有触发限流规则

如果是代码发生异常sentinel 不会捕获异常,可以使用fallback
@SentinelResource(value = "testF",blockHandler = "blocktestF" ,fallback = "")
系统规则

新增系统规则

- LOAD : 自适应 (仅对Linux/Unix-like机器生效)系统的load1 作为启发指标,进行自适应系统保护,当系统load1超过设定的启发值。且系统当前的并发线程数超过估算的系统容量时才会触发系统保护(BBR阶段)。系统容量由系统的maxQps *minRt估算得出,设定参考值一般是 CPU cores * 2.5
- 平均RT: 当单台机器上所有入口流量的平均RT达到阈值 即触发系统保护, 单位是毫秒
- 线程数 : 当单台机器上所有入口流量的并发数达到阈值,即触发系统保护。
- 入口QPS :当单台机器上所有入口流量的QPS达到阈值,即触发系统保护。
- CPU usage : 当系统的CPU使用率超过阈值,即触发系统保护。(取值范围0.0-1.0)
演示入口QPS

 @RequestMapping("/testA")
    public String testA() {
        return "testA";
    }
    @RequestMapping("/testB")
    public String testB(){
        return "testB   ";
    }
访问 http://localhost:8401/testA、http://localhost:8401/testB 都会触发限流规则


@SentinelResource
新建RateLimitController
package com.yc.springcloudsentinel.controller;

import com.alibaba.csp.sentinel.annotation.SentinelResource;
import com.alibaba.csp.sentinel.slots.block.BlockException;
import org.springframework.web.bind.annotation.RequestMapping;
import org.springframework.web.bind.annotation.RestController;

import java.util.Date;

@RestController
public class RateLimitController {

    @RequestMapping("/byResource")
    @SentinelResource(value = "byResource",blockHandler ="byResourceException" )
    public String byResource(){

        return "byResource ok";
    }

    public String byResourceException(BlockException E){

        return "byResourceException"+ new Date();
    }
}
查看sentinel

按照资源名称进行添加限流规则

测试

当8401 停止会怎么办?
刷新sentinel 限流规则消失 (是临时节点)

按照URL进行添加限流规则
 @RequestMapping("/rateLimit/byUrl")
    @SentinelResource(value = "byUrl"  )
    public String byUrl(){

        return "Sentinel 默认限流规则";
    }
}
sentinel 控制台查看

进行添加限流规则


使用的是sentinel默认的限流异常

总结:使用资源名称和URL 进行限流,效果一样。当使用@SentinelResource 进行自定义blockHandler 时。使用自定义的,没有自定义的使用sentinel 默认的
以上兜底方法面临的问题
- 代码耦合度高
- 无法体现自己的业务要求
- 全局统一的处理方法没有体现
** springcloud-sentinel POM 添加Lombok的依赖 **
<dependency>
            <groupId>org.projectlombok</groupId>
            <artifactId>lombok</artifactId>
            <version>1.18.22</version>
        </dependency>
**新建 User 实体类 **
package com.yc.springcloudsentinel.vo;


import lombok.AllArgsConstructor;
import lombok.Data;
import lombok.NoArgsConstructor;

@Data
@NoArgsConstructor
@AllArgsConstructor
public class User {

    public String name;
    public Integer age;
}
新建自定义限流处理规则 CostomerBlockHandler
package com.yc.springcloudsentinel.myhandler;

import com.alibaba.csp.sentinel.annotation.SentinelResource;
import com.alibaba.csp.sentinel.slots.block.BlockException;
import com.yc.springcloudsentinel.vo.User;
import org.springframework.web.bind.annotation.RequestMapping;

public class CostomerBlockHandler {

    /**
     *  无参 自定义兜底方法
     * @param e
     * @return 返回字符串
     */
    public static String  blockHandler1(BlockException e){
        return "BlockException ";
    }

    /**
     * 无参 自定义兜底方法
     * @param e
     * @return 返回对象
     */
    public  static User blockHandlerUser(BlockException e){
        return new User("获取失败",555);
    }


    /**
     *  有参 自定义兜底方法
     * @param name
     * @param age
     * @param e
     * @return 返回对象
     */
    public static User blockHandlerParam(String name,Integer age,BlockException e){

        return new User("blockHandlerParam 获取失败 ",444);
    }
}
新建controller
package com.yc.springcloudsentinel.controller;

import com.alibaba.csp.sentinel.annotation.SentinelResource;
import com.yc.springcloudsentinel.myhandler.CostomerBlockHandler;
import com.yc.springcloudsentinel.vo.User;
import org.springframework.web.bind.annotation.RequestMapping;
import org.springframework.web.bind.annotation.RestController;

@RestController
public class CostomerBlockHandlerController {

    @RequestMapping("/blockHandler1")
    @SentinelResource(value = "blockHandler1", //资源名称
            blockHandlerClass = CostomerBlockHandler.class, //使用自定义的限流处理规则
            blockHandler = "blockHandler1") // 指定使用 哪个方法
    public String  blockHandler1(){
        return "blockHandler1";
    }
    @RequestMapping("/blockHandlerUser")
    @SentinelResource(value = "blockHandlerUser", //资源名称
            blockHandlerClass = CostomerBlockHandler.class, //使用自定义的限流处理规则
            blockHandler = "blockHandlerUser") // 指定使用 哪个方法
    public User blockHandlerUser(){
        return new User("番茄",18);
    }

    @RequestMapping("/blockHandlerParam")
    @SentinelResource(value = "blockHandlerParam", //资源名称
            blockHandlerClass = CostomerBlockHandler.class, //使用自定义的限流处理规则
            blockHandler = "blockHandlerParam") // 指定使用 哪个方法
    public User blockHandlerParam(String name,Integer age){
        return new User(name,age);
    }
}
进行添加限流规则

对blockHandler1 进行限流

测试访问

对blockHandlerUser进行限流


对blockHandlerUser进行限流


sentinel整合 Ribbon
新建提供者 SentinelRibbonPaymentMain9003 、SentinelRibbonPaymentMain9004
9003 pom
<?xml version="1.0" encoding="UTF-8"?>
<project xmlns="http://maven.apache.org/POM/4.0.0" xmlns:xsi="http://www.w3.org/2001/XMLSchema-instance"
         xsi:schemaLocation="http://maven.apache.org/POM/4.0.0 https://maven.apache.org/xsd/maven-4.0.0.xsd">
    <parent>
        <artifactId>sunflower</artifactId>
        <groupId>com.yc</groupId>
        <version>0.0.1-SNAPSHOT</version>
    </parent>
    <modelVersion>4.0.0</modelVersion>
    <artifactId>sentinel-ribbon-payment9003</artifactId>
    <properties>
        <java.version>1.8</java.version>
    </properties>
    <dependencies>
        <dependency>
            <groupId>org.springframework.boot</groupId>
            <artifactId>spring-boot-starter-web</artifactId>
        </dependency>
        <dependency>
            <groupId>org.springframework.boot</groupId>
            <artifactId>spring-boot-starter-actuator</artifactId>
        </dependency>
        <dependency>
            <groupId>org.springframework.boot</groupId>
            <artifactId>spring-boot-starter-test</artifactId>
            <scope>test</scope>
        </dependency>
        <!--nacos-->
        <dependency>
            <groupId>com.alibaba.cloud</groupId>
            <artifactId>spring-cloud-starter-alibaba-nacos-discovery</artifactId>
        </dependency>
    </dependencies>

    <build>
        <plugins>
            <plugin>
                <groupId>org.springframework.boot</groupId>
                <artifactId>spring-boot-maven-plugin</artifactId>
            </plugin>
        </plugins>
    </build>

</project>
9003 yml
server:
  port: 9003
spring:
  application:
    name: nacos-payment-provider
  cloud:
    nacos:
      server-addr: localhost:8848
      discovery:
        username: nacos
        password: nacos
        namespace: public

management:
  endpoints:
    web:
      exposure:
        include: '*'
9003 主启动类
package com.yc.springcloud.alibaba;

import org.springframework.boot.SpringApplication;
import org.springframework.boot.autoconfigure.SpringBootApplication;

@SpringBootApplication
public class SentinelRibbonPaymentMain9003 {

    public static void main(String[] args) {
        SpringApplication.run(SentinelRibbonPaymentMain9003.class, args);
    }

}
9003 controller
package com.yc.springcloud.alibaba.controller;

import org.springframework.beans.factory.annotation.Value;
import org.springframework.web.bind.annotation.PathVariable;
import org.springframework.web.bind.annotation.RequestMapping;
import org.springframework.web.bind.annotation.RestController;

@RestController
public class PaymentController {

    @Value("${server.port}")
    public String port;

    @RequestMapping("/paymentSQL/{id}")
    public String paymentSQL(@PathVariable("id") String id){
        return "ID :" +id+", 服务器端口:" +port;
    }
}
** 自测9003**
http://localhost:9003/paymentSQL/1
搭建9004
9004 pom
<?xml version="1.0" encoding="UTF-8"?>
<project xmlns="http://maven.apache.org/POM/4.0.0" xmlns:xsi="http://www.w3.org/2001/XMLSchema-instance"
         xsi:schemaLocation="http://maven.apache.org/POM/4.0.0 https://maven.apache.org/xsd/maven-4.0.0.xsd">
    <parent>
         <groupId>com.yc</groupId>
        <version>0.0.1-SNAPSHOT</version>
        <artifactId>sunflower</artifactId>
    </parent>
    <artifactId>sentinel-ribbon-payment9004</artifactId>
    <modelVersion>4.0.0</modelVersion>
    <properties>
        <java.version>1.8</java.version>
    </properties>
    <dependencies>
        <dependency>
            <groupId>org.springframework.boot</groupId>
            <artifactId>spring-boot-starter-web</artifactId>
        </dependency>

        <dependency>
            <groupId>org.springframework.boot</groupId>
            <artifactId>spring-boot-starter-test</artifactId>
            <scope>test</scope>
        </dependency>

        <!--nacos-->
        <dependency>
            <groupId>com.alibaba.cloud</groupId>
            <artifactId>spring-cloud-starter-alibaba-nacos-discovery</artifactId>
        </dependency>
    </dependencies>

    <build>
        <plugins>
            <plugin>
                <groupId>org.springframework.boot</groupId>
                <artifactId>spring-boot-maven-plugin</artifactId>
            </plugin>
        </plugins>
    </build>

</project>
9004 yml
server:
  port: 9003
spring:
  application:
    name: nacos-payment-provider
  cloud:
    nacos:
      server-addr: localhost:8848
      discovery:
        username: nacos
        password: nacos
        namespace: public

management:
  endpoints:
    web:
      exposure:
        include: '*'
9004 主启动类
package com.yc.springcloud.alibaba;

import org.springframework.boot.SpringApplication;
import org.springframework.boot.autoconfigure.SpringBootApplication;

@SpringBootApplication
public class SentinelRibbonPaymentMain9004 {

    public static void main(String[] args) {
        SpringApplication.run(SentinelRibbonPaymentMain9004.class, args);
    }

}
9004 controller
package com.yc.springcloud.alibaba.controller;

import org.springframework.beans.factory.annotation.Value;
import org.springframework.web.bind.annotation.PathVariable;
import org.springframework.web.bind.annotation.RequestMapping;
import org.springframework.web.bind.annotation.RestController;

@RestController
public class PaymentController {

    @Value("${server.port}")
    public String port;

    @RequestMapping("/paymentSQL/{id}")
    public String paymentSQL(@PathVariable("id") String id){
        return "ID :" +id+", 服务器端口:" +port;
    }
}
自测9004
http://localhost:9004/paymentSQL/1
搭建SentinelRibbonConsumerOrder84Application
84 pom
<?xml version="1.0" encoding="UTF-8"?>
<project xmlns="http://maven.apache.org/POM/4.0.0" xmlns:xsi="http://www.w3.org/2001/XMLSchema-instance"
         xsi:schemaLocation="http://maven.apache.org/POM/4.0.0 https://maven.apache.org/xsd/maven-4.0.0.xsd">
    <parent>
        <groupId>com.yc</groupId>
        <artifactId>sunflower</artifactId>
        <version>0.0.1-SNAPSHOT</version>

    </parent>
    <modelVersion>4.0.0</modelVersion>
    <groupId>com.yc.springcloud.alibaba</groupId>
    <artifactId>sentinel-ribbon-consumer-order84</artifactId>

    <description>Demo project for Spring Boot</description>
    <properties>
        <java.version>1.8</java.version>
    </properties>
    <dependencies>
        <dependency>
            <groupId>org.springframework.boot</groupId>
            <artifactId>spring-boot-starter-web</artifactId>
        </dependency>
        <dependency>
            <groupId>org.springframework.boot</groupId>
            <artifactId>spring-boot-starter-actuator</artifactId>
        </dependency>

        <!-- nacos -->
        <dependency>
            <groupId>com.alibaba.cloud</groupId>
            <artifactId>spring-cloud-starter-alibaba-nacos-discovery</artifactId>
        </dependency>

        <!-- sentinel -->
        <dependency>
            <groupId>com.alibaba.cloud</groupId>
            <artifactId>spring-cloud-starter-alibaba-sentinel</artifactId>
        </dependency>

        <dependency>
            <groupId>org.springframework.boot</groupId>
            <artifactId>spring-boot-starter-test</artifactId>
            <scope>test</scope>
        </dependency>
    </dependencies>

    <build>
        <plugins>
            <plugin>
                <groupId>org.springframework.boot</groupId>
                <artifactId>spring-boot-maven-plugin</artifactId>
            </plugin>
        </plugins>
    </build>

</project>
84 yml
server:
  port: 84
spring:
  application:
    name: nacos-order-consumer
  cloud:
    nacos:
      server-addr: localhost:8848
      discovery:
        username: nacos
        password: nacos

    sentinel:
      transport:
        dashboard: localhost:8080
        port: 8719

#service-url:
#  nacos-user-service: http://nacos-payment-provider
84 主启动类
package com.yc.springcloud.alibaba;

import org.springframework.boot.SpringApplication;
import org.springframework.boot.autoconfigure.SpringBootApplication;

@SpringBootApplication
public class SentinelRibbonConsumerOrder84Application {

    public static void main(String[] args) {
        SpringApplication.run(SentinelRibbonConsumerOrder84Application.class, args);
    }

}
** 84 配置负载均衡配置类 ApplicationConfig84**
package com.yc.springcloud.alibaba.config;

import org.springframework.cloud.client.loadbalancer.LoadBalanced;
import org.springframework.context.annotation.Bean;
import org.springframework.context.annotation.Configuration;
import org.springframework.web.client.RestTemplate;

@Configuration
public class ApplicationConfig84 {

    @Bean
    @LoadBalanced
    public RestTemplate getRestTemplate(){
        return  new RestTemplate();
    }
}
** 84 controller**
package com.yc.springcloud.alibaba.controller;

import com.alibaba.csp.sentinel.annotation.SentinelResource;
import org.springframework.web.bind.annotation.PathVariable;
import org.springframework.web.bind.annotation.RequestMapping;
import org.springframework.web.bind.annotation.RestController;
import org.springframework.web.client.RestTemplate;

import javax.annotation.Resource;

@RestController
public class OrderController84 {
    public static  final  String PAYMENT_URL= "http://nacos-payment-provider";

    @Resource
    public RestTemplate restTemplate;

    @RequestMapping("/consumer/fallback/{id}")
    @SentinelResource(value = "fallback") //没有进行任何 服务降级配置
    public String fallback(@PathVariable("id") String id){
        String forObject = restTemplate.getForObject(PAYMENT_URL + "/paymentSQL/" + id, String.class);
        return forObject;
    }
}
测试访问 http://localhost:84/consumer/fallback/2 是轮询负载均衡


使用 fallback 进行 Java异常降级配置 更改84 controller
 @RequestMapping("/consumer/fallback/{id}")
    @SentinelResource(value = "fallback" ,fallback ="fallbackHandler"   ) //fallback 服务降级配置
    public String fallback(@PathVariable("id") String id){
        String forObject = restTemplate.getForObject(PAYMENT_URL + "/paymentSQL/" + id, String.class);
        if ("4".equals(id)){
            throw  new IllegalArgumentException(" IllegalArgumentException, 非法参数异常");
        }
        if ("5".equals(id)){
             throw  new NullPointerException(" NullPointerException, 没有对应的ID"+id+"商品,空指针异常");
        }
        if ("6".equals(id)){
                int a=10/0;
        }

        return forObject;
    }
    //  fallback 降级方法 也可以使用 fallbackClass 进行多个降级方法类 编写
    public String fallbackHandler(  String id,Throwable e){// 参数和原方法保持一致即可,必须添加 Throwable 参数,继续接收参数信息

        return "Java 异常降级成功, id是:"+id + " 异常信息是:"+e.getMessage();
    }
进行访问
http://localhost:84/consumer/fallback/4 http://localhost:84/consumer/fallback/6


同时 使用 fallback 进行 Java异常降级配置 和 blockHandler 更改84 controller
@RequestMapping("/consumer/fallback/{id}")
    @SentinelResource(value = "fallback" ,fallback ="fallbackHandler"  ,
            blockHandler = "blockHandler" ) //fallback 服务降级配置 和 blockHandler 同时使用
    public String fallback(@PathVariable("id") String id){
        String forObject = restTemplate.getForObject(PAYMENT_URL + "/paymentSQL/" + id, String.class);
        if ("4".equals(id)){
            throw  new IllegalArgumentException(" IllegalArgumentException, 非法参数异常");
        }
        if ("5".equals(id)){
             throw  new NullPointerException(" NullPointerException, 没有对应的ID"+id+"商品,空指针异常");
        }
        if ("6".equals(id)){
                int a=10/0;
        }

        return forObject;
    }
    //  fallback 降级方法 也可以使用 fallbackClass 进行多个降级方法类 编写
    public String fallbackHandler(  String id,Throwable e){// 参数和原方法保持一致即可,必须添加 Throwable 参数,继续接收参数信息

        return "Java 异常降级成功, id是:"+id + " 异常信息是:"+e.getMessage();
    }
    //  blockHandler 降级方法 也可以使用 blockHandlerClass 进行多个降级方法类 编写
    public String blockHandler(String id, BlockException e){// 参数和原方法保持一致即可,必须添加 BlockException 参数,继续接收参数信息

        return "BlockException 降级成功,   id是:"+id + " 异常信息是:"+e.getMessage();
    }
配置流控规则

快速访问 http://localhost:84/consumer/fallback/1

访问 http://localhost:84/consumer/fallback/4

快速访问 http://localhost:84/consumer/fallback/4

两者同时配置,触发流控规则时使用 sentinel的降级方法 有Java异常时 使用 fallback 降级方法
sentinel 整合Fegin
84 pom 添加fegin
 <!-- openfegin-->
        <dependency>
            <groupId>org.springframework.cloud</groupId>
            <artifactId>spring-cloud-starter-openfeign</artifactId>
        </dependency>
84 yml
server:
  port: 84
spring:
  application:
    name: nacos-order-consumer
  cloud:
    nacos:
      server-addr: localhost:8848
      discovery:
        username: nacos
        password: nacos

    sentinel:
      transport:
        dashboard: localhost:8080
        port: 8719


#service-url:
#  nacos-user-service: http://nacos-payment-provider
# 开启sentinel 支持fegin 中文可能会导致项目启动不成功,请删除中文注释
feign:
  sentinel:
    enabled: true
84 主启动类添加
@SpringBootApplication
@EnableFeignClients
@EnableDiscoveryClient
public class SentinelRibbonConsumerOrder84Application {

    public static void main(String[] args) {
        SpringApplication.run(SentinelRibbonConsumerOrder84Application.class, args);
    }

}
84 编写PaymentService 接口
package com.yc.springcloud.alibaba.service;

import org.springframework.cloud.openfeign.FeignClient;
import org.springframework.stereotype.Component;
import org.springframework.web.bind.annotation.PathVariable;
import org.springframework.web.bind.annotation.RequestMapping;

@FeignClient(value = "nacos-payment-provider" , //访问提供者的服务名称
        fallback=PaymentServiceImpl.class) //熔断类,提供者发生异常是调用
public interface PaymentService {
    @RequestMapping("/paymentSQL/{id}")
    public String paymentSQL(@PathVariable("id") String id);
}
** 84 PaymentServiceImpl进行熔断类编写**
package com.yc.springcloud.alibaba.service;

import org.springframework.stereotype.Component;

@Component
public class PaymentServiceImpl implements  PaymentService{

    @Override
    public String paymentSQL(String id) {
        return "OpenFegin fallback";
    }
}
84 controller添加
 @Resource
    public PaymentService paymentService;

    @RequestMapping("/openFeginPaymentSQL/{id}")
    public String openFeginPaymentSQL(@PathVariable("id") String id){
        String s = paymentService.paymentSQL(id);
        return s;

    }
对9003 controller 更改
@RequestMapping("/paymentSQL/{id}")
    public String paymentSQL(@PathVariable("id") String id){
        int a=10/0; //异常 Fegin的熔断类会进行降级
        return "ID :" +id+", 服务器端口:" +port;
    }
启动84 报错 关键字 org.springframework.beans.factory.BeanCreationException: Error creating bean with name ‘feignTargeter’
org.springframework.beans.factory.BeanCreationException: Error creating bean with name 'orderController84': Injection of resource dependencies failed; nested exception is org.springframework.beans.factory.BeanCreationException: Error creating bean with name 'feignTargeter' defined in class path resource [org/springframework/cloud/openfeign/FeignAutoConfiguration$HystrixFeignTargeterConfiguration.class]: Initialization of bean failed; nested exception is org.springframework.aop.framework.AopConfigException: Could not generate CGLIB subclass of class org.springframework.cloud.openfeign.HystrixTargeter: Common causes of this problem include using a final class or a non-visible class; nested exception is org.springframework.cglib.core.CodeGenerationException: java.lang.IllegalAccessError-->class org.springframework.cloud.openfeign.HystrixTargeter$$EnhancerBySpringCGLIB$$905e7202 cannot access its superclass org.springframework.cloud.openfeign.HystrixTargeter
	at org.springframework.context.annotation.CommonAnnotationBeanPostProcessor.postProcessProperties(CommonAnnotationBeanPostProcessor.java:321) ~[spring-context-5.2.15.RELEASE.jar:5.2.15.RELEASE]
	at org.springframework.beans.factory.support.AbstractAutowireCapableBeanFactory.populateBean(AbstractAutowireCapableBeanFactory.java:1425) ~[spring-beans-5.2.15.RELEASE.jar:5.2.15.RELEASE]
	at org.springframework.beans.factory.support.AbstractAutowireCapableBeanFactory.doCreateBean(AbstractAutowireCapableBeanFactory.java:593) ~[spring-beans-5.2.15.RELEASE.jar:5.2.15.RELEASE]
	at org.springframework.beans.factory.support.AbstractAutowireCapableBeanFactory.createBean(AbstractAutowireCapableBeanFactory.java:516) ~[spring-beans-5.2.15.RELEASE.jar:5.2.15.RELEASE]
	at org.springframework.beans.factory.support.AbstractBeanFactory.lambda$doGetBean$0(AbstractBeanFactory.java:324) ~[spring-beans-5.2.15.RELEASE.jar:5.2.15.RELEASE]
	at org.springframework.beans.factory.support.DefaultSingletonBeanRegistry.getSingleton(DefaultSingletonBeanRegistry.java:234) ~[spring-beans-5.2.15.RELEASE.jar:5.2.15.RELEASE]
	at org.springframework.beans.factory.support.AbstractBeanFactory.doGetBean(AbstractBeanFactory.java:322) ~[spring-beans-5.2.15.RELEASE.jar:5.2.15.RELEASE]
	at org.springframework.beans.factory.support.AbstractBeanFactory.getBean(AbstractBeanFactory.java:202) ~[spring-beans-5.2.15.RELEASE.jar:5.2.15.RELEASE]
** 则需要把父项目的热部署的依赖去掉**
访问 http://localhost:84/openFeginPaymentSQL/1

测试使用sentinel 流控规则

更改 84 controller
 @RequestMapping("/openFeginPaymentSQL/{id}")
    @SentinelResource(value = "openFeginPaymentSQL"  ,
            blockHandler = "blockHandler" )
    public String openFeginPaymentSQL(@PathVariable("id") String id){
        String s = paymentService.paymentSQL(id);
        return s;

    }
快速访问 http://localhost:84/openFeginPaymentSQL/1

** 测试 sentinel fallback 和 fegin fallback**
更改9003 controller
    @RequestMapping("/paymentSQL/{id}")
    public String paymentSQL(@PathVariable("id") String id){
       if ("4".equals(id)){
         int a = 10/0;
       }
        return "ID :" +id+", 服务器端口:" +port;
    }
测试访问 http://localhost:84/openFeginPaymentSQL/4

更改84 controller
    @RequestMapping("/openFeginPaymentSQL/{id}")
    @SentinelResource(value = "openFeginPaymentSQL"  ,fallback ="fallbackHandler"  ,
            blockHandler = "blockHandler" )
    public String openFeginPaymentSQL(@PathVariable("id") String id){
        if ("4".equals(id)){
            int a =10/0; 添加代码
        }
        String s = paymentService.paymentSQL(id);
        return s;

    }
测试访问 http://localhost:84/openFeginPaymentSQL/4

去掉84 sentinel的fallback

总结: 猜测fegin 会降级提供者的异常 sentinel 则都会降级


 513
513

 被折叠的 条评论
为什么被折叠?
被折叠的 条评论
为什么被折叠?
 到【灌水乐园】发言


