


DOM4J解析XML文件
dom4j是一个Java的XML API,是jdom的升级产品,用来读写XML文件。另外对比其他API读写XML文件,dom4j是一个十分优秀的JavaXML API,具有性能优异、功能强大和极其易使用的特点,它的性能超过sun公司官方的dom技术!如今越来越多的Java软件、Java框架都在使用dom4j来读写XML文件,例如Sun公司的JAXM、Hinernate等都是使用dom4j来读取并解析配置文件。
作为一名Java开发者,非常推荐去学习XML文件的解析方式,无论是深入理解框架底层的解析方式(你就知道怎么编写配置文件了,例如Spring底层的解析方式)、还是在工作中自定义一些特定的配置文件(例如SQL映射文件、数据映射文件等)非常的灵活与实用!
当然这里主要是以解析xml配置文件的方式去介绍dom4j的在实际项目开发中运用方式,更多写的操作可以自行学习。另外如果单纯的只是解析配置文件非常推荐使用dom4j,性能完全够用!但是要解析有大量数据的xml文件时,就要考虑内存溢出问题,此时dom4j就不怎么合适了,要用SAX事件驱动解析方式(采用事件驱动模式,对内存消耗较小适用于处理拥有大量数据的xml文件),这种解析方式在另外一篇博客有介绍。
jar获取 / 引入方式:
1、maven
<!-- https://mvnrepository.com/artifact/org.dom4j/dom4j -->
<dependency>
    <groupId>org.dom4j</groupId>
    <artifactId>dom4j</artifactId>
    <version>2.1.1</version>
</dependency>
<!-- https://mvnrepository.com/artifact/jaxen/jaxen -->
<dependency>
    <groupId>jaxen</groupId>
    <artifactId>jaxen</artifactId>
    <version>1.1.1</version>
</dependency>
2、gradle
// https://mvnrepository.com/artifact/org.dom4j/dom4j
implementation group: 'org.dom4j', name: 'dom4j', version: '2.1.1'

// https://mvnrepository.com/artifact/jaxen/jaxen
implementation group: 'jaxen', name: 'jaxen', version: '1.1.1'
引入jaxen的依赖是因为使用dom4j的xpath查询xml节点时,需要jaxen提供支持!否则会抛会java.lang.ClassNotFoundException: org.jaxen.JaxenException的异常。
这里为什么要提一下gradle呢?Gradle抛弃了基于XML的各种繁琐配置,确实更优秀、更简洁,并且SpringBoot 3.0默认的版本管理器也换成Gradle了(但是国内Gradle从中央仓库下载依赖是真的慢),未来可能会成为趋势!
1、环境准备
1.1、常用类及方法介绍
DOM4J常用的类
| 类名 | 用途 |
|---|---|
| Attribute | 定义了 XML 的属性。 |
| Branch | 指能够包含子节点的节点。如XML元素(Element)和文档(Docuemnts)定义了一个公共的行为 |
| CDATA | 定义了 XML CDATA 区域 |
| CharacterData | 是一个标识接口,标识基于字符的节点。如CDATA,Comment, Text. |
| Comment | 定义了 XML 注释的行为 |
| Document | 定义了XML 文档 |
| DocumentType | 定义 XML DOCTYPE 声明 |
| Element | 定义XML 元素 |
| ElementHandler | 定义了Element 对象的处理器 |
| ElementPath | 被 ElementHandler 使用,用于取得当前正在处理的路径层次信息 |
| Entity | 定义 XML entity |
| Node | 为dom4j中所有的XML节点定义了多态行为 |
| NodeFilter | 定义了在dom4j 节点中产生的一个滤镜或谓词的行为(predicate) |
| ProcessingInstruction | 定义 XML 处理指令 |
| Text | 定义 XML 文本节点 |
| Visitor | 用于实现 Visitor模式 |
| XPath | 在分析一个字符串后会提供一个 XPath 表达式 |
Element类常见的方法。我们解析XML文件最终都会把标签对转成Element节点对象,去读取节点属性与节点元素所含有的text内容,所以这个类非常重要。
| 方法名 | 含义 |
|---|---|
| getQName() | 元素的QName对象 |
| getNamespace() | 元素所属的Namespace对象 |
| getNamespacePrefix() | 元素所属的Namespace对象的prefix |
| getNamespaceURI() | 元素所属的Namespace对象的URI |
| getName() | 元素的local name |
| getQualifiedName() | 元素的qualified name |
| getText() | 元素所含有的text内容,如果内容为空则返回一个空字符串而不是null |
| getTextTrim() | 元素所含有的text内容,其中连续的空格被转化为单个空格,该方法不会返回null |
| attributeIterator() | 元素属性的iterator,其中每个元素都是Attribute对象 |
| attributeValue() | 元素的某个指定属性所含的值 |
| elementIterator() | 元素的子元素的iterator,其中每个元素都是Element对象 |
| element() | 元素的某个指定(qualified name或者local name)的子元素 |
| elementText() | 元素的某个指定(qualified name或者local name)的子元素中的text信息 |
| getParent | 元素的父元素 |
| getPath() | 元素的XPath表达式,其中父元素的qualified name和子元素的qualified name之间使用"/"分隔 |
| isTextOnly() | 是否该元素只含有text或是空元素 |
1.2、项目环境搭建
这里主要已Gradle来构建一个测试工程,当然也可以使用Maven来构建,没有任何区别的除了引入jar包的方式。例如项目结构与引入的GAV坐标如下:
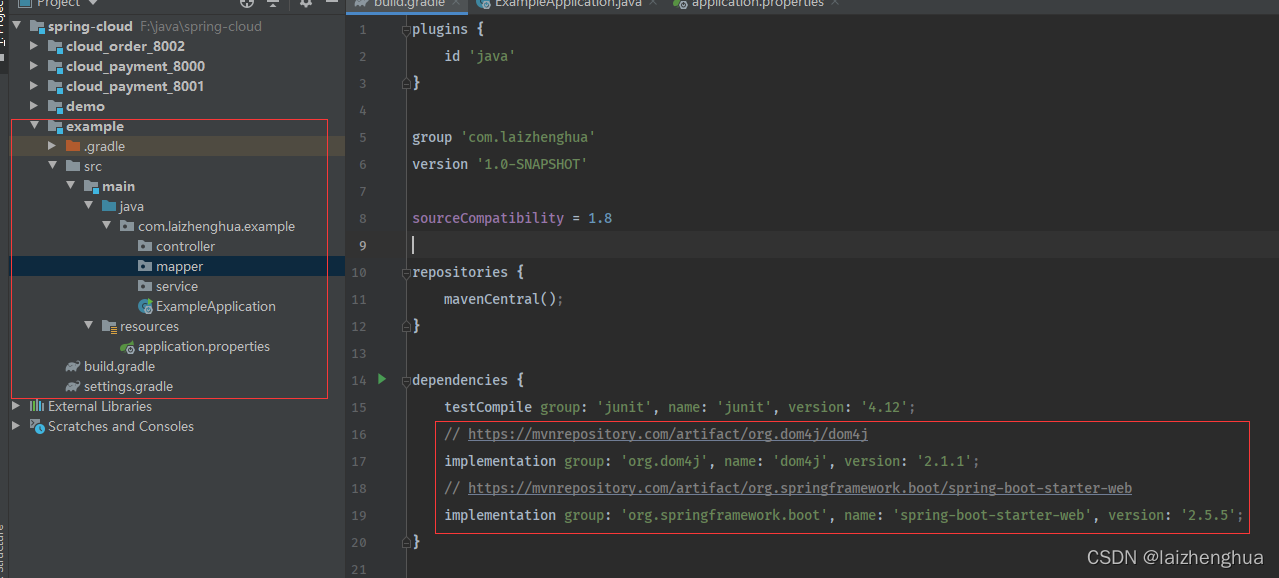
暂时先引入这几个依赖坐标,后面用到什么添加什么即可。搭建好基础环境后,我们用一个完整的项目功能案例,来体验dom4j的解析过程,与在项目上的使用方式。
2、功能实现
2.1、功能简要说明
我们要完成的项目功能为,基于XML配置文件完成Excel数据的导入与导出功能(从前端传入Excel文件完成数据入库或导出表数据至Excel文件)。这个功能看似简单其实做起来会涉及到非常多的东西,例如
1、持久层框架JPA集成(数据库我们采用Oracle,当然也可以使用MyBatis-Plus+MySQL看自己的选择)
2、设计XML映射 / 配置文件(实体、Excel标题、数据库表字段的映射关系。通过XML文件实现)最终Excel数据通过xml配置文件获取需要保存到数据库的实体集合。
3、XML文件的解析方式(使用DOM4J解析)
4、通用工具类的封装(通用的XML解析器)
5、解析Excel文件数据(通过Apache POI解析)
等等
重要的是学会一种思想,自定义配置文件,自己去解析!去满足特定的场景,例如我们想通过JPA执行复杂原生SQL,或完成自己的动态SQL,就可以把SQL语句写在特定的XML标签上,自己去解析与获取。在来说动态SQL,学会XML文件解析后,完全可以实现MyBatis的动态SQL功能,只需要设计特定的标签,SQL传参的时候判断有没有这个参数,有则拼接上SQL,没有则不拼接SQL。
2.2、SpringBoot集成JPA
关于更多的JPA知识这里就不多说了。
1、引入相关依赖(JPA/数据库驱动),注意最后三个是最新引入的。
dependencies {
    testCompile group: 'junit', name: 'junit', version: '4.12';
    // https://mvnrepository.com/artifact/org.dom4j/dom4j
    implementation group: 'org.dom4j', name: 'dom4j', version: '2.1.1';
    // https://mvnrepository.com/artifact/org.springframework.boot/spring-boot-starter-web
    implementation group: 'org.springframework.boot', name: 'spring-boot-starter-web', version: '2.5.5';
    // https://mvnrepository.com/artifact/org.projectlombok/lombok
    compileOnly group: 'org.projectlombok', name: 'lombok', version: '1.18.20';
    // https://mvnrepository.com/artifact/com.alibaba/fastjson
    implementation group: 'com.alibaba', name: 'fastjson', version: '1.2.75';
    // https://mvnrepository.com/artifact/jaxen/jaxen
    implementation group: 'jaxen', name: 'jaxen', version: '1.1.1';

    // https://mvnrepository.com/artifact/org.springframework.boot/spring-boot-starter-data-jpa
    implementation 'org.springframework.boot:spring-boot-starter-data-jpa:2.5.4'
    // https://mvnrepository.com/artifact/com.oracle.database.jdbc/ojdbc6
    implementation group: 'com.oracle.database.jdbc', name: 'ojdbc6', version: '11.2.0.4';
    // https://mvnrepository.com/artifact/org.apache.poi/poi
    // implementation 'org.apache.poi:poi:4.1.2';
    // https://mvnrepository.com/artifact/org.apache.poi/poi-ooxml
    implementation 'org.apache.poi:poi-ooxml:4.1.2';
}

// 解决Java编译出现中文乱码问题
tasks.withType(JavaCompile) {
    options.encoding = "UTF-8"
}
2、编写application.properties文件(数据库的连接信息的)
server.port=8080
spring.application.name=example
spring.datasource.driver-class-name=oracle.jdbc.driver.OracleDriver
spring.datasource.url=jdbc:oracle:thin:@122.41.571.179:1521:helowin
spring.datasource.username=LN
spring.datasource.password=LN
spring.jpa.show-sql=true
3、编写实体类(注意注解的使用方式,SQL脚本在后面)
/**
 * @description: UserEntity
 * @date: 2022/3/13 11:00
 */
@Entity
@Table(name = "LN_USER", schema = "LN") // schema属性在ORACLE数据库中填用户ID
@JsonIgnoreProperties(value = {"hibernateLazyInitializer", "handler"})
public class UserEntity implements Serializable {
    private static final long serialVersionUID = 7521045049709813121L;
    private Integer id;
    private String username;
    private String password;

    @Id
    @Column(name = "ID", unique = true, nullable = false)
    @GeneratedValue(strategy = GenerationType.SEQUENCE, generator = "LN_USER_ID")
    @SequenceGenerator(name = "LN_USER_ID", schema = "LN", sequenceName = "S_LN_USER", allocationSize = 1)
    public Integer getId() {
        return id;
    }

    public void setId(Integer id) {
        this.id = id;
    }

    @Column(name = "USERNAME")
    public String getUsername() {
        return username;
    }

    public void setUsername(String username) {
        this.username = username;
    }

    @Column(name = "PASSWORD")
    public String getPassword() {
        return password;
    }

    public void setPassword(String password) {
        this.password = password;
    }
}
SQL脚本
/* 创建表空间 */
CREATE TABLESPACE LN_TEST
DATAFILE '/home/oracle/app/oracle/oradata/helowin/ln_test.dbf'
SIZE 100M
AUTOEXTEND ON
NEXT 10M

/* 给用户重新指定表空间(因为LN这个用户我们之前就创建好了) */
ALTER USER LN DEFAULT TABLESPACE LN_TEST;

/* 创建序列 */
CREATE SEQUENCE "LN"."S_LN_USER" MINVALUE 1 MAXVALUE 99999 INCREMENT BY 1 CACHE 20;

/* 最后在创建表 */
CREATE TABLE "LN"."LN_USER" (
  "ID" NUMBER(10,0) NOT NULL,
  "USERNAME" VARCHAR2(255 BYTE),
  "PASSWORD" VARCHAR2(255 BYTE),
  CONSTRAINT "SYS_C0011150" PRIMARY KEY ("ID"),
  CONSTRAINT "SYS_C0011149" CHECK ("ID" IS NOT NULL) NOT DEFERRABLE INITIALLY IMMEDIATE NORELY VALIDATE
)
TABLESPACE "LN_TEST"
LOGGING
NOCOMPRESS
PCTFREE 10
INITRANS 1
STORAGE (
  BUFFER_POOL DEFAULT
)
PARALLEL 1
NOCACHE
DISABLE ROW MOVEMENT
4、编写Dao接口,需要继承JPA提供的JpaRepository<T, ID>接口
/**
 * @description: UserDao
 * @date: 2022/4/26 21:58
 */
public interface UserDao extends JpaRepository<UserEntity, Integer> {
}
5、编写测试方法,数据库访问是否正常
/**
 * @description:
 * @date: 2022/4/26 22:15
 */
@RestController
@RequestMapping(value = "/user")
public class UserController {
    @Autowired
    private UserDao userDao;
    @RequestMapping(value = "/getList", method = RequestMethod.GET)
    public R getUserList() {
        return R.ok().put("data", userDao.findAll());
    }
}
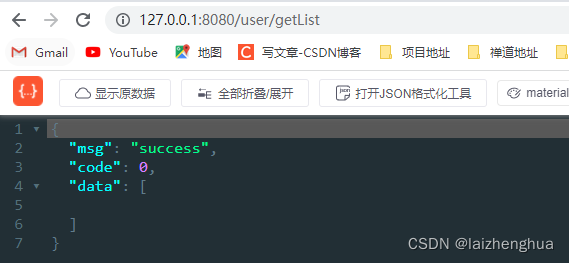
OK到这里,JPA和Oracle环境已经搭建完毕。
2.3、XML配置文件设计
所有资源文件包括配置文件我们一般放在resources目录下,方便程序加载集成到我们的应用程序中。例如我们可以在resources目录下新建一个文件夹config专门存放自定义的配置文件。
resources/config/test.xml
<?xml version="1.0" encoding="UTF-8"?>
<root>
    <!-- user实体映射关系 -->
    <class name="userEntity" package="com.laizhenghua.example.entity.userEntity" dbname="LN_USER">
        <property name="username" type="String">
            <clomun name="USERNAME" notnull="true">用户名</clomun>
        </property>
        <property name="password" type="String">
            <clomun name="PASSWORD" notnull="true">密码</clomun>
        </property>
    </class>
</root>
我们设计的配置文件也很简单,主要描述Excel表的标题、Java实体、数据库表字段直接的映射关系。例如:
1、class标签为Java实体类名信息!可以指定类名与类的全限定名,方便后面通过反射给类的属性赋值。
2、property标签为类的属性信息!分别对应属性的名称与数据类型。
3、clomun标签为数据库表字段信息!name属性为具体的表字段,notnull限定是否可以为空(当然也可以扩展其他属性),标签text内容为Excel标题,当然也可以使用一个标签属性指定。只要方便解析能描述对应关系即可。
那么这样一个配置文件,我们如何通过程序进行解析呢?
2.4、通用XML文件解析工具类设计
设计好XML配置文件后,我们需要在程序中获取配置规则。解析思路如下:
1、规定通过路径(从resources目录开始算)filePath、配置文件名fileName、唯一标识此配置项的关键字configName获取配置信息(class标签的name属性)。
2、使用ClassLoader加载配置文件,也就是获取XML配置的URL信息,最后实例化成一个File对象,方便使用DOM4J的SAXReader类去读取。
3、设计配置信息实体(ExcelConfig),最终把配置信息都封装到实体中,方便程序调用。
4、使用ConcurrentHashMap设计两个本地缓存,避免每次都去重新解析与读取XML配置文件。一个是缓存配置文件的最后更新时间,通过文件路径(config/xxx.xml)作为key,最后更新时间作为value。接口获取配置信息的时候,先获取该文件的最后更新时间,再拿缓存中的时间去做对比,如果最后更新时间没有变则走缓存,否则重新解析。而另外一个缓存则缓存具体的配置信息,把XML配置文件名(xxx.xml)作为key,把每一项配置信息封装为一个map作为缓存的value。
5、详见以下代码
ExcelConfig.class
package com.laizhenghua.example.configuration;

import java.util.List;

/**
 * @author laizhenghua
 * @description: excel配置
 * @date: 2022/4/25 22:05
 */
public class ExcelConfig {
    private String filePath;
    private String name; // configName
    private String dbName;
    private String packagePath; // 类的全路径名称
    private List<ColumnConfig> columnConfigList;

    public String getFilePath() {
        return filePath;
    }

    public void setFilePath(String filePath) {
        this.filePath = filePath;
    }

    public String getName() {
        return name;
    }

    public void setName(String name) {
        this.name = name;
    }

    public String getDbName() {
        return dbName;
    }

    public void setDbName(String dbName) {
        this.dbName = dbName;
    }

    public String getPackagePath() {
        return packagePath;
    }

    public void setPackagePath(String packagePath) {
        this.packagePath = packagePath;
    }

    public List<ColumnConfig> getColumnConfigList() {
        return columnConfigList;
    }

    public void setColumnConfigList(List<ColumnConfig> columnConfigList) {
        this.columnConfigList = columnConfigList;
    }
}
ColumnConfig.class
package com.laizhenghua.example.configuration;

/**
 * @author laizhenghua
 * @description: Java实体与表字段的配置
 * @date: 2022/4/25 22:14
 */
public class ColumnConfig {
    private String name; // 实体属性名
    private String type; // 实体属性数据类型
    private String columnName; // 表字段名
    private Boolean notNull = false; // 是否可以为空 默认为 false
    private String title; // Excel表头字段名

    public String getName() {
        return name;
    }

    public void setName(String name) {
        this.name = name;
    }

    public String getType() {
        return type;
    }

    public void setType(String type) {
        this.type = type;
    }

    public String getColumnName() {
        return columnName;
    }

    public void setColumnName(String columnName) {
        this.columnName = columnName;
    }

    public Boolean getNotNull() {
        return notNull;
    }

    public void setNotNull(Boolean notNull) {
        this.notNull = notNull;
    }

    public String getTitle() {
        return title;
    }

    public void setTitle(String title) {
        this.title = title;
    }
}
最后是通用的XML解析器工具类,也是最重要的一个类,我们把它命名为XmlParser。
XmlParser.class
package com.laizhenghua.example.utils;

import com.laizhenghua.example.configuration.ColumnConfig;
import com.laizhenghua.example.configuration.ExcelConfig;
import org.dom4j.Element;
import org.dom4j.Node;
import org.dom4j.io.SAXReader;

import java.io.File;
import java.net.URL;
import java.util.*;
import java.util.concurrent.ConcurrentHashMap;

/**
 * @description: xml解析器封装
 * @author: laizhenghua
 * @date: 2022/4/25 21:19
 */
public class XmlParser {
    private static final org.apache.logging.log4j.Logger log = org.apache.logging.log4j.LogManager.getLogger(XmlParser.class);
    public static final String DEFAULT_PATH = "config";
    /**
     * 文件最后更新时间缓存
     */
    private static Map<String, Long> configTimeCache = new ConcurrentHashMap<String, Long>();
    /**
     * 配置文件缓存
     */
    private static Map<String, Map<String, ExcelConfig>> configCache = new ConcurrentHashMap<>();

    private static ExcelConfig getConfigFromCache(String fileName, String configName) {
        if (configCache.containsKey(fileName)) {
            Map<String, ExcelConfig> cache = configCache.get(fileName);
            if (cache.containsKey(configName)) {
                return cache.get(configName);
            }
        }
        return null;
    }
    /**
     * 根据指定的路径、文件名、配置名获取配置信息
     * @param path 类路径下开辟的文件目录名(一般资源文件都放在resources目录下)
     * @param fileName xml文件
     * @param configName 配置项名
     */
    public static ExcelConfig getConfigInfo(String path, String fileName, String configName) {
        String filePath = "";
        if (path != null && path.length() > 0) {
            filePath += path;
        } else {
            filePath += DEFAULT_PATH;
        }
        if (fileName != null && fileName.length() > 0) {
            filePath += "/" + fileName;
        }
        filePath = filePath.replaceAll("\\\\", "/");
        filePath = filePath.replaceAll("//", "/");

        if (filePath.startsWith("/")) {
            filePath = filePath.substring(1);
        }
        ExcelConfig result = null;
        try {
            URL url = XmlParser.class.getClassLoader().getResource(filePath);
            if (url == null) {
                 log.error(String.format("not found ExcelConfig [path=%s], [fileName=%s], [configName=%s]", path, fileName, configName));
                return null;
            }
            // 1.获取文件最后更新时间
            String fullPath = new File(url.toURI()).getAbsolutePath();
            Long lastModified = getLastModifiedTime(fullPath);
            // 2.尝试从缓存中获取配置信息(最后更改时间与缓存相等)
            Long cacheModified = configTimeCache.get(filePath); // filePath=config/xxx.xml
            if (lastModified.equals(cacheModified)) {
                return getConfigFromCache(fileName, configName);
            }
            // 3.缓存中不存在或文件已更新过
            Map<String, ExcelConfig> excelConfigMap = resolveConfigInfo(fullPath, filePath);
            if (excelConfigMap == null) {
                log.error(String.format("not found ExcelConfig [path=%s], [fileName=%s], [configName=%s]", path, fileName, configName));
                return null;
            }
            if (excelConfigMap.containsKey(configName)) {
                result = excelConfigMap.get(configName);
            }
            // 4.更新缓存
            updateCache(lastModified, filePath, fileName, excelConfigMap);
        } catch (Exception e) {
            log.error(e);
        }
        return result;
    }

    /**
     * 获取xml文件最后更新时间戳
     * @param fullPath
     * @return
     */
    private static Long getLastModifiedTime(String fullPath) {
        Long max = null;
        if (fullPath == null || fullPath.length() == 0) {
            return max;
        }
        File file = new File(fullPath);
        if (file.exists()) {
            max = file.lastModified();
        }
        return max;
    }

    /**
     * 解析xml配置文件
     * @param fullPath
     * @param filePath
     */
    private static Map<String, ExcelConfig> resolveConfigInfo(String fullPath, String filePath) {
        if (fullPath == null) {
            return null;
        }
        File file = new File(fullPath);
        if (file.exists()) {
            try {
                SAXReader reader = new SAXReader(); // 创建SAXReader对象,用于读取xml文件
                Element root = reader.read(file).getRootElement(); // 通过 read() 解析为Document对象 在获取root根元素节点
                return resolveRoot(root, filePath);
            } catch (Exception e) {
                log.error(e);
            }
        }
        return null;
    }

    /**
     * 解析根节点含有的元素(转为ExcelConfig配置对象)
     * @param root
     * @param filePath
     */
    private static Map<String, ExcelConfig> resolveRoot(Element root, String filePath) {
        Map<String, ExcelConfig> result = new HashMap<>();
        // Iterator<Element> elementIterator = root.elementIterator();
        List<Node> nodeList = root.selectNodes("//class");
        Iterator<Node> iterator = nodeList.iterator();
        while (iterator.hasNext()) {
            Element element = (Element) iterator.next();
            ExcelConfig config = new ExcelConfig();
            config.setFilePath(filePath);
            config.setName(element.attributeValue("name"));
            config.setDbName(element.attributeValue("dbname"));
            config.setPackagePath(element.attributeValue("package"));
            config.setColumnConfigList(resolveSubNode(element));
            result.put(config.getName(), config);
        }
        return result;
    }
    private static List<ColumnConfig> resolveSubNode(Element element) {
        // List<Node> nodeList = element.selectNodes("//property");
        Iterator<Element> iterator = element.elementIterator();
        List<ColumnConfig> configList = new ArrayList<>();
        while (iterator.hasNext()) {
            Element node = (Element) iterator.next();
            ColumnConfig config = new ColumnConfig();
            config.setName(node.attributeValue("name"));
            config.setType(node.attributeValue("type"));
            Iterator<Element> elementIterator = node.elementIterator();
            while (elementIterator.hasNext()) {
                Element el = elementIterator.next();
                config.setColumnName(el.attributeValue("name"));
                String notnull = el.attributeValue("notnull");
                if (notnull != null) {
                    config.setNotNull(Boolean.parseBoolean(notnull));
                }
                config.setTitle(el.getStringValue());
            }
            configList.add(config);
        }
        return configList;
    }

    private static void updateCache(Long lastModified, String filePath, String fileName, Map<String, ExcelConfig> configMap) {
        configTimeCache.put(filePath, lastModified);
        configCache.put(fileName, configMap);
    }
}
2.5、测试配置信息获取
前面我们已经封装好一个通用的XML解析工具类,如何获取配置信息呢?去验证我们书写的解析代码对不对?
1、新建一个ExcelController,例如:
/**
 * @description:
 * @date: 2022/4/26 13:28
 */
@RestController
@RequestMapping(value = "excel")
public class ExcelController {
    @Autowired
    private ExcelService excelService;

    /**
     * 获取xml配置文件信息
     * @param queryParam
     * @return
     */
    @RequestMapping(value = "/getConfigInfo", method = RequestMethod.POST)
    public R getConfigInfo(@RequestBody QueryParamDTO queryParam) {
        return R.ok().setData(excelService.getConfigInfo(queryParam));
    }
}
为了后端接收参数信息,特意设计了QueryParamDTO数据传输对象!并且通过request body传输。
QueryParamDTO.class
/**
 * @description:
 * @date: 2022/4/26 13:37
 */
public class QueryParamDTO {
    private String filePath;
    private String fileName;
    private String configName;

    // getter and setter
    ...
}
2、业务层编写
/**
 * @description:
 * @date: 2022/4/26 13:30
 */
@Service(value = "excelService")
public class ExcelServiceImpl implements ExcelService {
    private static final org.apache.logging.log4j.Logger log = org.apache.logging.log4j.LogManager.getLogger(ExcelServiceImpl.class);

    @Autowired
    private UserDao userDao;

    @Override
    public ExcelConfig getConfigInfo(QueryParamDTO queryParam) {
        ExcelConfig configInfo = XmlParser.getConfigInfo(queryParam.getFilePath(), queryParam.getFileName(), queryParam.getConfigName());
        return configInfo;
    }
}
3、编写好业务代码以后,我们使用Postman进行测试。
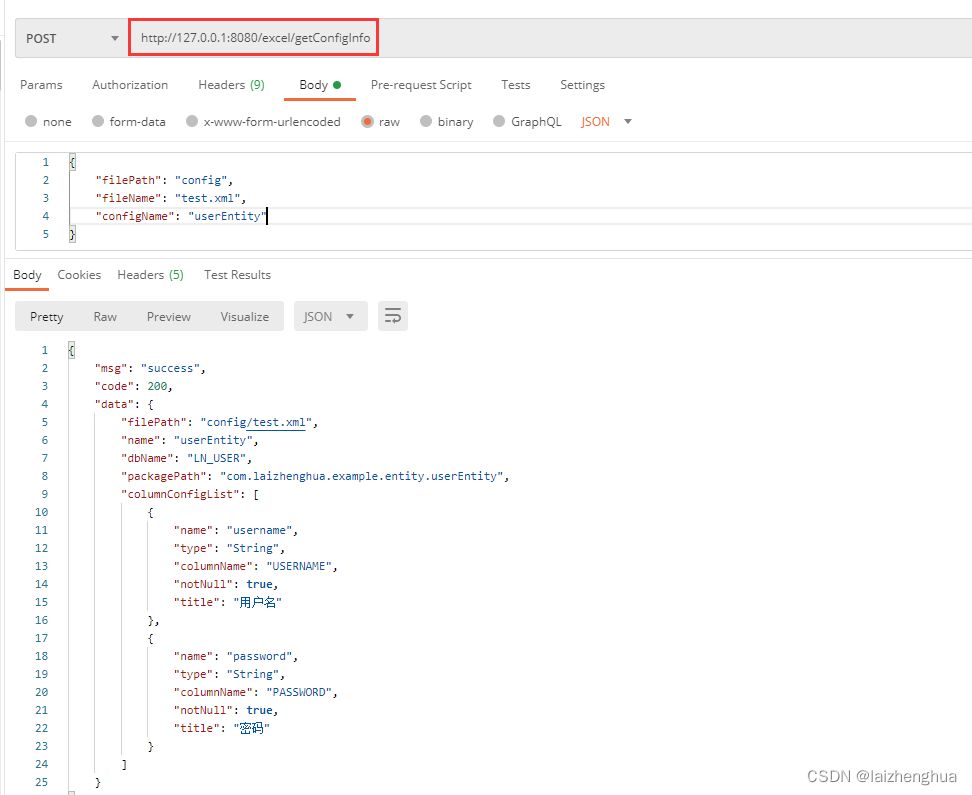
所有配置信息就拿到了。在我们项目上xml解析方式都使用这种解析方式,前端传filePath、fileName、configName参数信息,由这些参数信息决定获取哪一项配置信息。
2.6、Excel导入功能开发
前面那些内容,都是准备阶段,我们以导入以下Excel数据为例,开发导入接口!
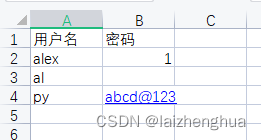
我们来简单分析下Excel数据,因为在xml配置文件中做了非空限制,所以有效数据只有两行,分别是第2行和第4行。
1、Excel数据解析代码编写,为了方便复用,我们规定只需传入MultipartFile文件对象,就能返回出List<Map<String, Cell>>,map的key为Excel标题,value为Cell单元格对象。
@Override
public List<Map<String, Cell>> resolveExcelData(MultipartFile file) {
    List<Map<String, Cell>> dataList = new ArrayList<>();
    InputStream in = null;
    try {
        in = file.getInputStream();
        String name = file.getOriginalFilename();
        Workbook wb = null;
        if (name.endsWith(".xlsx")) {
            wb = new XSSFWorkbook(in);
        } else if (name.endsWith(".xls")) {
            wb = new HSSFWorkbook(in);
        } else {
            return null;
        }
        // 默认为0
        Sheet sheet = wb.getSheetAt(0);
        // 标题集合
        List<String> titleList = getTitle(sheet);
        int rowNum = sheet.getLastRowNum() + 1;
        int cellNum = titleList.size();
        for (int i = 1; i < rowNum; i++) {
            Row row = sheet.getRow(i);
            if (row == null) {
                continue;
            }
            Map<String, Cell> excelMap = new HashMap<>();
            for (int j = 0; j < cellNum; j++) {
                Cell cell = row.getCell(j);
                if (cell == null) {
                    excelMap.put(titleList.get(j), null);
                    continue;
                }
                excelMap.put(titleList.get(j), cell);
            }
            dataList.add(excelMap);
        }
    } catch (IOException e) {
        log.error(e);
    } finally {
        if (in != null) {
            try {
                in.close();
            } catch (IOException e) {
                log.error(e);
            }
        }
    }
    return dataList;
}

/**
 * 解析Excel标题
 * @param sheet 工作簿
 * @return 标题集合
 */
private List<String> getTitle(Sheet sheet) {
    List<String> list = new ArrayList<>();
    Row row = sheet.getRow(0);
    for (int i = 0; i < row.getPhysicalNumberOfCells(); i++) {
        Cell cell = row.getCell(i);
        list.add(cell.getStringCellValue());
    }
    return list;
}
2、基于配置文件信息封装Excel数据(封装成实体),封装为Java实体,为了方法的复用我们也利用反射进行封装。
/**
 * 根据映射信息,将Excel文件数据赋值给实体类
 * @param config 配置信息
 * @param data Excel数据
 * @return
 */
@Override
public <E> List<E> convertEntity(ExcelConfig config, List<Map<String, Cell>> data, Class<E> clazz) {
    List<E> entityList = new ArrayList<>();
    List<ColumnConfig> columnConfigList = config.getColumnConfigList();
    E object = null;
    flag:
    for (Map<String, Cell> map : data) {
        try {
            assert clazz != null;
            object = (E) clazz.newInstance();
        } catch (Exception e) {
            log.error(e);
            return null;
        }
        for (ColumnConfig columnConfig : columnConfigList) {
            String title = columnConfig.getTitle(); // excel标题
            String name = columnConfig.getName(); // 实体属性名
            String type = columnConfig.getType(); // 实体属性类型
            Boolean notNull = columnConfig.getNotNull();
            Cell cell = map.get(title);
            Object cellValue = parseCellValue(cell);
            if (notNull) {
                // title对应的值不允许为空
                if (ObjectUtils.isEmpty(cellValue)) {
                    // result.put(cell.getAddress().toString(), "导入失败,失败原因不允许为空!");
                    continue flag;
                }
            }
            // 获取实体类全部属性并赋值
            Field[] fields = object.getClass().getDeclaredFields();
            for (Field field : fields) {
                field.setAccessible(true);
                if (field.getName().equals(name) && field.getType().getSimpleName().equals(type)) {
                    try {
                        Object value = null;
                        value = getValue(cellValue.toString(), field.getType());
                        field.set(object, value);
                    } catch (Exception e) {
                        log.error(e);
                    }
                }
            }
        }
        entityList.add(object);
    }
    return entityList;
}

/**
 * Excel数据类型转换
 * @param cell 单元格
 * @return
 */
private Object parseCellValue(Cell cell) {
    if (cell == null) {
        return "";
    }
    Object cellValue = null;
    switch (cell.getCellType()) {
        case NUMERIC:
            if (HSSFDateUtil.isCellDateFormatted(cell)) {
                Date date = cell.getDateCellValue();
                if (date != null) {
                    cellValue = new SimpleDateFormat("yyyy-MM-dd").format(date);
                } else {
                    cellValue = "";
                }
            } else {
                cellValue = new DecimalFormat("0").format(cell.getNumericCellValue());
            }
            break;
        case FORMULA:
            if (DateUtil.isCellDateFormatted(cell)) {
                cellValue = cell.getDateCellValue();
            } else {
                cellValue = String.valueOf(cell.getNumericCellValue());
            }
            break;
        case STRING:
            cellValue = cell.getRichStringCellValue().getString();
            break;
        default:
            cellValue = "";
    }
    return cellValue;
}

/**
 * 类型转换,把val转换成type类型返回 比如说getValue("123", Integer.class) 返回一个123
 * @param val
 * @param type
 * @param <T>
 * @return
 */
public <T> T getValue(String val, Class<T> type) {
    T value = null;
    try {
        if ("Date".equals(type.getSimpleName())) {
            SimpleDateFormat simpleDateFormat = new SimpleDateFormat("yyyy-MM-dd");
            value = (T) simpleDateFormat.parse(val);
            return value;
        }
        Constructor<T> constructor = type.getConstructor(String.class);
        constructor.setAccessible(true);
        value = constructor.newInstance(val);
    } catch (Exception e) {
        log.error(e);
    }
    return value;
}
3、编写控制层代码
/**
 * @description:
 * @date: 2022/4/26 22:15
 */
@RestController
@RequestMapping(value = "/user")
public class UserController {
    @Autowired
    private UserDao userDao;
    @Autowired
    private UserService userService;

    @RequestMapping(value = "/getList", method = RequestMethod.GET)
    public R getUserList() {

        return R.ok().put("data", userDao.findAll());
    }

    /**
     * Excel导入数据接口
     * @param file
     * @return
     */
    @RequestMapping(value = "/excel/import", method = RequestMethod.POST)
    public R importData(@RequestParam(value = "file") MultipartFile file, @RequestParam(value = "filePath") String filePath,
            @RequestParam(value = "fileName") String fileName,
            @RequestParam(value = "configName") String configName) {
        QueryParamDTO queryParam = new QueryParamDTO();
        queryParam.setFilePath(filePath);
        queryParam.setFileName(fileName);
        queryParam.setConfigName(configName);
        Map<String, String> result = userService.importExcelData(file, queryParam);
        String error = result.get("error");
        if (error != null) {
            return R.error(500, error);
        }
        return R.ok().put("data", result);
    }
}
4、业务层代码编写(其实就是把上面这几个步骤连起来即可)
/**
 * @description:
 * @date: 2022/5/1 18:04
 */
@Service(value = "userService")
public class UserServiceImpl implements UserService {
    @Autowired
    private UserDao userDao;

    @Autowired
    private ExcelService excelService;

    @Override
    public Map<String, String> importExcelData(MultipartFile file, QueryParamDTO queryParam) {
        Map<String, String> result = new HashMap<>();
        // 1.获取Excel标题、实体、表字段的映射关系
        ExcelConfig configInfo = XmlParser.getConfigInfo(queryParam.getFilePath(), queryParam.getFileName(), queryParam.getConfigName());
        if (configInfo == null) {
            result.put("error", "导入失败无法找到配置信息!");
            return result;
        }
        // 2.解析Excel数据
        List<Map<String, Cell>> excelData = excelService.resolveExcelData(file);
        if (excelData == null || excelData.size() == 0) {
            result.put("error", "导入失败Excel文件解析失败");
            return result;
        }
        // 3.基于配置文件封装Excel数据(封装成实体)
        List<UserEntity> entityList = excelService.convertEntity(configInfo, excelData, UserEntity.class);
        if (CollectionUtils.isEmpty(entityList)) {
            result.put("error", "获取实体信息失败");
            return result;
        }
        // 4.保存
        int listSize = entityList.size();
        int toIndex = 100;
        for (int i = 0; i < listSize; i += 100) {
            if ((i + 100) > listSize) {
                toIndex = listSize - i;
            }
            // 每次保存100
            List<UserEntity> subList = entityList.subList(i, i + toIndex);
            if (subList.size() > 0) {
                userDao.saveAll(subList);
            }
        }
        result.put("success", String.format("保存成功%s个", listSize));
        return result;
    }
}
5、保存数据测试
懒得写前端页面了,我们直接使用Postman测试即可,例如:

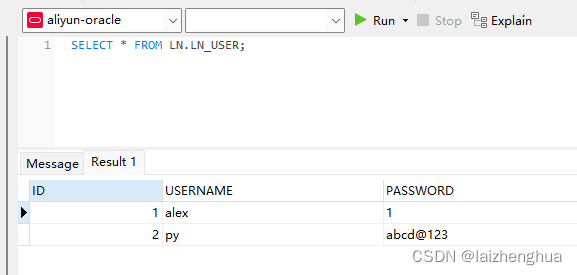
再来看数据库中有没有数据。
OK,到这里Excel数据入库的功能已经实现了!代码和配置文件还有许多可以扩展的东西,例如可以制作详细导入报告,可以返回给前端哪一行或哪一个单元格数据为空或格式不对的错误信息。另外应该支持执行多次接口,保证执行结果都一样。xml配置文件应该设计一个字段唯一主键标识,保证导入不重复的数据等等,都可以基于以上代码进行灵活的扩展。
2.7、Excel导出功能开发
导出功能也很简单,我们只需要基于xml解析器获取配置信息,再从数据库里面查询所有Java实体(当然可以根据条件查询!使用请求参数进行绑定即可),再把Java实体集合转成excel表通过流的形式返回给前端。这样前端就能下载到本地。
1、控制层业务代码示例
/**
 * @description:
 * @date: 2022/4/26 22:15
 */
@RestController
@RequestMapping(value = "/user")
public class UserController {
    @Autowired
    private UserDao userDao;
    @Autowired
    private UserService userService;

    /**
     * Excel导出数据接口
     * @param response
     * @return
     */
    @RequestMapping(value = "/excel/export", method = RequestMethod.GET)
    @CrossOrigin(origins = "*")
    public void exportData2(@RequestParam(value = "filePath") String filePath, @RequestParam(value = "fileName") String fileName,
                            @RequestParam(value = "configName") String configName, HttpServletResponse response) {
        QueryParamDTO queryParam = new QueryParamDTO();
        queryParam.setFilePath(filePath);
        queryParam.setFileName(fileName);
        queryParam.setConfigName(configName);
        userService.exportData(queryParam, response);
    }
}
2、业务层代码封装代码示例
/**
 * @description:
 * @date: 2022/5/1 18:04
 */
@Service(value = "userService")
public class UserServiceImpl implements UserService {

    private static final org.apache.logging.log4j.Logger log = org.apache.logging.log4j.LogManager.getLogger(UserServiceImpl.class);

    @Autowired
    private UserDao userDao;

    @Autowired
    private ExcelService excelService;

    @Override
    public String exportData(QueryParamDTO queryParam, HttpServletResponse response) {
        // 1.获取xml配置信息
        ExcelConfig configInfo = XmlParser.getConfigInfo(queryParam.getFilePath(), queryParam.getFileName(), queryParam.getConfigName());
        if (configInfo == null) {
            return "导出失败!无法找到[configName=" + queryParam.getConfigName() + "]的配置信息";
        }
        // 2.获取数据库数据
        List<UserEntity> userList = userDao.findAll();
        if (CollectionUtils.isEmpty(userList)) {
            return "导出失败!数据库数据为空";
        }
        // 3.根据配置信息,将Java实体数据写入Excel表里
        File file = new File(configInfo.getName() + ".xlsx");
        if (!file.exists()) {
            try {
                file.createNewFile();
            } catch (IOException e) {
                log.error(e);
            }
        }
        FileOutputStream fos = null;
        InputStream inputStream = null;
        try {
            fos = new FileOutputStream(file);
            excelService.writeOutputStreamByConfig(configInfo, userList, fos);
            // 设置 ContentType
            String fileName = URLEncoder.encode(file.getName(), "utf-8");
            response.setContentType("application/octet-stream"); // application/vnd.ms-excel;charset=utf-8
            response.setHeader("Content-Disposition",
                    "attachment; filename=\"" + fileName + "\"");
            // 把文件以流的形式写入
            ServletOutputStream outputStream = response.getOutputStream();
            inputStream = new FileInputStream(file);
            excelService.write(inputStream, outputStream);
            response.getOutputStream().close();
        } catch (IOException e) {
            log.error(e);
        } finally {
            if (fos != null) {
                try {
                    fos.close();
                } catch (IOException e) {
                    log.error(e);
                }
            }
            if (inputStream != null) {
                try {
                    inputStream.close();
                } catch (IOException e) {
                    log.error(e);
                }
            }
            file.delete();
        }
        return "导出成功!";
    }
}
需要注意的是,前面解析XML配置信息和查询数据库信息都和导入一样,不同的是封装在ExcelService上的两个方法,第一个方法负责把Java实体通过XML配置信息转成Excel表。第二个方法负责把Excel文件以流的形式写入response中
<E> void writeOutputStreamByConfig(ExcelConfig config, List<E> list, FileOutputStream fos);void write(InputStream inputStream, OutputStream outputStream);
@Override
public <E> void writeOutputStreamByConfig(ExcelConfig config, List<E> list, FileOutputStream fos) {
    // 创建Excel文件
    Workbook wb = new XSSFWorkbook();
    // 创建工作表
    Sheet sheet = wb.createSheet(config.getName());
    // 设置单元格居中
    CellStyle cellStyle = wb.createCellStyle();
    cellStyle.setAlignment(HorizontalAlignment.GENERAL);

    // 单元格赋值
    Row titleRow = null; // 标题列
    int index = 0; // 列索引
    List<ColumnConfig> columnConfigList= config.getColumnConfigList();
    for (E entity : list) {
        Field[] fields = entity.getClass().getDeclaredFields();
        Row row = sheet.createRow(index + 1);
        int cellIndex = 0; // 单元格索引
        for (ColumnConfig column : columnConfigList) {
            String title = column.getTitle(); // excel标题
            String name = column.getName(); // 实体属性名
            String type = column.getType(); // 属性类型
            for (Field field : fields) {
                if (field.getName().equals(name) && field.getType().getSimpleName().equals(type)) {
                    if (index == 0) {
                        if (titleRow == null) {
                            titleRow = sheet.createRow(index);
                        }
                        Cell cell = titleRow.createCell(cellIndex);
                        cell.setCellValue(title);
                    }
                    Cell cell = row.createCell(cellIndex);
                    try {
                        field.setAccessible(true); // 取消访问检查
                        Object value = field.get(entity);
                        setCellValue(cell, value, field.getType());
                    } catch (Exception e) {
                        log.error(e);
                    }
                    cellIndex++;
                }
            }
        }
        index++;
    }
    try {
        wb.write(fos);
    } catch (IOException e) {
        log.error(e);
    }
}

@Override
public void write(InputStream inputStream, OutputStream outputStream) {
    byte[] buffer = new byte[4096];
    try {
        int count = inputStream.read(buffer, 0, buffer.length);
        while (count != -1) {
            outputStream.write(buffer, 0, count);
            count = inputStream.read(buffer, 0, buffer.length);
        }
    } catch (RuntimeException e) {
        throw e;
    } catch (Exception e) {
        throw new RuntimeException(e.getMessage(), e);
    }
}
3、简单编写前端页面与按钮,测试导入功能
<!DOCTYPE html>
<html lang="en">

<head>
    <meta charset="UTF-8">
    <meta http-equiv="X-UA-Compatible" content="IE=edge">
    <meta name="viewport" content="width=device-width, initial-scale=1.0">
    <title>Document</title>
    <!--<script src="./index.js"></script>-->
    <script type="text/javascript" src="https://cdn.staticfile.org/jquery/3.6.0/jquery.min.js"></script>
</head>
<body>
    <input type="button" value="导出" id="btn">
    <script>
        function paramToQueryUrl(param) {
            if (!param) {
                return null;
            }
            var paramList = [];
            for (var key in param) {
                paramList.push(key + "=" + param[key]);
            }
            return "?" + paramList.join("&");
        }

        $(function () {
            var url = "http://127.0.0.1:8080/user/excel/export";
            $("#btn").click(function () {
                var param = {
                    filePath: "config",
                    fileName: "test.xml",
                    configName: "userEntity"
                };
                window.open(url + paramToQueryUrl(param));
            });
        });
    </script>
</body>
</html>
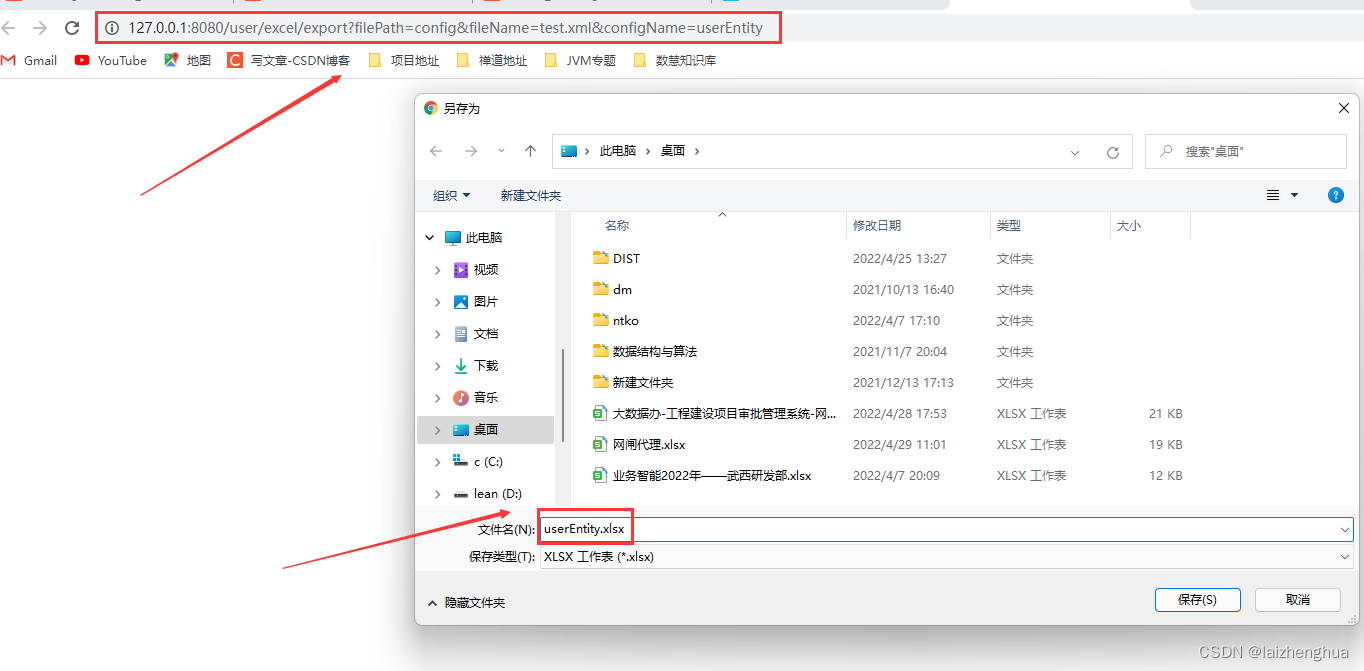
前端页面也很简单,就是编写了一个导出按钮,点击导出按钮后触发一个事件!如下图所示
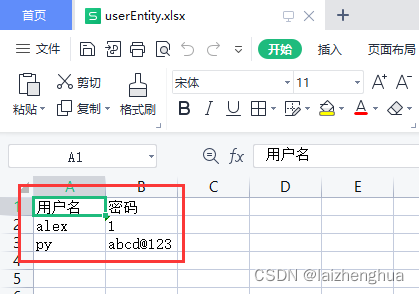
再来看Excel表里面的数据是否正确
OK完美。
2.8、总结
到这里基于XML配置文件完成Excel数据的导入与导出功能已经完整实现了。个人能力有限,也有许多设计不合理的地方。当然在这里只是给大家提供一种思路,在项目中灵活使用自定义的XML配置文件,然后自己去解析配置信息。去满足特定的应用场景。如有疑问欢迎大家私我。
3、完整代码Gitee地址
gitee地址:https://gitee.com/laizhenghua/example


 436
436


 被折叠的 条评论
为什么被折叠?
被折叠的 条评论
为什么被折叠?
 到【灌水乐园】发言


