


Ehcache缓存
说道缓存,大家想到的是一定是Redis,确实在国内Redis被大量应用,推上了新的高度!但是不一定所有的场合都要使用Redis,例如服务器资源紧缺,集成不方便的时候就可以考虑使用本地缓存。
1、Ehcache简介
1.1、概述
缓存应该是每个系统都要考虑的架构,缓存不仅可以加速系统的访问速度还可以提升系统的性能。如我们需要经常访问的高频热点数据,如果把它缓存起来就能有效减少数据库服务器的压力。手机验证码等有一定的失效时间,我们就可以考虑使用缓存,等失效时间过了,就删掉验证码。因此市面上缓存组件也层出不进,常见的有
JCache:Java缓存API。由JSR107定义,定义了5个核心接口,分别是CachingProvider,CacheManager,Cache,Entry和ExpriyEhCache:纯Java的进程内缓存框架,jvm虚拟机中缓存、速度快,效率高,是Hibernate中默认的CacheProvider,但是共享缓存与集群分布式应用整合不方便Redis:生态完善,通过socket访问缓存服务,效率上是比EhCache低的,但是在集群模式、分布式应用上就比较成熟,是大型应用首先中间件Caffeine:Caffeine是使用Java8对Guava缓存的重写版本,有人称它为缓存之王
本文也是主要介绍Ehcache本地缓存的使用,相对来说使用还是比较广泛,出现时间也比较早,拥有的优点也不少,能满足大多数场景,非常适合做本地缓存。
主要的特性有:
- 快速
- 简单
- 多种缓存策略(设置有效期等)
- 缓存数据有两级:内存和磁盘,因此无需担心容量问题
- 缓存数据会在虚拟机重启的过程中写入磁盘
- 可以通过RMI、可插入API等方式进行分布式缓存
- 具有缓存和缓存管理器的侦听接口
- 支持多缓存管理器实例,以及一个实例的多个缓存区域
- 提供Hibernate的缓存实现
jar包获取方式:
<!-- https://mvnrepository.com/artifact/net.sf.ehcache/ehcache -->
<dependency>
    <groupId>net.sf.ehcache</groupId>
    <artifactId>ehcache</artifactId>
    <version>2.10.6</version>
</dependency>
1.2、Spring缓存抽象
在Spring中使用缓存,就不得不说Spring中的缓存抽象。为了简化缓存的开发Spring从3.1开始定义了org.springframework.cache.Cache和org.springframework.cache.CacheManager接口来统一不同的缓存技术或组件。例如 JCache、 EhCache、 Hazelcast、 Guava、 Redis 等,具体规范如下:
- Cache接口为缓存的组件规范定义,包含缓存的各种操作集合
- Cache接口下Spring提供了各种xxxCache的实现。如RedisCache,EhCacheCache ,ConcurrentMapCache等
- 每次调用需要缓存功能的方法时,Spring会检查检查指定参数的指定的目标方法是否已经被调用过。如果有就直接从缓存中获取方法调用后的结果,如果没有就调用方法并缓存结果后返回给用户。下次调用直接从缓存中获取。
因此我们在使用这些缓存组件的时候,一定要告诉Spring我们使用的是哪一种(注册实现CacheManager接口的Bean,都不注册则会使用ConcurrentMapCacheManager默认缓存实现)。
在缓存抽象中也支持使用JCache(JSR-107)的注解去大大简化我们的开发。
| 相关注解或概念 | 说明 |
|---|---|
| Cache | 缓存接口,定义缓存操作。实现有:RedistCache、EhCacheCache、ConcurrentMapCache等 |
| CacheManager | 缓存管理器,管理各种缓存(Cache)组件 |
| @Cacheable | 主要针对方法配置,能够根据方法的请求参数对其结果进行缓存 |
| @CacheEvict | 清空缓存 |
| @CachePut | 保证方法被调用,又希望结果被缓存 |
| @EnableCaching | 开启基于注解的缓存 |
| keyGenerator | 缓存数据时key生成策略 |
| serialize | 缓存数据时value序列化策略 |
2、SpringBoot集成Ehcache
2.1、缓存效果初体验
使用SpringBoot的初始化向导或Maven快速搭建一个工程,并添加如下依赖pom.xml
<?xml version="1.0" encoding="UTF-8"?>
<project xmlns="http://maven.apache.org/POM/4.0.0"
         xmlns:xsi="http://www.w3.org/2001/XMLSchema-instance"
         xsi:schemaLocation="http://maven.apache.org/POM/4.0.0 http://maven.apache.org/xsd/maven-4.0.0.xsd">
    <modelVersion>4.0.0</modelVersion>

    <groupId>com.laizhenghua</groupId>
    <artifactId>cache-sample</artifactId>
    <version>1.0-SNAPSHOT</version>
    <properties>
        <java.version>1.8</java.version>
    </properties>
    <dependencies>
        <!-- https://mvnrepository.com/artifact/org.springframework.boot/spring-boot-starter-web -->
        <dependency>
            <groupId>org.springframework.boot</groupId>
            <artifactId>spring-boot-starter-web</artifactId>
            <version>2.5.5</version>
        </dependency>
        <!-- https://mvnrepository.com/artifact/org.springframework.boot/spring-boot-starter-test -->
        <dependency>
            <groupId>org.springframework.boot</groupId>
            <artifactId>spring-boot-starter-test</artifactId>
            <version>2.5.5</version>
            <scope>test</scope>
        </dependency>
        <!-- https://mvnrepository.com/artifact/com.alibaba/fastjson -->
        <dependency>
            <groupId>com.alibaba</groupId>
            <artifactId>fastjson</artifactId>
            <version>1.2.75</version>
        </dependency>
        <!-- https://mvnrepository.com/artifact/net.sf.ehcache/ehcache -->
        <dependency>
            <groupId>net.sf.ehcache</groupId>
            <artifactId>ehcache</artifactId>
            <version>2.10.6</version>
        </dependency>
        <!-- https://mvnrepository.com/artifact/org.springframework.boot/spring-boot-starter-cache -->
        <dependency>
            <groupId>org.springframework.boot</groupId>
            <artifactId>spring-boot-starter-cache</artifactId>
            <version>2.5.5</version>
        </dependency>
    </dependencies>
</project>
我们暂时先添加这些依赖,等往后用到什么添加什么即可。
1、编写主程序,添加@EnableCaching注解
/**
 * @description: 主程序
 * @author: laizhenghua
 * @date: 2022/5/4 17:06
 */
@EnableCaching // 开启基于注解的缓存
@SpringBootApplication
public class ApplicationMain {
    public static void main(String[] args) {
        SpringApplication.run(ApplicationMain.class, args);
    }
}
2、在resources目录下,编写ehcache.xml配置文件(配置文件一般放在resources目录下),这个文件怎么编写呢?在ehcache依赖jar包中找到ehcache-failsafe.xml文件,如下图所示:

把文件内容复制到ehcache.xml,注释内容去掉,新增一个Cache标签并改造文件内容(注意Cache标签配置信息不能为空否则启动程序会报错(不能只有默认的defaultCache缓存组件),标签属性先按照以下配置后面会讲具体含义),如下所示
ehcache.xml
<?xml version="1.0" encoding="UTF-8"?>
<ehcache xmlns:xsi="http://www.w3.org/2001/XMLSchema-instance" xsi:noNamespaceSchemaLocation="http://ehcache.org/ehcache.xsd">
    <diskStore path="java.io.tmpdir"/>
    <!-- defaultCache -->
    <defaultCache
            maxElementsInMemory="10000"
            eternal="false"
            timeToIdleSeconds="120"
            timeToLiveSeconds="120"
            maxElementsOnDisk="10000000"
            diskExpiryThreadIntervalSeconds="120"
            memoryStoreEvictionPolicy="LRU">
        <persistence strategy="localTempSwap"/>
    </defaultCache>
    <!-- userEntityCache(有效期5min) -->
    <cache name="userEntityCache" maxElementsInMemory="10" eternal="false"
           timeToIdleSeconds="60"
           timeToLiveSeconds="300"
           overflowToDisk="true"
           memoryStoreEvictionPolicy="LRU"/>
</ehcache>
3、编写application.properties配置文件与EhCacheCacheManager类型的bean实例(指定Spring缓存抽象Cache接口和CacheManager实现是什么)
application.properties
# 指定缓存组件的配置文件
spring.cache.ehcache.config=classpath:cache/ehcache.xml
EhCacheConfiguration.class(注意这个类是我们自己新增的)
/**
 * @description: EhCache的配置类
 * @author: laizhenghua
 * @date: 2022/5/4 20:08
 */
@Configuration
@EnableConfigurationProperties(CacheProperties.class) // 这样写的好处就是与配置文件的配置信息进行绑定
public class EhCacheConfiguration {

    private final CacheProperties cacheProperties;

    public EhCacheConfiguration(CacheProperties cacheProperties) {
        this.cacheProperties = cacheProperties;
    }

    @Bean
    public EhCacheManagerFactoryBean ehCacheManagerFactory() {
        EhCacheManagerFactoryBean ehCacheManagerFactory = new EhCacheManagerFactoryBean();
        ehCacheManagerFactory.setConfigLocation(cacheProperties.resolveConfigLocation(cacheProperties.getEhcache().getConfig()));
        ehCacheManagerFactory.setShared(true);
        return ehCacheManagerFactory;
    }

    @Bean
    public EhCacheCacheManager ehCacheCacheManager(EhCacheManagerFactoryBean ehCacheManagerFactory) {
        return new EhCacheCacheManager(ehCacheManagerFactory.getObject());
    }
}
4、编写控制层业务代码
/**
 * @description:
 * @author: laizhenghua
 * @date: 2022/5/4 17:54
 */
@RestController
@RequestMapping(value = "/user")
public class UserController {
    @Autowired
    private UserService userService;

    @RequestMapping(value = "/getList", method = RequestMethod.GET)
    public R getList() {
        return R.ok().put("data", userService.getList());
    }
}
5、编写业务层测试代码(注意@Cacheable注解的使用value属性就是ehcache.xml配置文件上配置的缓存名称)
/**
 * @description:
 * @author: laizhenghua
 * @date: 2022/5/4 17:55
 */
@Service(value = "userService")
public class UserServiceImpl implements UserService {

    private static final org.apache.logging.log4j.Logger log = org.apache.logging.log4j.LogManager.getLogger(UserServiceImpl.class);

    @Override
    @Cacheable(value = "userEntityCache", key = "#root.method.name") // 使用方法名作为缓存的key
    public List<String> getList() {
        log.info("query user list start"); // 启动项目 多次请求接口 观察此日志的输出情况就能看到效果
        List<String> dataList = new ArrayList<>();
        dataList.add("Java");
        dataList.add("Python");
        dataList.add("C/C++");
        dataList.add("PHP");
        return dataList;
    }
}
6、发起多次请求,观察日志输出情况!就能看到效果。
需要注意的是不是所有的方法加上@Cacheable注解后方法结果就会被缓存。Spring缓存抽象中注解@Cacheable也是基于面向切面的思想做的,在执行目标方法之前处理缓存逻辑!实际上就是使用动态代理,创建实例的时候注入的是代理对象,在代理对象里面先处理缓存逻辑,看有没有命中缓存,如果命中缓存则直接返回缓存,否则调用目标方法,再把结果缓存因此目标方法一定是能被Spring代理到,缓存才会生效。很多初学者遇到缓存不生效也是这个原因。
后面在介绍怎么优化这种情况。
2.2、验证缓存组件走的是EhCacheCache
我们发现前面给方法加上@Cacheable注解后,如果方法参数相同,再次调用方法时,SpringBoot将不再执行目标方法,而是直接返回了结果,实现这一过程的原理又是什么呢?
/**
 * {@link ImportSelector} to add {@link CacheType} configuration classes.
 */
 // 这个静态类是 CacheAutoConfiguration 自动配置类旗下的一个静态类
static class CacheConfigurationImportSelector implements ImportSelector {

	@Override
	public String[] selectImports(AnnotationMetadata importingClassMetadata) {
		CacheType[] types = CacheType.values();
		String[] imports = new String[types.length];
		for (int i = 0; i < types.length; i++) {
			imports[i] = CacheConfigurations.getConfigurationClass(types[i]);
		}
		return imports;
	}

}
一切都要从自动配置类CacheAutoConfiguration的静态类CacheConfigurationImportSelector加载缓存配置类说起,SpringBoot启动的时候,加载所有缓存自动配置类,如下图所示
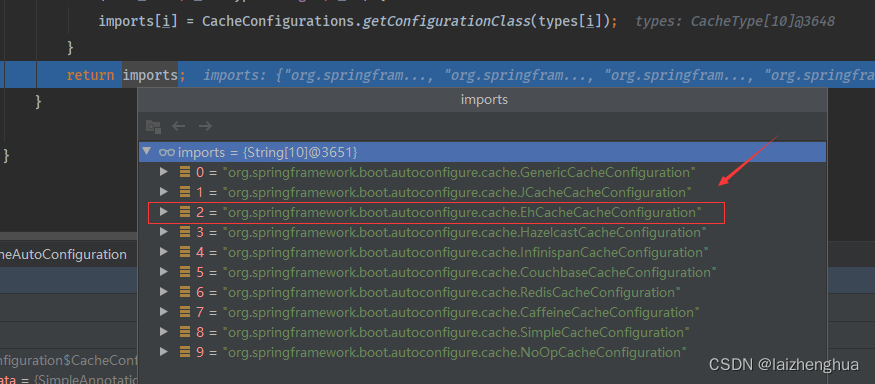
那么这么多自动缓存配置类,最终哪一个类会生效或配置类中声明的Bean注入IOC容器中呢?在没有导入Redis、Ehcache等配置类时,默认生效的是SimpleCacheConfiguration这个配置类时,这个默认生效的Cache实现类是ConcurrentMapCache本地map缓存。而上面案例我们是导入Ehcach了配置信息,此时生效的应该是EhCacheCacheConfiguration这个自动缓存配置类。
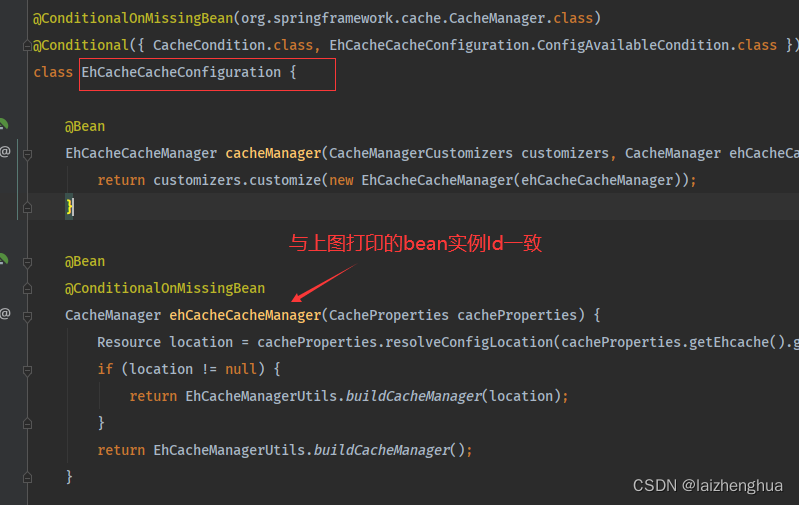
验证如下(主程序中打印IOC容器bean的Id):
/**
 * @description: 主程序
 * @author: laizhenghua
 * @date: 2022/5/4 17:06
 */
@EnableCaching // 开启基于注解的缓存
@SpringBootApplication
public class ApplicationMain {
    public static void main(String[] args) {
        ConfigurableApplicationContext applicationContext = SpringApplication.run(ApplicationMain.class, args);
        String[] beanDefinitionNames = applicationContext.getBeanDefinitionNames();
        for (String name : beanDefinitionNames) {
            if (name.startsWith("eh")) {
                System.out.println(name);
            }
        }
    }
}

到这里大家可能会有一个疑问,为什么仅凭这样我就敢断定缓存组件CacheManager或Spring缓存抽象Cache接口的实现类走的是EhCacheCache?就是我们加入ehcache配置类后,EhCacheCacheConfiguration缓存配置类就生效了
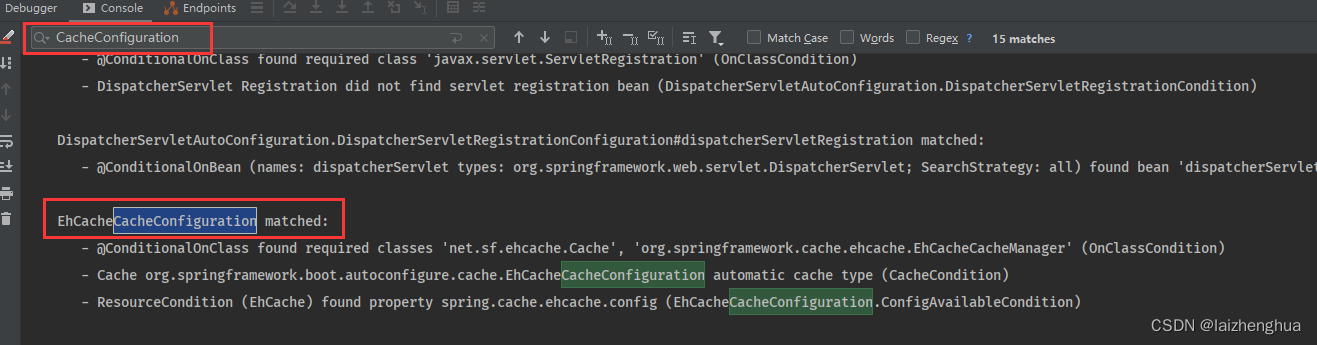
或者是可以在application.properties配置文件中设置debug=true,查看打印的自动配置类例如:
2.3、ehcache.xml配置文件详解
这个文件只有一个作用,就是通过cache标签声明一个个缓存组件,我们可以在这里指定缓存的一些属性和缓存策略如有效期、是否保存到磁盘等,详细属性含义如下
<!-- userEntityCache(有效期5min) -->
<cache name="userEntityCache" maxElementsInMemory="10" eternal="false"
       timeToIdleSeconds="60"
       timeToLiveSeconds="300"
       overflowToDisk="true"
       memoryStoreEvictionPolicy="LRU"/>

<!--
name                            缓存名称
eternal                         true表示对象永不过期,此时会忽略timeToIdleSeconds和timeToLiveSeconds属性,默认为false
timeToIdleSeconds               设定允许对象处于空闲状态的最长时间,以秒为单位。当对象自从最近一次被访问后,如果处于空闲状态的时间超过了timeToIdleSeconds属性值,这个对象就会过期,EHCache将把它从缓存中清空。只有当eternal属性为false,该属性才有效。如果该属性值为0,则表示对象可以无限期地处于空闲状态
timeToLiveSeconds               设定对象允许存在于缓存中的最长时间,以秒为单位。当对象自从被存放到缓存中后,如果处于缓存中的时间超过了 timeToLiveSeconds属性值,这个对象就会过期,EHCache将把它从缓存中清除。只有当eternal属性为false,该属性才有效。如果该属性值为0,则表示对象可以无限期地存在于缓存中。timeToLiveSeconds必须大于timeToIdleSeconds属性,才有意义
maxElementsInMemory             内存中最大缓存对象数;maxElementsInMemory界限后,会把溢出的对象写到硬盘缓存中。注意:如果缓存的对象要写入到硬盘中的话,则该对象必须实现了Serializable接口才行
memoryStoreEvictionPolicy       当达到maxElementsInMemory限制时,Ehcache将会根据指定的策略去清理内存。可选策略有:LRU(最近最少使用,默认策略)、FIFO(先进先出)、LFU(最少访问次数)
maxElementsOnDisk               硬盘中最大缓存对象数,若是0表示无穷大
overflowToDisk                  是否保存到磁盘,当系统宕机时
diskPersistent                  是否缓存虚拟机重启期数据,是否持久化磁盘缓存,当这个属性的值为true时,系统在初始化时会在磁盘中查找文件名为cache名称,后缀名为index的文件,这个文件中存放了已经持久化在磁盘中的cache的index,找到后会把cache加载到内存,要想把cache真正持久化到磁盘,写程序时注意执行net.sf.ehcache.Cache.put(Element element)后要调用flush()方法
diskSpoolBufferSizeMB           这个参数设置DiskStore(磁盘缓存)的缓存区大小。默认是30MB。每个Cache都应该有自己的一个缓冲区
diskExpiryThreadIntervalSeconds 磁盘失效线程运行时间间隔,默认为120秒
clearOnFlush                    内存数量最大时是否清除
-->
在项目中我们集成Ehcache时配置缓存组件根据实际情况进行调整与配置即可。
2.4、JSR-107缓存注解
光知道SpringBoot集成Ehcache还不够,我们还要知道怎么使用。然而ehcache在实际应用中可以抽离出来单独使用,但是需要自己手动实例化与put数据,一般不推荐。推荐配合JSR-107缓存注解去使用(因为Spring都给我们封装好了),Spring的缓存功能丰富,它还提供了很多注解,去完成不同的场景~其中使用最多的是@Cacheable注解。
1、@Cacheable
/*
@Cacheable几个属性:
	1.cacheNames/value:缓存组件的名字
	2.key:指定缓存数据使用的key,默认使用方法参数的值,可以编写SpEL进行指定,如#id就是参数的值
	3.keyGenerator:key的生成器,可以自己指定key的生成器的组件id,使用时key/keyGenerator只能二选一
	4.cacheManager:指定缓存管理器,或者cacheResolver指定获取解析器
	5.condition:指定复合条件的情况下才缓存,如condition = "#id > 0"
	6.unless:否定缓存,当unless指定的条件为true,方法的返回值就不会被缓存,如 unless = "#result == null"
	7.sync:是否启用异步模式,如果启用unless就不支持了。默认为false
	8.缓存的值就是方法返回的结果
*/
// 使用示例
@Override
@Cacheable(value = "userEntityCache", key = "#id", condition = "#id > 0") // 使用方法名参数id作为缓存的key
public UserEntity getByID(Integer id) {
    ...
}
关于SpEL(Cache SpEL available metadata)表达式:
| 名字 | 位置 | 描述 | 示例 |
|---|---|---|---|
| methodName | root object | 当前被调用的方法名 | #root.methodName |
| method | root object | 当前被调用的方法 | #root.method.name |
| target | root object | 当前被调用的目标对象 | #root.target |
| targetClass | root object | 当前被调用的目标对象类 | #root.targetClass |
| args | root object | 当前被调用的方法的参数列表 | #root.args[0] |
| caches | root object | 当前方法调用使用的缓存列表(如@Cacheable(value={"cache1", "cache2"})),则有两个cache | #root.caches[0].name |
| argument name | evaluation context | 方法参数的名字,可以直接 #参数名,也可以使用 #p0或#a0 的 形式,0代表参数的索引; | #iban 、 #a0 、 #p0 |
| result | evaluation context | 方法执行后的返回值(仅当方法执行之后的判断有效,如 unless,cache put的表达式 cache evict的表达式 beforeInvocation=false) | #result |
2、@CachePut注解:即调用方法,又更新缓存数据。如修改了某个数据库的某个数据,同时更新缓存。
执行过程:
- 先调用目标方法
- 将目标方法的结果缓存起来
@Override
@CachePut(cacheNames = {"employee"}, key = "#employeeEntity.id") // 这里的key必须和@Cacheable中指定的key一样
public EmployeeEntity updateEmployee(EmployeeEntity employeeEntity) {
    employeeMapper.updateEmployee(employeeEntity);
    return employeeEntity;
}
// 即调用方法也更新缓存,一般用在更新数据方法中
// key的写法还可以是这样:key = "#result.id"
3、@CacheEvict注解:缓存清除,一般在删除数据方法中使用
@Override
@CacheEvict(cacheNames = {"employee"}, key = "#id")
public Integer deleteEmployee(Integer id) {
    return employeeMapper.deleteEmployee(id);
}
/*
@Override
@CacheEvict(cacheNames = {"employee"}, key = "#id")
public Integer deleteEmployee(Integer id) {
    return employeeMapper.deleteEmployee(id);
}
/*
key:指定要清除的缓存
allEntries:是否清除这个缓存(cacheNames)中的所有数据。默认false
beforeInvocation:是否在方法执行之前清除缓存,默认false,如果方法出现异常是不会清除缓存的
*/
4、@Caching注解:定义复杂的缓存规则
// @Caching注解可以组合@Cacheable、@CachePut、@CacheEvict
public @interface Caching {

	Cacheable[] cacheable() default {};

	CachePut[] put() default {};

	CacheEvict[] evict() default {};

}

// 如
@Override
@Caching(
        cacheable = {@Cacheable(cacheNames = "employee", key = "#name")},
        put = {@CachePut(cacheNames = "employee", key = "#result.id"), @CachePut(cacheNames = "employee", key = "#result.email")})
public EmployeeEntity getEmployeeByName(String name) {
    return employeeMapper.getEmployeeByName(name);
}
5、@CacheConfig注解(抽取缓存公共配置):以上注解都是加在方法上,而这个注解是加在类上,即可以指定公共的cacheNames、cacheManager等,这样标注在方法上的注解,就可以不写cacheNames或其他属性。
2.5、SpringBoot缓存原理分析
说道原理就是简单看下SpringBoot关于缓存处理源码是怎么写的。说到底就是上面所说AOP思想,通过动态代理实现,目标方法让代理对象去调用,调用之前先看下缓存有没有,如果有,则从缓存上获取结果并直接返回。如果缓存中没有则执行目标方法,并把方法执行结果缓存。就是这么一个过程我们以默认Cache的实现ConcurrentMapCache与@Cacheable注解功能为例,来看下SpringBoot是如何书写的。
1、方法运行之前,CacheManager先获取相应的缓存,再去查询Cache(缓存组件),按照caheNames指定的名字获取。根据caheNames第一次获取缓存,如果没有Cache组件会自动创建。
@Override
@Nullable
public Cache getCache(String name) { // 这里的name参数就是@Cacheable注解指定caheNames的值
	Cache cache = this.cacheMap.get(name);
	if (cache == null && this.dynamic) {
		synchronized (this.cacheMap) {
			cache = this.cacheMap.get(name);
			if (cache == null) {
				cache = createConcurrentMapCache(name); // 没有则创建Cache组件
				this.cacheMap.put(name, cache);
			}
		}
	}
	return cache;
}
2、去Cache中查找缓存的内容,使用一个key,默认就是方法的参数。key是按照某种策略生成的,默认是使用keyGenerator生成的,默认使用SimpleKeyGenerator实现类生成key。(如果在@Cacheable中指定了key,如key = "#id"则使用指定的,不使用SimpleKeyGenerator实现类生成key)
@Nullable
protected Object generateKey(@Nullable Object result) {
	if (StringUtils.hasText(this.metadata.operation.getKey())) {
		EvaluationContext evaluationContext = createEvaluationContext(result);
		return evaluator.key(this.metadata.operation.getKey(), this.metadata.methodKey, evaluationContext);
	}
	return this.metadata.keyGenerator.generate(this.target, this.metadata.method, this.args);
	// SimpleKeyGenerator 生成策略
	/*
	public static Object generateKey(Object... params) {
		if (params.length == 0) {
			return SimpleKey.EMPTY; // 方法参数为空
		}
		if (params.length == 1) { // 有一个参数 则使用第一个参数作为key
			Object param = params[0];
			if (param != null && !param.getClass().isArray()) {
				return param;
			}
		}
		return new SimpleKey(params); // 多个参数
	}
	*/
}
3、根据key如果没有查到缓存就调用目标方法
@Nullable
private Cache.ValueWrapper findInCaches(CacheOperationContext context, Object key) {
	for (Cache cache : context.getCaches()) {
		Cache.ValueWrapper wrapper = doGet(cache, key); // 调用doGet()方法查找缓存
		if (wrapper != null) {
			if (logger.isTraceEnabled()) {
				logger.trace("Cache entry for key '" + key + "' found in cache '" + cache.getName() + "'");
			}
			return wrapper;
		}
	}
	return null;
}
4、将目标方法返回的结果,放进缓存中
public void apply(@Nullable Object result) { // result就是方法返回结果
	if (this.context.canPutToCache(result)) {
		for (Cache cache : this.context.getCaches()) {
			doPut(cache, this.key, result); // 调用doPut()方法将结果放入缓存中
		}
	}
}
总结下来就是:@Cacheable标准的方法执行之前先来检查缓存中没有这个数据,默认安装参数的值作为key去查询缓存,如果没有就运行方法并将结果放入缓存。
2.6、CacheService封装
前面我们也说了,不是所有的方法加上@Cacheable注解,方法的执行结果就能被缓存!但是我们就是想把一些方法的执行结果缓存,例如一些没有修改权限,别人写好的源代码或者本身不是接口实现类的方法又或者多个方法嵌套场景。像这类代码我们就可以在service上再封装一层CacheService。例如:
/**
 * @description:
 * @date: 2022/4/24 13:16
 */
public interface CacheService {
    boolean getOpenState();
    List<Dictionary> getDictionaryConfigInfo();
}

/**
 * @description: CacheService
 * @date: 2022/4/24 13:16
 */
public class CacheServiceImpl implements CacheService {
	@Autowired
    private WhiteIPValidateService whiteIPValidateService;

    @Override
    @Cacheable(value = "ipValidateOpenStateCache", key = "#root.method.name") // 使用方法名作为缓存数据的key
    public boolean getOpenState() {
        return whiteIPValidateService.getOpenState();
    }

    @Override
    @Cacheable(value = "ipConfigInfoCache", key = "#root.method.name") // 使用方法名作为缓存数据的key
    public List<Dictionary> getDictionaryConfigInfo() {
        return whiteIPValidateService.getDictionaryConfigInfo();
    }
}
在CacheService上完成目标方法的拦截!在其他地方就能灵活运用支持缓存的方法,例如:
@Autowired
private CacheService cacheService;

public void test() {
	boolean isOpen = cacheService.getOpenState();
	List<Dictionary> dictionaryList = cacheService.getDictionaryConfigInfo();
}
// 只要把CacheService注入进来,就能在任何地方使用缓存方法。
3、Spring集成Ehcache
为什么还要说Spring集成Ehcache呢?实际上SpringBoot已经迭代到3.0了,但是还有许多老项目不会随着版本的迭代而进行项目架构的迁移!还是会使用传统的配置文件方式,因此学会原生的集成方式也很重要。
然而Spring的集成方式也没有什么不同,只是注入bean实例的方式改为配置文件或注解的方式注入。
1、使用Maven快速构建一个maven工程,并添加如下依赖:
pom.xml
<?xml version="1.0" encoding="UTF-8"?>
<project xmlns="http://maven.apache.org/POM/4.0.0"
         xmlns:xsi="http://www.w3.org/2001/XMLSchema-instance"
         xsi:schemaLocation="http://maven.apache.org/POM/4.0.0 http://maven.apache.org/xsd/maven-4.0.0.xsd">
    <modelVersion>4.0.0</modelVersion>

    <groupId>com.laizhenghua</groupId>
    <artifactId>spring-ehcache</artifactId>
    <version>1.0-SNAPSHOT</version>
    <properties>
        <java.version>1.8</java.version>
    </properties>
    <dependencies>
        <!-- https://mvnrepository.com/artifact/org.springframework/spring-webmvc -->
        <!-- spring-webmvc 自己会下载其他依赖-->
        <dependency>
            <groupId>org.springframework</groupId>
            <artifactId>spring-webmvc</artifactId>
            <version>5.3.18</version>
        </dependency>
        <!-- https://mvnrepository.com/artifact/net.sf.ehcache/ehcache -->
        <dependency>
            <groupId>net.sf.ehcache</groupId>
            <artifactId>ehcache</artifactId>
            <version>2.10.6</version>
        </dependency>
        <!-- https://mvnrepository.com/artifact/org.springframework/spring-context-support -->
        <dependency>
            <groupId>org.springframework</groupId>
            <artifactId>spring-context-support</artifactId>
            <version>5.3.16</version>
        </dependency>
        <!-- https://mvnrepository.com/artifact/javax.servlet/javax.servlet-api -->
        <dependency>
            <groupId>javax.servlet</groupId>
            <artifactId>javax.servlet-api</artifactId>
            <version>3.1.0</version>
            <scope>provided</scope>
        </dependency>
        <!-- https://mvnrepository.com/artifact/com.alibaba/fastjson -->
        <dependency>
            <groupId>com.alibaba</groupId>
            <artifactId>fastjson</artifactId>
            <version>1.2.76</version>
        </dependency>
    </dependencies>
</project>
2、编写ehcache.xml文件,不会编写的可以看上面SpringBoot集成章节
<?xml version="1.0" encoding="UTF-8"?>
<ehcache xmlns:xsi="http://www.w3.org/2001/XMLSchema-instance" xsi:noNamespaceSchemaLocation="http://ehcache.org/ehcache.xsd">
    <diskStore path="java.io.tmpdir"/>
    <!-- defaultCache -->
    <defaultCache
            maxElementsInMemory="10000"
            eternal="false"
            timeToIdleSeconds="120"
            timeToLiveSeconds="120"
            maxElementsOnDisk="10000000"
            diskExpiryThreadIntervalSeconds="120"
            memoryStoreEvictionPolicy="LRU">
        <persistence strategy="localTempSwap"/>
    </defaultCache>
    <!-- testCache(有效期5min) -->
    <cache name="testCache" maxElementsInMemory="10" eternal="false"
           timeToIdleSeconds="60"
           timeToLiveSeconds="300"
           overflowToDisk="true"
           memoryStoreEvictionPolicy="LRU"/>
</ehcache>
3、编写applicationContext.xml文件
applicationContext.xml
<?xml version="1.0" encoding="UTF-8"?>
<beans xmlns="http://www.springframework.org/schema/beans"
       xmlns:xsi="http://www.w3.org/2001/XMLSchema-instance" xmlns:cache="http://www.springframework.org/schema/cache"
       xmlns:context="http://www.springframework.org/schema/context"
       xmlns:mvc="http://www.springframework.org/schema/mvc"
       xsi:schemaLocation="http://www.springframework.org/schema/beans http://www.springframework.org/schema/beans/spring-beans.xsd http://www.springframework.org/schema/cache http://www.springframework.org/schema/cache/spring-cache.xsd http://www.springframework.org/schema/context https://www.springframework.org/schema/context/spring-context.xsd http://www.springframework.org/schema/mvc https://www.springframework.org/schema/mvc/spring-mvc.xsd">
    <!-- 开启注解支持 -->
    <context:annotation-config/>
    <!-- 指定扫描的package -->
    <context:component-scan base-package="com.laizhenghua.ehcache"/>
    <!-- ehCacheManagerFactory -->
    <bean id="ehCacheManagerFactory" class="org.springframework.cache.ehcache.EhCacheManagerFactoryBean">
        <property name="configLocation" value="classpath:cache/ehcache.xml"/>
    </bean>
    <!-- ehCacheManager -->
    <bean id="ehCacheManager" class="org.springframework.cache.ehcache.EhCacheCacheManager">
        <property name="cacheManager" ref="ehCacheManagerFactory"/>
    </bean>

    <!-- 启用缓存注解:cache-manager属性指定当前所使用的CacheManager对应的bean名称,默认是 cacheManager-->
    <cache:annotation-driven cache-manager="ehCacheManager"/>

    <!-- JsonHttpMessageConverter 配置:用于将Java对象转为JSON返回给前端-->
    <mvc:annotation-driven>
        <mvc:message-converters register-defaults="true">
            <!-- 避免IE执行AJAX时,返回JSON出现下载文件 -->
            <bean id="fastJsonHttpMessageConverter" class="com.alibaba.fastjson.support.spring.FastJsonHttpMessageConverter">
                <property name="supportedMediaTypes">
                    <list>
                        <value>application/json;charset=UTF-8</value>
                    </list>
                </property>
            </bean>
        </mvc:message-converters>
    </mvc:annotation-driven>
</beans>
4、编写web.xml文件
<?xml version="1.0" encoding="UTF-8"?>
<web-app xmlns="http://xmlns.jcp.org/xml/ns/javaee"
         xmlns:xsi="http://www.w3.org/2001/XMLSchema-instance"
         xsi:schemaLocation="http://xmlns.jcp.org/xml/ns/javaee http://xmlns.jcp.org/xml/ns/javaee/web-app_4_0.xsd"
         version="4.0">
    <display-name>Archetype Created Web Application</display-name>
    <!--注册Spring提供的过滤器,解决参数中文乱码问题-->
    <filter>
        <filter-name>characterEncodingFilter</filter-name>
        <filter-class>org.springframework.web.filter.CharacterEncodingFilter</filter-class>
        <init-param>
            <param-name>encoding</param-name>
            <param-value>UTF-8</param-value>
        </init-param>
    </filter>
    <filter-mapping>
        <filter-name>characterEncodingFilter</filter-name>
        <url-pattern>/*</url-pattern>
    </filter-mapping>

    <!--注册前端控制器DispatcherServlet-->
    <servlet>
        <servlet-name>dispatcherServlet</servlet-name>
        <servlet-class>org.springframework.web.servlet.DispatcherServlet</servlet-class>
        <init-param>
            <param-name>contextConfigLocation</param-name>
            <param-value>classpath:applicationContext.xml</param-value>
        </init-param>
        <!-- 启动顺序,数字越小,启动越早 -->
        <load-on-startup>1</load-on-startup>
    </servlet>
    <servlet-mapping>
        <servlet-name>dispatcherServlet</servlet-name>
        <url-pattern>/</url-pattern>
    </servlet-mapping>
</web-app>
5、统一返回类封装
/**
 * @description: 统一返回类封装
 * @author: laizhenghua
 * @date: 2022/5/14 11:41
 */
public class R extends HashMap<String, Object> {
    public R() {
        this.put("code", 200);
        this.put("state", "success");
    }
    public static R ok() {
        return new R();
    }
    public static R error(Integer code, String message) {
        R r = new R();
        r.put("code", code);
        r.put("state", "error");
        r.put("message", message);
        return r;
    }
    public R put(String key, Object value) {
        super.put(key, value);
        return this;
    }
}
6、编写业务方法进行缓存测试
controller
/**
* @description:
* @author: laizhenghua
* @date: 2022/5/14 11:40
*/
@RestController
@RequestMapping(value = "test")
public class TestController {
@Autowired
private TestService testService;
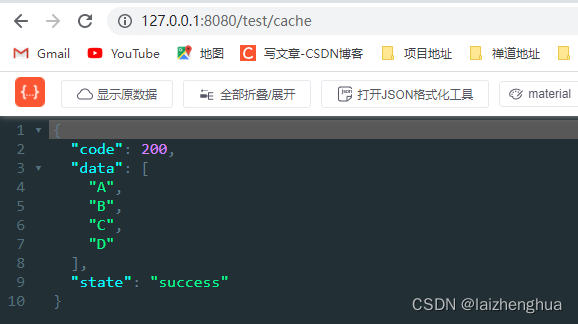
@RequestMapping(value = "/cache", method = RequestMethod.GET)
public R test() {
List<String> data = testService.getNameList();
return R.ok().put("data", data);
}
}
service
/**
 * @description:
 * @author: laizhenghua
 * @date: 2022/5/14 11:50
 */
@Service(value = "testService ")
public class TestServiceImpl implements TestService {
    @Override
    @Cacheable(value = "testCache", key = "#root.method.name")
    public List<String> getNameList() {
        System.out.println("====== method getNameList is run ======");
        List<String> list = new ArrayList<>();
        list.add("A");
        list.add("B");
        list.add("C");
        list.add("D");
        return list;
    }
}
最后重复调用接口,查看日志输出情况,或打断点进行测试即可。


 1229
1229


 被折叠的 条评论
为什么被折叠?
被折叠的 条评论
为什么被折叠?
 到【灌水乐园】发言


