


前言
Spring Security是一个提供身份验证,授权和保护以防止常见攻击的框架。
凭借对命令式和响应式应用程序的一流支持,它是用于保护基于Spring的应用程序的事实上的标准。
导入相关的jar
<!--     security启动器      -->
   <dependency>
            <groupId>org.springframework.boot</groupId>
            <artifactId>spring-boot-starter-security</artifactId>
        </dependency>
        <!--        web启动器    -->
          <dependency>
            <groupId>org.springframework.boot</groupId>
            <artifactId>spring-boot-starter-web</artifactId>
        </dependency>
        <!--  thymeleaf启动器          -->
        <dependency>
            <groupId>org.springframework.boot</groupId>
            <artifactId>spring-boot-starter-thymeleaf</artifactId>
        </dependency>
        <!--  thymeleaf整合security          -->
        <dependency>
            <groupId>org.thymeleaf.extras</groupId>
            <artifactId>thymeleaf-extras-springsecurity5</artifactId>
        </dependency>

        <dependency>
            <groupId>org.projectlombok</groupId>
            <artifactId>lombok</artifactId>
            <optional>true</optional>
        </dependency>
相关静态页面
这些静态页面仅供参考
index.html
security头文件
xmlns:sec="http://www.thymeleaf.org/extras/spring-security"
isAuthenticated()验证授权是否成功
sec:authorize="!isAuthenticated()"
获取认证成功的信息
sec:authentication="name"
根据授权成功的角色信息来展示内容
sec:authorize="hasRole('vip1')"
<!DOCTYPE html >
<html lang="en" xmlns:th="http://www.thymeleaf.org"
xmlns:sec="http://www.thymeleaf.org/extras/spring-security">
<head>
<meta charset="UTF-8">
<title>Title</title>
</head>
<body>
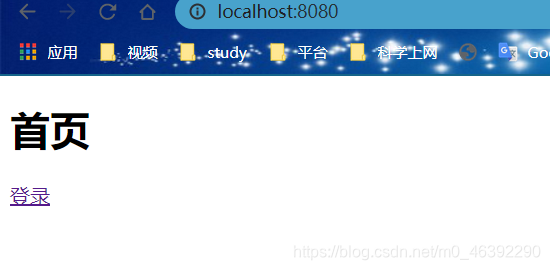
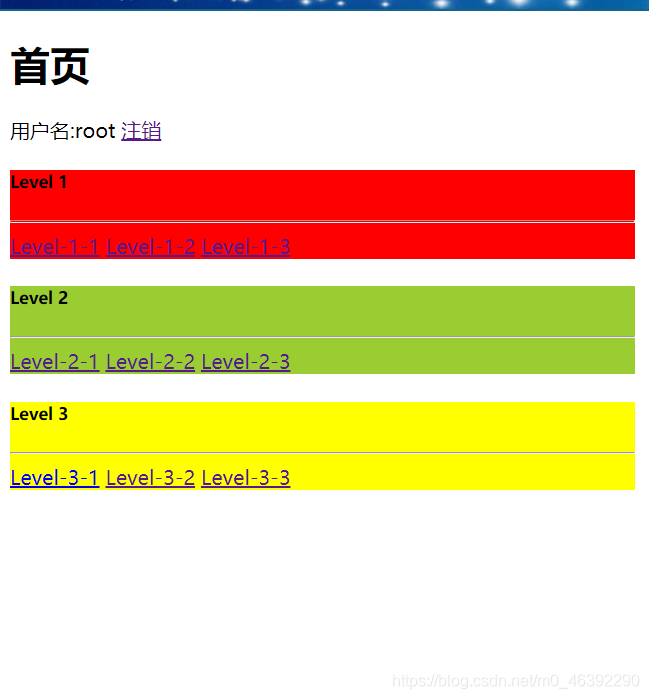
<h1>首页</h1>
<div>
<div sec:authorize="!isAuthenticated()">
<a th:href="@{/toLogin}">登录</a>
</div>
<div sec:authorize="isAuthenticated()">
用户名:<span sec:authentication="name"></span>
<!-- 角色:<span sec:authentication="principal.getPassword()"></span>-->
<a th:href="@{/logout}">注销</a>
</div>
</div>
<div style="background-color:red;width: 500px" sec:authorize="hasRole('vip1')">
<h5>Level 1</h5>
<hr>
<a href="/level1/1">Level-1-1</a>
<a href="/level1/2">Level-1-2</a>
<a href="/level1/3">Level-1-3</a>
</div>
<div style="background-color:yellowgreen;width: 500px" sec:authorize="hasRole('vip2')">
<h5>Level 2</h5>
<hr>
<a href="/level2/1" >Level-2-1</a>
<a href="/level2/2" >Level-2-2</a>
<a href="/level2/3" >Level-2-3</a>
</div>
<div style="background-color:yellow;width: 500px" sec:authorize="hasRole('vip3')">
<h5>Level 3</h5>
<hr>
<a href="/level3/1" >Level-3-1</a>
<a href="/level3/2" >Level-3-2</a>
<a href="/level3/3" >Level-3-3</a>
</div>
</body>
</html>
login.html
<!DOCTYPE html>
<html lang="en" xmlns:th="http://www.thymeleaf.org">
<head>
<meta charset="UTF-8">
<title>Title</title>
</head>
<body>
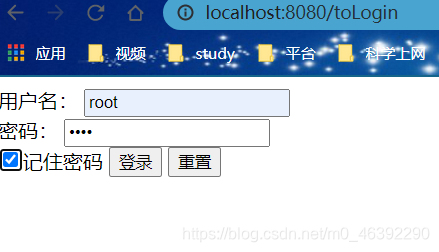
<form action="/login" method="post">
用户名:
<input type="text" name="unm" placeholder="请输入用户名" >
<br>
密码:
<input type="password" name="pwd" placeholder="请输入密码">
<br>
<input type="checkbox" name="remember">记住密码
<button type="submit" value="登录">登录</button>
<button type="reset" value="重置">重置</button>
</form>
</body>
</html>
level
<!DOCTYPE html>
<html lang="en">
<head>
    <meta charset="UTF-8">
    <title>Title</title>
</head>
<body>
  <h1>Hello level-1-1</h1>
</body>
</html>

ReouterController
@Controller
public class RouterController {

    @RequestMapping({"/","index"})
    public String index(){
        return "index";
    }
    @RequestMapping("/toLogin")
    public String login(){
        return "views/login";
    }
    @RequestMapping("/level1/{id}")
    public String level1(@PathVariable("id") int id){
        return "views/level1/"+id;
    }
    @RequestMapping("/level2/{id}")
    public String level2(@PathVariable("id") int id){
        return "views/level2/"+id;
    }
    @RequestMapping("/level3/{id}")
    public String level3(@PathVariable("id") int id){
        return "views/level3/"+id;
    }
}
核心
我们给这些页面添加相关的权限,实则就是添加过滤、拦截,但是我们先现在是使用的AOP的思想进行添加的,不会改动原来的代码。
两个核心的类
WebSecurityConfigurerAdapter安全适配器
AuthenticationManagerBuilder认证管理构建
//开启web安全
@EnableWebSecurity//继承这个web安全适配器 WebSecurityConfigurerAdapter
public class SecurityConfig extends WebSecurityConfigurerAdapter {
    @Override//重写configure http
    protected void configure(HttpSecurity http) throws Exception {
        //设置授权请求
        http.authorizeRequests()
               .antMatchers("/").permitAll()//所有人都可以访问
               .antMatchers("/level1/**").hasRole("vip1")//固定的角色访问
               .antMatchers("/level2/**").hasRole("vip2")
               .antMatchers("level3/**").hasRole("vip3");
       //开启默认的登录页面 授权信息不正确就会走到这个默认登录的界面
        http.formLogin()//默认走的是/login
                .loginPage("/toLogin")//修改称自己的登录页面
                .loginProcessingUrl("/login")//授权认证走的路径 action的路径一样
                .usernameParameter("unm")//使用自己的参数名 默认的是username
                .passwordParameter("pwd")//默认的是password
                .successForwardUrl("/");//授权成功跳转的页面 /在这里指的是首页

        //开启记住我 cookie,默认会存两周
        http.rememberMe().rememberMeParameter("remember");

        //  关闭网站防伪攻击 如果开启可能会造成登录失败
        http.csrf().disable();
        //开启注销功能 注销成功跳转之首页
       http.logout().logoutSuccessUrl("/");
    }

    @Override//开启登录认证
    protected void configure(AuthenticationManagerBuilder auth) throws Exception {
        //设置登录这的信息
            auth.inMemoryAuthentication().passwordEncoder(new BCryptPasswordEncoder())//给密码进行加密
                    .withUser("aw").password(new BCryptPasswordEncoder().encode("123")).roles("vip1").and()//设置角色
                    .withUser("admin").password(new BCryptPasswordEncoder().encode("admin")).roles("vip1","vip2").and()
                    .withUser("root").password(new BCryptPasswordEncoder().encode("root")).roles("vip1","vip2","vip3");

    }
}
首页


 5万+
5万+


 被折叠的 条评论
为什么被折叠?
被折叠的 条评论
为什么被折叠?
 到【灌水乐园】发言


