⭐简单说两句⭐
作者:后端小知识
CSDN个人主页:后端小知识
🔎GZH:
后端小知识🎉欢迎关注🔎点赞👍收藏⭐️留言📝
文章目录
Spring
说明下【本文是在网上听课做的笔记,代码是自己敲的,有些文字是复制的老师发的】
Spring框架介绍
Spring是一个轻量级的IoC和AOP的框架
IoC
控制反转
AOP
面向切面编程
Spring的功能
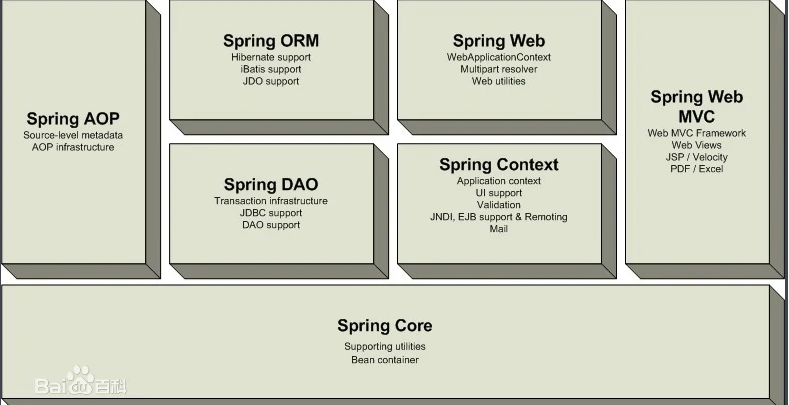
优点:
1)方便解耦,简化开发
Spring 就是一个大工厂,可以将所有对象的创建和依赖关系的维护交给 Spring 管理。
2)方便集成各种优秀框架
Spring 不排斥各种优秀的开源框架,其内部提供了对各种优秀框架(如 Struts2、Hibernate、MyBatis
等)的直接支持。
3)降低 Java EE API 的使用难度
Spring 对 Java EE 开发中非常难用的一些 API(JDBC、JavaMail、远程调用等)都提供了封装,使这些
API 应用的难度大大降低。
4)方便程序的测试
Spring 支持 JUnit4,可以通过注解方便地测试 Spring 程序。
5)AOP 编程的支持
Spring 提供面向切面编程,可以方便地实现对程序进行权限拦截和运行监控等功能。
6)声明式事务的支持
只需要通过配置就可以完成对事务的管理,而无须手动编程。
接口和Spring 是完美搭配
以前
public interface UserDAO{
    void save();
}
public class UserDAOImpl implements UserDAO{
    public void save(){
        ....
    }
}
public class UserServiceImpl implements UserService{
    private UserDAO userDAO = new UserDAOImpl();
    public void reg(){
        userDAO.save();
    }
}
----------------------------------------------------

public class UserDAOJDBCImpl implements UserDAO{
	public void save(){
		....
	}
}

public class UserServiceImpl implements UserService{
    private UserDAO userDAO;
    public void reg(){
        userDAO.save();
        ....
    }
}

我们在UserServiceImpl中不再实例化DAO对象
从Spring容器中获得
搭建Spring环境
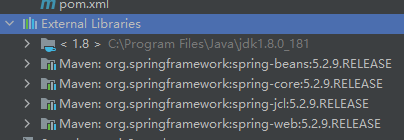
1、添加依赖
<!-- https://mvnrepository.com/artifact/org.springframework/spring-web -->
<dependency>
    <groupId>org.springframework</groupId>
    <artifactId>spring-web</artifactId>
    <version>4.3.18.RELEASE</version>
</dependency>
2、编写bean
package cn.cqie.pojo;

import lombok.AllArgsConstructor;
import lombok.Data;
import lombok.NoArgsConstructor;

@Data
@AllArgsConstructor
@NoArgsConstructor
public class User {
    private String uname;
    private String upwd;

}
3、编写配置文件
先将模板在idea中生成
<?xml version="1.0" encoding="UTF-8"?>
<beans xmlns="http://www.springframework.org/schema/beans"
       xmlns:xsi="http://www.w3.org/2001/XMLSchema-instance"
       xsi:schemaLocation="http://www.springframework.org/schema/beans http://www.springframework.org/schema/beans/spring-beans.xsd">
    <!--
        User user = new User();
        <bean>  声明实例化对象的信息
        id  对象的名称
        class 对象的类型
    -->
    <bean id="user" class="cn.cqie.pojo.User"></bean>
</beans>
4、测试获取user对象
package cn.cqie.test;

import cn.cqie.pojo.User;
import org.junit.Test;
import org.springframework.context.ApplicationContext;
import org.springframework.context.support.ClassPathXmlApplicationContext;

public class AppTest {
    @Test
    public void test(){
        ApplicationContext applicationContext =
                new ClassPathXmlApplicationContext("app.xml");
        User user = (User) applicationContext.getBean("user");
        System.out.println("AppTest.test"+user);
        user.setUname("yx");
        user.setUpwd("123");
        System.out.println(user);
    }
}
IOC容器介绍
BeanFactory
在没有获取容器中实例时,不实例化对应的对象
BeanFactory beanFactory = new XmlBeanFactory(new ClassPathResource("app.xml"));
BeanFactory beanFactory1 = new XmlBeanFactory(new FileSystemResource("d:/app.xml"));
ApplicationContext
ApplicationContext applicationContext2 = new FileSystemXmlApplicationContext("d:/app.xml");
ApplicationContext applicationContext = new ClassPathXmlApplicationContext("app.xml");
ApplicationContext applicationContext3 = new AnnotationConfigApplicationContext(JavaConfig.class);
User user = (User) applicationContext3.getBean("user");
System.out.println("AppTest.test"+user);
user.setUname("yx");
user.setUpwd("123");
System.out.println(user);
容器生成时,就会实例化配置文件中声明的对象
ApplicationContext从BeanFactory派生出来的
ApplicationContext增加了以下功能
-
国际化(MessageSource)
-
访问资源,如URL和文件(ResourceLoader)
-
载入多个(有继承关系)上下文 ,使得每一个上下文都专注于一个特定的层次,比如应用的web层
-
消息发送、响应机制(ApplicationEventPublisher)
-
AOP(拦截器)
获取实例的简单的底层原理
package cn.cqie.util;

import cn.cqie.pojo.User;
import org.dom4j.Attribute;
import org.dom4j.Document;
import org.dom4j.DocumentException;
import org.dom4j.Element;
import org.dom4j.io.SAXReader;

import java.io.File;
import java.io.FileInputStream;
import java.io.FileNotFoundException;
import java.io.InputStream;
import java.util.HashMap;
import java.util.List;
import java.util.Map;

public class MyClassPathXmlApplicationContext {
    Map<String,Object> container = new HashMap<>();
    public MyClassPathXmlApplicationContext(String resource){

        //获得resource对应的文件路径 或者 输入流
        InputStream inputStream = null;
        try {
            inputStream = new FileInputStream(new File(resource));
        } catch (FileNotFoundException e) {
            e.printStackTrace();
        }

        //使用xml 解析技术(dom4j)读取xml文件的信息
        SAXReader reader = new SAXReader();
        try {
            Document document = reader.read(inputStream);
            //读出标签<bean>、属性(id 、 class) 及值 (user 、 cn.cqie.pojo.User)
            Element rootElement = document.getRootElement();
            List<Element> elements = rootElement.elements();
            for (Element element:elements){
                System.out.println(element.getName());
                List<Attribute> attributes = element.attributes();
                String id = "";
                String clazz = "";
                for (Attribute attribute:attributes){
                    if(attribute.getName().equals("id")){
                        id = attribute.getValue();
                        System.out.println("id :"+id);
                    }else{
                        if(attribute.getName().equals("class")){
                            clazz = attribute.getValue();
                            System.out.println("clazz :"+ clazz);
                        }
                    }
                }
                //使用反射生成实例
                Class<?> aClass = Class.forName(clazz);
                Object obj = aClass.newInstance();

                //使用Map存储id和对应的实例
                container.put(id,obj);
            }

        } catch (DocumentException | ClassNotFoundException | InstantiationException | IllegalAccessException e) {
            e.printStackTrace();
        }

    }
    public Object getBean(String id){
        return container.get(id);
    }

    public static void main(String[] args) {
        MyClassPathXmlApplicationContext context = new MyClassPathXmlApplicationContext("f:/app2.xml");
        User user = (User) context.getBean("user");
        user.setUname("tcx");
        System.out.println("user :"+user);
    }
}
Bean的概念
Spring中Bean就是一个类的实例
<bean id="" class="" />
Bean的生成方式有三种:
1、构造器生成
<?xml version="1.0" encoding="UTF-8"?>
<beans xmlns="http://www.springframework.org/schema/beans"
       xmlns:xsi="http://www.w3.org/2001/XMLSchema-instance"
       xsi:schemaLocation="http://www.springframework.org/schema/beans http://www.springframework.org/schema/beans/spring-beans.xsd">

<!--    通过构造器生成
		cn.cqie.pojo.User 必须有为空的构造器
-->
    <bean id="user" class="cn.cqie.pojo.User"/>
</beans>
    @Test
    public void testConstructor(){
        System.out.println(66);
        ApplicationContext applicationContext = new ClassPathXmlApplicationContext("app2.xml");
        User user = (User) applicationContext.getBean("user");
        user.setUname("constructor  ");
        System.out.println(user);
    }
2、静态工厂
//UserStaticFactor.java
package cn.cqie.util;

import cn.cqie.pojo.User;

public class UserStaticFactor {
    public static User getUser(){
        return new User();
    }
}
<?xml version="1.0" encoding="UTF-8"?>
<beans xmlns="http://www.springframework.org/schema/beans"
       xmlns:xsi="http://www.w3.org/2001/XMLSchema-instance"
       xsi:schemaLocation="http://www.springframework.org/schema/beans http://www.springframework.org/schema/beans/spring-beans.xsd">

<!--        通过静态工厂生成
			User user = UserStaticFactor.getUser();
-->
    <bean id="user2" class="cn.cqie.util.UserStaticFactor" factory-method="getUser"/>

</beans>
    @Test
    public void testStaticFactor(){
        ApplicationContext applicationContext = new ClassPathXmlApplicationContext("app2.xml");
        User user2 = (User) applicationContext.getBean("user2");
        user2.setUname("static factory");
        System.out.println(user2);
    }
3、实例工厂
//	UserInstanceFactor.java
package cn.cqie.util;

import cn.cqie.pojo.User;

public class UserInstanceFactor {
    public User getUser(){
        return new User();
    }
}
<?xml version="1.0" encoding="UTF-8"?>
<beans xmlns="http://www.springframework.org/schema/beans"
       xmlns:xsi="http://www.w3.org/2001/XMLSchema-instance"
       xsi:schemaLocation="http://www.springframework.org/schema/beans http://www.springframework.org/schema/beans/spring-beans.xsd">

<!--    实例化工厂构造
	UserInstanceFactor userInstanceFactor = new UserInstanceFactor();
    User user = userInstanceFactor.getUser();
-->
    <bean id="userInstanceFactor" class="cn.cqie.util.UserInstanceFactor" />
    <bean id="user3" factory-bean="userInstanceFactor" factory-method="getUser"/>
</beans>
    @Test
    public void testInstanceFactor(){
       ApplicationContext applicationContext = new ClassPathXmlApplicationContext("app2.xml");
        User user3 = (User) applicationContext.getBean("user3");
        user3.setUname("Instance factor ");
    }
Bean的作用域范围
scope有如下五个取值:
singleton:单例的(默认的),使用singleton定义的Bean是单例的,每次调用getBean都是调用的同一个对象。只要IoC容器一创建就会创建Bean的实例。
prototype:多例的,每次通过Spring IoC容器获取prototype定义的Bean时,容器都将创建一个新的Bean实例。创建时不会实例该Bean,只有调用getBean方法时,才会实例化。
request:作用于web的请求范围,在每一次HTTP请求时,容器会返回Bean的同一个实例,对不同的HTTP请求则会产生一个新的Bean,而且该Bean仅在当前HTTP Request内有效。
session:作用于web的会话范围,在一次HTTP Session中,容器会返回该Bean的同一个实例,对不同的HTTP请求则会产生一个新的Bean,而且该Bean仅在当前HTTP Session内有效。
global-session:作用于集群环境的会话范围(全局会话范围),在一个全局的HTTP Session中,容器返回Bean的同一个实例。当不是集群环境时,它就是session。
<?xml version="1.0" encoding="UTF-8"?>
<beans xmlns="http://www.springframework.org/schema/beans"
       xmlns:xsi="http://www.w3.org/2001/XMLSchema-instance"
       xsi:schemaLocation="http://www.springframework.org/schema/beans http://www.springframework.org/schema/beans/spring-beans.xsd">

<!--    通过构造器生成-->
    <bean id="user" class="cn.cqie.pojo.User" scope="prototype"/>

</beans>
    @Test
    public void testScope(){
        ClassPathXmlApplicationContext applicationContext = new ClassPathXmlApplicationContext("app3.xml");
        User user = (User) applicationContext.getBean("user");
        User user2 = (User) applicationContext.getBean("user");
        System.out.println(user==user2);
    }
依赖注入概述
dao层和service层 impl代码
package cn.cqie.dao.impl;

import cn.cqie.dao.UserDAO;

public class UserDAOImpl implements UserDAO {
    @Override
    public void save() {
        System.out.println("UserDAOImpl.save");
    }
}
package cn.cqie.service.impl;

import cn.cqie.dao.UserDAO;
import cn.cqie.pojo.User;
import cn.cqie.service.UserService;

public class UserServiceImpl implements UserService {
    private UserDAO userDAO;
    //setter注入
    public void setUserDAO(UserDAO userDAO){
        this.userDAO=userDAO;
    }
    public UserServiceImpl(){

    }
    //构造器注入
    public UserServiceImpl(UserDAO userDAO){
        this.userDAO=userDAO;
    }
    @Override
    public void save() {
        System.out.println("UserServiceImpl.save");
        userDAO.save();
    }
}
Setter注入
<?xml version="1.0" encoding="UTF-8"?>
<beans xmlns="http://www.springframework.org/schema/beans"
       xmlns:xsi="http://www.w3.org/2001/XMLSchema-instance"
       xmlns:p="http://www.springframework.org/schema/p"
       xmlns:c="http://www.springframework.org/schema/c"
       xsi:schemaLocation="http://www.springframework.org/schema/beans http://www.springframework.org/schema/beans/spring-beans.xsd">

    <!--
      DI  依赖注入
      UserDAO userDAO = new UserDAOImpl();
      UserService userService = new UserServiceImpl();

      这时需要通过setter或者构造器注入
      1、setter注入
  -->
    <bean id="userDAO" class="cn.cqie.dao.impl.UserDAOImpl"/>
    <bean id="userService1" class="cn.cqie.service.impl.UserServiceImpl">
        <property name="userDAO" ref="userDAO"/>
    </bean>

</beans>
@Test
public void testSetterDI(){
    ApplicationContext applicationContext = new ClassPathXmlApplicationContext("app4.xml");
    UserService userService1 = (UserService) applicationContext.getBean("userService1");
    userService1.save();
}
构造器注入
<?xml version="1.0" encoding="UTF-8"?>
<beans xmlns="http://www.springframework.org/schema/beans"
       xmlns:xsi="http://www.w3.org/2001/XMLSchema-instance"
       xmlns:p="http://www.springframework.org/schema/p"
       xmlns:c="http://www.springframework.org/schema/c"
       xsi:schemaLocation="http://www.springframework.org/schema/beans http://www.springframework.org/schema/beans/spring-beans.xsd">

    <!--
       2、构造器注入
   -->
    <bean id="userDAO2" class="cn.cqie.dao.impl.UserDAOImpl"/>
    <bean id="userService2" class="cn.cqie.service.impl.UserServiceImpl">
        <constructor-arg name="userDAO" ref="userDAO2"/>
    </bean>

</beans>
@Test
public void testConstructorDI(){
    ApplicationContext applicationContext = new ClassPathXmlApplicationContext("app4.xml");
    UserServiceImpl userService2 = (UserServiceImpl) applicationContext.getBean("userService2");
    userService2.save();
}
命名空间
<?xml version="1.0" encoding="UTF-8"?>
<beans xmlns="http://www.springframework.org/schema/beans"
       xmlns:xsi="http://www.w3.org/2001/XMLSchema-instance"
       xmlns:p="http://www.springframework.org/schema/p"
       xmlns:c="http://www.springframework.org/schema/c"
       xsi:schemaLocation="http://www.springframework.org/schema/beans http://www.springframework.org/schema/beans/spring-beans.xsd">

    <!--
        命名空间注入
        本质还是setter和构造器注入,只是换了种方式
    -->
    <bean id="userDAO3" class="cn.cqie.dao.impl.UserDAOImpl"/>
    <bean id="userService3" class="cn.cqie.service.impl.UserServiceImpl" c:userDAO-ref="userDAO3"
          p:userDAO-ref="userDAO3"/>


</beans>
自动装配
通过ByType
<?xml version="1.0" encoding="UTF-8"?>
<beans xmlns="http://www.springframework.org/schema/beans"
       xmlns:xsi="http://www.w3.org/2001/XMLSchema-instance"
       xmlns:p="http://www.springframework.org/schema/p"
       xmlns:c="http://www.springframework.org/schema/c"
       xsi:schemaLocation="http://www.springframework.org/schema/beans http://www.springframework.org/schema/beans/spring-beans.xsd">
    <!--
          自动装配
          byName 按照名字装配,要求bean的id于servcie中声明的对象一致
          byType 按照类型装配,要求容器中该类型只能有一个实例
       -->
    <bean id="userDAO4" class="cn.cqie.dao.impl.UserDAOImpl"></bean>
    <bean id="userService4" class="cn.cqie.service.impl.UserServiceImpl" autowire="byType"></bean>

</beans>
@Test
public void testAutowireByType(){
    ApplicationContext applicationContext = new ClassPathXmlApplicationContext("app5.xml");
    UserServiceImpl userService4 = (UserServiceImpl) applicationContext.getBean("userService4");
    userService4.save();
}
通过ByName
<?xml version="1.0" encoding="UTF-8"?>
<beans xmlns="http://www.springframework.org/schema/beans"
       xmlns:xsi="http://www.w3.org/2001/XMLSchema-instance"
       xmlns:p="http://www.springframework.org/schema/p"
       xmlns:c="http://www.springframework.org/schema/c"
       xsi:schemaLocation="http://www.springframework.org/schema/beans http://www.springframework.org/schema/beans/spring-beans.xsd">
    <!--
          自动装配
          byName 按照名字装配,要求bean的id于servcie中声明的对象一致
          byType 按照类型装配,要求容器中该类型只能有一个实例
       -->
    <bean id="userDAO" class="cn.cqie.dao.impl.UserDAOImpl"></bean>
    <bean id="userService4" class="cn.cqie.service.impl.UserServiceImpl" autowire="byName"></bean>


</beans>
@Test
public void testAutowireByName(){
    ApplicationContext applicationContext = new ClassPathXmlApplicationContext("app5.xml");
    UserServiceImpl userService4 = (UserServiceImpl) applicationContext.getBean("userService4");
    userService4.save();
}
FactoryBean
Spring 中有两种类型的Bean,一种是普通Bean,另一种是工厂Bean 即 FactoryBean。FactoryBean跟普通Bean不同,其返回的对象不是指定类的一个实例,而是该FactoryBean的getObject方法所返回的对象。创建出来的对象是否属于单例由isSingleton中的返回决定。
一般情况下,Spring通过反射机制利用的class属性指定实现类实例化Bean,在某些情况下,实例化Bean过程比较复杂,如果按照传统的方式,则需要在中提供大量的配置信息。配置方式的灵活性是受限的,这时采用编码的方式可能会得到一个简单的方案。Spring为此提供了一个org.springframework.bean.factory.FactoryBean的工厂类接口,用户可以通过实现该接口定制实例化Bean的逻辑。FactoryBean接口对于Spring框架来说占用重要的地位,Spring自身就提供了70多个FactoryBean的实现。它们隐藏了实例化一些复杂Bean的细节,给上层应用带来了便利。从Spring3.0开始,FactoryBean开始支持泛型,即接口声明改为FactoryBean的形式
以Bean结尾,表示它是一个Bean,不同于普通Bean的是:它是实现了FactoryBean接口的Bean,根据该Bean的ID从BeanFactory中获取的实际上是FactoryBean的getObject()返回的对象,而不是FactoryBean本身,如果要获取FactoryBean对象,请在id前面加一个&符号来获取。
<?xml version="1.0" encoding="UTF-8"?>
<beans xmlns="http://www.springframework.org/schema/beans"
       xmlns:xsi="http://www.w3.org/2001/XMLSchema-instance"
       xmlns:p="http://www.springframework.org/schema/p"
       xmlns:c="http://www.springframework.org/schema/c"
       xsi:schemaLocation="http://www.springframework.org/schema/beans http://www.springframework.org/schema/beans/spring-beans.xsd">

    <bean id="userService" class="cn.cqie.util.UserServiceFactoryBean"/>
	<!--    这里的userService 是在cn.cqie.util.UserServiceFactoryBean 中的 getObject() 方法的返回值-->
</beans>
package cn.cqie.util;

import cn.cqie.dao.impl.UserDAOImpl;
import cn.cqie.service.UserService;
import cn.cqie.service.impl.UserServiceImpl;
import org.springframework.beans.factory.FactoryBean;

public class UserServiceFactoryBean implements FactoryBean<UserService> {
    /*
    通过FactoryBean返回指定类型的对象
     */
    @Override
    public UserService getObject() throws Exception {
        //编写复杂的组装逻辑
        UserServiceImpl userService = new UserServiceImpl();
        userService.setUserDAO(new UserDAOImpl());
        return userService;
    }

    @Override
    public Class<?> getObjectType() {
        //当前对象的类型
        return null;
    }

    @Override
    public boolean isSingleton() {
        //返回的对象是否为单例
        return false;
    }
}
@Test
public void testFactoryBean(){
    ApplicationContext applicationContext = new ClassPathXmlApplicationContext("app6.xml");
    UserServiceImpl userService = (UserServiceImpl) applicationContext.getBean("userService");
    userService.save();
}
Spring常用注解
可以通过注解可以在配置文件中少写一些内容
在配置文件中添加命名空间context,还需添加格式文件
xmlns:context="http://www.springframework.org/schema/context"

需要在xsi:schemaLocation中加入格式文件
http://www.springframework.org/schema/context  http://www.springframework.org/schema/context/spring-context.xsd

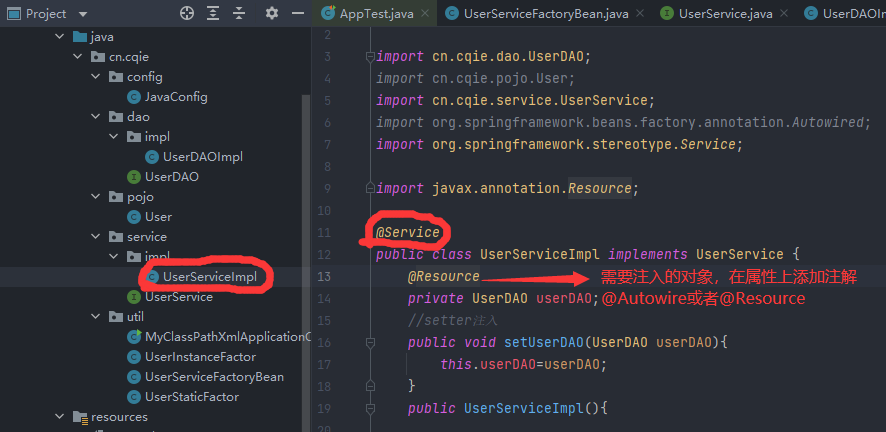
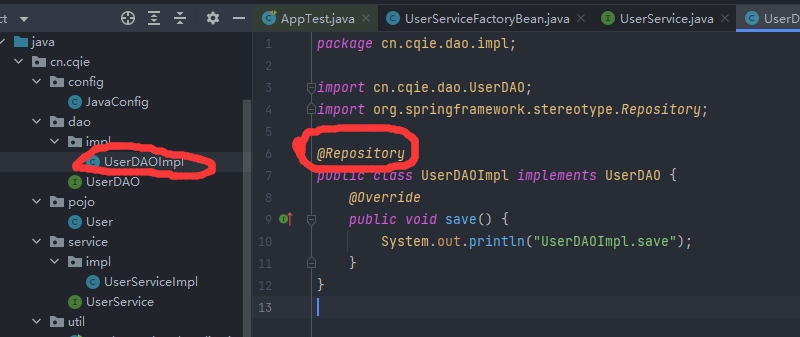
@Component 这是下面三个的老大
@Controller
@Service 在service的类上加
@Repository 在 dao 层 mapper 层 加
注意:
1、需要注入的对象,在属性上添加注解@Autowire或者@Resource
2、所有bean的id默认为类名首字母小写。否则需要在注解中声明实例的id。
eg
MyBatis注解
mybatis的配置文件
<?xml version="1.0" encoding="UTF-8" ?>
<!DOCTYPE configuration
PUBLIC "-//mybatis.org//DTD Config 3.0//EN"
"http://mybatis.org/dtd/mybatis-3-config.dtd">
<configuration>
<typeAliases>
<package name="cn.cqie.pojo"/>
</typeAliases>
<environments default="mysql">
<environment id="mysql">
<transactionManager type="JDBC"></transactionManager>
<dataSource type="POOLED">
<property name="driver" value="com.mysql.cj.jdbc.Driver"/>
<property name="url" value="jdbc:mysql://127.0.0.1:3306/springmybatis?useSSL=false&useUnicode=true&characterEncoding=utf8&serverTimezone=Asia/Shanghai"/>
<property name="username" value="root"/>
<property name="password" value="tcx119"/>
</dataSource>
</environment>
</environments>
<mappers>
<!--
resource: xml所在的目录
读取本地磁盘的xml 要用 url(file:///D:1.xml)
-->
<mapper resource="cn/cqie/mapper/ad.xml"/>
</mappers>
</configuration>
写SQL语句的xml文件
<!DOCTYPE mapper

        PUBLIC "-//mybatis.org//DTD Mapper 3.0//EN"

        "http://mybatis.org/dtd/mybatis-3-mapper.dtd">
<mapper namespace="cn.cqie.mapper.UserMapper">
    <select id="selectAll" resultType="User">
        select
        <include refid="BASE_COL_LIST"></include>
        from user
    </select>
    <sql id="BASE_COL_LIST">
        uname,pwd,hobby
    </sql>
</mapper>
注解
注意:在使用注解时要重新关联

package cn.cqie.mapper;
import cn.cqie.pojo.User;
import org.apache.ibatis.annotations.Insert;
import org.apache.ibatis.annotations.Select;
import java.util.List;

public interface UserMapper {
    @Select("select * from user")
    List<User> selectAll();

    @Insert("insert into user values(#{uname},#{pwd},#{hobby})")
    int save(User user1);
}
package cn.cqie.test;

import cn.cqie.mapper.UserMapper;
import cn.cqie.pojo.User;
import org.apache.ibatis.io.Resources;
import org.apache.ibatis.session.SqlSession;
import org.apache.ibatis.session.SqlSessionFactory;
import org.apache.ibatis.session.SqlSessionFactoryBuilder;
import org.junit.Test;

import java.io.IOException;
import java.util.List;

public class testApp {
    @Test
    public void testSelectAll() throws IOException {
        SqlSessionFactory sqlSessionFactory = new SqlSessionFactoryBuilder().build(Resources.getResourceAsStream("mybatis.xml"));
        SqlSession sqlSession = sqlSessionFactory.openSession();
        UserMapper mapper = sqlSession.getMapper(UserMapper.class);
        //插入一条内容
        User user = new User("yhl", "dasd", "ai");
        int save = mapper.save(user);
        //这里一定要写,不然 在本地数据库中是没有的
        sqlSession.commit();

        List<User> users = mapper.selectAll();
        System.out.println(users);
    }

}
mybaties逆向工程
插件

时区: serverTimezone=Asia/Shanghai
特别注意
若mysql的版本在8以及以上 一定要写上时区

Spring与MyBatis集成
Spring+Mybatis
1、添加依赖
关于Mybatis依赖
关于Spring的依赖
关于Mybatis和Spring关联的依赖
其他依赖
<!-- mybatis -->
    <dependency>
      <groupId>mysql</groupId>
      <artifactId>mysql-connector-java</artifactId>
      <version>5.1.38</version>
    </dependency>
    <dependency>
      <groupId>com.alibaba</groupId>
      <artifactId>druid</artifactId>
      <version>1.1.23</version>
    </dependency>
    <dependency>
      <groupId>org.mybatis</groupId>
      <artifactId>mybatis</artifactId>
      <version>3.4.6</version>
    </dependency>
    <!-- spring -->
    <dependency>
      <groupId>org.springframework</groupId>
      <artifactId>spring-web</artifactId>
      <version>4.3.18.RELEASE</version>
    </dependency>
    <!-- 对于持久层框架的支持 -->
    <dependency>
      <groupId>org.springframework</groupId>
      <artifactId>spring-orm</artifactId>
      <version>4.3.18.RELEASE</version>
    </dependency>
    <!-- mybatis和Spring关联的jar -->
    <!-- https://mvnrepository.com/artifact/org.mybatis/mybatis-spring -->
    <dependency>
      <groupId>org.mybatis</groupId>
      <artifactId>mybatis-spring</artifactId>
      <version>2.0.6</version>
    </dependency>
    <dependency>
      <groupId>junit</groupId>
      <artifactId>junit</artifactId>
      <version>4.12</version>
      <scope>test</scope>
    </dependency>
2、逆向生成Mybatis代码 or 手写
3、Spring的配置文件
<?xml version="1.0" encoding="UTF-8"?>
<beans xmlns="http://www.springframework.org/schema/beans"
xmlns:xsi="http://www.w3.org/2001/XMLSchema-instance"
xmlns:context="http://www.springframework.org/schema/context"
xmlns:tx="http://www.springframework.org/schema/tx"
xsi:schemaLocation="http://www.springframework.org/schema/beans
http://www.springframework.org/schema/beans/spring-beans.xsd
http://www.springframework.org/schema/context
http://www.springframework.org/schema/context/spring-context.xsd
http://www.springframework.org/schema/tx
http://www.springframework.org/schema/tx/spring-tx.xsd">
<!--(扫描要被Spring管理的实例) 如果不想在xml文件中配置bean,
我们可以给我们的类加上spring组件注解,只需再配置下spring的扫描器就可以实现bean的自动载入。-->
<context:component-scan base-package="cn.cqie"/>
<!-- 生成数据库连接池对象-->
<bean id="dataSource" class="com.alibaba.druid.pool.DruidDataSource">
<property name="url"
value="jdbc:mysql://localhost:3306/springmybatis?characterEncoding=utf8& serverTimezone=Asia/Shanghai"/>
<property name="username" value="root"/>
<property name="password" value="tcx119"/>
</bean>
<!-- 生成SqlSessionFactory-->
<bean id="sqlSessionFactory" class="org.mybatis.spring.SqlSessionFactoryBean">
<property name="dataSource" ref="dataSource"/>
<property name="typeAliasesPackage" value="cq.cqie.pojo"/>
</bean>
<!-- 扫描所有dao-->
<!-- 通过下面的配置扫描cn.cqie.dao,将所有dao接口对应dao.xml生成对应的实例-->
<bean id="mapperScanner" class="org.mybatis.spring.mapper.MapperScannerConfigurer">
<property name="sqlSessionFactory" ref="sqlSessionFactory" />
<property name="basePackage" value="cn.cqie.dao"/>
</bean>
</beans>
4、生成代码
UserServiceImpl
package cn.cqie.service.impl;

import cn.cqie.dao.UserDao;
import cn.cqie.pojo.User;
import cn.cqie.service.UserService;
import org.springframework.beans.factory.annotation.Autowired;
import org.springframework.stereotype.Service;

import javax.annotation.Resource;
import java.util.List;
@Service
public class UserServiceImpl implements UserService {
    @Resource
    private UserDao userDao;
    @Override
    public List<User> findAll() {
        return userDao.selectByExample(null);
    }
}
UserServlet
package cn.cqie.controller;

import cn.cqie.pojo.User;
import cn.cqie.service.impl.UserServiceImpl;
import org.springframework.context.ApplicationContext;
import org.springframework.context.support.ClassPathXmlApplicationContext;

import javax.servlet.ServletException;
import javax.servlet.annotation.WebServlet;
import javax.servlet.http.HttpServlet;
import javax.servlet.http.HttpServletRequest;
import javax.servlet.http.HttpServletResponse;
import java.io.IOException;
import java.util.List;

@WebServlet("/userServlet")

public class UserServlet extends HttpServlet {
    @Override
    protected void service(HttpServletRequest req, HttpServletResponse resp) throws ServletException, IOException {
        ApplicationContext applicationContext = new ClassPathXmlApplicationContext("app.xml");
        UserServiceImpl userServiceImpl = (UserServiceImpl) applicationContext.getBean("userServiceImpl");
        List<User> all = userServiceImpl.findAll();
        req.setAttribute("all",all);
        req.getRequestDispatcher("list.jsp").forward(req,resp);
    }
}
list.jsp
<%--
  Created by IntelliJ IDEA.
  User: admin
  Date: 2021/11/12
  Time: 18:17
  To change this template use File | Settings | File Templates.
--%>
<%@ page contentType="text/html;charset=UTF-8" language="java" %>
<%@ taglib uri="http://java.sun.com/jsp/jstl/core" prefix="c"%>
<html>
<head>
    <title>Title</title>
</head>
<body>
    <table>
        <c:forEach items="${requestScope.all}" var="all">
            <tr>
                <td>${all.uname}</td>
            </tr>
        </c:forEach>
    </table>

</body>
</html>
以下需要注意
**若要使用@ WebServlet 注解 需要添加依赖**
  <dependency>
    <groupId>javax.servlet</groupId>
    <artifactId>javax.servlet-api</artifactId>
    <version>4.0.1</version>
  </dependency>
**JSTL与EL需要导入的依赖**
<!-- https://mvnrepository.com/artifact/javax.servlet/jstl -->
<dependency>
  <groupId>javax.servlet</groupId>
  <artifactId>jstl</artifactId>
  <version>1.2</version>
</dependency>

  <dependency>
  <groupId>taglibs</groupId>
  <artifactId>standard</artifactId>
  <version>1.1.2</version>
</dependency>
  <!-- https://mvnrepository.com/artifact/javax.el/javax.el-api -->
  <dependency>
      <groupId>javax.el</groupId>
      <artifactId>javax.el-api</artifactId>
      <version>3.0.1-b06</version>
  </dependency>
AOP概述及出现背景
面向切面编程
aop概述
AOP全称为Aspect Oriented Programming的缩写,意为:面向切面编程。将程序中公用代码进行抽离,通过动态代理实现程序功能的统一维护的一种技术。
使代码耦合性降低,提高了开发的效率。
aop可以完成的功能
日志记录,性能统计,安全控制,事务处理,异常处理等等。
aop与oop区别
OOP:(面向对象编程)针对业务处理过程的实体及其属性和行为进行抽象封装,以获得更加清晰高效的逻辑单元划分。java实体类就是面向对象编程的最准确的体现。
AOP:则是针对业务处理过程中的切面进行提取,它所面对的是处理过程中的某个步骤或阶段,以获得逻辑过程中各部分之间低耦合性的隔离效果。这两种设计思想在目标上有着本质的差异。
spring AOP底层实现介绍
spring的AOP底层是由 JDK提供的动态代理技术 和 CGLIB(动态字节码增强技术)实现。
**JDK动态代理:**Jdk动态代理只针对于接口操作。
CGLIB:可以针对没有接口的java类和有接口的java类。
静态代理
package cn.cqie.service;

public interface UserService {
    void save();
}
目标Target
package cn.cqie.service;

public class UserServiceImpl implements UserService{
    @Override
    public void save() {
        System.out.println("UserServiceImpl.save");
    }
}
代理Proxy:代理类需要和目标类实现同一个接口。
package cn.cqie.service;

public class UserServiceProxyImpl implements UserService{
    private UserService userService;
    public UserServiceProxyImpl(UserService userService){
        this.userService = userService;
    }
    @Override
    public void save() {
        System.out.println("tiancx ");
        userService.save();
    }
}
Test类
@Test
public void testStaticProxy(){
    UserService userService = new UserServiceProxyImpl(new UserServiceImpl());
    userService.save();
}

动态代理
1、编写类介入到bean的生命周期中
package cn.cqie.service;

import org.springframework.beans.BeansException;
import org.springframework.beans.factory.config.BeanFactoryPostProcessor;
import org.springframework.beans.factory.config.BeanPostProcessor;

import java.lang.reflect.InvocationHandler;
import java.lang.reflect.Method;
import java.lang.reflect.Proxy;

public class MyProxy implements BeanPostProcessor {
    @Override
    public Object postProcessBeforeInitialization(final Object o, String s) throws BeansException {
        System.out.println("MyProxy.postProcessBeforeInitialization");
        //使用了jdk的动态代理
        //目标对象的类加载器,目标对象所实现的接口,切面代码的编写
        Object obj = Proxy.newProxyInstance(o.getClass().getClassLoader(), o.getClass().getInterfaces(), new InvocationHandler() {
            @Override
            public Object invoke(Object proxy, Method method, Object[] args) throws Throwable {
                System.out.println("我在前面");
                //找到目标对象的方法
                method.invoke(o, args);
                System.out.println("我在后面");
                return proxy;
            }
        });
        return obj;
    }

    @Override
    public Object postProcessAfterInitialization(Object o, String s) throws BeansException {
        System.out.println("MyProxy.postProcessAfterInitialization");
        return o;
    }
}
2、在Spring中配置需要切入的Bean和切入类(MyProxy)
<?xml version="1.0" encoding="UTF-8"?>
<beans xmlns="http://www.springframework.org/schema/beans"
       xmlns:xsi="http://www.w3.org/2001/XMLSchema-instance"
       xmlns:context="http://www.springframework.org/schema/context"
       xmlns:tx="http://www.springframework.org/schema/tx"
       xsi:schemaLocation="http://www.springframework.org/schema/beans
       http://www.springframework.org/schema/beans/spring-beans.xsd
       http://www.springframework.org/schema/context
       http://www.springframework.org/schema/context/spring-context.xsd
        http://www.springframework.org/schema/tx
       http://www.springframework.org/schema/tx/spring-tx.xsd">
    <bean id="myProxy" class="cn.cqie.service.MyProxy"/>
    <bean id="userService" class="cn.cqie.service.UserServiceImpl"/>
<!--    deptService是为了测试才加的,看看效果什么样-->
    <bean id="deptService" class="cn.cqie.service.DeptServiceImpl"/>

</beans>
3、后续
再加入一个DeptServiceImpl类试一试
package cn.cqie.service;

public class DeptServiceImpl implements DeptService{
    @Override
    public void save() {
        System.out.println("DeptServiceImpl.save");
    }
}
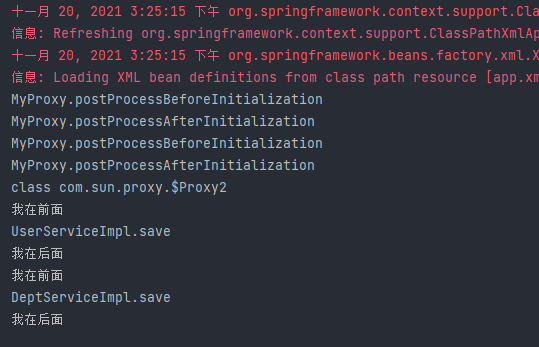
测试类
    @Test
    public void testActiveProxy(){
        ApplicationContext applicationContext = new ClassPathXmlApplicationContext("app.xml");
        UserService userService =  applicationContext.getBean(UserService.class);
//        System.out.println(UserService.class);
        System.out.println(userService.getClass());
        userService.save();
        DeptService deptService = applicationContext.getBean(DeptService.class);
        deptService.save();
    }
Spring的生命周期
bean的生命周期
1.Spring对bean进行实例化,调用bean的构造参数
2.设置对象属性,调用bean的set方法,将属性注入到bean的属性中
3.检查bean是否实现BeanNameAware、BeanFactoryAware、ApplicationContextAware接口,如果实现了这几个接口Spring会分别调用其中实现的方法。
BeanNameAware:setBeanName(String name)方法,参数是bean的ID
BeanFactoryAware:setBeanFactory(BeanFactory bf)方法,参数是BeanFactory容器
ApplicationContextAware:setApplicationContext(ApplicationContext context)方法,参数是bean所在的引用的上下文,如果是用Bean工厂创建bean,那就可以忽略ApplicationContextAware。
4.如果bean是否实现BeanPostProcessor接口,Spring会在初始化方法的前后分别调用postProcessBeforeInitialization和postProcessAfterInitialization方法
5.如果bean是否实现InitalizingBean接口,将调用afterPropertiesSet()方法
6.如果bean声明初始化方法,也会被调用
7.使用bean,bean将会一直保留在应用的上下文中,直到该应用上下文被销毁。
8.检查bean是否实现DisposableBean接口,Spring会调用它们的destory方法
9.如果bean声明销毁方法,该方法也会被调用
AOP核心概念
1、横切关注点
向代码中切入的内容。
2、切面(aspect)
是一个类,包含了若干个横切关注点
3、连接点(joinpoint)
真实被切面切入的方法
4、切入点(pointcut)
想要切入的方法
5、通知(advice)
5种通知:
a、前置通知
b、后置通知
c、异常通知
d、返回通知
e、环绕通知
6、目标对象(Target)
要运行的对象。
7、织入(weave)
将目标对象加入通知,生成代理对象的过程
XML配置实现AOP
1、添加依赖
<!-- https://mvnrepository.com/artifact/org.springframework/spring-aspects -->
<dependency>
  <groupId>org.springframework</groupId>
  <artifactId>spring-aspects</artifactId>
  <version>4.3.18.RELEASE</version>
</dependency>
2、编写切面类
package cn.cqie.aop;

import org.aspectj.lang.ProceedingJoinPoint;

/**
 * Description:
 * Author: tiancx
 * Date: Created in 2021/11/20 16:51
 */
public class MyAOP {
//    public void before(){
//        System.out.println("MyAOP.before");
//    }
//    public void after(){
//        System.out.println("MyAOP.after");
//    }
//    public void exception(){
//        System.out.println("MyAOP.exception");
//    }
//    public void afterReturning(){
//        System.out.println("MyAOP.afterReturning");
    //    }
    public Object around(ProceedingJoinPoint joinPoint){
        Object proceed = null;
        try {
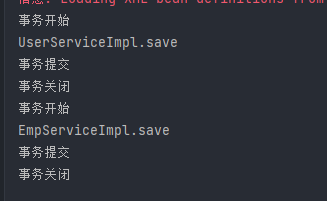
            System.out.println("事务开始"); //前置通知
            proceed = joinPoint.proceed(); //执行连接点对应的方法
            System.out.println("事务提交"); //返回通知
        }catch (Throwable throwable) {
            throwable.printStackTrace();
            System.out.println("事务回滚"); //异常通知
        } finally {
            System.out.println("事务关闭"); //后置通知
        }
        return proceed;
    }
}
3、编写service类
package cn.cqie.aop;

import cn.cqie.aop.UserService;

public class UserServiceImpl implements UserService {
    @Override
    public void save() {
        System.out.println("UserServiceImpl.save");
//        System.out.println(1/0);
    }
}
4、配置AOP
<?xml version="1.0" encoding="UTF-8"?>
<beans xmlns="http://www.springframework.org/schema/beans"
       xmlns:xsi="http://www.w3.org/2001/XMLSchema-instance"
       xmlns:context="http://www.springframework.org/schema/context"
       xmlns:tx="http://www.springframework.org/schema/tx"
       xmlns:aop="http://www.springframework.org/schema/aop"
       xsi:schemaLocation="http://www.springframework.org/schema/beans
       http://www.springframework.org/schema/beans/spring-beans.xsd
       http://www.springframework.org/schema/context
       http://www.springframework.org/schema/context/spring-context.xsd
        http://www.springframework.org/schema/tx
       http://www.springframework.org/schema/tx/spring-tx.xsd
        http://www.springframework.org/schema/aop
        http://www.springframework.org/schema/aop/spring-aop.xsd" >

    <!--
        AOP的xml配置
        1、添加AOP的命名空间
         xmlns:aop="http://www.springframework.org/schema/aop"
          http://www.springframework.org/schema/aop
        http://www.springframework.org/schema/aop/spring-aop.xsd
        2、添加需要被Spring管理的实例
        3、添加切面类
    -->
    <bean id="userService" class="cn.cqie.aop.UserServiceImpl"/>
    <bean id="empService" class="cn.cqie.aop.EmpServiceImpl"/>
    <bean id="myAOP" class="cn.cqie.aop.MyAOP"/>
    <!--
       4、aop配置
   -->
    <aop:config >
        <!--
           5、切面配置
            ref="myAOP"关联到切面类
       -->
        <aop:aspect ref="myAOP">
            <!--
               6、配置切入点
           -->
            <aop:pointcut id="pc" expression="execution(* cn.cqie.aop..*(..)) "/>
            <!--
                7、通知配置
                前置
                后置
                异常
                返回
                环绕
            -->
<!--            <aop:before method="before" pointcut-ref="pc"/>-->
<!--            <aop:after method="after" pointcut-ref="pc"/>-->
<!--            <aop:after-throwing method="exception" pointcut-ref="pc"/>-->
<!--            <aop:after-returning method="afterReturning" pointcut-ref="pc"/>-->
            <aop:around method="around" pointcut-ref="pc"/>

        </aop:aspect>


    </aop:config>

</beans>
部分运行结果
AspectJ实现AOP
1、相关类添加注解
比如 @Service
2、编写切面类
package cn.cqie.aop;

import org.aspectj.lang.ProceedingJoinPoint;
import org.aspectj.lang.annotation.*;
import org.springframework.stereotype.Component;

/**
 * Description:
 * Author: tiancx
 * Date: Created in 2021/11/21 12:49
 */
@Aspect  //描述本类为切面类
@Component   //被Spring容器管理
public class MyAOP2 {
    /**
     * execution(* com.woniu..*.*(..))
     * 第一个*表示返回类型
     * 第二个*表示类
     * 第三个*表示方法
     * 第一个..表示根包下类及子包下类
     * 第二个..表示方法的所有参数类型
     */
    @Pointcut("execution(* cn.cqie..*.*(..))")
    public void pointCut(){}

    @Before("pointCut()")
    public void before(){
        System.out.println("MyAOP2.before");
    }

    @After("pointCut()")
    public void after(){
        System.out.println("MyAOP2.after");
    }

    @AfterReturning("pointCut()")
    public void afterReturning(){
        System.out.println("MyAOP2.afterReturning");
    }

    @AfterThrowing("pointCut()")
    public void afterThrowing(){
        System.out.println("MyAOP2.afterThrowing");
    }

    @Around("pointCut()")
    public Object around(ProceedingJoinPoint joinPoint){
        System.out.println("MyAOP2.around1");
        Object proceed = null;
        try {
           proceed = joinPoint.proceed();
        } catch (Throwable e) {
            e.printStackTrace();
        }
        System.out.println("MyAOP2.around2");
        return proceed;
    }
}
3、配置文件编写
<?xml version="1.0" encoding="UTF-8"?>
<beans xmlns="http://www.springframework.org/schema/beans"
       xmlns:xsi="http://www.w3.org/2001/XMLSchema-instance"
       xmlns:aop="http://www.springframework.org/schema/aop"
       xmlns:context="http://www.springframework.org/schema/context"
       xsi:schemaLocation="http://www.springframework.org/schema/beans
       http://www.springframework.org/schema/beans/spring-beans.xsd
        http://www.springframework.org/schema/aop
       http://www.springframework.org/schema/aop/spring-aop.xsd
       http://www.springframework.org/schema/context
       http://www.springframework.org/schema/context/spring-context.xsd">
    <!--
            AspectJ实现aop功能
            通过注解实现功能
            1、扫描要被Spring容器管理的类
            2、启动自动代理
        -->
    <context:component-scan base-package="cn.cqie.aop"/>
    <aop:aspectj-autoproxy/>

</beans>
4、测试代码
@Test
public void testAnno(){
    ApplicationContext applicationContext = new ClassPathXmlApplicationContext("app3.xml");
    UserService userService= (UserService) applicationContext.getBean("userServiceImpl2");
    userService.save();
}
注意:

事务属性
事务的特性
- 原子性(Atomicity):事务是一个原子操作,由一系列动作组成。事务的原子性确保动作要么全部完成,要么完全不起作用。
- 一致性(Consistency):一旦事务完成(不管成功还是失败),系统必须确保它所建模的业务处于一致的状态,而不会是部分完成部分失败。在现实中的数据不应该被破坏。
- 隔离性(Isolation):可能有许多事务会同时处理相同的数据,因此每个事务都应该与其他事务隔离开来,防止数据损坏。
- 持久性(Durability):一旦事务完成,无论发生什么系统错误,它的结果都不应该受到影响,这样就能从任何系统崩溃中恢复过来。通常情况下,事务的结果被写到持久化存储器中。
Spring事务的配置方式
Spring支持编程式事务管理以及声明式事务管理两种方式。
1. 编程式事务管理
编程式事务管理是侵入性事务管理,使用TransactionTemplate或者直接使用PlatformTransactionManager,对于编程式事务管理,Spring推荐使用TransactionTemplate。
2. 声明式事务管理
声明式事务管理建立在AOP之上,其本质是对方法前后进行拦截,然后在目标方法开始之前创建或者加入一个事务,执行完目标方法之后根据执行的情况提交或者回滚。
编程式事务每次实现都要单独实现,但业务量大功能复杂时,使用编程式事务无疑是痛苦的,而声明式事务不同,声明式事务属于无侵入式,不会影响业务逻辑的实现,只需要在配置文件中做相关的事务规则声明或者通过注解的方式,便可以将事务规则应用到业务逻辑中。
显然声明式事务管理要优于编程式事务管理,这正是Spring倡导的非侵入式的编程方式。唯一不足的地方就是声明式事务管理的粒度是方法级别,而编程式事务管理是可以到代码块的,但是可以通过提取方法的方式完成声明式事务管理的配置。
事务的传播机制
事务的传播性一般用在事务嵌套的场景,比如一个事务方法里面调用了另外一个事务方法,那么两个方法是各自作为独立的方法提交还是内层的事务合并到外层的事务一起提交,这就是需要事务传播机制的配置来确定怎么样执行。
常用的事务传播机制如下:
- PROPAGATION_REQUIRED
Spring默认的传播机制,能满足绝大部分业务需求,如果外层有事务,则当前事务加入到外层事务,一块提交,一块回滚。如果外层没有事务,新建一个事务执行 - PROPAGATION_REQUES_NEW
该事务传播机制是每次都会新开启一个事务,同时把外层事务挂起,当当前事务执行完毕,恢复上层事务的执行。如果外层没有事务,执行当前新开启的事务即可 - PROPAGATION_SUPPORT
如果外层有事务,则加入外层事务,如果外层没有事务,则直接使用非事务方式执行。完全依赖外层的事务 - PROPAGATION_NOT_SUPPORT
该传播机制不支持事务,如果外层存在事务则挂起,执行完当前代码,则恢复外层事务,无论是否异常都不会回滚当前的代码 - PROPAGATION_NEVER
该传播机制不支持外层事务,即如果外层有事务就抛出异常 - PROPAGATION_MANDATORY
与NEVER相反,如果外层没有事务,则抛出异常 - PROPAGATION_NESTED
该传播机制的特点是可以保存状态保存点,当前事务回滚到某一个点,从而避免所有的嵌套事务都回滚,即各自回滚各自的,如果子事务没有把异常吃掉,基本还是会引起全部回滚的。
传播规则回答了这样一个问题:一个新的事务应该被启动还是被挂起,或者是一个方法是否应该在事务性上下文中运行。
事务的隔离级别
事务的隔离级别定义一个事务可能受其他并发务活动活动影响的程度,可以把事务的隔离级别想象为这个事务对于事务处理数据的自私程度。
在一个典型的应用程序中,多个事务同时运行,经常会为了完成他们的工作而操作同一个数据。并发虽然是必需的,但是会导致以下问题:
- 脏读(Dirty read)
脏读发生在一个事务读取了被另一个事务改写但尚未提交的数据时。如果这些改变在稍后被回滚了,那么第一个事务读取的数据就会是无效的。 - 不可重复读(Nonrepeatable read)
不可重复读发生在一个事务执行相同的查询两次或两次以上,但每次查询结果都不相同时。这通常是由于另一个并发事务在两次查询之间更新了数据。
不可重复读重点在修改。
3. 幻读(Phantom reads)
幻读和不可重复读相似。当一个事务(T1)读取几行记录后,另一个并发事务(T2)插入了一些记录时,幻读就发生了。在后来的查询中,第一个事务(T1)就会发现一些原来没有的额外记录。
幻读重点在新增或删除。
在理想状态下,事务之间将完全隔离,从而可以防止这些问题发生。然而,完全隔离会影响性能,因为隔离经常涉及到锁定在数据库中的记录(甚至有时是锁表)。完全隔离要求事务相互等待来完成工作,会阻碍并发。因此,可以根据业务场景选择不同的隔离级别。
| 隔离级别 | 含义 |
|---|---|
| ISOLATION_DEFAULT | 使用后端数据库默认的隔离级别 |
| ISOLATION_READ_UNCOMMITTED | 允许读取尚未提交的更改。可能导致脏读、幻读或不可重复读。 |
| ISOLATION_READ_COMMITTED | (Oracle 默认级别)允许从已经提交的并发事务读取。可防止脏读,但幻读和不可重复读仍可能会发生。 |
| ISOLATION_REPEATABLE_READ | (MYSQL默认级别)对相同字段的多次读取的结果是一致的,除非数据被当前事务本身改变。可防止脏读和不可重复读,但幻读仍可能发生。 |
| ISOLATION_SERIALIZABLE | 完全服从ACID的隔离级别,确保不发生脏读、不可重复读和幻影读。这在所有隔离级别中也是最慢的,因为它通常是通过完全锁定当前事务所涉及的数据表来完成的。 |
只读
如果一个事务只对数据库执行读操作,那么该数据库就可能利用那个事务的只读特性,采取某些优化措施。通过把一个事务声明为只读,可以给后端数据库一个机会来应用那些它认为合适的优化措施。由于只读的优化措施是在一个事务启动时由后端数据库实施的, 因此,只有对于那些具有可能启动一个新事务的传播行为(PROPAGATION_REQUIRES_NEW、PROPAGATION_REQUIRED、 ROPAGATION_NESTED)的方法来说,将事务声明为只读才有意义。
事务超时
为了使一个应用程序很好地执行,它的事务不能运行太长时间。因此,声明式事务的下一个特性就是它的超时。
假设事务的运行时间变得格外的长,由于事务可能涉及对数据库的锁定,所以长时间运行的事务会不必要地占用数据库资源。这时就可以声明一个事务在特定秒数后自动回滚,不必等它自己结束。
由于超时时钟在一个事务启动的时候开始的,因此,只有对于那些具有可能启动一个新事务的传播行为(PROPAGATION_REQUIRES_NEW、PROPAGATION_REQUIRED、ROPAGATION_NESTED)的方法来说,声明事务超时才有意义。
回滚规则
在默认设置下,事务只在出现运行时异常(runtime exception)时回滚,而在出现受检查异常(checked exception)时不回滚(这一行为和EJB中的回滚行为是一致的)。
不过,可以声明在出现特定受检查异常时像运行时异常一样回滚。同样,也可以声明一个事务在出现特定的异常时不回滚,即使特定的异常是运行时异常。
声明式事务配置
Spring的配置文件
<?xml version="1.0" encoding="UTF-8"?>
<beans xmlns="http://www.springframework.org/schema/beans"
xmlns:xsi="http://www.w3.org/2001/XMLSchema-instance"
xmlns:context="http://www.springframework.org/schema/context"
xmlns:tx="http://www.springframework.org/schema/tx" xmlns:aop="http://www.springframework.org/schema/aop"
xsi:schemaLocation="http://www.springframework.org/schema/beans
http://www.springframework.org/schema/beans/spring-beans.xsd
http://www.springframework.org/schema/context
http://www.springframework.org/schema/context/spring-context.xsd
http://www.springframework.org/schema/tx
http://www.springframework.org/schema/tx/spring-tx.xsd http://www.springframework.org/schema/aop http://www.springframework.org/schema/aop/spring-aop.xsd">
<context:component-scan base-package="cn.cqie"/>
<!--
数据源
-->
<bean id="dataSource" class="com.alibaba.druid.pool.DruidDataSource">
<property name="driverClassName" value="com.mysql.cj.jdbc.Driver"/>
<property name="url" value="jdbc:mysql://127.0.0.1:3306/springmybatis?useSSL=false&useUnicode=true&characterEncoding=utf8&serverTimezone=Asia/Shanghai"/>
<property name="username" value="root"/>
<property name="password" value="tcx119"/>
</bean>
<!-- SqlSessionFactory-->
<bean id="sqlSessionFactory" class="org.mybatis.spring.SqlSessionFactoryBean">
<property name="dataSource" ref="dataSource"/>
</bean>
<!--
扫描Dao
-->
<bean id="mapperScanner" class="org.mybatis.spring.mapper.MapperScannerConfigurer">
<property name="sqlSessionFactory" ref="sqlSessionFactory"/>
<property name="basePackage" value="cn.cqie.dao"/>
</bean>
<!--
配置事务管理器
DataSourceTransactionManager提供了事务管理的代码
-->
<bean id="transactionManager" class="org.springframework.jdbc.datasource.DataSourceTransactionManager">
<property name="dataSource" ref="dataSource"/>
</bean>
<!--
配置事务的信息
配置传播机制、隔离级别、是否只读、回滚条件
-->
<tx:advice id="advice">
<tx:attributes>
<tx:method name="save" propagation="REQUIRED" isolation="DEFAULT" read-only="false" rollback-for="java.lang.RuntimeException"/>
</tx:attributes>
</tx:advice>
<!--
配置AOP
-->
<aop:config>
<aop:pointcut id="pc" expression="execution(* cn.cqie.service..*.*(..))"/>
<aop:advisor advice-ref="advice" pointcut-ref="pc"/>
</aop:config>
</beans>
package cn.cqie.service;

import cn.cqie.dao.DeptDao;
import cn.cqie.pojo.Dept;
import org.springframework.stereotype.Service;
import org.springframework.transaction.annotation.Transactional;

import javax.annotation.Resource;

@Service
@Transactional //将DataSourceTransactionManager切入到当前类的所有的方法
public class DeptServiceImpl implements DeptService{
    @Resource
    private DeptDao deptDao;
    @Override
    public void save(Dept dept) {
        deptDao.insert(dept);
        System.out.println("DeptServiceImpl.save");
//        throw new RuntimeException("异常出现,事务回滚!");

    }
}
    @Test
    public void testTransaction(){
        ApplicationContext applicationContext = new ClassPathXmlApplicationContext("application.xml");
        DeptService deptService = (DeptService) applicationContext.getBean("deptServiceImpl");
        Dept dept = new Dept();
        dept.setSalary(BigDecimal.valueOf(50.0));
        dept.setName("tiancx");
//        dept.setId(1);
        deptService.save(dept);
    }
注解的方式配置事务
<?xml version="1.0" encoding="UTF-8"?>
<beans xmlns="http://www.springframework.org/schema/beans"
xmlns:xsi="http://www.w3.org/2001/XMLSchema-instance"
xmlns:context="http://www.springframework.org/schema/context"
xmlns:tx="http://www.springframework.org/schema/tx" xmlns:aop="http://www.springframework.org/schema/aop"
xsi:schemaLocation="http://www.springframework.org/schema/beans
http://www.springframework.org/schema/beans/spring-beans.xsd
http://www.springframework.org/schema/context
http://www.springframework.org/schema/context/spring-context.xsd
http://www.springframework.org/schema/tx
http://www.springframework.org/schema/tx/spring-tx.xsd http://www.springframework.org/schema/aop http://www.springframework.org/schema/aop/spring-aop.xsd">
<context:component-scan base-package="cn.cqie"/>
<!--
数据源
-->
<bean id="dataSource" class="com.alibaba.druid.pool.DruidDataSource">
<property name="driverClassName" value="com.mysql.cj.jdbc.Driver"/>
<property name="url" value="jdbc:mysql://127.0.0.1:3306/springmybatis?useSSL=false&useUnicode=true&characterEncoding=utf8&serverTimezone=Asia/Shanghai"/>
<property name="username" value="root"/>
<property name="password" value="tcx119"/>
</bean>
<!-- SqlSessionFactory-->
<bean id="sqlSessionFactory" class="org.mybatis.spring.SqlSessionFactoryBean">
<property name="dataSource" ref="dataSource"/>
</bean>
<!--
扫描Dao
-->
<bean id="mapperScanner" class="org.mybatis.spring.mapper.MapperScannerConfigurer">
<property name="sqlSessionFactory" ref="sqlSessionFactory"/>
<property name="basePackage" value="cn.cqie.dao"/>
</bean>
<!--
配置事务管理器
DataSourceTransactionManager提供了事务管理的代码
-->
<bean id="transactionManager" class="org.springframework.jdbc.datasource.DataSourceTransactionManager">
<property name="dataSource" ref="dataSource"/>
</bean>
<tx:annotation-driven transaction-manager="transactionManager"></tx:annotation-driven>
</beans>
import cn.cqie.dao.DeptDao;
import cn.cqie.pojo.Dept;
import org.springframework.stereotype.Service;
import org.springframework.transaction.annotation.Isolation;
import org.springframework.transaction.annotation.Propagation;
import org.springframework.transaction.annotation.Transactional;

import javax.annotation.Resource;

@Service
@Transactional //将DataSourceTransactionManager切入到当前类的所有的方法
public class DeptServiceImpl implements DeptService{
    @Resource
    private DeptDao deptDao;
    @Transactional(propagation = Propagation.REQUIRED,isolation = Isolation.DEFAULT,readOnly = false,rollbackFor = java.lang.RuntimeException.class)
    @Override
    public void save(Dept dept) {
        deptDao.insert(dept);
        System.out.println("DeptServiceImpl.save");
//        throw new RuntimeException("异常出现,事务回滚!");
    }
}
ProxyFactory详解
package cn.cqie.aop;

import cn.cqie.aop.UserService;

public class UserServiceImpl implements UserService {
    @Override
    public void save() {
        System.out.println("UserServiceImpl.save");
//        System.out.println(1/0);
    }
}
package cn.cqie.service;

import org.aspectj.lang.annotation.Before;
import org.springframework.aop.MethodBeforeAdvice;

import java.lang.reflect.Method;

/**
 * Description:
 * Author: tiancx
 * Date: Created in 2021/11/22 13:27
 */
public class BeforeAdvice implements MethodBeforeAdvice {
    @Override
    public void before(Method method, Object[] objects, Object o) throws Throwable {
        System.out.println("BeforeAdvice.before");
        System.out.println(method.getName()+"  "+method.getClass());
    }
}
@Test
public void testProxyFactory(){
    //生成代理工厂对象
    ProxyFactory proxyFactory = new ProxyFactory();
    //准备目标对象
    proxyFactory.setTarget(new UserServiceImpl());
    //通知对象
    proxyFactory.addAdvice(new BeforeAdvice());
    //生成代理对象
    UserService proxy = (UserService) proxyFactory.getProxy();
    proxy.save();
}
Spring常用注解
@Controller
@Service
@Component
@Repostory
将这些注解声明的类加到Spring的IOC容器中
@Configuration
@Bean
使用类代替xml配置
JavaConfig
@Resource
@Autowired
DI 依赖注入
@Transactional
事务处理
【都看到这了,点点赞点点关注呗,爱你们】😚😚

结语
谢谢你的阅读,由于作者水平有限,难免有不足之处,若读者发现问题,还请批评,在留言区留言或者私信告知,我一定会尽快修改的。若各位大佬有什么好的解法,或者有意义的解法都可以在评论区展示额,万分谢谢。
写作不易,望各位老板点点赞,加个关注!😘😘😘
💬
作者:后端小知识
CSDN个人主页:后端小知识
🔎GZH:后端小知识
🎉欢迎关注🔎点赞👍收藏⭐️留言📝


 1859
1859


 被折叠的 条评论
为什么被折叠?


