


1.整合JDBC
在yaml里配置文件连接数据库
spring:
  datasource:
    url: jdbc:mysql://localhost:3306/db01?useUnicode=true&characterEncoding=utf8&useSSL=false&serverTimezone=Asia/Shanghai
    username: root
    password: 111111
    driver-class-name: com.mysql.cj.jdbc.Driver
测试
import javax.annotation.Resource;
import javax.sql.DataSource;
import java.sql.Connection;
import java.sql.SQLException;

@SpringBootTest
class SpringbootJdbcApplicationTests {
    @Resource
    DataSource dataSource;

    @Test
    void contextLoads() throws SQLException {
        //默认数据源:class com.zaxxer.hikari.HikariDataSource
        System.out.println(dataSource.getClass());
        //获得数据库连接
        Connection connection=dataSource.getConnection();
        System.out.println(connection);
        connection.close();


    }

}
打印输出,连接成功!
import org.springframework.jdbc.core.JdbcTemplate;
import org.springframework.web.bind.annotation.GetMapping;
import org.springframework.web.bind.annotation.PathVariable;
import org.springframework.web.bind.annotation.RestController;

import javax.annotation.Resource;
import java.util.List;
import java.util.Map;

@RestController
public class JDBCController {
    /**
     * Spring Boot 默认提供了数据源,默认提供了 org.springframework.jdbc.core.JdbcTemplate
     * JdbcTemplate 中会自己注入数据源,用于简化 JDBC操作
     * 还能避免一些常见的错误,使用起来也不用再自己来关闭数据库连接
     */
        @Resource
        JdbcTemplate jdbcTemplate;


    //查询employee表中所有数据
    //List 中的1个 Map 对应数据库的 1行数据
    //Map 中的 key 对应数据库的字段名,value 对应数据库的字段值
    @GetMapping("/list")
    public List<Map<String, Object>> userList(){
        String sql = "select * from dept";
        List<Map<String, Object>> maps = jdbcTemplate.queryForList(sql);
        return maps;
    }
}
访问url,查询出数据。简单的测试完成,当然我们在实际开发中并不会这么用。

2.集成Druid
导个包
 <!-- https://mvnrepository.com/artifact/com.alibaba/druid-spring-boot-starter -->
        <dependency>
            <groupId>com.alibaba</groupId>
            <artifactId>druid-spring-boot-starter</artifactId>
            <version>1.2.8</version>
</dependency> 
然后改一下配置文件里面的datasource type就可以了
spring:
  datasource:
    url: jdbc:mysql://localhost:3306/db01?useUnicode=true&characterEncoding=utf8&useSSL=false&serverTimezone=Asia/Shanghai
    username: root
    password: 111111
    driver-class-name: com.mysql.cj.jdbc.Driver
    type: com.alibaba.druid.pool.DruidDataSource
配置文件扩展
spring:
  datasource:
    url: jdbc:mysql://localhost:3306/db01?useUnicode=true&characterEncoding=utf8&useSSL=false&serverTimezone=Asia/Shanghai
    username: root
    password: 111111
    driver-class-name: com.mysql.cj.jdbc.Driver
    type: com.alibaba.druid.pool.DruidDataSource

    #SpringBoot默认是不注入这些的,需要自己绑定
    #druid数据源专有配置
    druid:
      #Spring Boot 默认是不注入这些属性值的,需要自己绑定
      #druid 数据源专有配置
      initialSize: 5
      minIdle: 5
      maxActive: 20
      maxWait: 60000
      timeBetweenEvictionRunsMillis: 60000
      minEvictableIdleTimeMillis: 300000
      validationQuery: SELECT 1 FROM DUAL
      testWhileIdle: true
      testOnBorrow: false
      testOnReturn: false
      poolPreparedStatements: true

      #配置监控统计拦截的filters,stat:监控统计、log4j:日志记录、wall:防御sql注入
      #如果允许时报错  java.lang.ClassNotFoundException: org.apache.log4j.Priority
      #则导入 log4j 依赖即可,Maven 地址:https://mvnrepository.com/artifact/log4j/log4j
      filters: stat,wall,log4j
      maxPoolPreparedStatementPerConnectionSize: 20
      useGlobalDataSourceStat: true
      connectionProperties: druid.stat.mergeSql=true;druid.stat.slowSqlMillis=500
写完配置了,怎么把他绑定起来呢
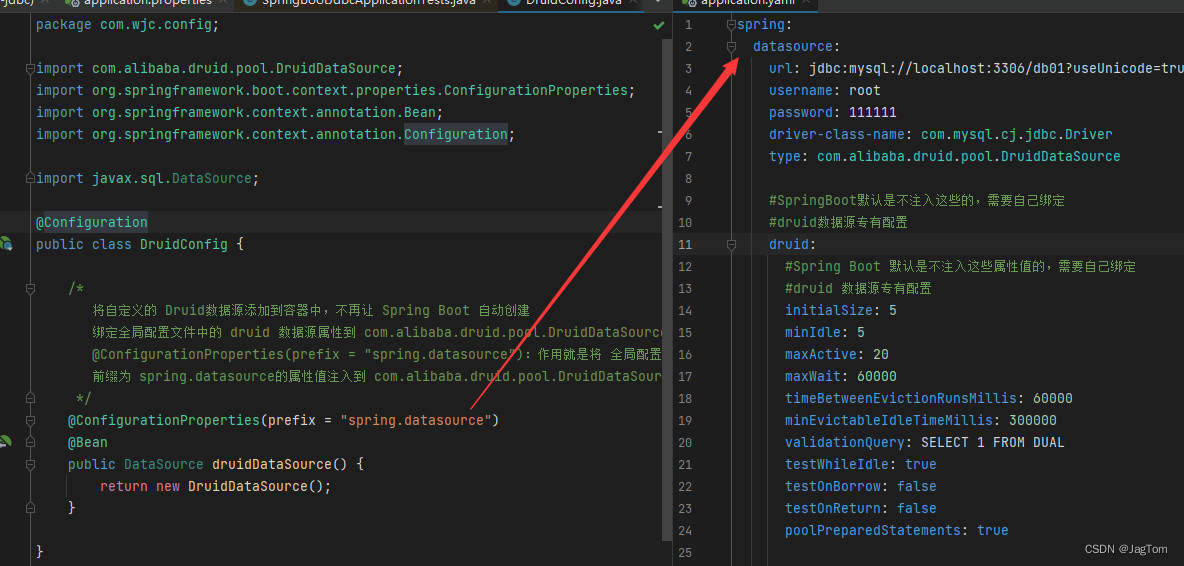
配置类
import com.alibaba.druid.pool.DruidDataSource;
import org.springframework.boot.context.properties.ConfigurationProperties;
import org.springframework.context.annotation.Bean;
import org.springframework.context.annotation.Configuration;

import javax.sql.DataSource;

@Configuration
public class DruidConfig {

    /*
       将自定义的 Druid数据源添加到容器中,不再让 Spring Boot 自动创建
       绑定全局配置文件中的 druid 数据源属性到 com.alibaba.druid.pool.DruidDataSource从而让它们生效
       @ConfigurationProperties(prefix = "spring.datasource"):作用就是将 全局配置文件中
       前缀为 spring.datasource的属性值注入到 com.alibaba.druid.pool.DruidDataSource 的同名参数中
     */
    @ConfigurationProperties(prefix = "spring.datasource")
    @Bean
    public DataSource druidDataSource() {
        return new DruidDataSource();
    }

}3.整合Mybatis
配置文件
spring:
  datasource:
    url: jdbc:mysql://localhost:3306/db01?useUnicode=true&characterEncoding=utf8&useSSL=false&serverTimezone=Asia/Shanghai
    username: root
    password: 111111
    driver-class-name: com.mysql.cj.jdbc.Driver
#    整合mybatis
mybatis:
  type-aliases-package: com.wjc.pojo
  mapper-locations: classpath:mybatis/mapper/*.xml
Dept.class
import lombok.AllArgsConstructor;
import lombok.Data;
import lombok.NoArgsConstructor;

@Data
@AllArgsConstructor
@NoArgsConstructor
public class Dept {
    private  Integer deptno;
    private  String dname;
    private  String db_source;
}
DeptMapper.xml
<?xml version="1.0" encoding="UTF-8" ?>

<!DOCTYPE mapper
        PUBLIC "-//mybatis.org//DTD Mapper 3.0//EN"
        "http://mybatis.org/dtd/mybatis-3-mapper.dtd">
<!--namespace=绑定一个对应的Mapper接口-->
<mapper namespace="com.wjc.mapper.DeptMapper">

    <!--增加一个-->
    <insert id="addDept" parameterType="Dept">
        insert into dept(dname, db_source)
        values (#{dname}, #{db_source})
    </insert>

    <!--根据id删除一个-->
    <delete id="deleteDept" parameterType="int">
        delete from dept where deptno = #{deptno}
    </delete>

    <!--更新-->
    <update id="updateDept" parameterType="Dept">
        update dept
        set dname = #{dname},db_source = #{db_source}
        where deptno= #{deptno}
    </update>

    <!--根据id查询,返回一个-->
    <select id="queryDeptById" resultType="Dept">
        select * from db01.dept
        where deptno = #{deptno}
    </select>

    <!--查询全部-->
    <select id="queryDeptList" resultType="Dept">
        SELECT * from dept
    </select>

</mapper>
DeptMapper.interface
import java.util.List;

//@Mapper  //将它标识为一个mybatis的mapper接口
//@Repository  //注册bean  使用了@Mapper注解同样会把当前类注册给bean容器  //而如果你在主启动类用了@MapperScan,就无需写这两个注解,注意controller层注入得用@Resource
public interface DeptMapper {
    List<Dept>  queryDeptList();

    Dept queryDeptById(int id);

    int addDept(Dept dept);

    int updateDept(Dept dept);

    int deleteDept(int id);

}
DeptController.class
import javax.annotation.Resource;
import java.util.List;

@RestController
public class DeptController {
    @Resource
    private DeptMapper deptMapper;

    @GetMapping("/queryDeptList")
    public List<Dept> queryDeptList(){

        List<Dept> depts = deptMapper.queryDeptList();
        for (Dept dept : depts) {
            System.out.println(dept);
        }
        return  depts;
    }


}
主启动类
@SpringBootApplication
@MapperScan("com.wjc.mapper") //配置扫描mapper接口包,动态实现mapper接口注入到spring容器中 取代以前的ssm xml配置
public class SpringbootJdbcApplication {

    public static void main(String[] args) {
        SpringApplication.run(SpringbootJdbcApplication.class, args);
    }

}
测试,查询功能

测试成功!
这里整合过程中跳过了业务层,逻辑还是一样的。
@Repository 与 @Mapper的区别_轻舟渡沧海的博客-CSDN博客_@repository和@mapper


 239
239


 被折叠的 条评论
为什么被折叠?
被折叠的 条评论
为什么被折叠?
 到【灌水乐园】发言


