没有Spring的时候我们如何进行开发的?
没有Spring为我们服务的,写代码一定是这样的
调用层:
 public static void main(String[] args) {
  		//创建视图层对象
        TestController testController = new TestController();
         //调用视图层方法
        testController.test();
    }
视图层:
  //视图层是这么写的
  public class TestController {
	DataBaseService testService = new DataBaseServiceImpl();
    public void test(){
        testService.testMethod();
    }

  }
业务层:
public class DataBaseServiceImpl implements DataBaseService {
     DataBaseDao mysqlDao= new MysqlDaoImpl();
    @Override
      public void testMethod() {
        mysqlDao.testMethodDao();
    }
}
持久层:
public class MysqlDaoImpl implements DataBaseDao {
    @Override
    public void testMethodDao() {
        System.out.println("mysql方法被调用了");
    }
}
这样的流程虽然能够正常调用到方法,如下

但是存在一个问题:
如果现在除了MySQL的数据源,业务上面要扩展一个Oracle库,只能如下操作
在业务层中多一种实现方式,修改原来的代码
public class DataBaseServiceImpl implements DataBaseService {

    DataBaseDao mysqlDao = new MysqlDaoImpl();
    DataBaseDao oracleDao = new OracleDaoImpl();

    @Override
    public void testMethod() {
        mysqlDao.testMethodDao();
    }

    @Override
    public void testMethod2() {
        oracleDao.testMethodDao();
    }
}
OCP原则
开闭原则,英文缩写OCP,全称Open Closed Principle。
原始定义:
Software entities (classes, modules, functions) should be open for extension but closed for modification。
字面翻译:
软件实体(包括类、模块、功能等)应该对扩展开放,但是对修改关闭。
为什么要“开”和“闭”
一般情况,我们接到需求变更的通知,通常方式可能就是修改模块的源代码,然而修改已经存在的源代码是存在很大风险的,尤其是项目上线运行一段时间后,开发人员发生变化,这种风险可能就更大。所以,为了避免这种风险,在面对需求变更时,我们一般不修改源代码,即所谓的对修改关闭。不允许修改源代码,我们如何应对需求变更呢?答案就是我们下面要说的对扩展开放。
通过扩展去应对需求变化,就要求我们必须要面向接口编程,或者说面向抽象编程。所有参数类型、引用传递的对象必须使用抽象(接口或者抽象类)的方式定义,不能使用实现类的方式定义;通过抽象去界定扩展,比如我们定义了一个接口A的参数,那么我们的扩展只能是接口A的实现类。总的来说,开闭原则提高系统的可维护性和代码的重用性。
明显,上述代码就不符合开闭原则。
DIP原则
依赖倒置原则(Dependence Inversion Principle),简称DIP。
高层模块不应该依赖于低层模块,两者都应该依赖其抽象。
抽象不应该依赖细节。细节应该依赖抽象。
这里的低层模块就是不可分割的原子逻辑,原子逻辑再组装就成了高级模块。
抽象是指接口或者抽象类,两者都是不能直接被实例化;
细节就是实现类,实现接口或继承抽象类而产生的类,可以直接被直接实例化。
所谓的能否直接实例化也就在于是否可以通过关键字new产生的一个对象。
简单来说就是模块之间的依赖都是通过抽象发生,实现类之间并不直接产生依赖关系,其依赖关系都是通过接口或者抽象类产生的。
实现类依赖接口或抽象类,但接口或抽象类不依赖实现类。这也正好对应面向接口编程。
为了符合DIP原则,我们刚才的代码就应该这么写,不能引入Service的实现类了,要引入service的接口:
public class DataBaseController {
	//但是这时候有另一个问题,就是testService现在是null
	//因为还没有用Spring框架进行对象管理,它替我们管理以后就不会是null了
    DataBaseService testService;
    public void test(){
        testService.testMethod();
        testService.testMethod2();
    }
}
其实,这种写法就是控制反转的思想。
控制反转
控制反转: IoC (Inversion of Control)
反转是什么呢?
反转的是两件事:
第一件事:
我不在程序中采用硬编码的方式来new对象了。
(new对象我不管了,new对象的权利交出去了。)
第二件事:
我不在程序中采用硬编码的方式来维护对象的关系了。
(对象之间关系的维护权,我也不管了,交出去了。)
控制反转:是一种编程思想。或者叫做一种新型的设计模式。
由于出现的比较新,没有被纳入GOF23种设计模式范围内。
Spring中的IoC
- Spring框架实现了控制反转IOC这种思想
Spring框架可以帮你new对象。
Spring框架可以帮你维护对象和对象之间的关系。
*Spring是一个实现了IoC思想的容器。
*控制反转的实现方式有多种,
其中比较重要的叫做: 依赖注入(Dependency Injection,简称DI).
依赖注入DI,又包括常见的两种方式:
第一种: set注入(执行set方法给属性赋值)
第二种:构造方法注入(执行构造方法给属性赋值)
依赖注入 中“依赖"是什么意思?"注入"是什么意思?
依赖:A对象和B对象的关系。
注入:是一种手段,通过这种手段,可以让A对象和B对象产生关系
依赖注入:对象A和对象B之间的关系,靠注入的手段来维护。而注入包括: set注入和构造注入。
Spring中八大模块
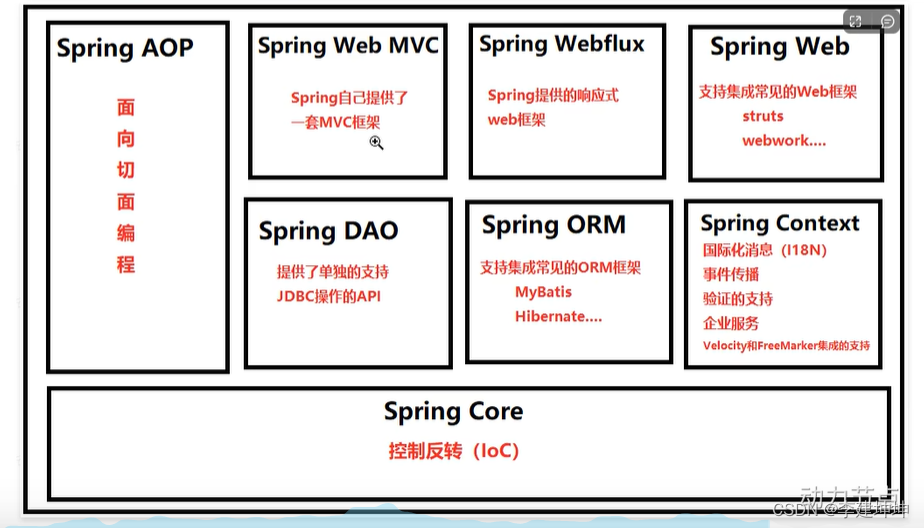
Spring特点
轻量
1.从大小与开销两方面而言Spring都是轻量的。完整的Spring框架可以在一个大小只有 1MB多的JAR文件里发布,并Spring所需的处理开销也是微不足道的
2.Spring是非侵入式的: Spring应用中的对象不依赖于Spring的特定类
控制反转
Spring通过一种称作控制反转 (loC) 的技术促进了松耦合。当应用了loC,一个对象依赖的其它对象会通过被动的方式传递进来,而不是这个对象自己创建或者查找依赖对象。你可以认为loC与JND相反一不是对象从容器中查找依赖,而是容器在对象初始化时不等对象清求就主动将依赖传递给它。
面向切面
Spring提供了面向切面编程的丰富支持,允许通过分离应用的业务逻与系统级服务(例审计(auditing)和事务transaction)管理)进行内聚性的开发。
应用对象只实现它们应该做的一一完成业务逻辑一仅此而已。它们并不负责甚至是意识)其它的系统级关注点,例如日志或事务支持.
容器
Spring包含并管理应用对象的配置和生命周期,在这个意义上它是一种容器,你可以配置你的每bean何被创建一基于一个可面置原型(prototype),你的oean可以创建一个单独的实例或者每次需要时都生成一个新的实例-以及它们是如何相与关联的。然而,Sring不应该被混同于传统的重量级的EJB容器,它价经常是庞大与笨重的,难以使用。
框架
Spring可以将简单的组件雷置、组合成为复杂的应用,在Soring中,应用对象被声明式地组合,典型地是在一个XML文件里,Spring也提供了很多基础功能(事务管理、持久化框架集成等等) ,将应用逻辑的开发留给了你。
所有Spring的这些特征使你能够编写更干净、更可管理、并且更易于测试的代码。它们也为Spring中的各种模块提供了基础支持
Spring的下载
一般在开发中,都直接用Idea自动引入Spring,下面演示如何自己去下载Spring
首先进入下面这个网站
Spring中文网
https://spring.p2hp.com/
项目下的Spring Framework就是Spring框架

点击GitHub
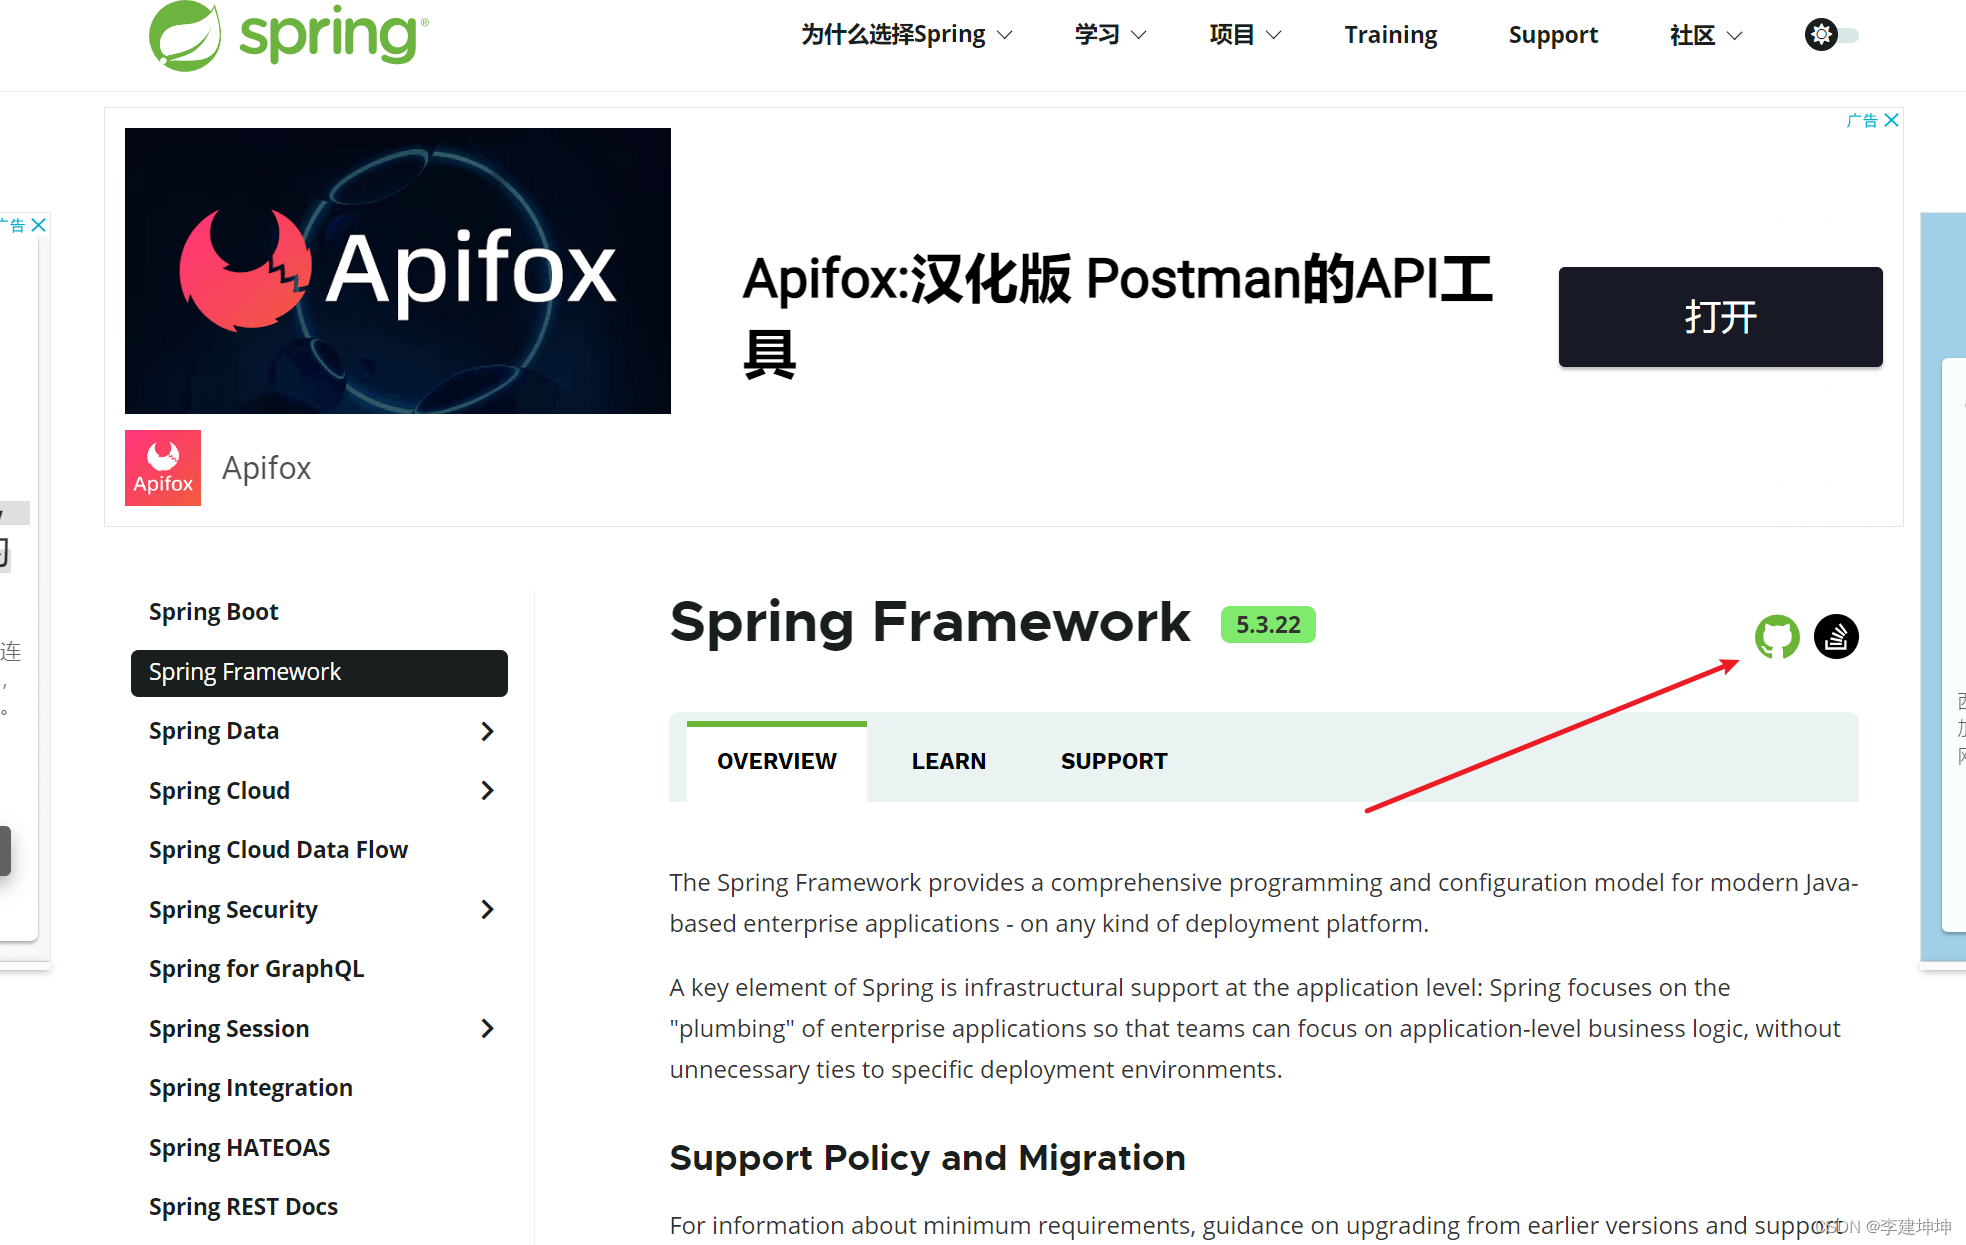
往下滑找到二进制文件,点击链接
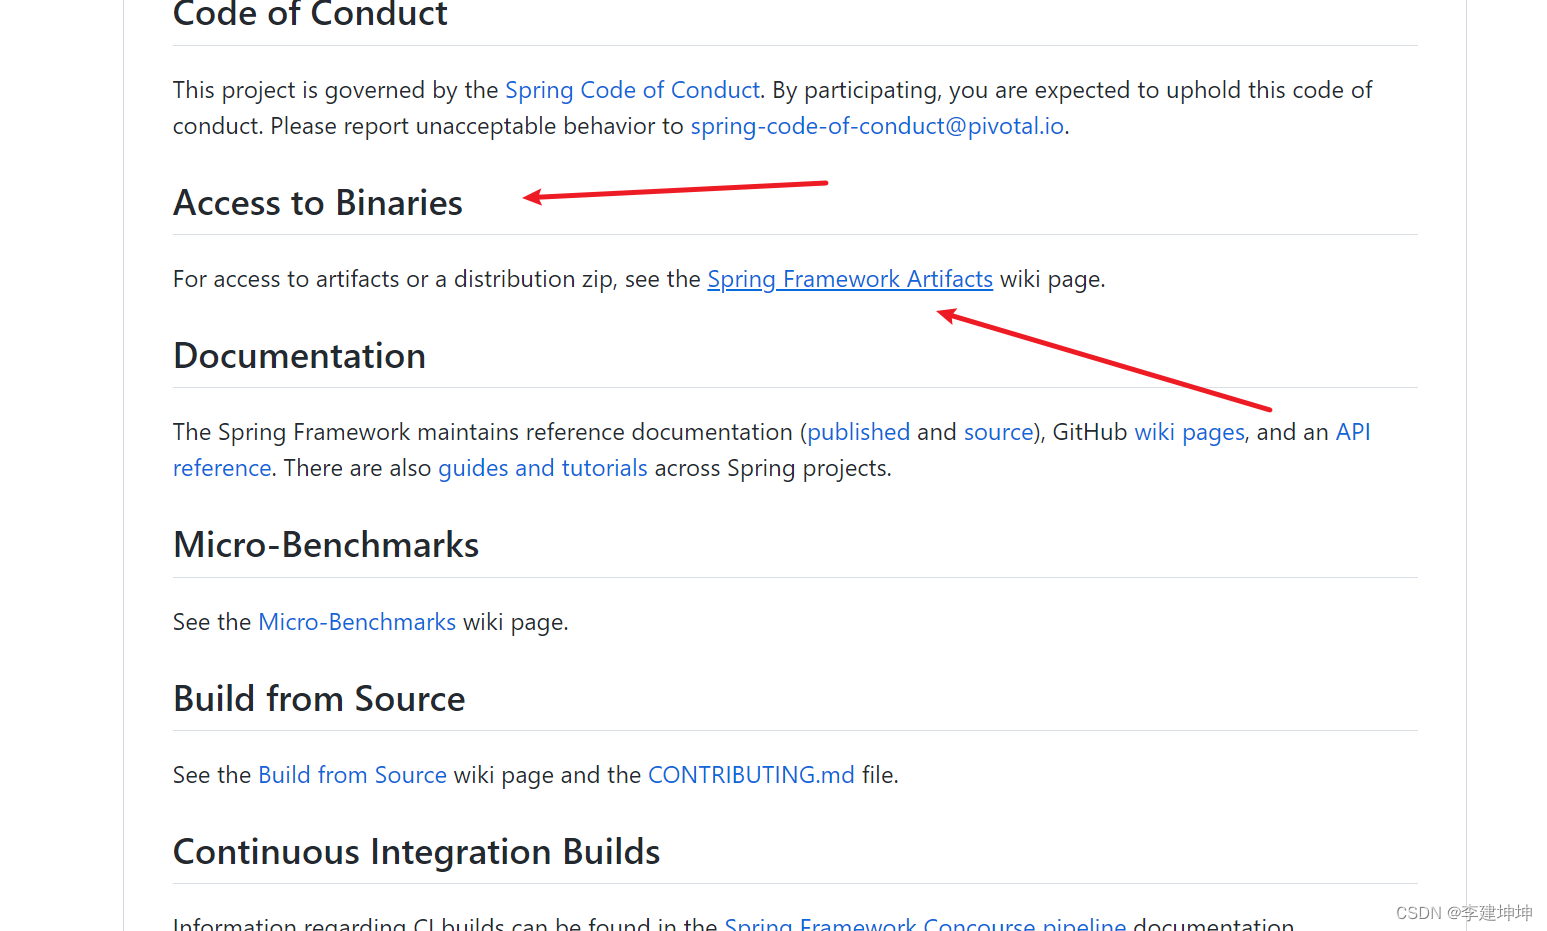
进来之后点击仓库地址
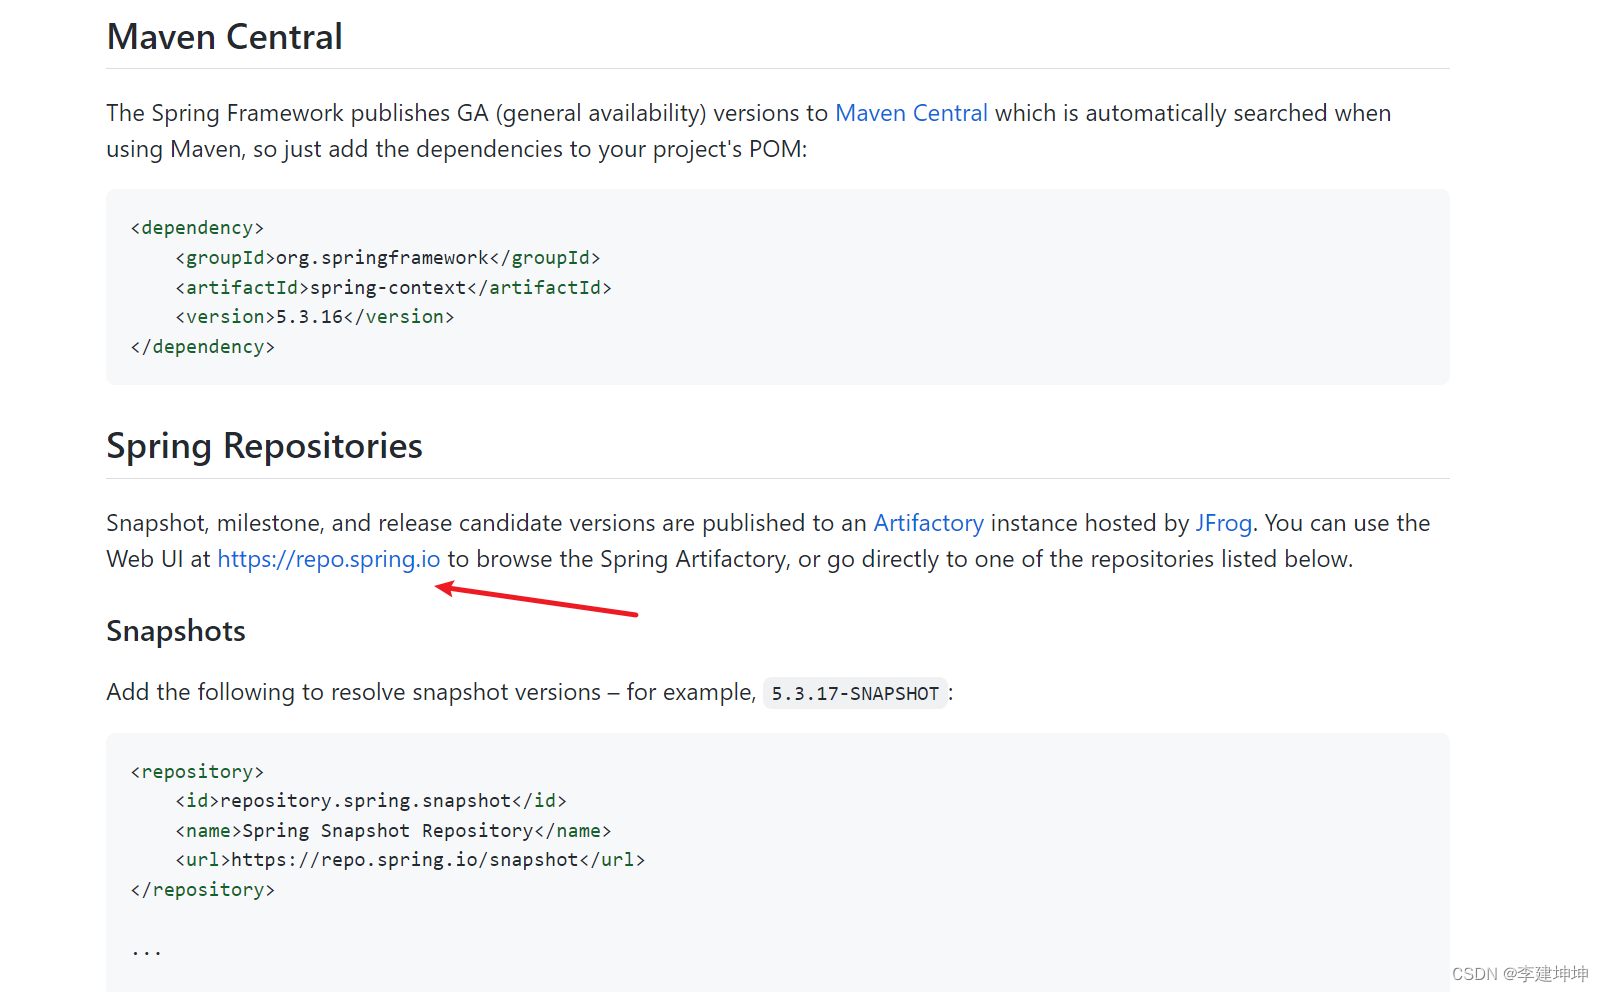
依次点击文件目录
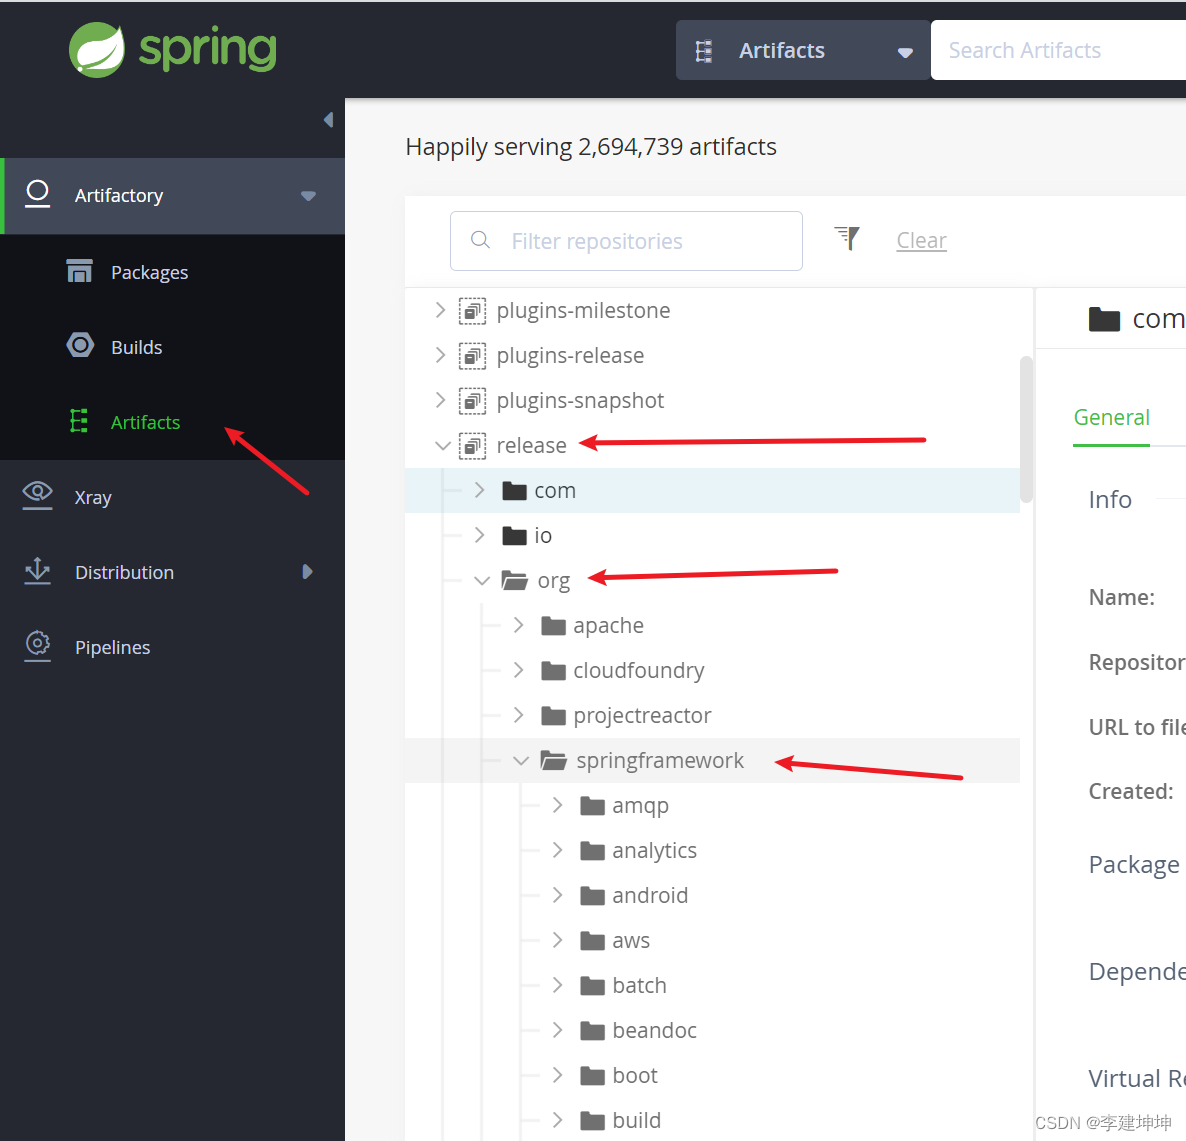
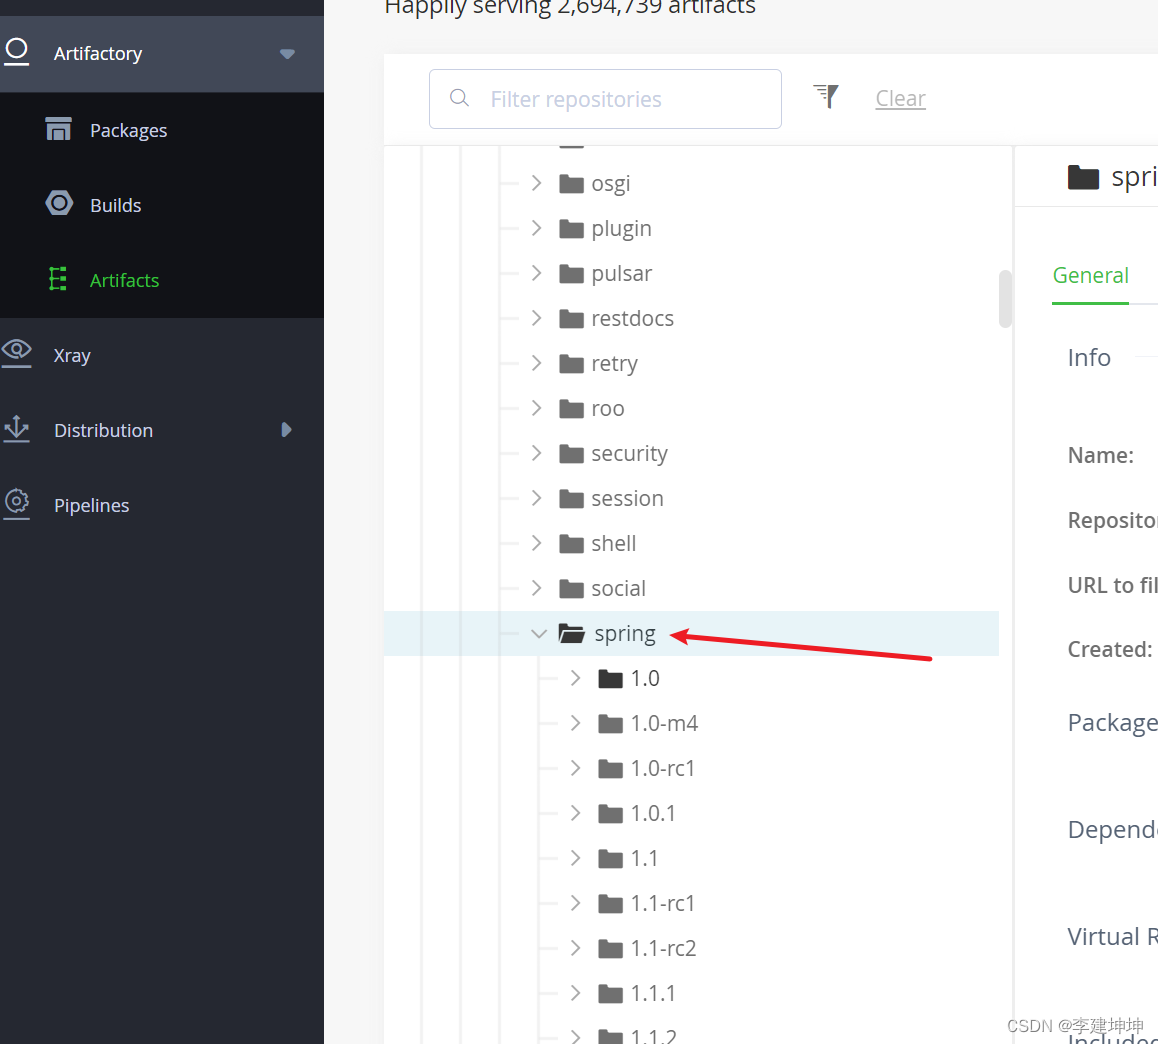
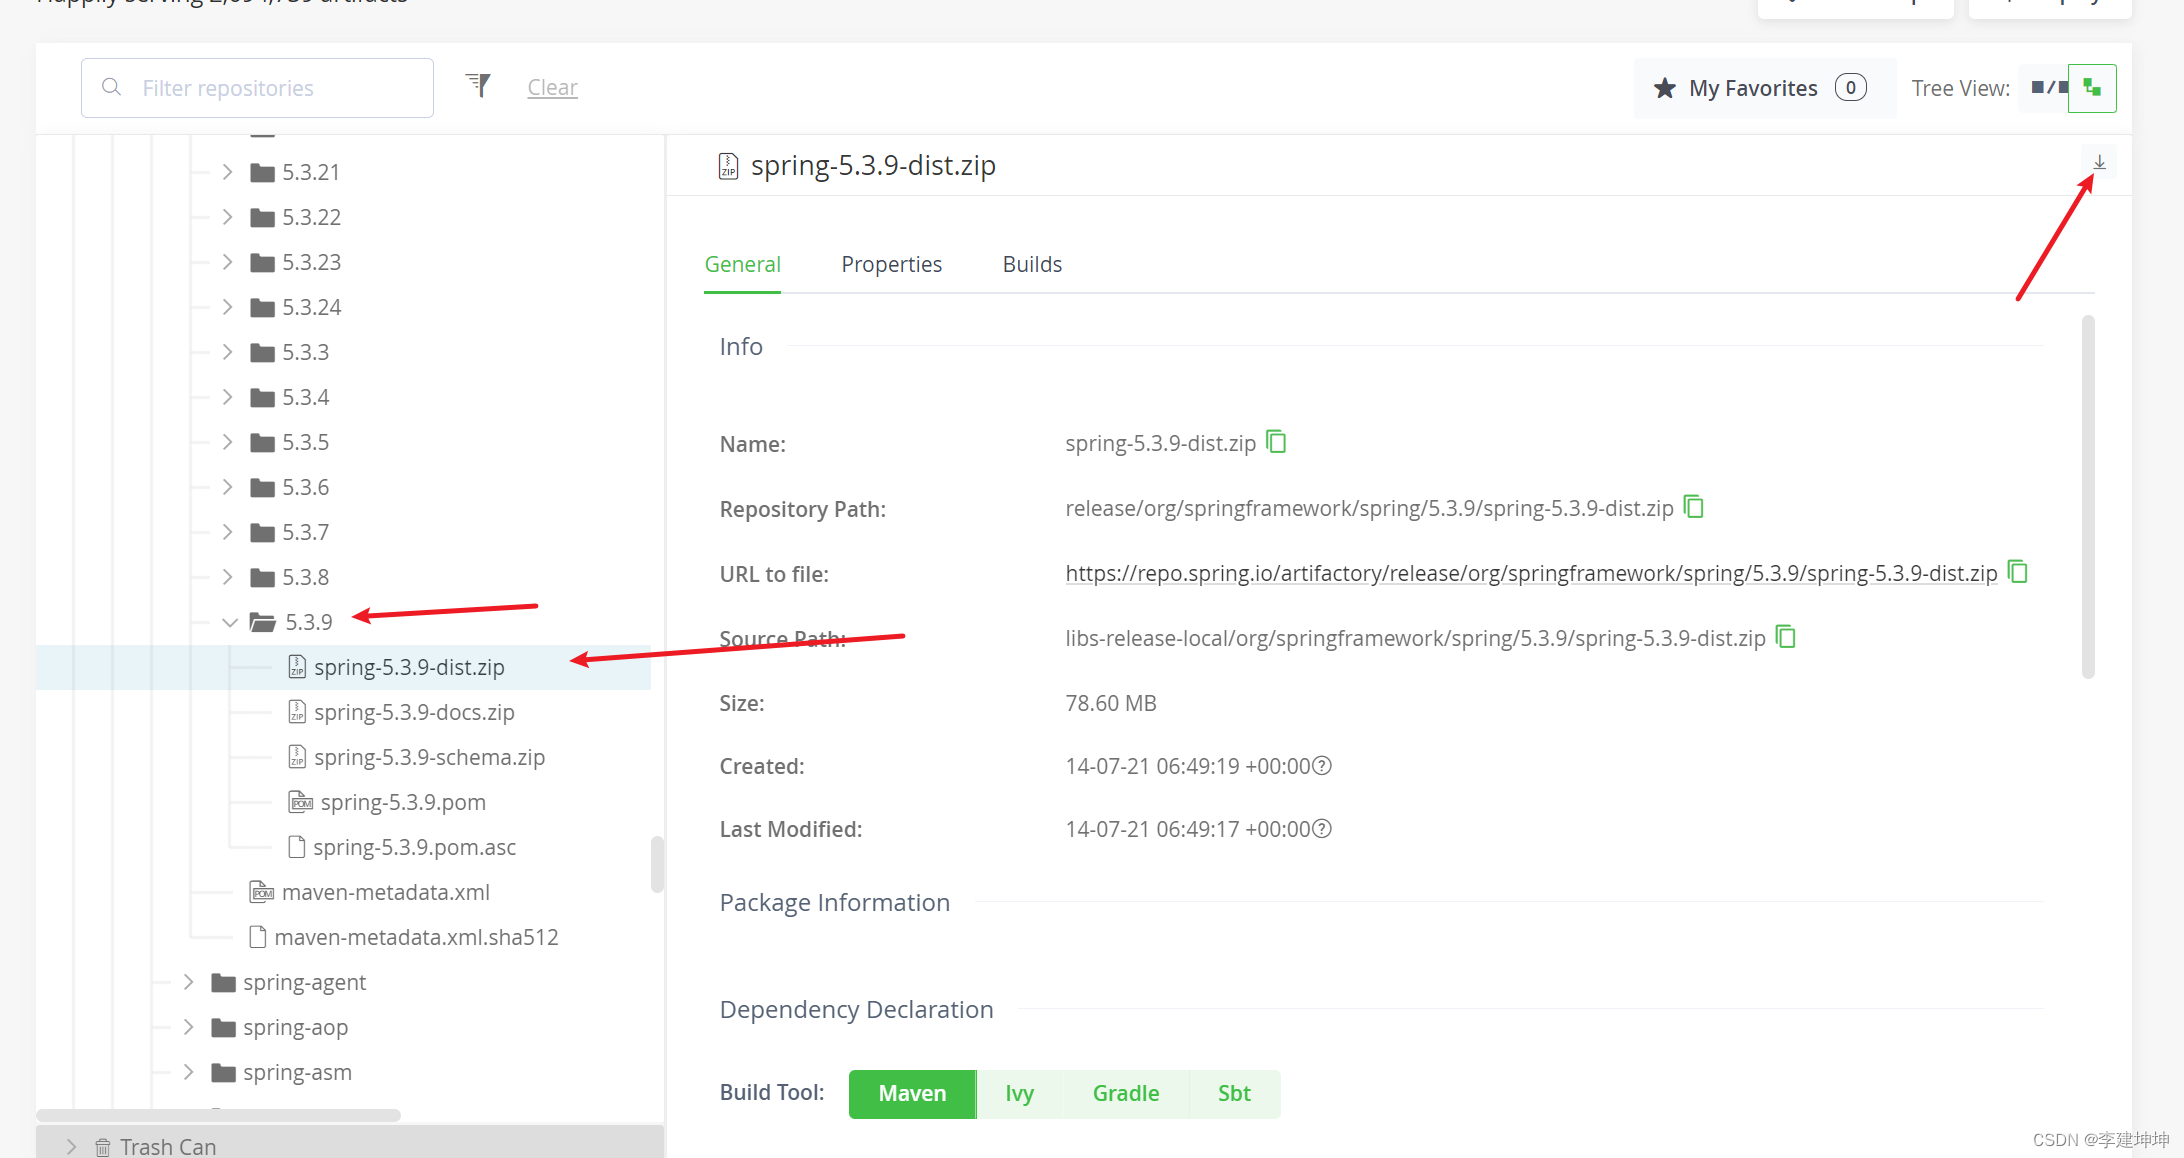
找到对应版本Spring,进行下载
Spring项目中常用的依赖
如果使用的是里程碑版本的Spring,如6.0.0,需要引入如下仓库依赖
<!--配置多个仓库-->
<repositories>
	<!--spring里程碑版本的仓库-->
	<repository>
		<id>repository.spring.milestone</id>
		<name>Spring Milestone Repository</name>
		<url>https://repo.spring.io/milestone</url>
	</repository>
</repositories>
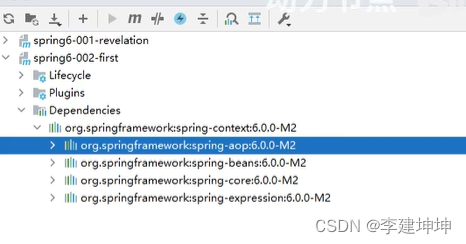
Spring中最基础的依赖,SpringContext依赖
<dependency>
	<groupId>org.springframework</groupId>
	<artifactId>spring-context</artifactId>
	<version>6.0.0-M2</version>
</dependency>
引入该依赖后会自动引入IOC与AOP相关的jar包
Spring如何管理对象的
比如我们现在有个User对象
public classUser{
}
那么我们可以新建一个Spring.xml配置文件来管理它
 <?xml version="1.0" encoding="UTF-8"?>
 <beans
 xmins="http://www.springframework.org/schema/beans"
xmins:xsi="http://www.w3.org/2001/XMLSchema-instance"
xsi:schemalocation="ttp://www.sorinaframerork.org/schemabeans http://ww.springframework.org/schemabeans spring-beans.xsd">
<!--这就是Spring的配智文件-->

	<bean id="userBean" class="com.powernode.spring6.bean.User">
</beans>
注意
1.IDEA工具为我们提供了这个文件的桃板,一定要使用这个模板来创建
2.这个文件名不一定叫做spring.xml,可以是其它名字
同时,这个配置文件也可以有多个,在不同的地方可以分别进行调用。
3.这个文件最好是放在类路径当中,方便后期的移植
4.放在resources根目录下,就相当于是放到了类的根路径下
5.配bean,这样spring才可以帮助我们管理这个对象
6.bean标签的两个重要属性:
id:是这个bean的身份证号,不能重复,是唯一的标识。
cLass: 必须城写类的全路径,全限定类名。(带包名的类名)
设置好配置文件之后,可以像如下代码这样来使用配置文件读取对象
public void testFistSpringCode(){
	ApplicationContext applicationContext = new ClassPathXmlApplicationContext("spring.xml");
	Object userBean = applicationContext.getBean(name:"userBean");
	System.out.println(userBean):
}
步骤:
第一步:获取Spring容器对象。
ApplicationContext 翻泽为:应用上下文。其实就是Spring容器。
ApplicationContext 是一个接口
ApplicationContext 接口下有很多实现类。
其中有一个实现类叫做: CLassPathXmlApplicationContext
cLassPathXmLApplicationContext 是专门从类路径当中加载spring配置文件的一个Spring上下文对象。
这行代码只要执行:就相当于启动了Spring容器,解析spring.xml文件,并且实例化所有的ean对象,放到spring容器当中。
第二步:根据bean前id从Spring容器中获取这个对象。
Spring是怎么实例化对象的
默认情况下Spring 会通过反射机制,调用类的无参数构造方法来实例化对象
实现原理如下:
CLass clazz = Class.forName(“com.powernode.spring6.bean.User”);
clazz.newInstance();
注意
如果定义了有参构造方法那么JVM就不会在提供无参数构造了,
所以如果我们定义了有参构造那么无参构造也要显示的定义出来,
否则就无法通过反射创建对象了。
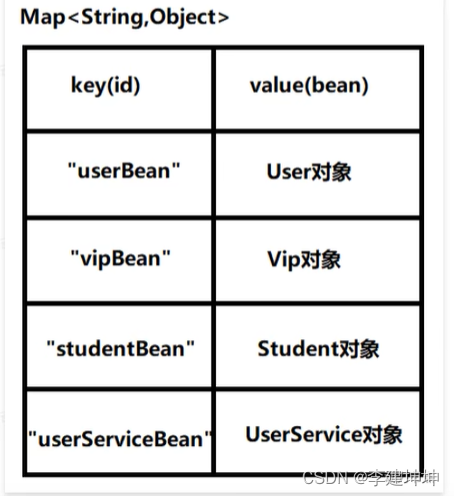
实例化对象之后存到什么数据结构中?
实际存到了一个map中
Spring配置文件可以同时存在多个吗?
可以的,ClassPathXmlApplicationContext可以传参多个配置文件,同时使用
ApplicationContext applicationContext = new
ClassPathXmlApplicationContext("spring6.xml","beans.xml");
Spring在配置文件中配置的类必须是自定义的吗,可以使用JDK中的类吗,例如: java.util.Date?
可以,使用方法都是一样的
Spring配置文件中getBean()方法调用时,如果指定的id不存在会怎样?
会报错,而不是返回空对象

Spring配置文件中getBean()方法返回的对象类型是什么?如何处理?
返回类型是Object
可以强制类型转换
Date nowTime = (Date) applicationContext.getBean(“nowTime”);
也可以在第二个参数传入要获取的类型
Date nowTime = applicationContext.getBean(“nowTime”, Date,class);
ClassPathXmlApplicationContext是从类路径中加载配置文件,如果没有在类路径当中,又应该如何加载配置文件呢?
比如Spring的配置文件现在没有在类的路径下,在D盘根路径中,如下所示

可以采取这种方式引入
ApplicationContext applicationContext = new FileSystemXmlApplicationContext("d:/spring6.xml");
ApplicationContext接口的来源
它的超级父接口是:BeanFactory
(翻译Bean工厂,就是能够生产Bean对象的一个工厂对象。)
BeanFactory.是IoC容器的顶级接口。
Spring的IoC容器底层实际上使用了:工厂模式。
Spring底层的IoC是怎么实现的?XML解析+工厂模式+反射机制
ApplicationContext applicationContext = new ClassPathXmlApplicationContext("spring6.xml")
依赖注入方式一:set方法注入
采用xml文件配置对象之后,能够创建对象了,但是如下这样调用
public class UserService {
	private UserDao userDao;
	public void saveUser(){
		userDao.insert();
	}
}
会报错空指针异常,因为xml 文件目前仅能够创建对象,而没有实现对象注入的功能。
可以通过如下set方法方式进行注入
	<!--配置dao-->
	<bean id="userDaoBean"class="com.powernode.spring6.dao.UserDao"/>
	<!--配置service-->
	<bean id="userServiceBean" class="com.powernode.spring6.service.UserService">
		<property name="mySQLUserDao" ref="userDaoBean"/>
	</bean>
注意
- 想让Spring调用对应的set方法,需要配置property标签
- name属性怎么指定值:set方法的方法名,去掉set,然后把剩下的单词首字母变小写,写到这里
- ref翻译为引用。英语单词:refrences。ref后面指定的是要注入的bean的id
- 需要存在对应的set方法才能生效,如下所示
public class UserService {
	private UserDao userDao;
	public void setMySQLUserDao(UserDao xyz){
		this.userDao xyz;
	}
}
依赖注入方式二:构造方法注入
index属性指定参数下标。
第一个参数是0,第二个参数是1,第三个参数是2,以此类排。
ref属性用来指定注入bean的id
<bean id="userDaBean"class="com.powernode.spring6.dao.UserDao"/>
<bean id="vipDaoBean"class="com.powernode.spring6.dao.VipDao"/>
<bean id="csBean"class="com.powernode.spring6.service.CustomerService">
	<!--构造注入-->
	//index属性指定参数下标,第一个参数是0,第二个参数是1,第三个参数是2,以此类排。ref属性用来指定注入bean的id
	//指定构造方法的第一个参数,下标是0
	<constructor-arg index="0" ref="userDaoBean"/>
	//指定构渣方法的第二个参数,下标是1
	<constructor-arg index="1" ref="vipDaoBean"/>
</bean>
需要有指定的构造方法
public class CustomerService
	private UserDao userDao;
	private VipDao vipDao;
	//指定构造方法
	public CustomerService(UserDaouserDao,VipDao vipDao){
		this.userDao userDao;
		this.vipDao vipDao;
	}
	public void save(){
		userDao.insert();
		vipDao.insert();
	}
}
注意
1.这里面的index属性也可以换成name,同样会生效
<constructor-arg name="0"ref="userDaoBean"/>
2.不用name也不用index,只用ref也可以
这种方式实际上是根据类型进行注入的。
spring会自动根据类型来判断把ref注入给哪个参数。
<constructor-arg ref="userDaoBean"/>
Set注入:Spring配置文件中的外部bean和内部bean是什么
内部bean,property标签中使用嵌套bean标签
<bean id="orderServiceBean2" class="com.powernode.spring6.service.OrderService">
	<property name="orderDao">
		<bean class="com.powernode.spring6.dao.OrderDao">
		</bean>
	</property>
</bean>
外部bean,通过ref来引用其他的Bean
<bean id="userDaoBean"class="com.powernode.spring6.dao.UserDao"/>
<bean id="userServiceBean" class="com.powernode.spring6.service.UserService">
	<property name="mySQLUserDao" ref="userDaoBean"/>
</bean>
Set注入: 如何注入简单类型
如果是给简单类型赋值,就不能使ref了。就需要使value了
<bean id="userBean"class="com.powernode.spring6.bean.User">
	<property name:="username" valve="张三"/>
	<property name="password"  value="123"/>
	<property name="age"       value="20"/>
</bean>
Set注入: 简单类型都包括哪些
可以进入BeanUtil类中的这个方法,里面列举了简单类型
public static boolean isSimpleValueType(Class<?>type){
	return (Void.class !type &void.class !type &
			(Classutils.isPrimitiveorWrapper(type)
			Enum.class.isAssignableFrom(type)
			CharSequence.class.isAssignableFrom(type)
			Number.class.isAssignableFrom(type)
			Date.class.isAssignableFrom(type)
			Temporal.class.isAssignableFrom(type)
			URI.class =type
			URL.class =type
			Locale.class =type
			Class.class =type));
}
对于这些简单类型,都可以通过value来进行对象赋值
<bean id="svt"class="com.powernode.spring6.bean.SimpleValueType">
	<property name="age"value="20"/>
	<property name="age2"value="20"/>
	<property name="username"value="zhangsan"/>
	<property name="season"value="SPRING"/>
	<property name="flag"value="false"/>
	<property name="flag2"value="true"/>
	<property name="c"value=""/>
	<property name="c2"value=""/>
	<property name="clazz" value="java.Lang.String"/>
</bean>
但是上述类型中有一个比较特殊的类型,Date类型直接用value会失败
<property name="birth" value="1970-10-11"/>
报错信息如下

这个报错是因为时间的格式不对
我们可以发现,时间的默认格式是这样的
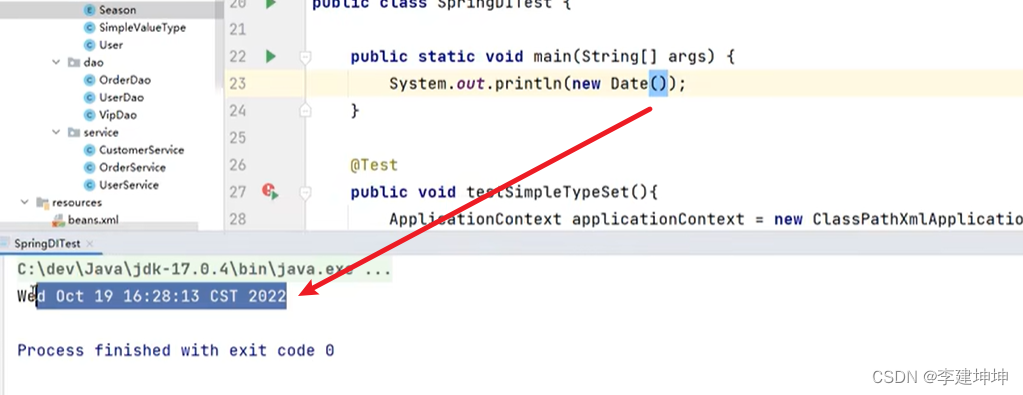
经测试,这种格式是正确的
<property name="birth"value="Wed Oct 19 16:28:13 CST 2022"/>
但是实际开发中这种格式很麻烦,所以日期格式一般都用ref来引入
Set注入: 级联属性赋值
比如现在有一个班级类
package com.powernode.spring6.beans;

/**
 * @author 动力节点
 * @version 1.0
 * @className Clazz
 * @since 1.0
 **/
public class Clazz {
    private String name;

    public Clazz() {
    }

    public Clazz(String name) {
        this.name = name;
    }

    public String getName() {
        return name;
    }

    public void setName(String name) {
        this.name = name;
    }

    @Override
    public String toString() {
        return "Clazz{" +
                "name='" + name + '\'' +
                '}';
    }
}
还有一个学生类
package com.powernode.spring6.beans;

/**
 * @author 动力节点
 * @version 1.0
 * @className Student
 * @since 1.0
 **/
public class Student {
    private String name;
    private Clazz clazz;

    public Student() {
    }

    public Student(String name, Clazz clazz) {
        this.name = name;
        this.clazz = clazz;
    }

    public void setName(String name) {
        this.name = name;
    }

    public void setClazz(Clazz clazz) {
        this.clazz = clazz;
    }

    public Clazz getClazz() {
        return clazz;
    }

    @Override
    public String toString() {
        return "Student{" +
                "name='" + name + '\'' +
                ", clazz=" + clazz +
                '}';
    }
}
可以如下这样,在学生类中直接给班级类的属性赋值
<?xml version="1.0" encoding="UTF-8"?>
<beans xmlns="http://www.springframework.org/schema/beans"
       xmlns:xsi="http://www.w3.org/2001/XMLSchema-instance"
       xsi:schemaLocation="http://www.springframework.org/schema/beans http://www.springframework.org/schema/beans/spring-beans.xsd">

    <bean id="clazzBean" class="com.powernode.spring6.beans.Clazz"/>

    <bean id="student" class="com.powernode.spring6.beans.Student">
        <property name="name" value="张三"/>

        <!--要点1:以下两行配置的顺序不能颠倒-->
        <property name="clazz" ref="clazzBean"/>
        <!--要点2:clazz属性必须有getter方法-->
        <property name="clazz.name" value="高三一班"/>
    </bean>
</beans>
测试程序
@Test
public void testCascade(){
    ApplicationContext applicationContext = new ClassPathXmlApplicationContext("spring-cascade.xml");
    Student student = applicationContext.getBean("student", Student.class);
    System.out.println(student);
}
运行结果

要点:
● 在spring配置文件中,如上,注意顺序。
● 在spring配置文件中,clazz属性必须提供getter方法。
Set注入: 注入数组
当数组中的元素是简单类型:
package com.powernode.spring6.beans;

import java.util.Arrays;

public class Person {
    private String[] favariteFoods;

    public void setFavariteFoods(String[] favariteFoods) {
        this.favariteFoods = favariteFoods;
    }

    @Override
    public String toString() {
        return "Person{" +
                "favariteFoods=" + Arrays.toString(favariteFoods) +
                '}';
    }
}
<?xml version="1.0" encoding="UTF-8"?>
<beans xmlns="http://www.springframework.org/schema/beans"
       xmlns:xsi="http://www.w3.org/2001/XMLSchema-instance"
       xsi:schemaLocation="http://www.springframework.org/schema/beans http://www.springframework.org/schema/beans/spring-beans.xsd">

    <bean id="person" class="com.powernode.spring6.beans.Person">
        <property name="favariteFoods">
            <array>
                <value>鸡排</value>
                <value>汉堡</value>
                <value>鹅肝</value>
            </array>
        </property>
    </bean>
</beans>
@Test
public void testArraySimple(){
    ApplicationContext applicationContext = new ClassPathXmlApplicationContext("spring-array-simple.xml");
    Person person = applicationContext.getBean("person", Person.class);
    System.out.println(person);
}
当数组中的元素是非简单类型:一个订单中包含多个商品。
package com.powernode.spring6.beans;

/**
 * @author 动力节点
 * @version 1.0
 * @className Goods
 * @since 1.0
 **/
public class Goods {
    private String name;

    public Goods() {
    }

    public Goods(String name) {
        this.name = name;
    }

    public String getName() {
        return name;
    }

    public void setName(String name) {
        this.name = name;
    }

    @Override
    public String toString() {
        return "Goods{" +
                "name='" + name + '\'' +
                '}';
    }
}
package com.powernode.spring6.beans;

import java.util.Arrays;

/**
 * @author 动力节点
 * @version 1.0
 * @className Order
 * @since 1.0
 **/
public class Order {
    // 一个订单中有多个商品
    private Goods[] goods;

    public Order() {
    }

    public Order(Goods[] goods) {
        this.goods = goods;
    }

    public void setGoods(Goods[] goods) {
        this.goods = goods;
    }

    @Override
    public String toString() {
        return "Order{" +
                "goods=" + Arrays.toString(goods) +
                '}';
    }
}
<?xml version="1.0" encoding="UTF-8"?>
<beans xmlns="http://www.springframework.org/schema/beans"
       xmlns:xsi="http://www.w3.org/2001/XMLSchema-instance"
       xsi:schemaLocation="http://www.springframework.org/schema/beans http://www.springframework.org/schema/beans/spring-beans.xsd">

    <bean id="goods1" class="com.powernode.spring6.beans.Goods">
        <property name="name" value="西瓜"/>
    </bean>

    <bean id="goods2" class="com.powernode.spring6.beans.Goods">
        <property name="name" value="苹果"/>
    </bean>

    <bean id="order" class="com.powernode.spring6.beans.Order">
        <property name="goods">
            <array>
                <!--这里使用ref标签即可-->
                <ref bean="goods1"/>
                <ref bean="goods2"/>
            </array>
        </property>
    </bean>

</beans>
@Test
public void testArray(){
    ApplicationContext applicationContext = new ClassPathXmlApplicationContext("spring-array.xml");
    Order order = applicationContext.getBean("order", Order.class);
    System.out.println(order);
}

要点:
● 如果数组中是简单类型,使用value标签。
● 如果数组中是非简单类型,使用ref标签。
Set注入: 注入List集合
package com.powernode.spring6.beans;

import java.util.List;

public class People {
    // 一个人有多个名字
    private List<String> names;

    public void setNames(List<String> names) {
        this.names = names;
    }

    @Override
    public String toString() {
        return "People{" +
                "names=" + names +
                '}';
    }
}
<?xml version="1.0" encoding="UTF-8"?>
<beans xmlns="http://www.springframework.org/schema/beans"
       xmlns:xsi="http://www.w3.org/2001/XMLSchema-instance"
       xsi:schemaLocation="http://www.springframework.org/schema/beans http://www.springframework.org/schema/beans/spring-beans.xsd">

    <bean id="peopleBean" class="com.powernode.spring6.beans.People">
        <property name="names">
            <list>
                <value>铁锤</value>
                <value>张三</value>
                <value>张三</value>
                <value>张三</value>
                <value>狼</value>
            </list>
        </property>
    </bean>
</beans>
@Test
public void testCollection(){
    ApplicationContext applicationContext = new ClassPathXmlApplicationContext("spring-collection.xml");
    People peopleBean = applicationContext.getBean("peopleBean", People.class);
    System.out.println(peopleBean);
}

注意:注入List集合的时候使用list标签,如果List集合中是简单类型使用value标签,反之使用ref标签。
Set注入: 注入Set集合
package com.powernode.spring6.beans;

import java.util.List;
import java.util.Set;


public class People {
    // 一个人有多个电话
    private Set<String> phones;

    public void setPhones(Set<String> phones) {
        this.phones = phones;
    }

    @Override
    public String toString() {
        return "People{" +
                "phones=" + phones +
                ", names=" + names +
                '}';
    }
}
<?xml version="1.0" encoding="UTF-8"?>
<beans xmlns="http://www.springframework.org/schema/beans"
       xmlns:xsi="http://www.w3.org/2001/XMLSchema-instance"
       xsi:schemaLocation="http://www.springframework.org/schema/beans http://www.springframework.org/schema/beans/spring-beans.xsd">

    <bean id="peopleBean" class="com.powernode.spring6.beans.People">
        <property name="phones">
            <set>
                <!--非简单类型可以使用ref,简单类型使用value-->
                <value>110</value>
                <value>110</value>
                <value>120</value>
                <value>120</value>
                <value>119</value>
                <value>119</value>
            </set>
        </property>
    </bean>
</beans>

要点:
● 使用标签
● set集合中元素是简单类型的使用value标签,反之使用ref标签。
Set注入: 注入Map集合
package com.powernode.spring6.beans;

import java.util.List;
import java.util.Map;
import java.util.Set;


public class People {
    // 一个人有多个住址
    private Map<Integer, String> addrs;

    public void setAddrs(Map<Integer, String> addrs) {
        this.addrs = addrs;
    }

    @Override
    public String toString() {
        return "People{" +
                "addrs=" + addrs +
                ", phones=" + phones +
                ", names=" + names +
                '}';
    }

}
<?xml version="1.0" encoding="UTF-8"?>
<beans xmlns="http://www.springframework.org/schema/beans"
       xmlns:xsi="http://www.w3.org/2001/XMLSchema-instance"
       xsi:schemaLocation="http://www.springframework.org/schema/beans http://www.springframework.org/schema/beans/spring-beans.xsd">

    <bean id="peopleBean" class="com.powernode.spring6.beans.People">
        <property name="addrs">
            <map>
                <!--如果key不是简单类型,使用 key-ref 属性-->
                <!--如果value不是简单类型,使用 value-ref 属性-->
                <entry key="1" value="北京大兴区"/>
                <entry key="2" value="上海浦东区"/>
                <entry key="3" value="深圳宝安区"/>
            </map>
        </property>
    </bean>
</beans>

要点:
● 使用
Set注入: 注入Properties集合
java.util.Properties继承java.util.Hashtable,所以Properties也是一个Map集合。
package com.powernode.spring6.beans;

import java.util.List;
import java.util.Map;
import java.util.Properties;
import java.util.Set;

public class People {

    private Properties properties;

    public void setProperties(Properties properties) {
        this.properties = properties;
    }

    @Override
    public String toString() {
        return "People{" +
                "properties=" + properties +
                ", addrs=" + addrs +
                ", phones=" + phones +
                ", names=" + names +
                '}';
    }
}
<?xml version="1.0" encoding="UTF-8"?>
<beans xmlns="http://www.springframework.org/schema/beans"
       xmlns:xsi="http://www.w3.org/2001/XMLSchema-instance"
       xsi:schemaLocation="http://www.springframework.org/schema/beans http://www.springframework.org/schema/beans/spring-beans.xsd">

    <bean id="peopleBean" class="com.powernode.spring6.beans.People">
        <property name="properties">
            <props>
                <prop key="driver">com.mysql.cj.jdbc.Driver</prop>
                <prop key="url">jdbc:mysql://localhost:3306/spring</prop>
                <prop key="username">root</prop>
                <prop key="password">123456</prop>
            </props>
        </property>
    </bean>
</beans>

要点:
● 使用标签嵌套标签完成。
Set注入: 注入null和空字符串
注入空字符串使用: 或者 value=“”
注入null使用: 或者 不为该属性赋值
● 我们先来看一下,怎么注入空字符串。
package com.powernode.spring6.beans;

public class Vip {
    private String email;

    public void setEmail(String email) {
        this.email = email;
    }

    @Override
    public String toString() {
        return "Vip{" +
                "email='" + email + '\'' +
                '}';
    }
}
<?xml version="1.0" encoding="UTF-8"?>
<beans xmlns="http://www.springframework.org/schema/beans"
       xmlns:xsi="http://www.w3.org/2001/XMLSchema-instance"
       xsi:schemaLocation="http://www.springframework.org/schema/beans http://www.springframework.org/schema/beans/spring-beans.xsd">

    <bean id="vipBean" class="com.powernode.spring6.beans.Vip">
        <!--空串的第一种方式-->
        <!--<property name="email" value=""/>-->
        <!--空串的第二种方式-->
        <property name="email">
            <value/>
        </property>
    </bean>

</beans>
@Test
public void testNull(){
    ApplicationContext applicationContext = new ClassPathXmlApplicationContext("spring-null.xml");
    Vip vipBean = applicationContext.getBean("vipBean", Vip.class);
    System.out.println(vipBean);
}
怎么注入null呢?
第一种方式:不给属性赋值
<?xml version="1.0" encoding="UTF-8"?>
<beans xmlns="http://www.springframework.org/schema/beans"
       xmlns:xsi="http://www.w3.org/2001/XMLSchema-instance"
       xsi:schemaLocation="http://www.springframework.org/schema/beans http://www.springframework.org/schema/beans/spring-beans.xsd">

    <bean id="vipBean" class="com.powernode.spring6.beans.Vip" />

</beans>

第二种方式:使用 <null/>
<?xml version="1.0" encoding="UTF-8"?>
<beans xmlns="http://www.springframework.org/schema/beans"
       xmlns:xsi="http://www.w3.org/2001/XMLSchema-instance"
       xsi:schemaLocation="http://www.springframework.org/schema/beans http://www.springframework.org/schema/beans/spring-beans.xsd">

    <bean id="vipBean" class="com.powernode.spring6.beans.Vip">
        <property name="email">
            <null/>
        </property>
    </bean>

</beans>

Set注入: 注入的值中含有特殊符号
XML中有5个特殊字符,分别是:<、>、'、"、&
以上5个特殊符号在XML中会被特殊对待,会被当做XML语法的一部分进行解析,如果这些特殊符号直接出现在注入的字符串当中,会报错。
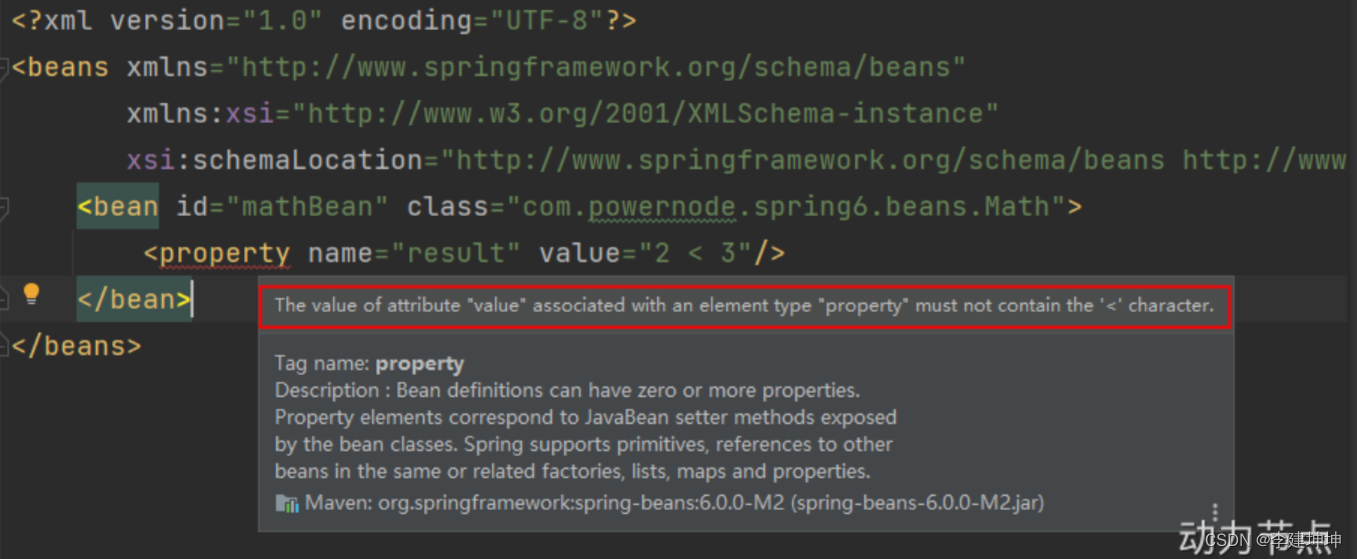
解决方案包括两种:
● 第一种:特殊符号使用转义字符代替。
● 第二种:将含有特殊符号的字符串放到:<![CDATA[]]> 当中。因为放在CDATA区中的数据不会被XML文件解析器解析。
5个特殊字符对应的转义字符分别是:
| 特殊字符 | 转义字符 |
|---|---|
| > | > |
| < | < |
| ’ | ' |
| " | " |
| & | & |
先使用转义字符来代替:
package com.powernode.spring6.beans;

public class Math {
    private String result;

    public void setResult(String result) {
        this.result = result;
    }

    @Override
    public String toString() {
        return "Math{" +
                "result='" + result + '\'' +
                '}';
    }
}
<?xml version="1.0" encoding="UTF-8"?>
<beans xmlns="http://www.springframework.org/schema/beans"
xmlns:xsi="http://www.w3.org/2001/XMLSchema-instance"
xsi:schemaLocation="http://www.springframework.org/schema/beans http://www.springframework.org/schema/beans/spring-beans.xsd">
<bean id="mathBean" class="com.powernode.spring6.beans.Math">
<property name="result" value="2 < 3"/>
</bean>
</beans>
@Test
public void testSpecial(){
    ApplicationContext applicationContext = new ClassPathXmlApplicationContext("spring-special.xml");
    Math mathBean = applicationContext.getBean("mathBean", Math.class);
    System.out.println(mathBean);
}

我们再来使用CDATA方式:
<?xml version="1.0" encoding="UTF-8"?>
<beans xmlns="http://www.springframework.org/schema/beans"
       xmlns:xsi="http://www.w3.org/2001/XMLSchema-instance"
       xsi:schemaLocation="http://www.springframework.org/schema/beans http://www.springframework.org/schema/beans/spring-beans.xsd">

    <bean id="mathBean" class="com.powernode.spring6.beans.Math">
        <property name="result">
            <!--只能使用value标签-->
            <value><![CDATA[2 < 3]]></value>
        </property>
    </bean>

</beans>
注意:使用CDATA时,不能使用value属性,只能使用value标签

依赖注入方式: p命名空间注入
目的:简化配置。
使用p命名空间注入的前提条件包括两个:
● 第一:在XML头部信息中添加p命名空间的配置信息:xmlns:p=“http://www.springframework.org/schema/p”
● 第二:p命名空间注入是基于setter方法的,所以需要对应的属性提供setter方法。
package com.powernode.spring6.beans;

public class Customer {
    private String name;
    private int age;

    public void setName(String name) {
        this.name = name;
    }

    public void setAge(int age) {
        this.age = age;
    }

    @Override
    public String toString() {
        return "Customer{" +
                "name='" + name + '\'' +
                ", age=" + age +
                '}';
    }
}
<?xml version="1.0" encoding="UTF-8"?>
<beans xmlns="http://www.springframework.org/schema/beans"
       xmlns:p="http://www.springframework.org/schema/p"
       xmlns:xsi="http://www.w3.org/2001/XMLSchema-instance"
       xsi:schemaLocation="http://www.springframework.org/schema/beans http://www.springframework.org/schema/beans/spring-beans.xsd">

    <bean id="customerBean" class="com.powernode.spring6.beans.Customer" p:name="zhangsan" p:age="20"/>

</beans>
@Test
public void testP(){
    ApplicationContext applicationContext = new ClassPathXmlApplicationContext("spring-p.xml");
    Customer customerBean = applicationContext.getBean("customerBean", Customer.class);
    System.out.println(customerBean);
}

把setter方法去掉:

所以p命名空间实际上是对set注入的简化。
依赖注入方式: c命名空间注入
c命名空间是简化构造方法注入的。
使用c命名空间的两个前提条件:
第一:需要在xml配置文件头部添加信息:xmlns:c=“http://www.springframework.org/schema/c”
第二:需要提供构造方法。
package com.powernode.spring6.beans;

public class MyTime {
    private int year;
    private int month;
    private int day;

    public MyTime(int year, int month, int day) {
        this.year = year;
        this.month = month;
        this.day = day;
    }

    @Override
    public String toString() {
        return "MyTime{" +
                "year=" + year +
                ", month=" + month +
                ", day=" + day +
                '}';
    }
}
<?xml version="1.0" encoding="UTF-8"?>
<beans xmlns="http://www.springframework.org/schema/beans"
       xmlns:c="http://www.springframework.org/schema/c"
       xmlns:xsi="http://www.w3.org/2001/XMLSchema-instance"
       xsi:schemaLocation="http://www.springframework.org/schema/beans http://www.springframework.org/schema/beans/spring-beans.xsd">

    <!--<bean id="myTimeBean" class="com.powernode.spring6.beans.MyTime" c:year="1970" c:month="1" c:day="1"/>-->

    <bean id="myTimeBean" class="com.powernode.spring6.beans.MyTime" c:_0="2008" c:_1="8" c:_2="8"/>

</beans>
@Test
public void testC(){
    ApplicationContext applicationContext = new ClassPathXmlApplicationContext("spring-c.xml");
    MyTime myTimeBean = applicationContext.getBean("myTimeBean", MyTime.class);
    System.out.println(myTimeBean);
}

把构造方法注释掉:

所以,c命名空间是依靠构造方法的。
注意:不管是p命名空间还是c命名空间,注入的时候都可以注入简单类型以及非简单类型
依赖注入方式: util命名空间
使用util命名空间可以让配置复用。
使用util命名空间的前提是:在spring配置文件头部添加配置信息。如下:

package com.powernode.spring6.beans;

import java.util.Properties;

public class MyDataSource1 {
    private Properties properties;

    public void setProperties(Properties properties) {
        this.properties = properties;
    }

    @Override
    public String toString() {
        return "MyDataSource1{" +
                "properties=" + properties +
                '}';
    }
}
package com.powernode.spring6.beans;

import java.util.Properties;

public class MyDataSource2 {
    private Properties properties;

    public void setProperties(Properties properties) {
        this.properties = properties;
    }

    @Override
    public String toString() {
        return "MyDataSource2{" +
                "properties=" + properties +
                '}';
    }
}
<?xml version="1.0" encoding="UTF-8"?>
<beans xmlns="http://www.springframework.org/schema/beans"
       xmlns:xsi="http://www.w3.org/2001/XMLSchema-instance"
       xmlns:util="http://www.springframework.org/schema/util"
       xsi:schemaLocation="http://www.springframework.org/schema/beans http://www.springframework.org/schema/beans/spring-beans.xsd
                           http://www.springframework.org/schema/util http://www.springframework.org/schema/util/spring-util.xsd">

    <util:properties id="prop">
        <prop key="driver">com.mysql.cj.jdbc.Driver</prop>
        <prop key="url">jdbc:mysql://localhost:3306/spring</prop>
        <prop key="username">root</prop>
        <prop key="password">123456</prop>
    </util:properties>

    <bean id="dataSource1" class="com.powernode.spring6.beans.MyDataSource1">
        <property name="properties" ref="prop"/>
    </bean>

    <bean id="dataSource2" class="com.powernode.spring6.beans.MyDataSource2">
        <property name="properties" ref="prop"/>
    </bean>
</beans>
@Test
public void testUtil(){
    ApplicationContext applicationContext = new ClassPathXmlApplicationContext("spring-util.xml");

    MyDataSource1 dataSource1 = applicationContext.getBean("dataSource1", MyDataSource1.class);
    System.out.println(dataSource1);

    MyDataSource2 dataSource2 = applicationContext.getBean("dataSource2", MyDataSource2.class);
    System.out.println(dataSource2);
}

基于XML的自动装配:根据名称自动装配
package com.powernode.spring6.dao;

public class UserDao {

    public void insert(){
        System.out.println("正在保存用户数据。");
    }
}
package com.powernode.spring6.service;

import com.powernode.spring6.dao.UserDao;

public class UserService {

    private UserDao aaa;

    // 这个set方法非常关键
    public void setAaa(UserDao aaa) {
        this.aaa = aaa;
    }

    public void save(){
        aaa.insert();
    }
}
<?xml version="1.0" encoding="UTF-8"?>
<beans xmlns="http://www.springframework.org/schema/beans"
       xmlns:xsi="http://www.w3.org/2001/XMLSchema-instance"
       xsi:schemaLocation="http://www.springframework.org/schema/beans http://www.springframework.org/schema/beans/spring-beans.xsd">

    <bean id="userService" class="com.powernode.spring6.service.UserService" autowire="byName"/>

    <bean id="aaa" class="com.powernode.spring6.dao.UserDao"/>

</beans>
这个配置起到关键作用:
● UserService Bean中需要添加autowire=“byName”,表示通过名称进行装配。
● UserService类中有一个UserDao属性,而UserDao属性的名字是aaa,对应的set方法是setAaa(),正好和UserDao Bean的id是一样的。这就是根据名称自动装配。
@Test
public void testAutowireByName(){
    ApplicationContext applicationContext = new ClassPathXmlApplicationContext("spring-autowire.xml");
    UserService userService = applicationContext.getBean("userService", UserService.class);
    userService.save();
}

我们来测试一下,byName装配是和属性名有关还是和set方法名有关系:
package com.powernode.spring6.service;

import com.powernode.spring6.dao.UserDao;

public class UserService {
    // 这里没修改
    private UserDao aaa;

    /*public void setAaa(UserDao aaa) {
        this.aaa = aaa;
    }*/

    // set方法名变化了
    public void setDao(UserDao aaa){
        this.aaa = aaa;
    }

    public void save(){
        aaa.insert();
    }
}

通过测试得知,aaa属性并没有赋值成功。也就是并没有装配成功。
我们将spring配置文件修改以下:
<?xml version="1.0" encoding="UTF-8"?>
<beans xmlns="http://www.springframework.org/schema/beans"
       xmlns:xsi="http://www.w3.org/2001/XMLSchema-instance"
       xsi:schemaLocation="http://www.springframework.org/schema/beans http://www.springframework.org/schema/beans/spring-beans.xsd">

  <bean id="userService" class="com.powernode.spring6.service.UserService" autowire="byName"/>
  <!--这个id修改了-->
  <bean id="dao" class="com.powernode.spring6.dao.UserDao"/>

</beans>

这说明,如果根据名称装配(byName),底层会调用set方法进行注入。
例如:setAge() 对应的名字是age,setPassword()对应的名字是password,setEmail()对应的名字是email。
基于XML的自动装配:根据类型自动装配
package com.powernode.spring6.dao;

public class AccountDao {
    public void insert(){
        System.out.println("正在保存账户信息");
    }
}
package com.powernode.spring6.service;

import com.powernode.spring6.dao.AccountDao;

public class AccountService {
    private AccountDao accountDao;

    public void setAccountDao(AccountDao accountDao) {
        this.accountDao = accountDao;
    }

    public void save(){
        accountDao.insert();
    }
}
<?xml version="1.0" encoding="UTF-8"?>
<beans xmlns="http://www.springframework.org/schema/beans"
       xmlns:xsi="http://www.w3.org/2001/XMLSchema-instance"
       xsi:schemaLocation="http://www.springframework.org/schema/beans http://www.springframework.org/schema/beans/spring-beans.xsd">

    <!--byType表示根据类型自动装配-->
    <bean id="accountService" class="com.powernode.spring6.service.AccountService" autowire="byType"/>

    <bean class="com.powernode.spring6.dao.AccountDao"/>

</beans>
@Test
public void testAutowireByType(){
    ApplicationContext applicationContext = new ClassPathXmlApplicationContext("spring-autowire.xml");
    AccountService accountService = applicationContext.getBean("accountService", AccountService.class);
    accountService.save();
}

我们把UserService中的set方法注释掉,再执行:

可以看到无论是byName还是byType,在装配的时候都是基于set方法的。所以set方法是必须要提供的。提供构造方法是不行的,大家可以测试一下。这里就不再赘述。
如果byType,根据类型装配时,如果配置文件中有两个类型一样的bean会出现什么问题呢?
<?xml version="1.0" encoding="UTF-8"?>
<beans xmlns="http://www.springframework.org/schema/beans"
       xmlns:xsi="http://www.w3.org/2001/XMLSchema-instance"
       xsi:schemaLocation="http://www.springframework.org/schema/beans http://www.springframework.org/schema/beans/spring-beans.xsd">

    <bean id="accountService" class="com.powernode.spring6.service.AccountService" autowire="byType"/>

    <bean id="x" class="com.powernode.spring6.dao.AccountDao"/>
    <bean id="y" class="com.powernode.spring6.dao.AccountDao"/>

</beans>

测试结果说明了,当byType进行自动装配的时候,配置文件中某种类型的Bean必须是唯一的,不能出现多个。
Spring引入外部属性配置文件
我们都知道编写数据源的时候是需要连接数据库的信息的,例如:driver url username password等信息。这些信息可以单独写到一个属性配置文件中吗,这样用户修改起来会更加的方便。当然可以。
第一步:写一个数据源类,提供相关属性。
package com.powernode.spring6.beans;

import javax.sql.DataSource;
import java.io.PrintWriter;
import java.sql.Connection;
import java.sql.SQLException;
import java.sql.SQLFeatureNotSupportedException;
import java.util.logging.Logger;

public class MyDataSource implements DataSource {
    @Override
    public String toString() {
        return "MyDataSource{" +
                "driver='" + driver + '\'' +
                ", url='" + url + '\'' +
                ", username='" + username + '\'' +
                ", password='" + password + '\'' +
                '}';
    }

    private String driver;
    private String url;
    private String username;
    private String password;

    public void setDriver(String driver) {
        this.driver = driver;
    }

    public void setUrl(String url) {
        this.url = url;
    }

    public void setUsername(String username) {
        this.username = username;
    }

    public void setPassword(String password) {
        this.password = password;
    }

    //......
}
第二步:在类路径下新建jdbc.properties文件,并配置信息。
driver=com.mysql.cj.jdbc.Driver
url=jdbc:mysql://localhost:3306/spring
username=root
password=root123
第三步:在spring配置文件中引入context命名空间。
<?xml version="1.0" encoding="UTF-8"?>
<beans xmlns="http://www.springframework.org/schema/beans"
       xmlns:xsi="http://www.w3.org/2001/XMLSchema-instance"
       xmlns:context="http://www.springframework.org/schema/context"
       xsi:schemaLocation="http://www.springframework.org/schema/beans http://www.springframework.org/schema/beans/spring-beans.xsd
                           http://www.springframework.org/schema/context http://www.springframework.org/schema/context/spring-context.xsd">

</beans>
第四步:在spring中配置使用jdbc.properties文件。
<?xml version="1.0" encoding="UTF-8"?>
<beans xmlns="http://www.springframework.org/schema/beans"
       xmlns:xsi="http://www.w3.org/2001/XMLSchema-instance"
       xmlns:context="http://www.springframework.org/schema/context"
       xsi:schemaLocation="http://www.springframework.org/schema/beans http://www.springframework.org/schema/beans/spring-beans.xsd
                           http://www.springframework.org/schema/context http://www.springframework.org/schema/context/spring-context.xsd">

    <context:property-placeholder location="jdbc.properties"/>

    <bean id="dataSource" class="com.powernode.spring6.beans.MyDataSource">
        <property name="driver" value="${driver}"/>
        <property name="url" value="${url}"/>
        <property name="username" value="${username}"/>
        <property name="password" value="${password}"/>
    </bean>
</beans>
@Test
public void testProperties(){
    ApplicationContext applicationContext = new ClassPathXmlApplicationContext("spring-properties.xml");
    MyDataSource dataSource = applicationContext.getBean("dataSource", MyDataSource.class);
    System.out.println(dataSource);
}

Spring 中Bean的作用域
singleton
默认情况下,Spring的IoC容器创建的Bean对象是单例的。来测试一下:
package com.powernode.spring6.beans;

public class SpringBean {
}
<?xml version="1.0" encoding="UTF-8"?>
<beans xmlns="http://www.springframework.org/schema/beans"
       xmlns:xsi="http://www.w3.org/2001/XMLSchema-instance"
       xsi:schemaLocation="http://www.springframework.org/schema/beans http://www.springframework.org/schema/beans/spring-beans.xsd">

    <bean id="sb" class="com.powernode.spring6.beans.SpringBean" />

</beans>
@Test
public void testScope(){
    ApplicationContext applicationContext = new ClassPathXmlApplicationContext("spring-scope.xml");

    SpringBean sb1 = applicationContext.getBean("sb", SpringBean.class);
    System.out.println(sb1);

    SpringBean sb2 = applicationContext.getBean("sb", SpringBean.class);
    System.out.println(sb2);
}

通过测试得知:Spring的IoC容器中,默认情况下,Bean对象是单例的。
这个对象在什么时候创建的呢?可以为SpringBean提供一个无参数构造方法,测试一下,如下:
package com.powernode.spring6.beans;

public class SpringBean {
    public SpringBean() {
        System.out.println("SpringBean的无参数构造方法执行。");
    }
}
将测试程序中getBean()所在行代码注释掉
@Test
public void testScope(){
    ApplicationContext applicationContext = new ClassPathXmlApplicationContext("spring-scope.xml");
}

通过测试得知,默认情况下,Bean对象的创建是在初始化Spring上下文的时候就完成的。
prototype
如果想让Spring的Bean对象以多例的形式存在,可以在bean标签中指定scope属性的值为:prototype,这样Spring会在每一次执行getBean()方法的时候创建Bean对象,调用几次则创建几次。
<?xml version="1.0" encoding="UTF-8"?>
<beans xmlns="http://www.springframework.org/schema/beans"
       xmlns:xsi="http://www.w3.org/2001/XMLSchema-instance"
       xsi:schemaLocation="http://www.springframework.org/schema/beans http://www.springframework.org/schema/beans/spring-beans.xsd">

    <bean id="sb" class="com.powernode.spring6.beans.SpringBean" scope="prototype" />

</beans>
@Test
public void testScope(){
    ApplicationContext applicationContext = new ClassPathXmlApplicationContext("spring-scope.xml");

    SpringBean sb1 = applicationContext.getBean("sb", SpringBean.class);
    System.out.println(sb1);

    SpringBean sb2 = applicationContext.getBean("sb", SpringBean.class);
    System.out.println(sb2);
}

我们可以把测试代码中的getBean()方法所在行代码注释掉:
@Test
public void testScope(){
    ApplicationContext applicationContext = new ClassPathXmlApplicationContext("spring-scope.xml");
}

可以看到这一次在初始化Spring上下文的时候,并没有创建Bean对象。
那你可能会问:scope如果没有配置,它的默认值是什么呢?默认值是singleton,单例的。
<?xml version="1.0" encoding="UTF-8"?>
<beans xmlns="http://www.springframework.org/schema/beans"
       xmlns:xsi="http://www.w3.org/2001/XMLSchema-instance"
       xsi:schemaLocation="http://www.springframework.org/schema/beans http://www.springframework.org/schema/beans/spring-beans.xsd">

    <bean id="sb" class="com.powernode.spring6.beans.SpringBean"/>

</beans>
@Test
public void testScope(){
    ApplicationContext applicationContext = new ClassPathXmlApplicationContext("spring-scope.xml");

    SpringBean sb1 = applicationContext.getBean("sb", SpringBean.class);
    System.out.println(sb1);

    SpringBean sb2 = applicationContext.getBean("sb", SpringBean.class);
    System.out.println(sb2);
}

通过测试得知,没有指定scope属性时,默认是singleton单例的。
其它scope
scope属性的值不止两个,它一共包括8个选项:
● singleton:默认的,单例。
● prototype:原型。每调用一次getBean()方法则获取一个新的Bean对象。或每次注入的时候都是新对象。
● request:一个请求对应一个Bean。仅限于在WEB应用中使用。
● session:一个会话对应一个Bean。仅限于在WEB应用中使用。
● global session:portlet应用中专用的。如果在Servlet的WEB应用中使用global session的话,和session一个效果。(portlet和servlet都是规范。servlet运行在servlet容器中,例如Tomcat。portlet运行在portlet容器中。)
● application:一个应用对应一个Bean。仅限于在WEB应用中使用。
● websocket:一个websocket生命周期对应一个Bean。仅限于在WEB应用中使用。
● 自定义scope:很少使用。
自定义Scope
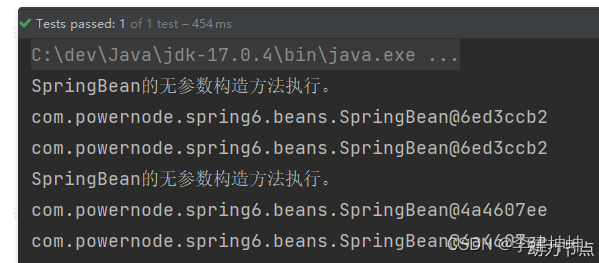
线程级别的Scope,在同一个线程中,获取的Bean都是同一个。跨线程则是不同的对象:(以下内容作为了解)
● 第一步:自定义Scope。(实现Scope接口)
○ spring内置了线程范围的类:org.springframework.context.support.SimpleThreadScope,可以直接用。
● 第二步:将自定义的Scope注册到Spring容器中。
<bean class="org.springframework.beans.factory.config.CustomScopeConfigurer">
  <property name="scopes">
    <map>
      <entry key="myThread">
        <bean class="org.springframework.context.support.SimpleThreadScope"/>
      </entry>
    </map>
  </property>
</bean>
●第三步:使用Scope。
<bean id="sb" class="com.powernode.spring6.beans.SpringBean" scope="myThread" />
编写测试程序:
@Test
public void testCustomScope(){
    ApplicationContext applicationContext = new ClassPathXmlApplicationContext("spring-scope.xml");
    SpringBean sb1 = applicationContext.getBean("sb", SpringBean.class);
    SpringBean sb2 = applicationContext.getBean("sb", SpringBean.class);
    System.out.println(sb1);
    System.out.println(sb2);
    // 启动线程
    new Thread(new Runnable() {
        @Override
        public void run() {
            SpringBean a = applicationContext.getBean("sb", SpringBean.class);
            SpringBean b = applicationContext.getBean("sb", SpringBean.class);
            System.out.println(a);
            System.out.println(b);
        }
    }).start();
}
GoF之工厂模式
● 设计模式:一种可以被重复利用的解决方案。
● GoF(Gang of Four),中文名——四人组。
● 《Design Patterns: Elements of Reusable Object-Oriented Software》(即《设计模式》一书),1995年由 Erich Gamma、Richard Helm、Ralph Johnson 和 John Vlissides 合著。这几位作者常被称为"四人组(Gang of Four)"。
● 该书中描述了23种设计模式。我们平常所说的设计模式就是指这23种设计模式。
● 不过除了GoF23种设计模式之外,还有其它的设计模式,比如:JavaEE的设计模式(DAO模式、MVC模式等)。
GoF23种设计模式可分为三大类:
创建型(5个):解决对象创建问题。
■ 单例模式
■ 工厂方法模式
■ 抽象工厂模式
■ 建造者模式
■ 原型模式
结构型(7个):一些类或对象组合在一起的经典结构。
■ 代理模式
■ 装饰模式
■ 适配器模式
■ 组合模式
■ 享元模式
■ 外观模式
■ 桥接模式
行为型(11个):解决类或对象之间的交互问题。
■ 策略模式
■ 模板方法模式
■ 责任链模式
■ 观察者模式
■ 迭代子模式
■ 命令模式
■ 备忘录模式
■ 状态模式
■ 访问者模式
■ 中介者模式
■ 解释器模式
● 工厂模式是解决对象创建问题的,所以工厂模式属于创建型设计模式。这里为什么学习工厂模式呢?这是因为Spring框架底层使用了大量的工厂模式。
工厂模式的三种形态
工厂模式通常有三种形态:
● 第一种:简单工厂模式(Simple Factory):不属于23种设计模式之一。简单工厂模式又叫做:静态 工厂方法模式。简单工厂模式是工厂方法模式的一种特殊实现。
● 第二种:工厂方法模式(Factory Method):是23种设计模式之一。
● 第三种:抽象工厂模式(Abstract Factory):是23种设计模式之一。
简单工厂模式
简单工厂模式的角色包括三个:
● 抽象产品 角色
● 具体产品 角色
● 工厂类 角色
简单工厂模式的代码如下:
抽象产品角色:
package com.powernode.factory;

/**
 * 武器(抽象产品角色)
 * @author 动力节点
 * @version 1.0
 * @className Weapon
 * @since 1.0
 **/
public abstract class Weapon {
    /**
     * 所有的武器都有攻击行为
     */
    public abstract void attack();
}
具体产品角色:
package com.powernode.factory;

/**
 * 坦克(具体产品角色)
 * @author 动力节点
 * @version 1.0
 * @className Tank
 * @since 1.0
 **/
public class Tank extends Weapon{
    @Override
    public void attack() {
        System.out.println("坦克开炮!");
    }
}
package com.powernode.factory;

/**
 * 战斗机(具体产品角色)
 * @author 动力节点
 * @version 1.0
 * @className Fighter
 * @since 1.0
 **/
public class Fighter extends Weapon{
    @Override
    public void attack() {
        System.out.println("战斗机投下原子弹!");
    }
}
package com.powernode.factory;

/**
 * 匕首(具体产品角色)
 * @author 动力节点
 * @version 1.0
 * @className Dagger
 * @since 1.0
 **/
public class Dagger extends Weapon{
    @Override
    public void attack() {
        System.out.println("砍他丫的!");
    }
}
工厂类角色:
package com.powernode.factory;

/**
 * 工厂类角色
 * @author 动力节点
 * @version 1.0
 * @className WeaponFactory
 * @since 1.0
 **/
public class WeaponFactory {
    /**
     * 根据不同的武器类型生产武器
     * @param weaponType 武器类型
     * @return 武器对象
     */
    public static Weapon get(String weaponType){
        if (weaponType == null || weaponType.trim().length() == 0) {
            return null;
        }
        Weapon weapon = null;
        if ("TANK".equals(weaponType)) {
            weapon = new Tank();
        } else if ("FIGHTER".equals(weaponType)) {
            weapon = new Fighter();
        } else if ("DAGGER".equals(weaponType)) {
            weapon = new Dagger();
        } else {
            throw new RuntimeException("不支持该武器!");
        }
        return weapon;
    }
}
测试程序(客户端程序):
package com.powernode.factory;

/**
 * @author 动力节点
 * @version 1.0
 * @className Client
 * @since 1.0
 **/
public class Client {
    public static void main(String[] args) {
        Weapon weapon1 = WeaponFactory.get("TANK");
        weapon1.attack();

        Weapon weapon2 = WeaponFactory.get("FIGHTER");
        weapon2.attack();

        Weapon weapon3 = WeaponFactory.get("DAGGER");
        weapon3.attack();
    }
}
执行结果:
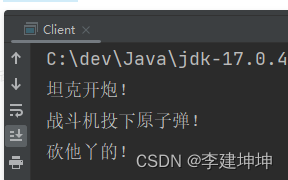
简单工厂模式的优点:
● 客户端程序不需要关心对象的创建细节,需要哪个对象时,只需要向工厂索要即可,初步实现了责任的分离。客户端只负责“消费”,工厂负责“生产”。生产和消费分离。
简单工厂模式的缺点:
● 缺点1:工厂类集中了所有产品的创造逻辑,形成一个无所不知的全能类,有人把它叫做上帝类。显然工厂类非常关键,不能出问题,一旦出问题,整个系统瘫痪。
● 缺点2:不符合OCP开闭原则,在进行系统扩展时,需要修改工厂类。
Spring中的BeanFactory就使用了简单工厂模式。
工厂方法模式
工厂方法模式既保留了简单工厂模式的优点,同时又解决了简单工厂模式的缺点。
工厂方法模式的角色包括:
● 抽象工厂角色
● 具体工厂角色
● 抽象产品角色
● 具体产品角色
代码如下:
抽象产品角色
package com.powernode.factory;

/**
 * 武器类(抽象产品角色)
 **/
public abstract class Weapon {
    /**
     * 所有武器都有攻击行为
     */
    public abstract void attack();
}
具体产品角色
package com.powernode.factory;

/**
 * 具体产品角色
 **/
public class Gun extends Weapon{
    @Override
    public void attack() {
        System.out.println("开枪射击!");
    }
}
package com.powernode.factory;

/**
 * 具体产品角色
 **/
public class Fighter extends Weapon{
    @Override
    public void attack() {
        System.out.println("战斗机发射核弹!");
    }
}
抽象工厂角色
package com.powernode.factory;

/**
 * 武器工厂接口(抽象工厂角色)
 **/
public interface WeaponFactory {
    Weapon get();
}
具体工厂角色
package com.powernode.factory;

/**
 * 具体工厂角色
 **/
public class GunFactory implements WeaponFactory{
    @Override
    public Weapon get() {
        return new Gun();
    }
}
package com.powernode.factory;

/**
 * 具体工厂角色
 **/
public class FighterFactory implements WeaponFactory{
    @Override
    public Weapon get() {
        return new Fighter();
    }
}
客户端程序:
package com.powernode.factory;

/**
 * @author 动力节点
 * @version 1.0
 * @className Client
 * @since 1.0
 **/
public class Client {
    public static void main(String[] args) {
        WeaponFactory factory = new GunFactory();
        Weapon weapon = factory.get();
        weapon.attack();

        WeaponFactory factory1 = new FighterFactory();
        Weapon weapon1 = factory1.get();
        weapon1.attack();
    }
}
执行客户端程序:
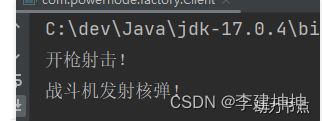
如果想扩展一个新的产品,只要新增一个产品类,再新增一个该产品对应的工厂即可,例如新增:匕首
增加:具体产品角色
package com.powernode.factory;

public class Dagger extends Weapon{
    @Override
    public void attack() {
        System.out.println("砍丫的!");
    }
}
增加:具体工厂角色
package com.powernode.factory;

public class DaggerFactory implements WeaponFactory{
    @Override
    public Weapon get() {
        return new Dagger();
    }
}
客户端程序:
package com.powernode.factory;

public class Client {
    public static void main(String[] args) {
        WeaponFactory factory = new GunFactory();
        Weapon weapon = factory.get();
        weapon.attack();

        WeaponFactory factory1 = new FighterFactory();
        Weapon weapon1 = factory1.get();
        weapon1.attack();

        WeaponFactory factory2 = new DaggerFactory();
        Weapon weapon2 = factory2.get();
        weapon2.attack();
    }
}
执行结果如下:
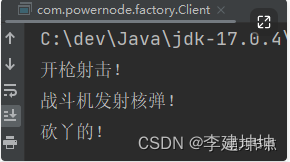
我们可以看到在进行功能扩展的时候,不需要修改之前的源代码,显然工厂方法模式符合OCP原则。
工厂方法模式的优点:
● 一个调用者想创建一个对象,只要知道其名称就可以了。
● 扩展性高,如果想增加一个产品,只要扩展一个工厂类就可以。
● 屏蔽产品的具体实现,调用者只关心产品的接口。
工厂方法模式的缺点:
● 每次增加一个产品时,都需要增加一个具体类和对象实现工厂,使得系统中类的个数成倍增加,在一定程度上增加了系统的复杂度,同时也增加了系统具体类的依赖。这并不是什么好事。
抽象工厂模式(了解)
抽象工厂模式相对于工厂方法模式来说,就是工厂方法模式是针对一个产品系列的,而抽象工厂模式是针对多个产品系列的,即工厂方法模式是一个产品系列一个工厂类,而抽象工厂模式是多个产品系列一个工厂类。
抽象工厂模式特点:抽象工厂模式是所有形态的工厂模式中最为抽象和最具一般性的一种形态。抽象工厂模式是指当有多个抽象角色时,使用的一种工厂模式。抽象工厂模式可以向客户端提供一个接口,使客户端在不必指定产品的具体的情况下,创建多个产品族中的产品对象。它有多个抽象产品类,每个抽象产品类可以派生出多个具体产品类,一个抽象工厂类,可以派生出多个具体工厂类,每个具体工厂类可以创建多个具体产品类的实例。每一个模式都是针对一定问题的解决方案,工厂方法模式针对的是一个产品等级结构;而抽象工厂模式针对的是多个产品等级结果。
抽象工厂中包含4个角色:
● 抽象工厂角色
● 具体工厂角色
● 抽象产品角色
● 具体产品角色
抽象工厂模式的类图如下:
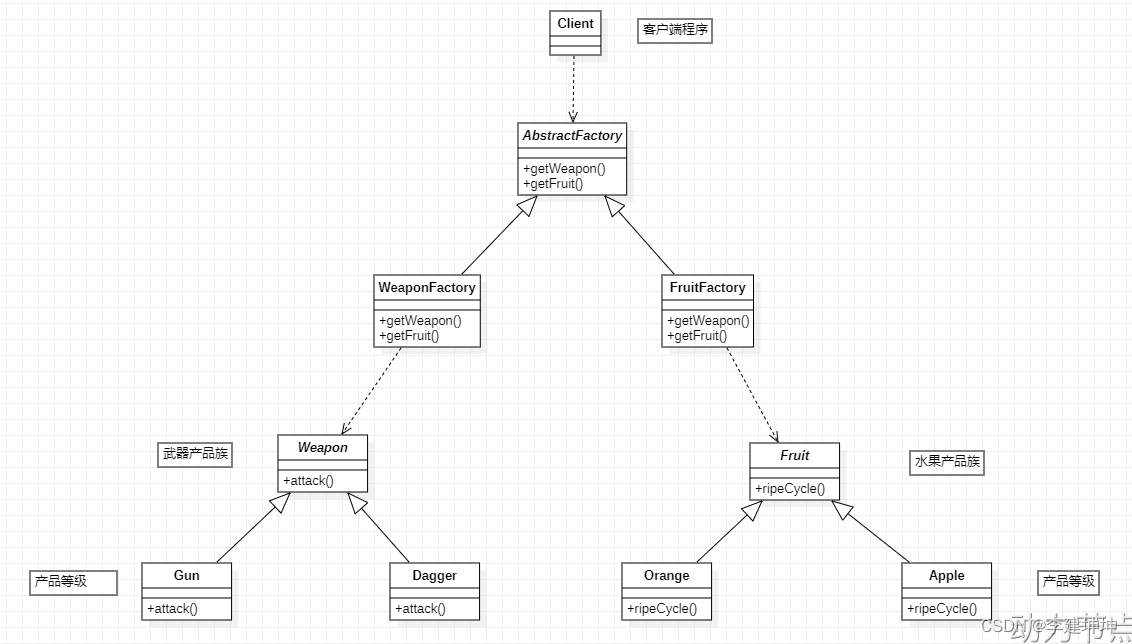
抽象工厂模式代码如下:
第一部分:武器产品族
package com.powernode.product;

/**
 * 武器产品族
 **/
public abstract class Weapon {
    public abstract void attack();
}
package com.powernode.product;

/**
 * 武器产品族中的产品等级1
 **/
public class Gun extends Weapon{
    @Override
    public void attack() {
        System.out.println("开枪射击!");
    }
}
package com.powernode.product;

/**
 * 武器产品族中的产品等级2
 **/
public class Dagger extends Weapon{
    @Override
    public void attack() {
        System.out.println("砍丫的!");
    }
}
第二部分:水果产品族
package com.powernode.product;

/**
 * 水果产品族
 **/
public abstract class Fruit {
    /**
     * 所有果实都有一个成熟周期。
     */
    public abstract void ripeCycle();
}
package com.powernode.product;

/**
 * 水果产品族中的产品等级1
 **/
public class Orange extends Fruit{
    @Override
    public void ripeCycle() {
        System.out.println("橘子的成熟周期是10个月");
    }
}
package com.powernode.product;

/**
 * 水果产品族中的产品等级2
 **/
public class Apple extends Fruit{
    @Override
    public void ripeCycle() {
        System.out.println("苹果的成熟周期是8个月");
    }
}
第三部分:抽象工厂类
package com.powernode.factory;

import com.powernode.product.Fruit;
import com.powernode.product.Weapon;

/**
 * 抽象工厂
 **/
public abstract class AbstractFactory {
    public abstract Weapon getWeapon(String type);
    public abstract Fruit getFruit(String type);
}
第四部分:具体工厂类
package com.powernode.factory;

import com.powernode.product.Dagger;
import com.powernode.product.Fruit;
import com.powernode.product.Gun;
import com.powernode.product.Weapon;

/**
 * 武器族工厂
 **/
public class WeaponFactory extends AbstractFactory{

    public Weapon getWeapon(String type){
        if (type == null || type.trim().length() == 0) {
            return null;
        }
        if ("Gun".equals(type)) {
            return new Gun();
        } else if ("Dagger".equals(type)) {
            return new Dagger();
        } else {
            throw new RuntimeException("无法生产该武器");
        }
    }

    @Override
    public Fruit getFruit(String type) {
        return null;
    }
}
package com.powernode.factory;

import com.powernode.product.*;

/**
 * 水果族工厂
 **/
public class FruitFactory extends AbstractFactory{
    @Override
    public Weapon getWeapon(String type) {
        return null;
    }

    public Fruit getFruit(String type){
        if (type == null || type.trim().length() == 0) {
            return null;
        }
        if ("Orange".equals(type)) {
            return new Orange();
        } else if ("Apple".equals(type)) {
            return new Apple();
        } else {
            throw new RuntimeException("我家果园不产这种水果");
        }
    }
}
第五部分:客户端程序
package com.powernode.client;

import com.powernode.factory.AbstractFactory;
import com.powernode.factory.FruitFactory;
import com.powernode.factory.WeaponFactory;
import com.powernode.product.Fruit;
import com.powernode.product.Weapon;

public class Client {
    public static void main(String[] args) {
        // 客户端调用方法时只面向AbstractFactory调用方法。
        AbstractFactory factory = new WeaponFactory(); // 注意:这里的new WeaponFactory()可以采用 简单工厂模式 进行隐藏。
        Weapon gun = factory.getWeapon("Gun");
        Weapon dagger = factory.getWeapon("Dagger");

        gun.attack();
        dagger.attack();

        AbstractFactory factory1 = new FruitFactory(); // 注意:这里的new FruitFactory()可以采用 简单工厂模式 进行隐藏。
        Fruit orange = factory1.getFruit("Orange");
        Fruit apple = factory1.getFruit("Apple");

        orange.ripeCycle();
        apple.ripeCycle();
    }
}
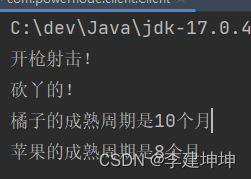
执行结果:
抽象工厂模式的优缺点:
● 优点:当一个产品族中的多个对象被设计成一起工作时,它能保证客户端始终只使用同一个产品族中的对象。
● 缺点:产品族扩展非常困难,要增加一个系列的某一产品,既要在AbstractFactory里加代码,又要在具体的里面加代码。
Bean的实例化方式
Spring为Bean提供了多种实例化方式,通常包括4种方式。(也就是说在Spring中为Bean对象的创建准备了多种方案,目的是:更加灵活)
● 第一种:通过构造方法实例化
● 第二种:通过简单工厂模式实例化
● 第三种:通过factory-bean实例化
● 第四种:通过FactoryBean接口实例化
通过构造方法实例化
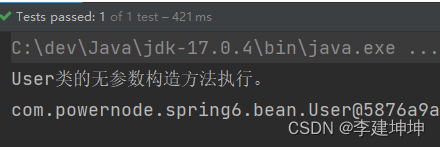
我们之前一直使用的就是这种方式。默认情况下,会调用Bean的无参数构造方法。
package com.powernode.spring6.bean;

public class User {
    public User() {
        System.out.println("User类的无参数构造方法执行。");
    }
}
spring.xml
<?xml version="1.0" encoding="UTF-8"?>
<beans xmlns="http://www.springframework.org/schema/beans"
       xmlns:xsi="http://www.w3.org/2001/XMLSchema-instance"
       xsi:schemaLocation="http://www.springframework.org/schema/beans http://www.springframework.org/schema/beans/spring-beans.xsd">

    <bean id="userBean" class="com.powernode.spring6.bean.User"/>

</beans>
测试程序
package com.powernode.spring6.test;

import com.powernode.spring6.bean.User;
import org.junit.Test;
import org.springframework.context.ApplicationContext;
import org.springframework.context.support.ClassPathXmlApplicationContext;

public class SpringInstantiationTest {

    @Test
    public void testConstructor(){
        ApplicationContext applicationContext = new ClassPathXmlApplicationContext("spring.xml");
        User user = applicationContext.getBean("userBean", User.class);
        System.out.println(user);
    }
}
执行结果:


 878
878


 被折叠的 条评论
为什么被折叠?


