


一文带你看懂 前后端之间图片的上传与回显
前言
看了很多类似的文章,发现很多文章,要不就是不对,要不就是代码写的不通俗易懂,所以有了这篇文章,我将会从原理到实战,带你了解 实战包含前端 原生 vue3 react 后端springboot 主流框架来进行实现。
原理篇
上传文件需要发送请求。在这些请求中,浏览器将数据拆分为小的“块”,然后通过连接逐个发送这些块。这是必要的,因为文件可能过大而无法一次性发送作为一个庞大的有效负载。
随时间发送的数据块组成了所谓的“流”。流在第一次理解时有点难 它们值得有一篇完整的文章(或多篇文章)来介绍,
基本上,流有点像是数据的传送带,每个块都可以在进入时被处理。就 HTTP 请求而言,后端会逐位接收请求的各个部分。
当我们使用请求上传文件时,浏览器将使用流一次发送一个块的数据。这是因为我们不能一次将整个文件放在请求对象中。multipart/form-data
我们直接去打印这个文件的请求。
我们应该看到一个包含所有表单字段及其值的对象,但对于每个文件输入,我们将看到一个表示上传文件的对象,而不是文件本身。此对象包含各种有用的信息,包括其在磁盘上的路径、名称等

这个时候我们需要把他转换为一个FormData 对象
这样便于我们给后端传输我们需要传输的东西。
文件上传为什么要用 multipart/form-data?
The encoding type application/x-www-form-urlencoded is inefficient for sending large quantities of binary data or text containing non-ASCII characters. Thus, a new media type,multipart/form-data, is proposed as a way of efficiently sending the values associated with a filled-out form from client to server.
1867文档中也写了为什么要新增一个类型,而不使用旧有的application/x-www-form-urlencoded:因为此类型不适合用于传输大型二进制数据或者包含非ASCII字符的数据。平常我们使用这个类型都是把表单数据使用url编码后传送给后端,二进制文件当然没办法一起编码进去了。所以multipart/form-data就诞生了,专门用于有效的传输文件。
文件上传为什么要用 multipart/form-data? 可以用application/json吗
文件上传通常使用multipart/form-data格式,而不是application/json,因为multipart/form-data格式允许在HTTP请求中传输二进制文件数据,例如图像、视频或文档等。而application/json格式通常用于传输结构化的文本数据,例如JSON对象或数组。
multipart/form-data格式允许在一个请求中同时发送文本数据和二进制文件数据,这对于上传文件非常有用。它使用一种多部分的格式,将请求体划分为多个部分,每个部分可以包含不同类型的数据,例如文本字段和文件数据。
相比之下,application/json格式虽然可以用于传输文本数据,但不支持直接在请求体中传输二进制文件数据。如果尝试将文件数据编码为JSON字符串并在application/json格式的请求中发送,通常会导致数据丢失或不可用。
实战篇
本地存储
第一个我要介绍最常用的,vue3+springboot
vue3+springboot
第一个实现方式是本地存储
也就是存储到自己的服务器上。
首先我们来看前端的源码:
<template>
<div>
<input type="file" @change="handleFileChange">
<button @click="uploadImage">上传图片</button>
<img :src="getImageUrl()" v-if="imageUrl">
</div>
</template>
<script setup>
import { ref } from 'vue';
import axios from 'axios';
const file = ref(null);
const imageUrl = ref(null);
const handleFileChange = (event) => {
file.value = event.target.files[0];
};
const uploadImage = async () => {
const formData = new FormData();
formData.append('image', file.value);
try {
const response = await axios.post('http://localhost:8081/api/upload', formData, {
headers: {
'Content-Type': 'multipart/form-data'
}
});
imageUrl.value = response.data;
} catch (error) {
console.error('Error uploading image: ', error);
}
};
const getImageUrl = () => {
if (imageUrl.value) {
// 拼接后端服务器地址和图片地址
return `http://localhost:8081${imageUrl.value}`;
}
};
</script>
这里我用到了axios 当然你也可以选择别的去用。相信我这个代码很简洁,我就不多说了。
我们来看后端的代码。
首先我们要在upload里面去配置一下我们存储文件的一个地址 我把这个放到了yml文件里面
upload:
  path: D:\onenodes\project\xiaou-easy-code\1\xiaou-spring boot-demo-backend\src\main\java\com\xiaou\upload\
这里需要注意的是,如果是本地的话,就是完整路径,如果你是想要部署上线的话,要填写你服务器的文件路径。
之后我们做一个文件映射
@Override
public void addResourceHandlers(ResourceHandlerRegistry registry) {
    registry.addResourceHandler("/uploads/**")
            .addResourceLocations("file:uploads/");
}
确保后端可以打开这个图片
之后是后端的代码
package com.xiaou.controller;
import lombok.extern.slf4j.Slf4j;
import org.springframework.beans.factory.annotation.Value;
import org.springframework.core.io.Resource;
import org.springframework.core.io.UrlResource;
import org.springframework.http.MediaType;
import org.springframework.http.ResponseEntity;
import org.springframework.web.bind.annotation.*;
import org.springframework.web.multipart.MultipartFile;
import java.io.File;
import java.io.IOException;
import java.util.UUID;
@RestController
@RequestMapping("/api")
@Slf4j
public class ImageController {
@Value("${upload.path}")
private String uploadPath;
@PostMapping("/upload")
public String uploadImage(@RequestParam("image") MultipartFile image) throws IOException {
String imageName = UUID.randomUUID().toString() + "_" + image.getOriginalFilename();
File dest = new File(uploadPath + imageName);
image.transferTo(dest);
log.info("图片后端地址 " + "/api/images" + imageName);
return "/api/images/" + imageName;
}
@GetMapping("/images/{imageName}")
public ResponseEntity<Resource> getImage(@PathVariable String imageName) throws IOException {
File file = new File(uploadPath + imageName);
Resource resource = new UrlResource(file.toURI());
return ResponseEntity.ok()
.contentType(MediaType.IMAGE_JPEG)
.body(resource);
}
}
这里设置俩个接口,一个是上传,一个就是图片的一个回显。
这里的ResponseEntity 是 Spring Framework 提供的一个类,用于表示 HTTP 响应实体。它允许你将 HTTP 响应的状态码、头部信息以及响应体等内容封装到一个对象中,然后返回给客户端。
之后我们来介绍原生的html css js
后端代码保持不变。前端代码如下:
原生html css JavaScript
<!DOCTYPE html>
<html lang="en">
<head>
<meta charset="UTF-8">
<meta name="viewport" content="width=device-width, initial-scale=1.0">
<title>Image Uploader</title>
<style>
/* CSS 样式 */
.container {
margin-top: 20px;
}
</style>
</head>
<body>
<div class="container">
<input type="file" id="fileInput">
<button id="uploadButton">上传图片</button>
<img id="uploadedImage" style="display: none;">
</div>
<script src="https://cdn.jsdelivr.net/npm/axios/dist/axios.min.js"></script>
<script>
// JavaScript 代码
document.getElementById('uploadButton').addEventListener('click', function() {
var fileInput = document.getElementById('fileInput');
var file = fileInput.files[0];
var formData = new FormData();
formData.append('image', file);
axios.post('http://localhost:8081/api/upload', formData, {
headers: {
'Content-Type': 'multipart/form-data'
}
}).then(function(response) {
var imageUrl = "http://localhost:8081"+response.data;
console.log(imageUrl)
document.getElementById('uploadedImage').src = imageUrl;
document.getElementById('uploadedImage').style.display = 'block';
}).catch(function(error) {
console.error('Error uploading image: ', error);
});
});
</script>
</body>
</html>
react
import React, { useState } from 'react';
import axios from 'axios';
function ImageUploader() {
const [file, setFile] = useState(null);
const [imageUrl, setImageUrl] = useState(null);
const handleFileChange = (event) => {
setFile(event.target.files[0]);
};
const uploadImage = async () => {
const formData = new FormData();
formData.append('image', file);
try {
const response = await axios.post('http://localhost:8081/api/upload', formData, {
headers: {
'Content-Type': 'multipart/form-data'
}
});
var imgUrl="http://localhost:8081/"+response.data
setImageUrl(imgUrl);
} catch (error) {
console.error('Error uploading image: ', error);
}
};
return (
<div>
<input type="file" onChange={handleFileChange} />
<button onClick={uploadImage}>上传图片</button>
{imageUrl && <img src={imageUrl} alt="Uploaded" />}
</div>
);
}
export default ImageUploader;
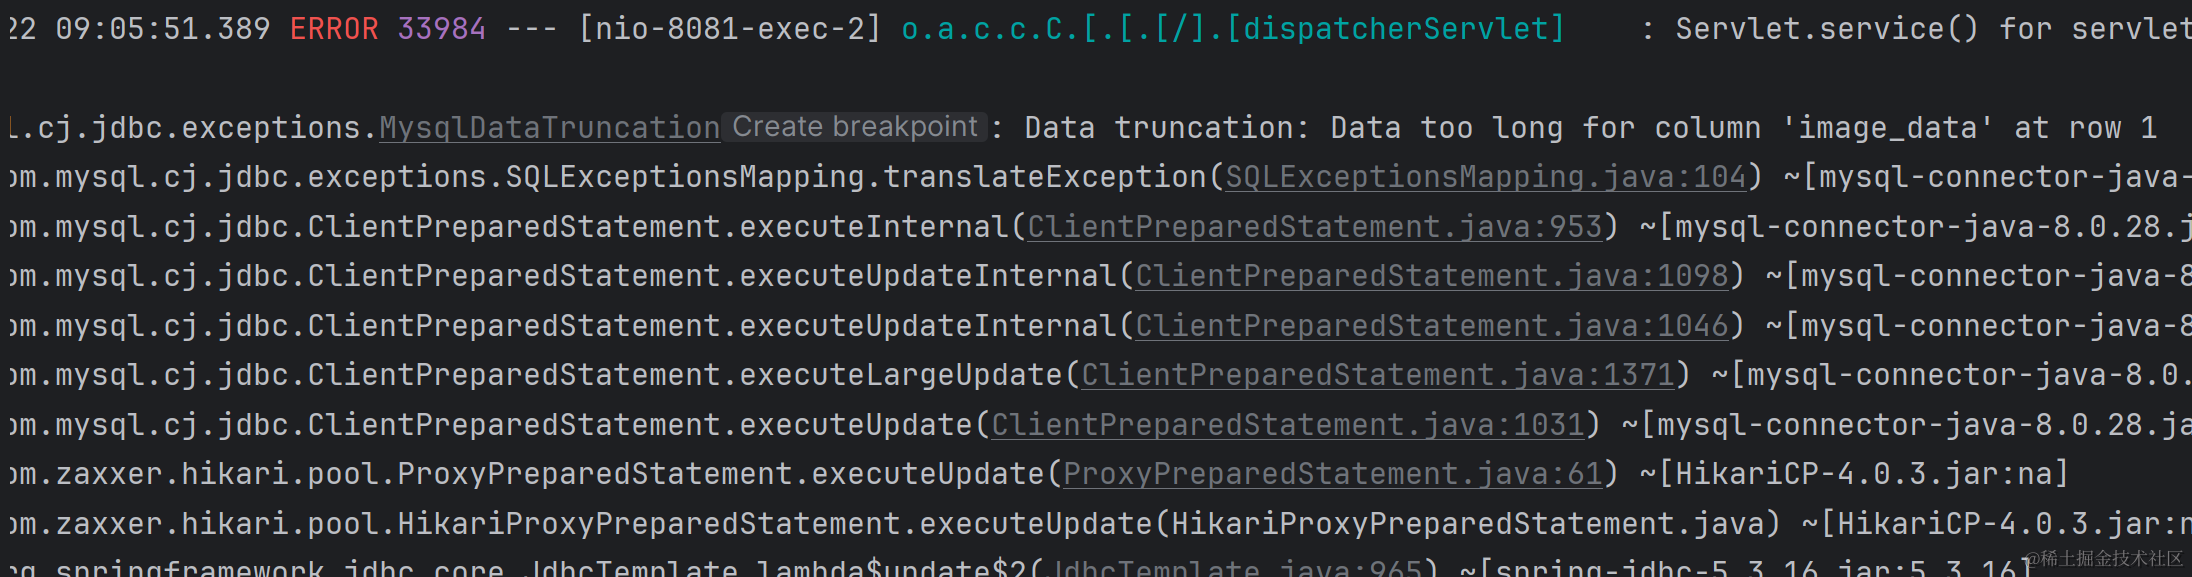
二进制存储到数据库
这个经过我的测试不是很好实现。
数据库字段会超出。考虑过压缩图片,但是这样完全没必要。所以这个直接跳过。
第三方存储 cos
这里用到工具类,你也可以自己封装,我这里用到了阿里云的oss
package com.xiaou.util;
import com.aliyun.oss.ClientException;
import com.aliyun.oss.OSS;
import com.aliyun.oss.OSSClientBuilder;
import com.aliyun.oss.OSSException;
import java.io.InputStream;
public class AliOssUtil {
private static final String ENDPOINT = "xxx";
private static final String ACCESS_KEY_ID = "xx";
private static final String SECRET_ACCESS_KEY = "xxx";
private static final String BUCKET_NAME = "xxx";
//上传文件,返回文件的公网访问地址
public static String uploadFile(String objectName, InputStream inputStream){
// 创建OSSClient实例。
OSS ossClient = new OSSClientBuilder().build(ENDPOINT,ACCESS_KEY_ID,SECRET_ACCESS_KEY);
//公文访问地址
String url = "";
try {
// 创建存储空间。
ossClient.createBucket(BUCKET_NAME);
ossClient.putObject(BUCKET_NAME, objectName, inputStream);
url = "https://"+BUCKET_NAME+"."+ENDPOINT.substring(ENDPOINT.lastIndexOf("/")+1)+"/"+objectName;
} catch (OSSException oe) {
System.out.println("Caught an OSSException, which means your request made it to OSS, "
+ "but was rejected with an error response for some reason.");
System.out.println("Error Message:" + oe.getErrorMessage());
System.out.println("Error Code:" + oe.getErrorCode());
System.out.println("Request ID:" + oe.getRequestId());
System.out.println("Host ID:" + oe.getHostId());
} catch (ClientException ce) {
System.out.println("Caught an ClientException, which means the client encountered "
+ "a serious internal problem while trying to communicate with OSS, "
+ "such as not being able to access the network.");
System.out.println("Error Message:" + ce.getMessage());
} finally {
if (ossClient != null) {
ossClient.shutdown();
}
}
return url;
}
}
之后直接调用就可以
package com.xiaou.controller;
import com.xiaou.util.AliOssUtil;
import org.springframework.web.bind.annotation.*;
import org.springframework.web.multipart.MultipartFile;
@RestController
@RequestMapping("/api")
public class FileUploadController {
@PostMapping("/upload")
public String uploadFile(@RequestParam("file") MultipartFile file) {
try {
// 调用阿里云 OSS 工具类上传文件
String objectName = file.getOriginalFilename();
String url = AliOssUtil.uploadFile(objectName, file.getInputStream());
return "File uploaded successfully! URL: " + url;
} catch (Exception e) {
e.printStackTrace();
return "Error uploading file: " + e.getMessage();
}
}
}
之后来看前端实现,我只写一下vue3的。其他的都大同小异:
<template>
<div>
<input type="file" @change="handleFileChange">
<button @click="uploadFile">上传文件</button>
<div v-if="uploadStatus">{{ uploadStatus }}</div>
</div>
</template>
<script>
import axios from 'axios';
export default {
data() {
return {
file: null,
uploadStatus: ''
};
},
methods: {
handleFileChange(event) {
this.file = event.target.files[0];
},
async uploadFile() {
if (!this.file) {
this.uploadStatus = '请选择要上传的文件';
return;
}
const formData = new FormData();
formData.append('file', this.file);
try {
const response = await axios.post('http://localhost:8080/api/upload', formData, {
headers: {
'Content-Type': 'multipart/form-data'
}
});
this.uploadStatus = response.data;
} catch (error) {
this.uploadStatus = '上传文件出错: ' + error.message;
}
}
}
};
</script>
至此,文件上传完成。
后记
这里说一个题外话,关于我自己开了一个新的项目,在业务开发中,我们有很多很固定的代码,这些东西我们大部分情况下会去选择复制一些,但是由于网络上的资源良莠不齐,而且很多代码没有详细的讲解,所以我打算开一个这样的通用模板项目。
目前项目在初期阶段,这个也是这个项目的第一个通用解决方法。各位如果有兴趣可以来看一看我这个项目,提个pr issue 一起共创这个项目。
我也会经常去更新这个项目,去抽离出一些优秀的解决方案。
以及文档地址:


 7428
7428


 被折叠的 条评论
为什么被折叠?
被折叠的 条评论
为什么被折叠?
 到【灌水乐园】发言


