vue2+elementui使用MessageBox 弹框$msgbox自定义VNode内容:实现radio

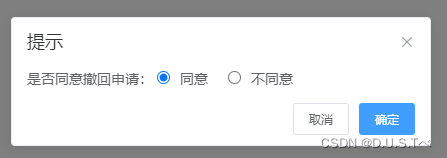
虽说实现下面的效果,用el-dialog很轻松就能搞定。但是这种简单的交互,我更喜欢使用MessageBox。
话不多说,直接上代码~

在这里插入图片描述

<el-button  type="primary" size="mini" @click="handleApply()" >处理申请</el-button>
handleApply() {
      const h = this.$createElement;
      let _this = this;
      _this.statu = '1';
      if (document.getElementById('radio1')) {
        // 默认按钮选中同意,否则下次打开对话框按钮值为上次选中的值
        document.getElementById('radio1').checked = true;
      }
      this.$msgbox({
        title: '提示',
        message:
          h('div', null, [
            h('span', null, '是否同意撤回申请: '),
            h('span', {
              style: {
                marginRight: '20px'
              }
            },
              [h('input', {
                style: {
                  cursor: 'pointer',
                },
                attrs: {
                  // 添加属性
                  type: "radio",
                  name: "Radio",
                  value: "1",
                  id: "radio1",
                  checked: _this.statu === '1',
                },
                on: {
                  change: () => {
                    _this.statu = '1'
                  }
                }
              }, []), h('span', {
                class: 'el-radio__label',
              }, `同意`)]),
            h('span', null,
              [h('input', {
                style: {
                  cursor: 'pointer',
                },
                attrs: {
                  type: "radio",
                  name: "Radio",
                  value: "0",
                  id: "radio2",
                  checked: _this.statu === '0',
                },
                on: {
                  change: () => {
                    _this.statu = '0'
                  }
                }
              }, []), h('span', { class: 'el-radio__label' }, `不同意`)]),
          ]),
        showCancelButton: true,
        confirmButtonText: '确定',
        cancelButtonText: '取消',
      }).then(action => {
          axios.$post(
            `/xxx/xxxxx/${_this.statu}`
          ).then((res) => {
            if (res.success) {
              this.$message.success("操作成功");
            }
          });
      })
    },
  • 这一步还是比较重要的,因为不是el-radio自动绑定,所以通过加入id属性,使用document来操作
if (document.getElementById('radio1')) {
    // 默认按钮选中同意,否则下次打开对话框按钮值为上次选中的值
    document.getElementById('radio1').checked = true;
  }

可能实现的不够完美,欢迎指正与补充。

  • 1
    点赞
  • 3
    收藏
    觉得还不错? 一键收藏
  • 0
    评论
ElementUIMessageBox 弹框中,可以通过传入一个 Vue 组件作为参数来自定义弹框内容。如果你想要在自定义组件中生成多个复选框,可以使用 v-for 指令来实现循环生成。 以下是一个示例代码,演示了如何在自定义组件中循环生成多个复选框: ``` <template> <div> <p>{{ message }}</p> <el-checkbox-group v-model="checkedList"> <el-checkbox v-for="item in options" :key="item.value" :label="item.value">{{ item.label }}</el-checkbox> </el-checkbox-group> <div> <el-button @click="handleConfirm">确定</el-button> <el-button @click="handleCancel">取消</el-button> </div> </div> </template> <script> export default { props: { message: { type: String, default: '' }, options: { type: Array, default: () => [] } }, data() { return { checkedList: [] } }, methods: { handleConfirm() { this.$emit('confirm', this.checkedList) }, handleCancel() { this.$emit('cancel') } } } </script> ``` 在这个组件中,我们使用了一个 el-checkbox-group 组件来实现多选框,使用 v-model 指令来绑定选中的值。然后使用 v-for 指令循环生成多个 el-checkbox 组件。 然后在调用 MessageBox 时,将这个组件作为参数传入,并传入 options 数组来提供选项列表: ``` <template> <div> <el-button @click="showDialog">显示自定义弹框</el-button> </div> </template> <script> import MyMessageBox from '@/components/MyMessageBox' export default { components: { MyMessageBox }, data() { return { options: [ { label: '选项1', value: 'option1' }, { label: '选项2', value: 'option2' }, { label: '选项3', value: 'option3' } ] } }, methods: { showDialog() { const h = this.$createElement const messageBox = this.$msgbox({ title: '自定义弹框', message: h(MyMessageBox, { props: { message: '请选择一个或多个选项:', options: this.options }, on: { confirm: (checkedList) => { messageBox.close() console.log(checkedList) }, cancel: () => { messageBox.close() } } }), showCancelButton: true, showConfirmButton: true, cancelButtonText: '取消', confirmButtonText: '确定' }) } } } </script> ``` 这样就可以在自定义组件中循环生成多个复选框了。注意,这里我们在 MyMessageBox 组件中添加了一个 options 属性,用于传递选项列表。在调用 MessageBox 时,我们也需要传入这个 options 属性。

“相关推荐”对你有帮助么?

  • 非常没帮助
  • 没帮助
  • 一般
  • 有帮助
  • 非常有帮助
提交
评论
添加红包

请填写红包祝福语或标题

红包个数最小为10个

红包金额最低5元

当前余额3.43前往充值 >
需支付:10.00
成就一亿技术人!
领取后你会自动成为博主和红包主的粉丝 规则
hope_wisdom
发出的红包
实付
使用余额支付
点击重新获取
扫码支付
钱包余额 0

抵扣说明:

1.余额是钱包充值的虚拟货币,按照1:1的比例进行支付金额的抵扣。
2.余额无法直接购买下载,可以购买VIP、付费专栏及课程。

余额充值