


前言
由于需要在登录时,附上一些用户说明书的弹窗
对于ElMessageBox的基本知识详细了解
可通过官网了解基本的语法知识ElMessageBox官网基本知识
1. 基本知识
Element Plus 是一个基于 Vue 3 的组件库,其中包括各种类型的弹窗组件,用于在网页上显示信息或与用户进行交互
主要的弹窗组件包括 ElMessageBox.alert、ElMessageBox.prompt 和 ElMessageBox.confirm 等
ElMessageBox.prompt
用于显示带有输入框的对话框
用于需要用户输入信息的场景
import { ElMessageBox } from 'element-plus'

ElMessageBox.prompt(
  '请输入你的邮箱',
  '提示',
  {
    confirmButtonText: '确定',
    cancelButtonText: '取消',
  }
).then(({ value }) => {
  console.log('用户输入的邮箱:', value)
}).catch(() => {
  console.log('取消输入')
})
ElMessageBox.alert
用于显示带有确认按钮的对话框
用于告知用户某些信息
import { ElMessageBox } from 'element-plus'

ElMessageBox.alert(
  '这是一段内容',
  '标题',
  {
    confirmButtonText: '确定',
    callback: action => {
      console.log(action)
    }
  }
)
ElMessageBox.confirm
用于显示带有确认和取消按钮的对话框
用于需要用户确认或取消某些操作的场景
import { ElMessageBox } from 'element-plus'

ElMessageBox.confirm(
  '此操作将永久删除该文件, 是否继续?',
  '提示',
  {
    confirmButtonText: '确定',
    cancelButtonText: '取消',
    type: 'warning',
  }
).then(() => {
  console.log('确认')
}).catch(() => {
  console.log('取消')
})
对于上述基本参数
| 参数 | 描述 |
|---|---|
| title | 对话框的标题 |
| message | 对话框的消息内容,可以是字符串或 HTML |
| type | 消息类型,如 success, info, warning, error |
| iconClass | 自定义图标的类名 |
| customClass | 对话框自定义类名 |
| showClose | 是否显示右上角关闭按钮,默认为 true |
| closeOnClickModal | 是否可以通过点击遮罩层关闭对话框,默认为 true |
| closeOnPressEscape | 是否可以通过按下 Esc 键关闭对话框,默认为 true |
| showCancelButton | 是否显示取消按钮,默认为 false |
| cancelButtonText | 取消按钮的文本内容 |
| confirmButtonText | 确认按钮的文本内容 |
| cancelButtonClass | 自定义取消按钮的类名 |
| confirmButtonClass | 自定义确认按钮的类名 |
| beforeClose | 关闭前的回调函数,可以用于阻止对话框的关闭 |
| callback | 对话框关闭时的回调函数 |
| inputPlaceholder | 输入框的占位符(仅用于 prompt) |
| inputValue | 输入框的初始值(仅用于 prompt) |
| inputType | 输入框的类型(仅用于 prompt) |
| inputPattern | 输入框的校验正则表达式(仅用于 prompt) |
| inputValidator | 输入框的校验函数(仅用于 prompt) |
| inputErrorMessage | 输入框校验失败时的错误提示(仅用于 prompt) |
2. Demo
对应的Demo示例:
ElMessageBox.prompt
import { ElMessageBox } from 'element-plus'

const showPrompt = () => {
  ElMessageBox.prompt(
    '请输入你的名字',
    '输入框',
    {
      confirmButtonText: '确定',
      cancelButtonText: '取消',
      inputPlaceholder: '名字',
      showClose: false,
      closeOnClickModal: false,
      closeOnPressEscape: false,
    }
  ).then(({ value }) => {
    console.log('输入的名字:', value)
  }).catch(() => {
    console.log('已取消')
  })
}
ElMessageBox.alert
import { ElMessageBox } from 'element-plus'

const showAlert = () => {
  ElMessageBox.alert(
    '操作成功',
    '提示',
    {
      confirmButtonText: '确定',
      type: 'success',
      showClose: false,
      closeOnClickModal: false,
      closeOnPressEscape: false,
    }
  ).then(() => {
    console.log('已确认')
  })
}
ElMessageBox.confirm
import { ElMessageBox } from 'element-plus'

const showConfirm = () => {
  ElMessageBox.confirm(
    '是否确认删除此项?',
    '删除确认',
    {
      confirmButtonText: '确认',
      cancelButtonText: '取消',
      type: 'warning',
      showClose: false,
      closeOnClickModal: false,
      closeOnPressEscape: false,
      beforeClose: (action, instance, done) => {
        if (action === 'confirm') {
          // 执行一些操作
          done()
        } else {
          done()
        }
      }
    }
  ).then(() => {
    console.log('已确认')
  }).catch(() => {
    console.log('已取消')
  })
}
如果需要自定义的样式,可通过如下:
ElMessageBox.confirm(
  '内容',
  '标题',
  {
    customClass: 'my-custom-class',
    confirmButtonText: '确认',
    cancelButtonText: '取消',
  }
)
css如下:
.my-custom-class .el-message-box__btns {
  justify-content: center;
}
.my-custom-class .el-button--primary {
  width: 100%;
  margin: 0;
}
3. 实战
const handleLogin = async (params) => {
loginLoading.value = true
try {
await getTenantId()
const data = await validForm()
if (!data) {
return
}
loginData.loginForm.captchaVerification = params.captchaVerification
const res = await LoginApi.login(loginData.loginForm)
if (!res) {
return
}
loading.value = ElLoading.service({
lock: true,
text: '正在加载系统中...',
background: 'rgba(0, 0, 0, 0.7)'
})
if (loginData.loginForm.rememberMe) {
authUtil.setLoginForm(loginData.loginForm)
} else {
authUtil.removeLoginForm()
}
authUtil.setToken(res)
if (!redirect.value) {
redirect.value = '/'
}
// 判断是否为SSO登录
if (redirect.value.indexOf('sso') !== -1) {
window.location.href = window.location.href.replace('/login?redirect=', '')
} else {
push({ path: redirect.value || permissionStore.addRouters[0].path })
}
} finally {
loginLoading.value = false
loading.value.close()
// 登录成功后显示弹窗提示
await ElMessageBox.confirm(
`<div>
<p>尊敬的客户:<br><br>
您好!xxxx前认真阅读以下须知:<br><br>
1xxxxxx<br><br>
<input type="checkbox" id="agree-checkbox" /> <label for="agree-checkbox">我已认真阅读并知悉以上须知</label>
</p>
</div>`,
'xxx须知',
{
confirmButtonText: '同意',
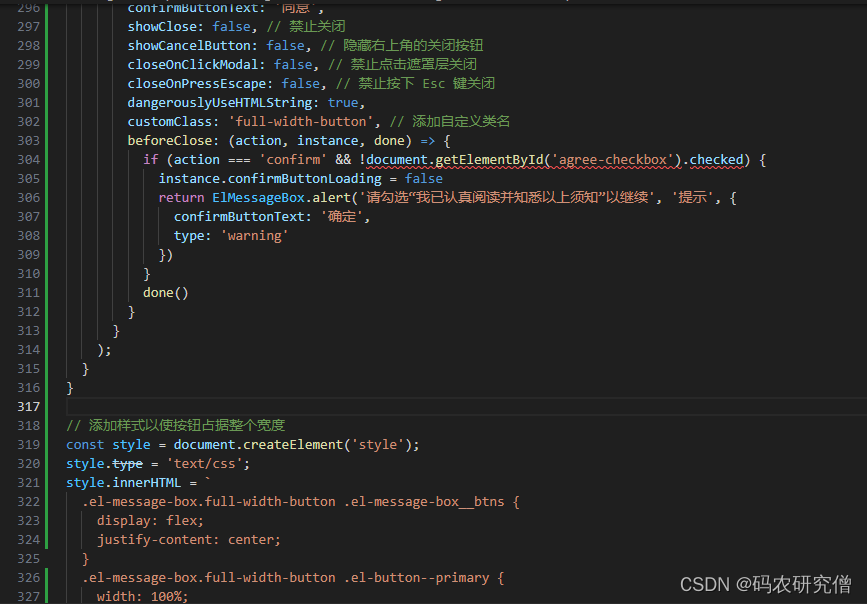
showClose: false, // 禁止关闭
showCancelButton: false, // 隐藏右上角的关闭按钮
closeOnClickModal: false, // 禁止点击遮罩层关闭
closeOnPressEscape: false, // 禁止按下 Esc 键关闭
dangerouslyUseHTMLString: true,
customClass: 'full-width-button', // 添加自定义类名
beforeClose: (action, instance, done) => {
if (action === 'confirm' && !document.getElementById('agree-checkbox').checked) {
instance.confirmButtonLoading = false
return ElMessageBox.alert('请勾选“我已认真阅读并知悉以上须知”以继续', '提示', {
confirmButtonText: '确定',
type: 'warning'
})
}
done()
}
}
);
}
}
// 添加样式以使按钮占据整个宽度
const style = document.createElement('style');
style.type = 'text/css';
style.innerHTML = `
.el-message-box.full-width-button .el-message-box__btns {
display: flex;
justify-content: center;
}
.el-message-box.full-width-button .el-button--primary {
width: 100%;
margin: 0;
}
`;
document.head.appendChild(style);
总体截图如下:
下半部分的截图如下:

4. 模版
针对上述应用的需求,可以附实战的Demo
import { ElMessage, ElMessageBox, ElNotification } from 'element-plus'
import { useI18n } from './useI18n'
export const useMessage = () => {
  const { t } = useI18n()
  return {
    // 消息提示
    info(content: string) {
      ElMessage.info(content)
    },
    // 错误消息
    error(content: string) {
      ElMessage.error(content)
    },
    // 成功消息
    success(content: string) {
      ElMessage.success(content)
    },
    // 警告消息
    warning(content: string) {
      ElMessage.warning(content)
    },
    // 弹出提示
    alert(content: string) {
      ElMessageBox.alert(content, t('common.confirmTitle'))
    },
    // 错误提示
    alertError(content: string) {
      ElMessageBox.alert(content, t('common.confirmTitle'), { type: 'error' })
    },
    // 成功提示
    alertSuccess(content: string) {
      ElMessageBox.alert(content, t('common.confirmTitle'), { type: 'success' })
    },
    // 警告提示
    alertWarning(content: string) {
      ElMessageBox.alert(content, t('common.confirmTitle'), { type: 'warning' })
    },
    // 通知提示
    notify(content: string) {
      ElNotification.info(content)
    },
    // 错误通知
    notifyError(content: string) {
      ElNotification.error(content)
    },
    // 成功通知
    notifySuccess(content: string) {
      ElNotification.success(content)
    },
    // 警告通知
    notifyWarning(content: string) {
      ElNotification.warning(content)
    },
    // 确认窗体
    confirm(content: string, tip?: string) {
      return ElMessageBox.confirm(content, tip ? tip : t('common.confirmTitle'), {
        confirmButtonText: t('common.ok'),
        cancelButtonText: t('common.cancel'),
        type: 'warning'
      })
    },
    // 删除窗体
    delConfirm(content?: string, tip?: string) {
      return ElMessageBox.confirm(
        content ? content : t('common.delMessage'),
        tip ? tip : t('common.confirmTitle'),
        {
          confirmButtonText: t('common.ok'),
          cancelButtonText: t('common.cancel'),
          type: 'warning'
        }
      )
    },
    // 导出窗体
    exportConfirm(content?: string, tip?: string) {
      return ElMessageBox.confirm(
        content ? content : t('common.exportMessage'),
        tip ? tip : t('common.confirmTitle'),
        {
          confirmButtonText: t('common.ok'),
          cancelButtonText: t('common.cancel'),
          type: 'warning'
        }
      )
    },
    // 提交内容
    prompt(content: string, tip: string) {
      return ElMessageBox.prompt(content, tip, {
        confirmButtonText: t('common.ok'),
        cancelButtonText: t('common.cancel'),
        type: 'warning'
      })
    }
  }
}


 3170
3170

 被折叠的 条评论
为什么被折叠?
被折叠的 条评论
为什么被折叠?
 到【灌水乐园】发言


