


前言
前段时间在项目的开发过程中,遇到了需要从数据库中动态查询新的数据源信息并切换到该数据源做相应的查询操作,翻阅了网上很多资料都是简单的对多数据源的整合,并没有涉及到动态添加新数据源并切换的案例,本文根据自己在项目中遇到的问题,用简单案例的形式,对该部分内容进行讲解。
一、项目搭建
本块内容将最初的环境搭建,一步步讲解如何配置多数据源,动态数据源添加,以及一些工具类的编写。
1、pom文件配置
项目中需要用到的相关依赖。
        <!--web模块依赖-->
		<dependency>
			<groupId>org.springframework.boot</groupId>
			<artifactId>spring-boot-starter-web</artifactId>
		</dependency>
		<!--spring核心aop模块依赖-->
		<dependency>
			<groupId>org.springframework.boot</groupId>
			<artifactId>spring-boot-starter-aop</artifactId>
		</dependency>
		<!--德鲁伊数据源连接池依赖-->
		<dependency>
			<groupId>com.alibaba</groupId>
			<artifactId>druid-spring-boot-starter</artifactId>
			<version>1.2.8</version>
		</dependency>
		<!--mybatis依赖-->
		<dependency>
			<groupId>org.mybatis.spring.boot</groupId>
			<artifactId>mybatis-spring-boot-starter</artifactId>
			<version>2.2.2</version>
		</dependency>
		<!--mysql驱动-->
		<dependency>
			<groupId>mysql</groupId>
			<artifactId>mysql-connector-java</artifactId>
			<version>5.1.49</version>
		</dependency>
		<!--lombok模块依赖-->
		<dependency>
			<groupId>org.projectlombok</groupId>
			<artifactId>lombok</artifactId>
			<optional>true</optional>
		</dependency>
		<dependency>
			<groupId>org.springframework.boot</groupId>
			<artifactId>spring-boot-starter-test</artifactId>
			<scope>test</scope>
		</dependency>
2、yml文件配置
server:
  port: 9090

spring:
  datasource:
    druid:
      type: com.alibaba.druid.pool.DruidDataSource
      master:
        url: jdbc:mysql://localhost:3306/db2?useUnicode=true&characterEncoding=utf-8&useSSL=false
        username: root
        password: root
        driver-class-name: com.mysql.jdbc.Driver
      slave:
        url: jdbc:mysql://localhost:3306/db3?useUnicode=true&characterEncoding=utf-8&useSSL=false
        username: root
        password: root
        driver-class-name: com.mysql.jdbc.Driver

#mybatis配置
mybatis:
  # 搜索指定包别名
  type-aliases-package: com.zy.fszl.domain
  # 配置mapper的扫描,找到所有的mapper.xml映射文件
  mapperLocations: classpath:mapper/*Mapper.xml
  # 加载全局的配置文件
  configLocation: classpath:mybatis/mybatis-config.xml
3、基于AbstractRoutingDataSource的数据源切换
在spring中有一个抽象类AbstractRoutingDataSource类,通过这个类可以实现动态数据源切换。 下面对AbstractRoutingDataSource类进行简单说明:
public abstract class AbstractRoutingDataSource extends AbstractDataSource implements InitializingBean {
        //目标数据源map集合,存储将要切换的多数据源bean信息
        @Nullable
        private Map<Object, Object> targetDataSources;
        //未指定数据源时的默认数据源对象
        @Nullable
        private Object defaultTargetDataSource;
        private boolean lenientFallback = true;
        //数据源查找接口,通过该接口的getDataSource(String dataSourceName)获取数据源信息
        private DataSourceLookup dataSourceLookup = new JndiDataSourceLookup();
        //解析targetDataSources之后的DataSource的map集合
        @Nullable
        private Map<Object, DataSource> resolvedDataSources;
        @Nullable
        private DataSource resolvedDefaultDataSource;

        //将targetDataSources的内容转化一下放到resolvedDataSources中,将defaultTargetDataSource转为DataSource赋值给resolvedDefaultDataSource
        public void afterPropertiesSet() {
            //如果目标数据源为空,会抛出异常,在系统配置时应至少传入一个数据源
            if (this.targetDataSources == null) {
                throw new IllegalArgumentException("Property 'targetDataSources' is required");
            } else {
                //初始化resolvedDataSources的大小
                this.resolvedDataSources = CollectionUtils.newHashMap(this.targetDataSources.size());
                //遍历目标数据源信息map集合,对其中的key,value进行解析
                this.targetDataSources.forEach((key, value) -> {
                    //resolveSpecifiedLookupKey方法没有做任何处理,只是将key继续返回
                    Object lookupKey = this.resolveSpecifiedLookupKey(key);
                    //将目标数据源map集合中的value值(德鲁伊数据源信息)转为DataSource类型
                    DataSource dataSource = this.resolveSpecifiedDataSource(value);
                    //将解析之后的key,value放入resolvedDataSources集合中
                    this.resolvedDataSources.put(lookupKey, dataSource);
                });
                if (this.defaultTargetDataSource != null) {
                    //将默认目标数据源信息解析并赋值给resolvedDefaultDataSource
                    this.resolvedDefaultDataSource = this.resolveSpecifiedDataSource(this.defaultTargetDataSource);
                }

            }
        }

        protected Object resolveSpecifiedLookupKey(Object lookupKey) {
            return lookupKey;
        }

        protected DataSource resolveSpecifiedDataSource(Object dataSource) throws IllegalArgumentException {
            if (dataSource instanceof DataSource) {
                return (DataSource)dataSource;
            } else if (dataSource instanceof String) {
                return this.dataSourceLookup.getDataSource((String)dataSource);
            } else {
                throw new IllegalArgumentException("Illegal data source value - only [javax.sql.DataSource] and String supported: " + dataSource);
            }
        }

        //因为AbstractRoutingDataSource继承AbstractDataSource,而AbstractDataSource实现了DataSource接口,所有存在获取数据源连接的方法
        public Connection getConnection() throws SQLException {
            return this.determineTargetDataSource().getConnection();
        }

        public Connection getConnection(String username, String password) throws SQLException {
            return this.determineTargetDataSource().getConnection(username, password);
        }

        protected DataSource determineTargetDataSource() {
            Assert.notNull(this.resolvedDataSources, "DataSource router not initialized");
            //调用实现类中重写的determineCurrentLookupKey方法拿到当前线程要使用的数据源的名称
            Object lookupKey = this.determineCurrentLookupKey();
            //去解析之后的数据源信息集合中查询该数据源是否存在,如果没有拿到则使用默认数据源resolvedDefaultDataSource
            DataSource dataSource = (DataSource)this.resolvedDataSources.get(lookupKey);
            if (dataSource == null && (this.lenientFallback || lookupKey == null)) {
                dataSource = this.resolvedDefaultDataSource;
            }

            if (dataSource == null) {
                throw new IllegalStateException("Cannot determine target DataSource for lookup key [" + lookupKey + "]");
            } else {
                return dataSource;
            }
        }

        @Nullable
        protected abstract Object determineCurrentLookupKey();
    }
4、 DynamicDataSource类
了解了AbstractRoutingDataSource的大体流程之后我们需要编写DynamicDataSource类继承AbstractRoutingDataSource类并重写抽象方法determineCurrentLookupKey
/**
 * 动态数据源
 * 调用AddDefineDataSource组件的addDefineDynamicDataSource()方法,获取原来targetdatasources的map,并将新的数据源信息添加到map中,并替换targetdatasources中的map
 * 切换数据源时可以使用@DataSource(value = "数据源名称"),或者DynamicDataSourceContextHolder.setContextKey("数据源名称")
 * @author zhangyu
 */
@Data
@AllArgsConstructor
@NoArgsConstructor
public class DynamicDataSource extends AbstractRoutingDataSource {
    //备份所有数据源信息,
    private Map<Object, Object> defineTargetDataSources;

    /**
     * 决定当前线程使用哪个数据源
     */
    @Override
    protected Object determineCurrentLookupKey() {
        return DynamicDataSourceHolder.getDynamicDataSourceKey();
    }
}
5、常量类
/**
 * @Description:   动态数据源常量类
 * @Author zhangyu
 * @Date 2022/8/18 16:33
 *
 */
public class CommonConstant {
    /**
     * 默认数据源标识
     */
    public static final String MASTER = "master";
    /**
     * 从数据源标识
     */
    public static final String SLAVE = "slave";
}
6、DynamicDataSourceHolder
DynamicDataSourceHolder类主要是设置当前线程的数据源名称,移除数据源名称,以及获取当前数据源的名称,便于动态切换。
/**
 * 数据源切换处理
 *
 * @author zhangyu
 */
@Slf4j
public class DynamicDataSourceHolder {
    /**
     * 保存动态数据源名称
     */
    private static final ThreadLocal<String> DYNAMIC_DATASOURCE_KEY = new ThreadLocal<>();

    /**
     * 设置/切换数据源,决定当前线程使用哪个数据源
     */
    public static void setDynamicDataSourceKey(String key){
        log.info("数据源切换为:{}",key);
        DYNAMIC_DATASOURCE_KEY.set(key);
    }

    /**
     * 获取动态数据源名称,默认使用mater数据源
     */
    public static String getDynamicDataSourceKey(){
        String key = DYNAMIC_DATASOURCE_KEY.get();
        return key == null ? CommonConstant.MASTER : key;
    }

    /**
     * 移除当前数据源
     */
    public static void removeDynamicDataSourceKey(){
        log.info("移除数据源:{}",DYNAMIC_DATASOURCE_KEY.get());
        DYNAMIC_DATASOURCE_KEY.remove();
    }
}
7、DruidConfig
数据源信息配置类,读取数据源配置信息并注册成bean。
@Configuration
@MapperScan("com.zy.fszl.mapper")
public class DruidConfig {

    @Bean(name = CommonConstant.MASTER)
    @ConfigurationProperties("spring.datasource.druid.master")
    public DataSource masterDataSource()
    {
        DruidDataSource dataSource = DruidDataSourceBuilder.create().build();
        return dataSource;
    }

    @Bean(name = CommonConstant.SLAVE)
    @ConfigurationProperties("spring.datasource.druid.slave")
    public DataSource slaveDataSource()
    {
        DruidDataSource dataSource = DruidDataSourceBuilder.create().build();
        return dataSource;
    }

    @Bean
    @Primary
    public DynamicDataSource dynamicDataSource()
    {
        Map<Object, Object> dataSourceMap = new HashMap<>(2);
        dataSourceMap.put(CommonConstant.MASTER,masterDataSource());
        dataSourceMap.put(CommonConstant.SLAVE,slaveDataSource());
        //设置动态数据源
        DynamicDataSource dynamicDataSource = new DynamicDataSource();
        dynamicDataSource.setDefaultTargetDataSource(masterDataSource());
        dynamicDataSource.setTargetDataSources(dataSourceMap);
        //将数据源信息备份在defineTargetDataSources中
        dynamicDataSource.setDefineTargetDataSources(dataSourceMap);
        return dynamicDataSource;
    }
}
8、数据源工具类
用来测试连接并动态将测试成功的数据源信息添加到目标数据源集合中。
/**
 * @Description:   数据源工具类
 * @Author zhangyu
 * @Date 2022/8/18 17:20
 *
 */
@Slf4j
@Component
public class DataSourceUtil {

    @Resource
    DynamicDataSource dynamicDataSource;

    /**
     * @Description: 根据传递的数据源信息测试数据库连接
     * @Author zhangyu
     */
    public DruidDataSource createDataSourceConnection(DataSourceInfo dataSourceInfo) {
        DruidDataSource druidDataSource = new DruidDataSource();
        druidDataSource.setUrl(dataSourceInfo.getUrl());
        druidDataSource.setUsername(dataSourceInfo.getUserName());
        druidDataSource.setPassword(dataSourceInfo.getPassword());
        druidDataSource.setBreakAfterAcquireFailure(true);
        druidDataSource.setConnectionErrorRetryAttempts(0);
        try {
            druidDataSource.getConnection(2000);
            log.info("数据源连接成功");
            return druidDataSource;
        } catch (SQLException throwables) {
            log.error("数据源 {} 连接失败,用户名:{},密码 {}",dataSourceInfo.getUrl(),dataSourceInfo.getUserName(),dataSourceInfo.getPassword());
            return null;
        }
    }

    /**
     * @Description: 将新增的数据源加入到备份数据源map中
     * @Author zhangyu
     */
    public void addDefineDynamicDataSource(DruidDataSource druidDataSource, String dataSourceName){
        Map<Object, Object> defineTargetDataSources = dynamicDataSource.getDefineTargetDataSources();
        defineTargetDataSources.put(dataSourceName, druidDataSource);
        dynamicDataSource.setTargetDataSources(defineTargetDataSources);
        dynamicDataSource.afterPropertiesSet();
    }
}
二、测试
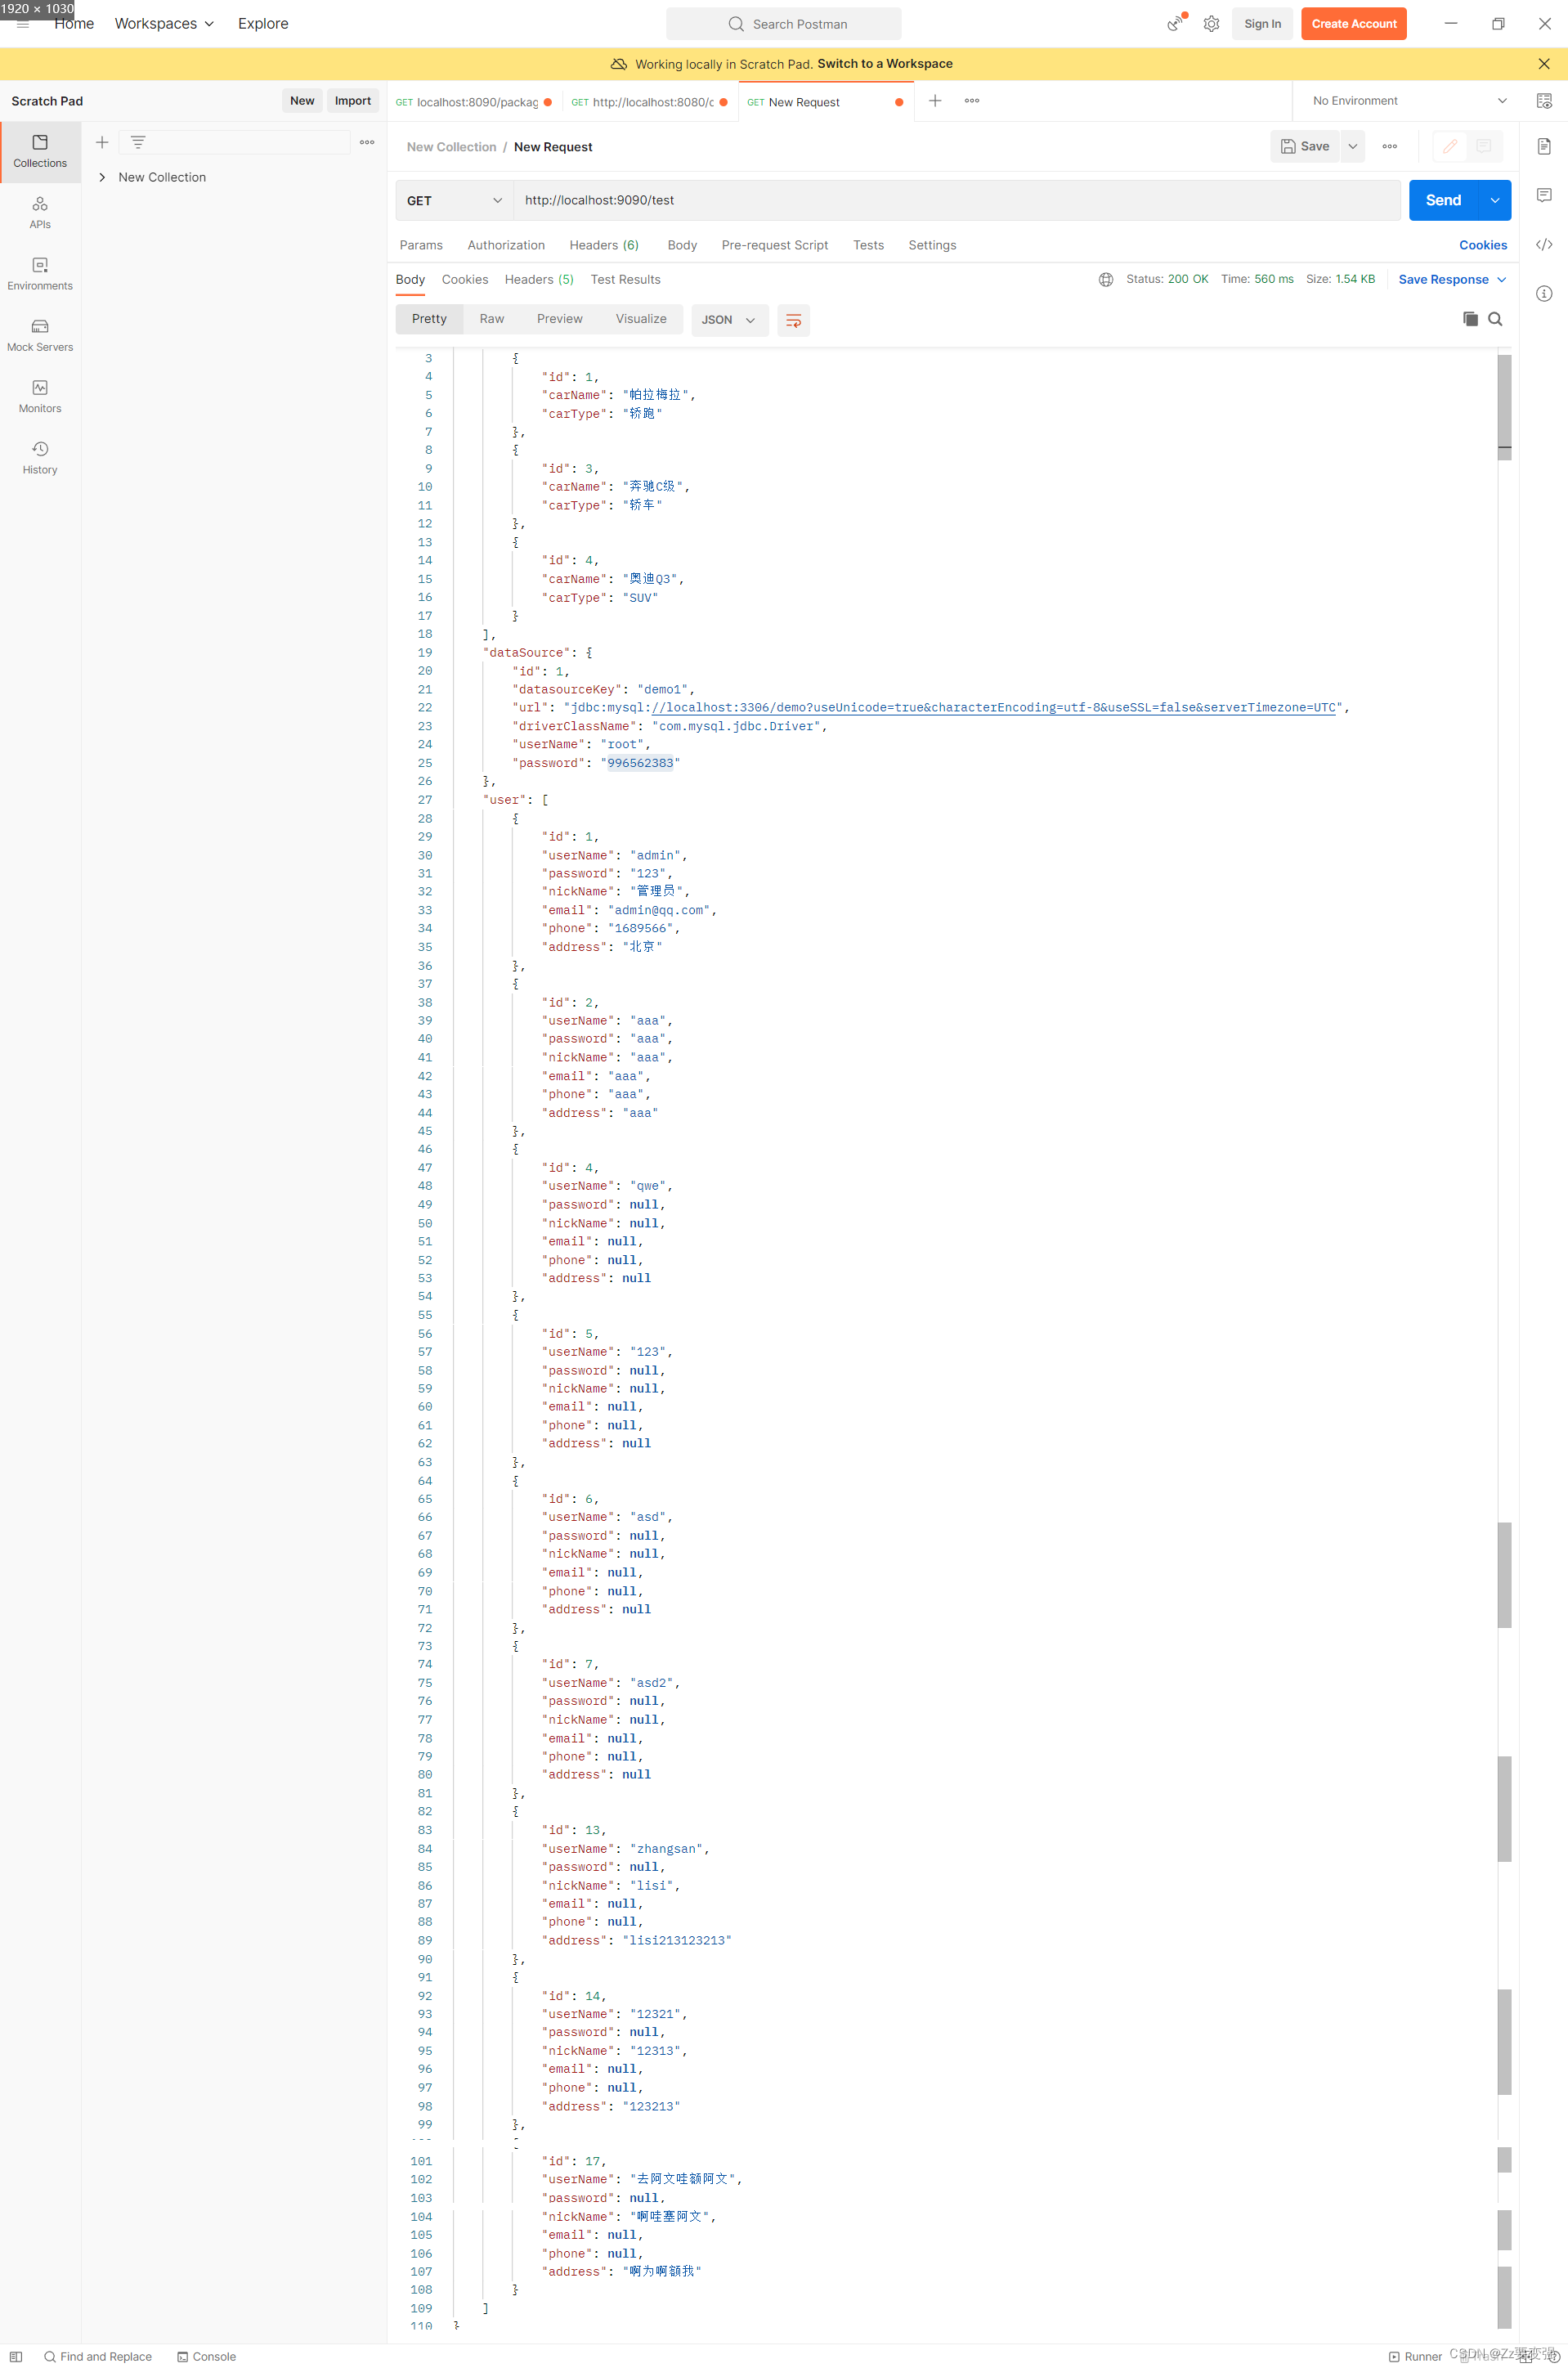
通过案例对动态数据源的添加及切换进行验证,先从主库中查询汽车信息,然后通过DynamicDataSourceHolder.setDynamicDataSourceKey("切换数据源名称"); 切换到从库查询数据源信息,并通过工具类测试数据源连接是否成功,数据源连接成功之后将数据源信息放到目标数据源集合中,并将targetDataSources的内容转化一下放到resolvedDataSources中,然后切换到从库查询所有用户信息,查询完成之后释放数据源连接。
@Slf4j
@RestController
public class TestController {

    @Resource
    CommonMapper commonMapper;
    @Resource
    DataSourceUtil dataSourceUtil;


    @GetMapping("/test")
    public Map<String, Object> dynamicDataSourceTest(){
        Map<String, Object> map = new HashMap<>();
        //在主库中查询汽车信息列表
        List<Car> carList = commonMapper.getCarInfo();
        map.put("car",carList);
        carList.forEach(car -> {
            log.info("汽车信息:{}",car);
        });
        //在从库中查询数据源信息
        DynamicDataSourceHolder.setDynamicDataSourceKey(CommonConstant.SLAVE);
        DataSourceInfo dataSourceInfo = commonMapper.getNewDataSourceInfo();
        map.put("dataSource",dataSourceInfo);
        log.info("数据源信息:{}",dataSourceInfo);
        //测试数据源连接
        DruidDataSource druidDataSource = dataSourceUtil.createDataSourceConnection(dataSourceInfo);
        if (Objects.nonNull(druidDataSource)){
            //将新的数据源连接添加到目标数据源map中
            dataSourceUtil.addDefineDynamicDataSource(druidDataSource,dataSourceInfo.getDatasourceKey());
            //设置当前线程数据源名称-----代码形式
            DynamicDataSourceHolder.setDynamicDataSourceKey(dataSourceInfo.getDatasourceKey());
            //在新的数据源中查询用户信息
            List<User> userList = commonMapper.getUserInfo();
            map.put("user",userList);
            userList.forEach(user -> {
                log.info("用户信息:{}",user);
            });
            //关闭数据源连接
            druidDataSource.close();
        }
        return map;
    }
}
可以看到map集合中的数据成功返回,说明数据源添加及切换成功。
三、使用注解方式切换数据源
从测试代码中可以看到,如果我们要想切换数据源需要在mapper调用之前调用DynamicDataSourceHolder.setDynamicDataSourceKey();方法,不够简洁优雅,所有我们可以通过注解的方式来动态进行数据源的切换。
1、创建注解类DataSource
/**
 * 自定义多数据源切换注解
 *
 * 优先级:先方法,后类,如果方法覆盖了类上的数据源类型,以方法的为准,否则以类上的为准
 *
 * @author ruoyi
 */
@Target({ ElementType.METHOD, ElementType.TYPE })
@Retention(RetentionPolicy.RUNTIME)
@Documented
@Inherited
public @interface DataSource
{
    /**
     * 切换数据源名称
     */
    public String value() default CommonConstant.MASTER;
}
2、创建切面DataSourceAspect
@Aspect
@Component
public class DataSourceAspect {

    // 设置DataSource注解的切点表达式
    @Pointcut("@annotation(com.zy.fszl.annotation.DataSource)")
    public void dynamicDataSourcePointCut(){

    }

    //环绕通知
    @Around("dynamicDataSourcePointCut()")
    public Object around(ProceedingJoinPoint joinPoint) throws Throwable{
        String key = getDefineAnnotation(joinPoint).value();
        DynamicDataSourceHolder.setDynamicDataSourceKey(key);
        try {
            return joinPoint.proceed();
        } finally {
            DynamicDataSourceHolder.removeDynamicDataSourceKey();
        }
    }

    /**
     * 先判断方法的注解,后判断类的注解,以方法的注解为准
     * @param joinPoint
     * @return
     */
    private DataSource getDefineAnnotation(ProceedingJoinPoint joinPoint){
        MethodSignature methodSignature = (MethodSignature) joinPoint.getSignature();
        DataSource dataSourceAnnotation = methodSignature.getMethod().getAnnotation(DataSource.class);
        if (Objects.nonNull(methodSignature)) {
            return dataSourceAnnotation;
        } else {
            Class<?> dsClass = joinPoint.getTarget().getClass();
            return dsClass.getAnnotation(DataSource.class);
        }
    }

}
3、进行数据源切换
只需要在对应mapper文件的方法上添加@DataSource注解即可
public interface CommonMapper {
    List<Car> getCarInfo();
    @DataSource(value = CommonConstant.SLAVE)
    DataSourceInfo getNewDataSourceInfo();
    //设置当前数据源名称------注解形式
    @DataSource(value = "demo1")
    List<User> getUserInfo();
}


 986
986


 被折叠的 条评论
为什么被折叠?
被折叠的 条评论
为什么被折叠?
 到【灌水乐园】发言


