


一、组件组成
组件最大的优势就是可复用性。
当使用构建步骤时,一般会将Vue组件定义在一个单独的.vue文件中,这叫做单文件组件(简称SFC)。
组件组成结构
<template>
    <div>承载标签</div>
</template>
<script>
export default { }
</script>
<style>
</style>
组件引用
<template>
    <!-- 第三步:显示组件 -->
    <MyComponent />
    <!-- 下列方式也可,但是不推荐,容易拆分错误 -->
    <my-component />
</template>
<script>
//第一步:引入组件
import MyComponent from "./components/MyComponent.vue"

export default {
    //第二步:注入组件
    components: {
        MyComponent
    }
}
</script>
<style>
</style>
对于一个组件来说,必须有的是template,别的都可以删除。
scoped属性(style标签)
作用:让当前样式只在当前组件中生效。(生效作用域)
二、组件嵌套关系
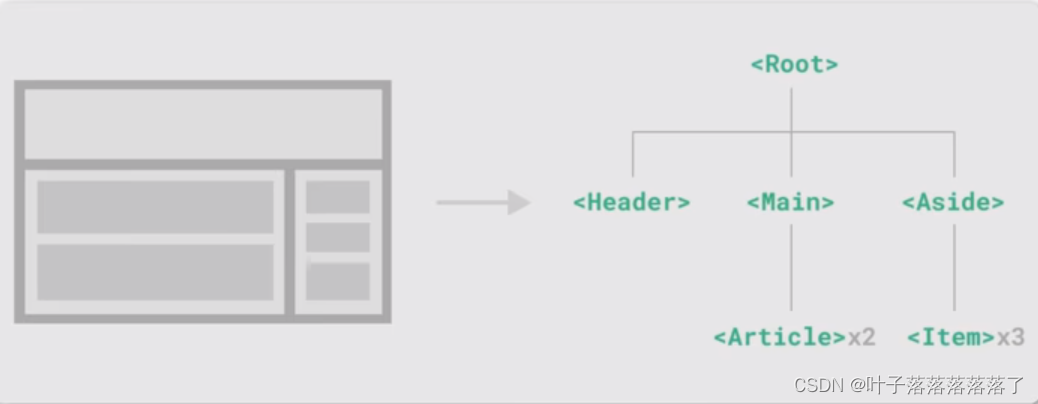
组件允许我们将UI划分成独立的、可重用的部分,并且可以对每个部分进行单独的思考。在实际应用中,组件常常被组织成层层嵌套的树状结构。
这与嵌套HTML元素的方式类似,Vue实现了自己的组件模型,使我们可以在每个组件内封装自定义内容与逻辑。
创建组件及引用关系
Header
<template>
    <h3>Header</h3>
</template>

<style scoped>
h3 {
    width: 100%;
    height: 100px;
    border: 5px solid #999;
    line-height: 100px;
    text-align: center;
    box-sizing: border-box;
}
</style>
Main
<template>
    <div class="main">
        <h3>Main</h3>
        <Article />
        <Article />

    </div>
</template>
<script>
    import Article from './Article.vue';
    export default {
        components: {
            Article
        }
    }
</script>
<style scoped>
    .main {
        float: left;
        width: 70%;
        height: 400px;
        border: 5px solid #999;
        box-sizing: border-box;
    }
</style>
Aside
<template>
    <div class="aside">
        <h3>Aside</h3>
        <Item />
        <Item />
        <Item />
    </div>
</template>

<script>
    import Item from "./Item.vue"
    export default {
        components: {
            Item
        }
    }
</script>

<style scoped>
    .aside {
        float: right;
        width: 30%;
        height: 400px;
        border: 5px solid #999;
        box-sizing: border-box;
    }
</style>
Article
<template>
    <h3>Article</h3>
</template>

<style scoped>
    h3 {
        width: 80%;
        margin: 0 auto;
        text-align: center;
        line-height: 100px;
        box-sizing: border-box;
        margin-top: 50px;
        background: #999;
    }
</style>
Item
<template>
    <h3>Item</h3>
</template>

<style scoped>
    h3 {
        width: 80%;
        margin: 0 auto;
        text-align: center;
        line-height: 100px;
        box-sizing: border-box;
        margin-top: 10px;
        background: #999;
    }
</style>
App
<script>
import Header from "./pages/Header.vue"
import Main from "./pages/Main.vue"
import Aside from "./pages/Aside.vue"
export default {
    components: {
      Header:Header,
      Main:Main,
      Aside:Aside
  }
}
</script>

<template>
  <Header />
  <Main />
  <Aside />
</template>

<style scoped>
</style>
三、组件注册方式
一个Vue组件在使用前需要先被“注册”,这样Vue才能在渲染模块时找到其对应的实现。组件注册有两种方式:全局注册和局部注册
全局注册
main.js
import { createApp } from 'vue'

import App from './App.vue'
import Header from "./pages/Header.vue"

const app = createApp(App)
//在这中间写组件的注册

app.component("Header", Header)

app.mount('#app')
局部注册
全局注册虽然很方便,但有以下几个问题:
(1)全局注册,但它并没有被使用的组件无法在生产打包时被自动移除(也叫"tree-shaking")。如果你全局注册了一个组件,即使它并没有被实际使用,它仍然会出现在打包的Js文件中。
(2)全局注册在大型项目中使项目的依赖关系变得不是那么明确。在父组件中使用子组件时,不太容易定位子组件的实现。和使用过多的全局变量一样,这可能会影响应用长期的可维护性。
局部注册需要使用components选项。
<script>
import Header from "./pages/Header.vue"
import Main from "./pages/Main.vue"
import Aside from "./pages/Aside.vue"
export default {
    components: {
      Header:Header,
      Main:Main,
      Aside:Aside
  }
}
</script>

<template>
  <Header />
  <Main />
  <Aside />
</template>

<style scoped>
</style>
四、组件传递数据_Props
组件与组件不是完全独立,而是有交集的,那就是组件与组件之间是可以传递数据的。传递数据的解决方案就是props。
注意:props传递数据,只能从父级传到子级,不能反其道而行。
parent
<template>
    <h3>Parent</h3>
    <Child title="Parent数据" demo="测试"/>
</template>

<script>
    import Child from "./Child.vue"
    export default {
        components: {
            Child:Child
        }
    }
</script>
child
<template>
    <h3>Child</h3>
    <p>{{ title }}</p>
    <p>{{ demo }}</p>
</template>

<script>
    export default {
        data() {
            return {

            }
        },
        props: ["title","demo"]
    }
</script>
动态数据传递
<template>
    <h3>Parent</h3>
    <Child :title="message" />
</template>

<script>
    import Child from "./Child.vue"
    export default {
        data() {
            return {
                message: "Parent数据"
            }
        },
        components: {
            Child:Child
        }
    }
</script>
五、组件传递多种数据类型
通过props传递数据,不仅可以传递字符串类型的数据,还可以是其他类型,例如:数字、对象、数组等。但实际上任何类型的值都可以作为props的值被传递。
number
<template>
    <h3>Parent</h3>
    <Child :age="age"/>
</template>

<script>
    import Child from "./Child.vue"
    export default {
        data() {
            return {
                age: 20,
            }
        },
        components: {
            Child:Child
        }
    }
</script>
Array
Parents
<template>
    <h3>Parent</h3>
    <Child :age="age" :names="names"/>
</template>

<script>
    import Child from "./Child.vue"
    export default {
        data() {
            return {
                age: 20,
                names: ["iwen", "ime", "frank"]
            }
        },
        components: {
            Child:Child
        }
    }
</script>
Child
<template>
    <h3>Child</h3>
    <p>{{ age }}</p>
    <ul>
        <li v-for="(item, index) of names" :key="index">{{ item }}</li>
    </ul>
</template>

<script>
    export default {
        data() {
            return {

            }
        },
        props: ["age", "names"]
    }
</script>
Object
Parents
<template>
    <h3>Parent</h3>
    <Child :age="age" :names="names" :userInfo="userInfo"/>
</template>

<script>
    import Child from "./Child.vue"
    export default {
        data() {
            return {
                age: 20,
                names: ["iwen", "ime", "frank"],
                userInfo: {
                    name: "iwen",
                    age: 20
                }
            }
        },
        components: {
            Child:Child
        }
    }
</script>
Child
<template>
    <h3>Child</h3>
    <p>{{ age }}</p>
    <ul>
        <li v-for="(item, index) of names" :key="index">{{ item }}</li>
    </ul>
    <p>{{ userInfo.name }}</p>
    <p>{{ userInfo.age }}</p>
</template>

<script>
    export default {
        data() {
            return {

            }
        },
        props: ["age", "names", "userInfo"]
    }
</script>
六、组件传递Props校验
Vue组件可以更细致地声明对传入的props的校验要求。
注意:props是只读的!即只允许子组件读,不允许修改。
parent
<template>
    <h3>Parent</h3>
    <Child :title="title" />
</template>

<script>
    import Child from "./Child.vue"
    export default {
        data() {
            return {
                title: 20,
            }
        },
        components: {
            Child:Child
        }
    }
</script>
child
<template>
    <h3>Child</h3>
    <p>{{ title }}</p>
</template>

<script>
    export default {
        data() {
            return {

            }
        },
        props: {
            title: {
                type:[String, Array]
            }
        }
    }
</script>
默认值
<template>
    <h3>Child</h3>
    <p>{{ title }}</p>
    <p>{{ age }}</p>
</template>

<script>
    export default {
        data() {
            return {

            }
        },
        props: {
            title: {
                type:[String, Array]
            },
            age: {
                type: Number,
                default: 0
            }
        }
    }
</script>
数字和字符串可以直接default,但是如果是数组和对象,必须通过工厂函数返回默认值。
<template>
    <h3>Child</h3>
    <p>{{ title }}</p>
    <p>{{ age }}</p>
    <p v-for="(name, index) of names" :key="index">{{ name }}</p>
</template>

<script>
    export default {
        data() {
            return {

            }
        },
        props: {
            title: {
                type:[String, Array]
            },
            age: {
                type: Number,
                default: 0
            },
            names: {
                type: String,
                default() {
                    return ["空"]
                }
            }
        }
    }
</script>
必选项
<template>
    <h3>Child</h3>
    <p>{{ age }}</p>
</template>

<script>
    export default {
        data() {
            return {

            }
        },
        props: {
            age: {
                type: Number,
                default: 0,
                required: true
            }
        }
    }
</script>
七、组件事件
组件事件:组件传递数据
在组件的模板表达式中,可以直接使用$emit方法触发自定义事件。
触发自定义事件的目的是组件之间传递数据。
parent
<template>
    <h3>Parent</h3>
    <Child @someEvent="getHandle" />
    <p>{{ message}}</p>
</template>

<script>
    import Child from "./Child.vue"
    export default {
        data() {
            return {
                message:""
            }
        },
        components: {
            Child:Child
        },
        methods: {
            getHandle(data) {
                console.log("触发了", data);
                this.message = data;
            }
        }
    }
</script>
child
<template>
    <h3>Child</h3>
    <button @click="clickEventHandle">传递数据</button>
</template>

<script>
    export default {
        data() {
            return {
                msg: "child数据"
            }
        },
        methods: {
            clickEventHandle() {
                //自定义事件
                this.$emit("someEvent", this.msg);
            }
        }
    }
</script>
结论:组件之间传递数据的方案。
1、父传子:props。
2、子传父:自定义事件(this.$emit)
八、组件事件配合v-model使用
如果是用户输入,我们希望在获取数据的同时发送数据配合v-model来使用。
main
<template>
    <h3>Main</h3>
    <p>搜索内容为: {{ search }}</p>
    <SearchComponets @searchEvent="getSearch" />
</template>

<script>
import SearchComponets from "./SearchComponets.vue"
export default {
    data() {
        return {
            search: ""
        }
    },
    components: {
        SearchComponets: SearchComponets
    },
    methods: {
        getSearch(data) {
            this.search = data;
        }
    }
}
</script>
searchComponets
<template>
    搜索: <input type="text" v-model="search" />
</template>
<script>
import { watch } from 'vue';

    export default {
        data() {
            return {
                search: ""
            }
        },
        watch: {
            search(newValue, oldValue) {
                this.$emit("searchEvent", newValue);
            }
        }
    }
</script>
九、组件数据传递
组件之间传递数据的方案。
1、父传子:props。
2、子传父:自定义事件(this.$emit)。
除了上述的方案,props也可以实现子传父。
简单而言就是:父类提供了一个函数接口给子类调用,子类调用并传值,传的这个值被父类接收到了。
Parent
<template>
    <h3>Parent</h3>
    <Child title="标题" :onEvent="dataFn" />
    <p>父元素:{{ message }}</p>
</template>

<script>
    import Child from "./Child.vue"
    export default {
        data() {
            return {
                message:""
            }
        },
        components: {
            Child:Child
        },
        methods: {
            dataFn(data) {
                this.message = data;
            }
        }
    }
</script>
Child
<template>
    <h3>Child</h3>
    <p>{{ title }}</p>
    <p>{{ onEvent('传递数据') }}</p>
</template>

<script>
    export default {
        data() {
        },
        props: {
            title:String,
            onEvent: Function
        }
    }
</script>
十、透传Attributes
透传Attribute指的是传递给一个组件,却没有被该组件声明为props或emits的attribute或者v-on事件监听器。最常见的例子就是class、style和id。
当一个组件以单个元素为根作渲染时,透传attribute会自动地被添加到根元素上。
parent
<template>
    <Child class="attr-container" />
</template>

<script>
    import Child from "./Child.vue"

    export default {
        data() {
            return {
            }
        },
        components: {
            Child:Child
        }
    }
</script>
child
<template>
<!-- 必须是唯一根元素 -->
<h3>透传属性</h3>
</template>
<script>
export default {
// 禁止透传
inheritAttrs: true
}
</script>
<style scoped>
.attr-container {
color: red;
}
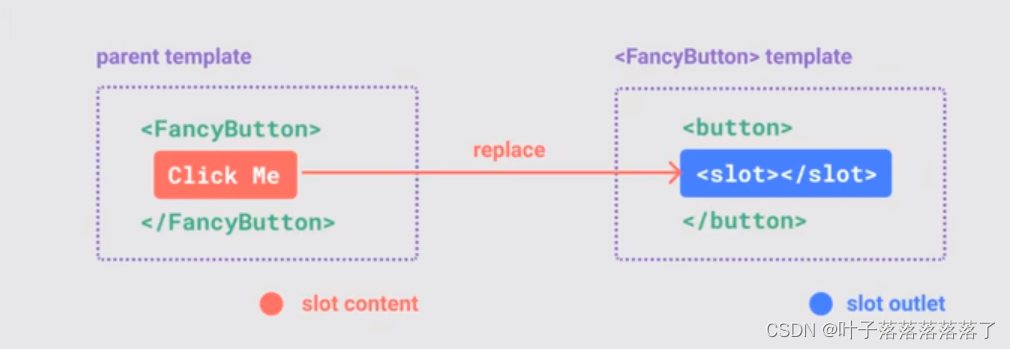
</style>十一、插槽Slots
组件能够接受任意类型的JavaScript值作为props,但组件要如何接受模板类型呢?在某些场景中,要为子组件传递一些模板片段,让子组件在它们的组件中渲染这些片段。
main
<template>
    <SlotsBase>
        <div>
            <h3>插槽标题</h3>
            <p>插槽内容</p>
        </div>
    </SlotsBase>

</template>

<script>
import SlotsBase from "./SlotsBase.vue"
export default {
    data() {
        return {

        }
    },
    components: {
        SlotsBase: SlotsBase
    }
}
</script>
SlotsBase
<template>
    <h3>插槽基础知识</h3>
    <slot></slot>
</template>

<script>
</script>
<slot>元素是一个插槽出口,标示了父元素提供的插槽内容将在哪里被渲染。
渲染作用域
插槽内容可以访问到父组件的数据作用域,因为插槽内容本身是在父组件模板中定义的。
main
<template>
    <SlotsBase>
        <h3>{{ message }}</h3>
    </SlotsBase>

</template>

<script>
import SlotsBase from "./SlotsBase.vue"
export default {
    data() {
        return {
            message: "插槽内容"
        }
    },
    components: {
        SlotsBase: SlotsBase
    }
}
</script>
默认插槽
在外部没有提供任何内容的情况下,可以为插槽指定默认内容。
main
<template>
    <SlotsBase>
        <!-- <h3>{{ message }}</h3> -->
    </SlotsBase>

</template>

<script>
import SlotsBase from "./SlotsBase.vue"
export default {
    data() {
        return {
            message: "插槽内容"
        }
    },
    components: {
        SlotsBase: SlotsBase
    }
}
</script>
slotBase
<template>
<slot>插槽默认值</slot>
</template>
<script>
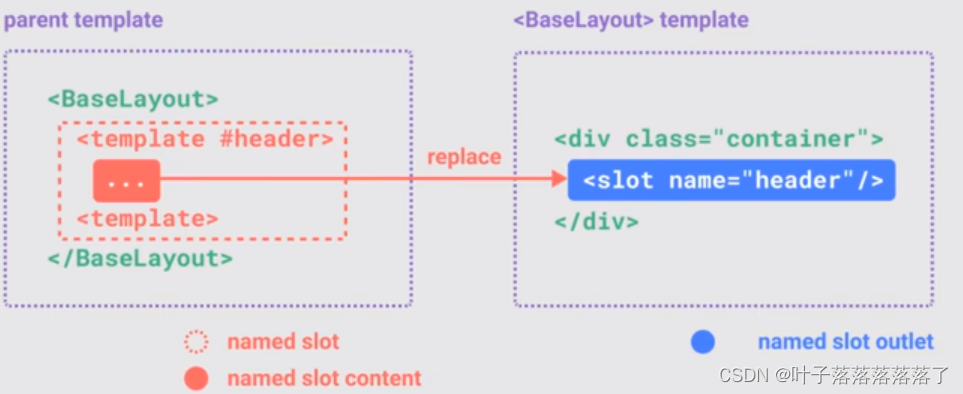
</script>具名插槽
当使用多个插槽时,给每个插槽定义一个名字。
main
<template>
    <SlotsBase>
        <template v-slot:header>
            <h3>{{ message }}</h3>
        </template>
        <template v-slot:main>
            <p>内容</p>
        </template>
    </SlotsBase>

</template>

<script>
import SlotsBase from "./SlotsBase.vue"
export default {
    data() {
        return {
            message: "插槽内容"
        }
    },
    components: {
        SlotsBase: SlotsBase
    }
}
</script>
slotBase
<template>
    <slot name="header"></slot>
    <hr />
    <slot name="main"></slot>
</template>

<script>
</script>
v-slot有对应的简写#,因此<template v-slot:header>可以简写为<template #header>。其意思就是:“将这部分模板片段传入子组件的header插槽中”。
插槽中的数据传递
在某些场景下插槽的内容可能想要同时使用父组件域内和子组件域内的数据。要做到这一点,需要一种方法来让子组件在渲染时将一部分数据提供给插槽。
像对组件传递props那样,向一个插槽的出口上传递attributes。
先将子元素数据传递给父元素,然后父元素将全部的数据(包括父元素自己的)通过插槽传递给子元素。
main
<template>
    <SlotsBase v-slot="slotProps">
        <h3>{{ currentTest }}: {{ slotProps.msg }}</h3>
    </SlotsBase>

</template>

<script>
import SlotsBase from "./SlotsBase.vue"
export default {
    data() {
        return {
            currentTest: "测试内容"
        }
    },
    components: {
        SlotsBase: SlotsBase
    }
}
</script>
slotBase
<template>
    <slot :msg="childMessage"></slot>
</template>

<script>

export default {
    data() {
        return {
            childMessage: "子组件数据"
        }
    }
}
</script>
具名插槽传递数据
main
<template>
    <SlotsBase>
        <template #header="slotProps">
            <h3>{{ currentTest }}: {{ slotProps.msg }}</h3>
        </template>
        <template #main="slotProps">
            <p>{{ slotProps.job }}</p>
        </template>
    </SlotsBase>

</template>

<script>
import SlotsBase from "./SlotsBase.vue"
export default {
    data() {
        return {
            currentTest: "测试内容"
        }
    },
    components: {
        SlotsBase: SlotsBase
    }
}
</script>
slotBase
<template>
    <slot name="header" :msg="childMessage" ></slot>
    <slot name="main" :job="jobMessgae"></slot>
</template>

<script>

export default {
    data() {
        return {
            childMessage: "子组件数据",
            jobMessgae: "C++"
        }
    }
}
</script>
十二、组件生命周期
每个Vue组件实例在创建时都需要经历一系列的初始化步骤,比如设置好数据侦听,编译模板,挂载实例到DOM,以及在数据改变时更新DOM。在此过程中,它也会运行被称为生命周期钩子的函数,让开发者有机会在特定阶段运行自己的代码。
生命周期函数
创建期:beforeCreate created
挂载期:beforeMount mounted
更新期:beforeUpdate updated
销毁期:beforeUnmount unmounted
<script>
export default {
    beforeCreate() {
      console.log("组件创建之前");
    },
    created() {
      console.log("组件创建之后");
    },
    beforeMount() {
      console.log("组件渲染之前");
    },
    mounted() {
      console.log("组件渲染之后");
    },
    beforeUpdate() {
      console.log("组件更新之前");
    },
    updated() {
      console.log("组件更新之后");
    },
    beforeUnmount() {
      console.log("组件销毁之前");
    },
    unmounted() {
      console.log("组件销毁之后");
    },
    data() {
      return {
        message: "更新之前"
      }
    },
    methods: {
      updateHandle() {
        this.message = "更新之后"
      }
    }
}
</script>

<template>
  <h3>{{ message }}</h3>
  <button @click="updateHandle">更新数据</button>
</template>

<style scoped>
</style>
十三、生命周期应用
组件的生命周期会随着我们对Vue的了解越多,也会越来越重要,这里我们先将两个常用的应用:
(1)通过ref获取元素DOM结构
(2)模拟网络请求渲染数据
通过ref获取元素DOM结构
<script>
export default {
  beforeMount() {
    console.log(this.$refs.name); //undefined
  },
  mounted() {
    console.log(this.$refs.name);
  }
}
</script>

<template>
  <p ref="name">测试</p>
</template>
模拟网络请求渲染数据
<script>
export default {
  created() {
    //模拟网络请求
    this.banner = []
  },
  mounted() {
    //也可以在created中进行模拟网络请求的操作,但是不太理想 应该先出网页框架后出数据,因为数据和网页整体来说不是那么重要
  },
  data() {
    return {
      banner: []
    }
  }
}
</script>

<template>
  <ul>
    <li v-for="(item, index) of banner" :key="index">
      <h3>{{ item.title }}</h3>
      <p>{{ item.content }}</p>
    </li>
  </ul>
</template>
十四、动态组件
有些场景会需要在两个组件间来回切换,比如Tab界面。
ComponetA
<template>
    <h3>ComponetA</h3>
</template>

<script>

</script>
ComponetB
<template>
    <h3>ComponetB</h3>
</template>

<script>

</script>
App
<template>
  <component :is="tabComponent"></component>
  <button @click="changeHandle">改变组件</button>
</template>

<script>
import ComponentA from "./components/ComponentA.vue"
import ComponentB from "./components/ComponentB.vue"
export default {
  components: {
    ComponentA: ComponentA,
    ComponentB: ComponentB
  },
  data() {
    return {
      tabComponent: "ComponentA"
    }
  },
  methods: {
    changeHandle() {
      this.tabComponent = this.tabComponent == "ComponentA" ? "ComponentB" : "ComponentA"
    }
  }
}
</script>
十五、组件保持存活
当使用<component:is="...">来在多个组件间作切换时,被切换掉的组件会被卸载。我们可以通过<keep-alive>组件强制被切换掉的组件仍然保持“存活”的状态。
<template>
  <KeepAlive>
    <component :is="tabComponent"></component>
  </KeepAlive>
  <button @click="changeHandle">改变组件</button>
</template>

<script>
import ComponentA from "./components/ComponentA.vue"
import ComponentB from "./components/ComponentB.vue"
export default {
  components: {
    ComponentA: ComponentA,
    ComponentB: ComponentB
  },
  data() {
    return {
      tabComponent: "ComponentA"
    }
  },
  methods: {
    changeHandle() {
      this.tabComponent = this.tabComponent == "ComponentA" ? "ComponentB" : "ComponentA"
    }
  }
}
</script>
Vue中会有分割字符的名称以及小驼峰式的名称写法:keep-alive和KeepAlive是一样的。
十六、异步组件(优化组件性能)
在大型项目中,可能需要拆分应用为更小的块,并仅在需要时再从服务器加载相关组件。Vue提供了defineAsncComponet方法来实现此功能。
<template>
  <KeepAlive>
    <component :is="tabComponent"></component>
  </KeepAlive>
  <button @click="changeHandle">改变组件</button>
</template>

<script>
import { defineAsyncComponent } from "vue"
import ComponentA from "./components/ComponentA.vue"
//异步加载组件
const ComponentB = defineAsyncComponent(()=>
  import("./components/ComponentB.vue")
)
export default {
  components: {
    ComponentA: ComponentA,
    ComponentB: ComponentB
  },
  data() {
    return {
      tabComponent: "ComponentA"
    }
  },
  methods: {
    changeHandle() {
      this.tabComponent = this.tabComponent == "ComponentA" ? "ComponentB" : "ComponentA"
    }
  }
}
</script>
十七、依赖注入
通常情况下,当需要从父组件向子组件传递数据时,会使用props。想象一个这样的结构:有一些多层级嵌套的组件,形成了一颗巨大的组件树,而某个深层的子组件需要一个较远的祖先组件中的部分数据。在这种情况下,如果仅使用props则必须将其沿着组件链逐级传递下去,这会非常麻烦。
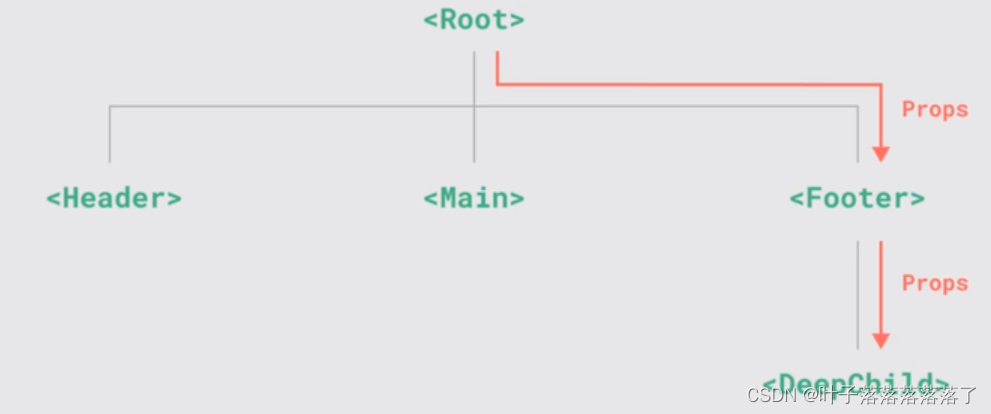
这一问题被称为“prop逐级透传”。
provide和inject可以帮助我们解决这一问题。一个父组件相对于其所有的后代组件,会作为依赖提供者。任何后代的组件树,无论层级多深,都可以注入由父组件提供给整条链路的依赖。
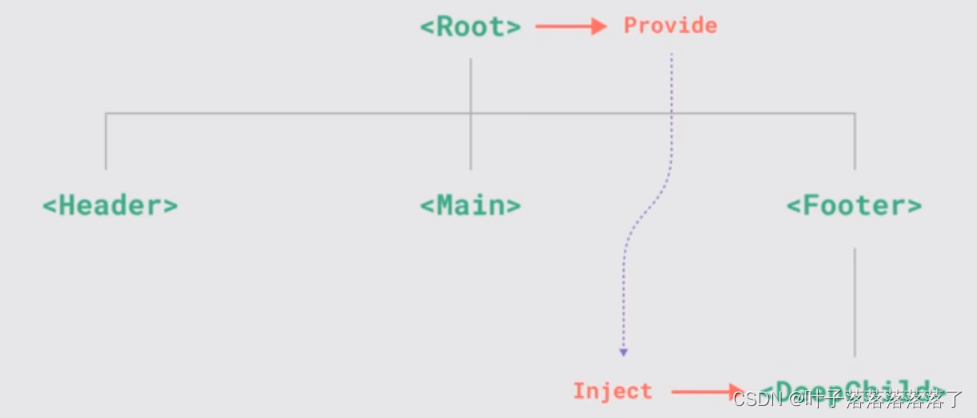
注意:provide和inject只能实现由上到下的传递,不能反向传递。
Provide(提供)
要为后代提供数据,需要使用到provide选项。
GrandParents
<template>
  <h3>GrandParents</h3>
  <Parent />
</template>

<script>
import Parent from "./components/Parent.vue"
export default{
  components: {
    Parent: Parent
  },
  provide: {
    message: "GrandParent`s goods"
  }
}
</script>
Inject(注入)
要注入上层组件提供的数据,需要使用到inject选项来声明。
Child
<template>
    <h3>child</h3>
    <p>{{ message }}</p>
</template>

<script>
export default{
    inject: ["message"]
}
</script>
获得data中的数据
GrandParents
<template>
  <h3>GrandParents</h3>
  <Parent />
</template>

<script>
import Parent from "./components/Parent.vue"
export default{
  components: {
    Parent: Parent
  },
  provide() {
    return {
      message: this.message
    }

  },
  data() {
    return {
      message: "GrandParent`s goods"
    }
  }
}
</script>
注入访问
注入会在组件自身的状态之前被解析,因此你可以在data()中访问到注入的属性。
Child
<template>
    <h3>child</h3>
    <p>{{ message }}</p>
    <p>{{ fullMessage }}</p>
</template>

<script>
export default{
    inject: ["message"],
    data() {
        return {
            //基于注入值的初始数据
            fullMessage: this.message
        }
    }
}
</script>
依赖提供
除了在一个组件中提供依赖,我们还可以在整个应用层面提供依赖。
main.js
import { createApp } from 'vue'

import App from './App.vue'

const app = createApp(App)
app.provide("globalData", "全局数据")

app.mount('#app')
这样导入之后,可以在整个项目的各个模块中使用inject来获取全局数据。


 1416
1416


 被折叠的 条评论
为什么被折叠?
被折叠的 条评论
为什么被折叠?
 到【灌水乐园】发言


