


文章目录
1. Redis入门
- Redis是一款基于键值对的NoSQL数据库,它的值支持多种数据结构:
字符串(strings)、哈希(hashs)、列表(lists)、集合(sets)、有序集合(sorted sets)等 - Redis将所有数据都存放在内存中,所以它的读写性能十分惊人。
同时,Redis还可以将内存中的数据以快照或日志的形式保存到硬盘上,以保证数据的安全性 - Redis典型的应用场景包括:缓存、排行榜、计数器、社交网络、消息队列等
Redis相关连接:官网,github上的Redis
1.1 Redis使用演示
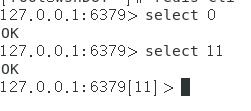
- Redis默认有16个库,从0-15,可以使用命令行进行切换
select [index]
2. 刷新数据库
flushdb
- String类型的数据操作命令
set key value [EX seconds] [PX milliseconds] [NX|XX]
get key
incr key
decr key
- hash类型的数据操作命令
hset key field value
hget key field
- list类型的数据操作命令
lpush key value [value ...]
llen key
lindex key index
lrange key start stop
lpop key
rpush key value [value ...]
rpop key
- set类型的数据操作命令
sadd key member [member ...]
scard key  //统计集合中有多少元素,输出个数
spop key [count]  //随机从集合中弹出数据
smembers key  //相比于scard来说,输出set中所有的member
- sorted set类型的数据操作命令
zadd key [NX|XX] [CH] [INCR] score member [score member ...]
zcard key
zscore key member
zrank key member  //返回排名
zrange key start stop [WITHSCORES]
- 其他一些常用命令
keys *
type key
exists key [key ...]
del key
expire key seconds
2. Spring整合Redis
- 引入依赖
- spring-boot-starter-data-redis
- 配置Redis
- 配置数据库参数
- 编写配置类,构造RedisTemplate
- 访问Redis
- redisTemplate.opsForValue()
- redisTemplate.opsForHash()
- redisTemplate.opsForList()
- redisTemplate.opsForSet()
- redisTemplate.opsForZset()

- 引入依赖,导包
<!--    Redis-->
<dependency>
    <groupId>org.springframework.boot</groupId>
    <artifactId>spring-boot-starter-data-redis</artifactId>
</dependency>
- 配置Redis
在application.properties文件中对Redis进行一些相关的配置
# redis
# RedisProperties
spring.redis.database=11
spring.redis.host=192.168.110.130
spring.redis.port=6379
因为默认RedisTemplate是<Object,Object>类型,不利于我们的操作,我们习惯于<String,Object>,写一个配置类

在conf包下,新建一个RedisConfig类
package com.ateam.community.config;

import org.springframework.context.annotation.Bean;
import org.springframework.context.annotation.Configuration;
import org.springframework.data.redis.connection.RedisConnectionFactory;
import org.springframework.data.redis.core.RedisTemplate;
import org.springframework.data.redis.serializer.RedisSerializer;

/**
 * @author wsh
 * @date 2021-11-29 11:51
 * @description
 */

@Configuration
public class RedisConfig {

    @Bean
    public RedisTemplate<String, Object> redisTemplate(RedisConnectionFactory factory) {
        RedisTemplate<String, Object> template = new RedisTemplate<>();
        template.setConnectionFactory(factory);

        // 设置key的序列化方式
        template.setKeySerializer(RedisSerializer.string());
        // 设置value的序列化方式
        template.setValueSerializer(RedisSerializer.json());
        // 设置hash的key的序列化方式
        template.setHashKeySerializer(RedisSerializer.string());
        // 设置hash的value的序列化方式
        template.setHashValueSerializer(RedisSerializer.json());

        template.afterPropertiesSet();
        return template;
    }
}
- 测试RedisTemplate访问Redis
在test包下,新建一个Redis测试类RedisTests
package com.ateam.community;

import com.ateam.community.util.CommunityUtil;
import com.ateam.community.util.RedisKeyUtil;
import org.apache.kafka.common.protocol.types.Field;
import org.junit.Test;
import org.junit.runner.RunWith;
import org.springframework.beans.factory.annotation.Autowired;
import org.springframework.boot.test.context.SpringBootTest;
import org.springframework.dao.DataAccessException;
import org.springframework.data.redis.connection.RedisConnection;
import org.springframework.data.redis.connection.RedisStringCommands;
import org.springframework.data.redis.core.*;
import org.springframework.test.context.ContextConfiguration;
import org.springframework.test.context.junit4.SpringRunner;

import javax.swing.*;
import java.text.ParseException;
import java.text.SimpleDateFormat;
import java.util.ArrayList;
import java.util.Arrays;
import java.util.Calendar;
import java.util.Date;


/**
 * @author wsh
 * @date 2021-11-29 11:59
 * @description
 */
@RunWith(SpringRunner.class)
@SpringBootTest
@ContextConfiguration(classes = CommunityApplication.class)//配置类
public class RedisTests {

    @Autowired
    private RedisTemplate redisTemplate;

    @Test
    public void testStrings(){
        String redisKey = "test:count";
        redisTemplate.opsForValue().set(redisKey,1);

        System.out.println(redisTemplate.opsForValue().get(redisKey));
        System.out.println(redisTemplate.opsForValue().increment(redisKey));
        System.out.println(redisTemplate.opsForValue().decrement(redisKey));

    }

    @Test
    public void testHashes(){
        String redisKey = "test:user";
        redisTemplate.opsForHash().put(redisKey,"id",101);
        redisTemplate.opsForHash().put(redisKey,"username","wsh");

        System.out.println(redisTemplate.opsForHash().get(redisKey,"id"));
        System.out.println(redisTemplate.opsForHash().get(redisKey,"username"));
    }


    // 多次访问同一个key
    @Test
    public void testBoundOperations(){
        String redisKey = "test:count";
        BoundValueOperations operations = redisTemplate.boundValueOps(redisKey);
        operations.increment();
        operations.increment();
        operations.increment();
        System.out.println(operations.get());

    }

    // 编程式事务
    /*
	声明式事务作用于整个方法,编程式事务更灵活
	*/
    @Test
    public void testTransactional(){
        Object obj = redisTemplate.execute(new SessionCallback() {
            @Override
            public Object execute(RedisOperations operations) throws DataAccessException {
                String redisKey = "test:tx";
                // 启动事务
                operations.multi();

                operations.opsForSet().add(redisKey,"wsh");
                operations.opsForSet().add(redisKey,"hcy");
                operations.opsForSet().add(redisKey,"lfw");

              //显示为[],所以一定不要在redis事务中做查询
                System.out.println(operations.opsForSet().members(redisKey));


                // 执行事务
                return operations.exec();
            }
        });

        System.out.println(obj);

    }
}
3. 点赞
- 点赞
- 支持对帖子、评论点赞
- 第一次点赞,第二次取消点赞
- 首页点赞数量
- 统计帖子的点赞数量
- 详情页点赞数量
- 统计点赞数量
- 显示点赞状态

3.1 Redis生成key的工具类
在util包下,新建一个工具类RedisUtil
public class RedisKeyUtil {

    private static final String SPLIT = ":";
    private static final String PREFIX_ENTITY_LIKE = "like:entity";


    // 某个实体的赞
    // like:entity:entityType:entityId - > set(userId)
    // 是一个set,存的是用户id,为了方便后面统计点赞数量等
    public static String getEntityLikeKey(int entityType, int entityId) {
        return PREFIX_ENTITY_LIKE + SPLIT + entityType + SPLIT + entityId;
    }


}
3.2 业务层
在service包下,新建一个LikeService类
@Service
public class LikeService {

    @Autowired
    private RedisTemplate redisTemplate;

    // 点赞
    public void like(int userId, int entityType, int entityId) {
        String entityLikeKey = RedisKeyUtil.getEntityLikeKey(entityType,entityId);
		// 第一次点是点赞,第二次点是取消赞
		// 判断是否已点赞,value是set集合,存的是userId
        Boolean isMember = redisTemplate.opsForSet().isMember(entityLikeKey, userId);
        if (isMember) {
            // 已点赞,取消
            redisTemplate.opsForSet().remove(entityLikeKey, userId);
        } else {
            redisTemplate.opsForSet().add(entityLikeKey,userId);
        }
    }

    // 查询某实体点赞的数量
    public long findEntityLikeCount(int entityType, int entityId){
        String entityLikeKey = RedisKeyUtil.getEntityLikeKey(entityType,entityId);
        return redisTemplate.opsForSet().size(entityLikeKey);
    }

    // 查询某个用户对某个实体的点赞状态
    public int findEntityLikeStatus(int userId, int entityType, int entityId) {
        String entityLikeKey = RedisKeyUtil.getEntityLikeKey(entityType,entityId);
        Boolean isMember = redisTemplate.opsForSet().isMember(entityLikeKey, userId);
        // 1,是点赞 0,是否
        return isMember ? 1 : 0;
    }
}
3.3 表现层-实现点赞功能
- 在controller包中,新建一个类LikeController
package com.ateam.community.controller;


@Controller
public class LikeController implements CommunityConstant {
    @Autowired
    private LikeService likeService;

    @Autowired
    private HostHolder hostHolder;

    @Autowired
    private RedisTemplate redisTemplate;

    @RequestMapping(value = "/like", method = RequestMethod.POST)
    @ResponseBody
    public String like(int entityType, int entityId {
        User user = hostHolder.getUser();

        // 点赞
        likeService.like(user.getId(),entityType,entityId);
        // 获得点赞的数量
        long likeCount = likeService.findEntityLikeCount(entityType, entityId);
        // 获得点赞的状态
        int likeStatus = likeService.findEntityLikeStatus(user.getId(), entityType, entityId);

        // 封装返回结果
        HashMap<String, Object> map = new HashMap<>();
        map.put("likeCount",likeCount);
        map.put("likeStatus",likeStatus);

        return CommunityUtil.getJSONString(0,null,map);
    }
}
- 处理帖子详情页面discuss-detail.html
首先,我们回顾一下我们定义的实体类型常量:1是帖子,2是评论,3是用户

给帖子点赞

- href=“javascript:;”:表示此点击a标签,找js里的方法,即后面的like方法
- onclick里的like方法,有三个参数:
- this:用来标识是哪里点的赞(帖子可以点赞,评论也可以点赞)
- 1:表示是给帖子点赞
- post.id:是帖子的id号
- 为了方便显示点赞数量,把 “赞” 用< b >标签包围,“11”用< i > 标签包围
给评论点赞

- href=“javascript:;”:表示此点击a标签,找js里的方法,即后面的like方法
- onclick里的like方法,有三个参数:
- this:用来标识是哪里点的赞(帖子可以点赞,评论也可以点赞)
- 2:表示是给评论点赞
- cvo.comment.id:是评论的id号
- 为了方便显示点赞数量,把 “赞” 用< b >标签包围,“1”用< i > 标签包围
给回复某用户的评论点赞

- href=“javascript:;”:表示此点击a标签,找js里的方法,即后面的like方法
- onclick里的like方法,有三个参数:
- this:用来标识是哪里点的赞(帖子可以点赞,评论也可以点赞)
- 2:表示是给回复某用户的评论点赞
- rvo.reply.id:是该评论的id号
- 为了方便显示点赞数量,把 “赞” 用< b >标签包围,“1”用< i > 标签包围
- discuss.js
点赞功能的实现,采用异步的方式

function like(btn, entityType, entityId) {
    $.post(
        CONTEXT_PATH + "/like",
        {"entityType":entityType,"entityId":entityId},
        function(data) {
            data = $.parseJSON(data);
            if(data.code == 0) {
                $(btn).children("i").text(data.likeCount);
                $(btn).children("b").text(data.likeStatus==1?'已赞':"赞");
            } else {
                alert(data.msg);
            }
        }
    );
}
3.4 表现层-显示点赞数量
- 首页上的点赞数量的显示
修改HomeController类中的getIndexPage方法

修改首页index.html页面

- 帖子详情页面上点赞数量的显示
修改DiscussPostController类中的getDiscussPost方法


修改帖子详情页面

4. 我收到的赞
- 重构点赞功能
- 以用户为key,记录点赞数量
- increment(key),decrement(key)
- 开发个人主页
- 以用户为key,查询点赞数量

- 以用户为key,查询点赞数量
4.1 重构点赞功能
- 在RedisUtil类中加入一个key
    private static final String SPLIT = ":";
    private static final String PREFIX_USER_LIKE = "like:user";

    // 某个用户的赞
    // like:user:userId - int
    public static String getUserLikeKey(int userId) {
        return PREFIX_USER_LIKE + SPLIT + userId;
    }
- 在LikeService类like方法中增加一个操作,来记录用户获得的点赞数量,并用编程式事务完成。
    // 点赞
    public void like(int userId, int entityType, int entityId, int entityUserid) { //entityUserid 就是被点赞的用户的id
//        String entityLikeKey = RedisKeyUtil.getEntityLikeKey(entityType,entityId);
//        Boolean isMember = redisTemplate.opsForSet().isMember(entityLikeKey, userId);
//        if (isMember) {
//            // 已点赞,取消
//            redisTemplate.opsForSet().remove(entityLikeKey, userId);
//        } else {
//            redisTemplate.opsForSet().add(entityLikeKey,userId);
//        }

        redisTemplate.execute(new SessionCallback() {
            @Override
            public Object execute(RedisOperations operations) throws DataAccessException {

                String entityLikeKey = RedisKeyUtil.getEntityLikeKey(entityType,entityId);
                String userLikeKey = RedisKeyUtil.getUserLikeKey(entityUserid);
                // 判断当前用户有没有点赞,这一步应该在事务开启前执行,因为在事务中的查询不会立即得到结果
                Boolean isMember = redisTemplate.opsForSet().isMember(entityLikeKey, userId);

                operations.multi();

                if (isMember) {
                    // 已点赞,取消
                    redisTemplate.opsForSet().remove(entityLikeKey, userId);
                    // 被点赞的用户点赞数量减一
                    operations.opsForValue().decrement(userLikeKey);
                } else {
                	// 未点赞,点赞
                    redisTemplate.opsForSet().add(entityLikeKey,userId);
                    // 被点赞的用户点赞数量加一
                    redisTemplate.opsForValue().increment(userLikeKey);
                }

                return operations.exec();
            }
        });
    }
- 在LikeService类中新加,查询某个用户获得点赞数量的方法
    // 查询某个用户获得赞的数量
    public int findUserLikeCount(int userid) {
        String userLikeKey = RedisKeyUtil.getUserLikeKey(userid);
        Integer count = (Integer) redisTemplate.opsForValue().get(userLikeKey);
        return count == null ? 0 :count.intValue();
    }
- 重构表现层
修改LikeController类中的like方法,多了个参数
    @RequestMapping(path = "/like", method = RequestMethod.POST)
    @ResponseBody
    public String like(int entityType, int entityId, int entityUserId) {
        User user = hostHolder.getUser();

        // 点赞
        likeService.like(user.getId(), entityType, entityId, entityUserId);

        // 数量
        long likeCount = likeService.findEntityLikeCount(entityType, entityId);
        // 状态
        int likeStatus = likeService.findEntityLikeStatus(user.getId(), entityType, entityId);
        // 返回的结果
        Map<String, Object> map = new HashMap<>();
        map.put("likeCount", likeCount);
        map.put("likeStatus", likeStatus);

        return CommunityUtil.getJSONString(0, null, map);
    }
帖子详情页面discuss-detail.html


修改discuss.js
function like(btn, entityType, entityId, entityUserId) {
    $.post(
        CONTEXT_PATH + "/like",
        {"entityType":entityType,"entityId":entityId,"entityUserId":entityUserId},
        function(data) {
            data = $.parseJSON(data);
            if(data.code == 0) {
                $(btn).children("i").text(data.likeCount);
                $(btn).children("b").text(data.likeStatus==1?'已赞':"赞");
            } else {
                alert(data.msg);
            }
        }
    );
}
4.2 开发个人主页
- 在UserController类中新加定位到用户页面的方法
    // 个人主页
    @RequestMapping(value = "/profile/{userId}", method = RequestMethod.GET)
    public String getProfilePage(@PathVariable("userId") int userId, Model model) {
        User user = userService.findUserById(userId);
        if (user == null) {
            throw new RuntimeException("该用户不存在!");
        }

        // 用户
        model.addAttribute("user",user);
        // 点赞数量
        int likeCount = likeService.findUserLikeCount(userId);
        model.addAttribute("likeCount",likeCount);


        return "/site/profile";
    }
- 修改页面
修改index.html


注:所有涉及到用户头像的,连接都要到个人主页上,这里只改了首页的,还有帖子详情上的等等,就不一一列举了。
修改profile.html

注:关注、取消关注功能,还没有实现,在下一节,这里,主要修改的是我标注的。
5. 关注、取消关注
- 需求
- 开发关注、取消关注功能
- 统计用户的关注数、粉丝数
- 关键
- 若A关注了B,则A是B的Follower(粉丝),B是A的Followee(目标)
- 关注的目标可以是用户、帖子、题目等,在实现时将这些目标抽象为实体
5.1 RedisUtil中新增获得key的方法
    private static final String SPLIT = ":";
    private static final String PREFIX_FOLLOWEE = "followee";
    private static final String PREFIX_FOLLOWER = "follower";


    // 某个用户(userId)关注的实体entityId
    // followee:userId:entityType -> zset(entityId,now)
    public static String getFolloweeKey(int userId, int entityType) {
        return PREFIX_FOLLOWEE + SPLIT + userId + SPLIT + entityType;
    }

    // 某个实体拥有的粉丝
    // follower:entityType:entityId -> zset(userId,now)
    public static String getFollowerKey(int entityType, int entityId) {
        return PREFIX_FOLLOWER + SPLIT + entityType + SPLIT + entityId;
    }


}
5.2 业务层
在service包中新建FollowService类
package com.ateam.community.service;


@Service
public class FollowService implements CommunityConstant {

    @Autowired
    private RedisTemplate redisTemplate;

    @Autowired
    private UserService userService;

	// 关注
    public void follow(int userid, int entityType, int entityId) {

		 // 事务,有多次操作
        redisTemplate.execute(new SessionCallback() {

            @Override
            public Object execute(RedisOperations operations) throws DataAccessException {

                String followeeKey = RedisKeyUtil.getFolloweeKey(userid, entityType);
                String followerKey = RedisKeyUtil.getFollowerKey(entityType, entityId);

                operations.multi();

                operations.opsForZSet().add(followeeKey,entityId,System.currentTimeMillis());
                operations.opsForZSet().add(followerKey,userid,System.currentTimeMillis());


                return operations.exec();
            }
        });
    }

    // 取消关注
    public void unFollow(int userid, int entityType, int entityId) {

        redisTemplate.execute(new SessionCallback() {

            @Override
            public Object execute(RedisOperations operations) throws DataAccessException {

                String followeeKey = RedisKeyUtil.getFolloweeKey(userid, entityType);
                String followerKey = RedisKeyUtil.getFollowerKey(entityType, entityId);

                operations.multi();

                operations.opsForZSet().remove(followeeKey,entityId);
                operations.opsForZSet().remove(followerKey,userid);


                return operations.exec();
            }
        });
    }


    // 获得关注实体数量
    public long findFolloweeCount(int userId, int entityType) {
    	// 某个用户(userId)关注的实体entityId
    	// followee:userId:entityType -> zset(entityId,now)
        String followeeKey = RedisKeyUtil.getFolloweeKey(userId, entityType);
        return redisTemplate.opsForZSet().zCard(followeeKey);
    }


    // 获得粉丝的数量
    public long findFollowerCount(int entityType, int entityId) {
        String followerKey = RedisKeyUtil.getFollowerKey(entityType, entityId);
        return redisTemplate.opsForZSet().zCard(followerKey);
    }


    // 判断某个实体是否关注某个实体
    public boolean hasFollowed(int userId, int entityType, int entityId) {
        String followeeKey = RedisKeyUtil.getFolloweeKey(userId, entityType);
        return redisTemplate.opsForZSet().score(followeeKey, entityId) != null;
    }

}
5.3 表现层
在controller包下,新建一个类FollowController
@Controller
public class FollowController implements CommunityConstant {

    @Autowired
    private FollowService followService;

    @Autowired
    private HostHolder hostHolder;

    @Autowired
    private UserService userService;

    @RequestMapping(path = "/follow", method = RequestMethod.POST)
    @ResponseBody
    public String follow(int entityType, int entityId) {
        User user = hostHolder.getUser();

        followService.follow(user.getId(), entityType, entityId);

        return CommunityUtil.getJSONString(0, "已关注!");
    }

    @RequestMapping(path = "/unfollow", method = RequestMethod.POST)
    @ResponseBody
    public String unfollow(int entityType, int entityId) {
        User user = hostHolder.getUser();

        followService.unfollow(user.getId(), entityType, entityId);

        return CommunityUtil.getJSONString(0, "已取消关注!");
    }
}
在UserController类的getProfilePage方法中,新增功能
 // 个人主页
    @RequestMapping(path = "/profile/{userId}", method = RequestMethod.GET)
    public String getProfilePage(@PathVariable("userId") int userId, Model model) {
        User user = userService.findUserById(userId);
        if (user == null) {
            throw new RuntimeException("该用户不存在!");
        }

        // 用户
        model.addAttribute("user", user);
        // 点赞数量
        int likeCount = likeService.findUserLikeCount(userId);
        model.addAttribute("likeCount", likeCount);

        // 关注数量
        long followeeCount = followService.findFolloweeCount(userId, ENTITY_TYPE_USER);
        model.addAttribute("followeeCount", followeeCount);
        // 粉丝数量
        long followerCount = followService.findFollowerCount(ENTITY_TYPE_USER, userId);
        model.addAttribute("followerCount", followerCount);
        // 是否已关注
        boolean hasFollowed = false;
        if (hostHolder.getUser() != null) {
            hasFollowed = followService.hasFollowed(hostHolder.getUser().getId(), ENTITY_TYPE_USER, userId);
        }
        model.addAttribute("hasFollowed", hasFollowed);

        return "/site/profile";
    }
修改页面


profile.js
$(function(){
	$(".follow-btn").click(follow);
});

function follow() {
	var btn = this;
	if($(btn).hasClass("btn-info")) {
		// 关注TA
		$.post(
		    CONTEXT_PATH + "/follow",
		    {"entityType":3,"entityId":$(btn).prev().val()},
		    function(data) {
		        data = $.parseJSON(data);
		        if(data.code == 0) {
                    window.location.reload();
		        } else {
                    alert(data.msg);
		        }
		    }
		);
		// $(btn).text("已关注").removeClass("btn-info").addClass("btn-secondary");
	} else {
		// 取消关注
		$.post(
		    CONTEXT_PATH + "/unfollow",
		    {"entityType":3,"entityId":$(btn).prev().val()},
		    function(data) {
		        data = $.parseJSON(data);
		        if(data.code == 0) {
                    window.location.reload();
		        } else {
                    alert(data.msg);
		        }
		    }
		);
		//$(btn).text("关注TA").removeClass("btn-secondary").addClass("btn-info");
	}
}
6. 关注列表、粉丝列表
- 业务层
- 查询某个用户关注的人,支持分页
- 查询某个用户的粉丝,支持分页
- 表现层
- 处理“查询关注的人”、“查询粉丝”请求
- 编写“查询关注的人”、“查询粉丝”模板
6.1 业务层
在FollowService中新加方法
	@Autowired
	private Userservice userservice;

    // 查询某用户关注的人
    public List<Map<String, Object>> findFollowees(int userId, int offset, int limit) {
        String followeeKey = RedisKeyUtil.getFolloweeKey(userId, ENTITY_TYPE_USER);
        Set<Integer> targetIds = redisTemplate.opsForZSet().reverseRange(followeeKey, offset, offset + limit - 1);

        if (targetIds == null) {
            return null;
        }

        List<Map<String, Object>> list = new ArrayList<>();
        for (Integer targetId : targetIds) {
            Map<String, Object> map = new HashMap<>();
            User user = userService.findUserById(targetId);
            // 用户
            map.put("user", user);
            Double score = redisTemplate.opsForZSet().score(followeeKey, targetId);
            // 关注时间
            map.put("followTime", new Date(score.longValue()));
            list.add(map);
        }

        return list;
    }

    // 查询某用户的粉丝
    public List<Map<String, Object>> findFollowers(int userId, int offset, int limit) {
        String followerKey = RedisKeyUtil.getFollowerKey(ENTITY_TYPE_USER, userId);
        // 返回的是set,但Redis中内置了一个set可以有序排列
        Set<Integer> targetIds = redisTemplate.opsForZSet().reverseRange(followerKey, offset, offset + limit - 1);

        if (targetIds == null) {
            return null;
        }

        List<Map<String, Object>> list = new ArrayList<>();
        for (Integer targetId : targetIds) {
            Map<String, Object> map = new HashMap<>();
            User user = userService.findUserById(targetId);
            map.put("user", user);
            Double score = redisTemplate.opsForZSet().score(followerKey, targetId);
            map.put("followTime", new Date(score.longValue()));
            list.add(map);
        }

        return list;
    }
6.2 表现层
- 在FollowController类中新增方法
某个用户关注了谁
	@Autowired
	private Userservice userService;

    public String getFollowees(@PathVariable("userId") int userId, Page page, Model model) {
    	// 关注的用户
        User user = userService.findUserById(userId);
        if (user == null) {
            throw new RuntimeException("该用户不存在!");
        }
        model.addAttribute("user", user);

        page.setLimit(5);
        page.setPath("/followees/" + userId);
        page.setRows((int) followService.findFolloweeCount(userId, ENTITY_TYPE_USER));

        List<Map<String, Object>> userList = followService.findFollowees(userId, page.getOffset(), page.getLimit());
        if (userList != null) {
            for (Map<String, Object> map : userList) {
                User u = (User) map.get("user");
                map.put("hasFollowed", hasFollowed(u.getId()));
            }
        }
       model.addAttribute("userList",userList);

        return "/site/followee";
    }

   private boolean hasFollowed(int userId) {
       if (hostHolder.getUser() == null) {
           return false;
       }

       return followService.hasFollowed(hostHolder.getUser().getId(), ENTITY_TYPE_USER, userId);
   }
某个用户的粉丝(即谁关注了该用户)
    @RequestMapping(value = "/followers/{userId}", method = RequestMethod.GET)
    public String getFollowers(@PathVariable("userId") int userId, Page page, Model model) {
        User user = userService.findUserById(userId);
        if (user == null) {
            throw new RuntimeException("该用户不存在!");
        }
        model.addAttribute("user",user);

        page.setLimit(5);
        page.setPath("/followers/" + user.getId());
        page.setRows((int) followService.findFollowerCount(CommunityConstant.ENTITY_TYPE_USER,userId));

        List<Map<String, Object>> userList = followService.findFollowers(userId,page.getOffset(),page.getLimit());

        if (userList != null) {
            for (Map<String, Object> map : userList) {
            	// 判断当前用户对 这个 用的的关注状态
                User u = (User) map.get("user");
                map.put("hasFollowed",hasFollowed(u.getId()));

            }
        }

        model.addAttribute("userList",userList);

        return "/site/follower";
    }
   private boolean hasFollowed(int userId) {
       if (hostHolder.getUser() == null) {
           return false;
       }
        return followService.hasFollowed(hostHolder.getUser().getId(), ENTITY_TYPE_USER, userId);
   }
- 处理页面
处理profile.html页面

处理followee.html页面


处理follower.html页面


7. 优化登录模块
- 使用Redis存储验证码
- 验证码需要频繁的访问与刷新,对性能要求较高
- 验证码不需要永久保存,通常在很短的时间后就会失效
- 分布式部署时,存在Session共享的问题
- 使用Redis存储登录凭证
- 处理每次请求时,都要查询用户的登录凭证,访问的频率非常高
- 使用Redis缓存用户信息
- 处理每次请求时,都要根据凭证查询用户信息,访问的频率非常高
7.1 使用Redis存储验证码
最初,我们是把验证码存在了session里,这样并不好。
使用Redis存验证码的好处:
- Redis性能较高
- Redis可以设置失效时间
- 存到Redis里,分布式部署的时候避免了session共享的问题
- 在RedisUtil中,增加存储验证码的key
    private static final String SPLIT = ":";
    private static final String PREFIX_KAPTCHA = "kaptcha";

    // 登录验证码
    public static String getKaptchaKey(String owner) {
        return PREFIX_KAPTCHA + SPLIT + owner;
    }
- 修改LoginController类里里的方法
修改getKaptcha方法
  // 返回验证码
    @RequestMapping(value = "/kaptcha",method = RequestMethod.GET)
    public void getKaptcha(HttpServletResponse response/*, HttpSession session*/) {
        // 生成验证码
        String text = producer.createText();
        BufferedImage image = producer.createImage(text);

        // 将验证码存入 session
        //session.setAttribute("kaptcha",text);

        // 验证码的 归属 owner
        String kaptchaOwner = CommunityUtil.generateUUID(); // 标识是谁在登录
        Cookie cookie = new Cookie("kaptchaOwner", kaptchaOwner);
        cookie.setMaxAge(60);
        cookie.setPath(contextPath);
        response.addCookie(cookie);

        // 将验证码存入Redis中
        String kaptchaKey = RedisKeyUtil.getKaptchaKey(kaptchaOwner);
        redisTemplate.opsForValue().set(kaptchaKey,text,60, TimeUnit.SECONDS);

        // 将突破输出给浏览器
        response.setContentType("image/png");
        try {
            //response 由SpringMVC 管理,输出流不用自己关
            ServletOutputStream outputStream = response.getOutputStream();
            ImageIO.write(image,"png",outputStream);
        } catch (IOException e) {
            logger.error("响应验证码失败:"  + e.getMessage());

        }
    }
修改login方法
    @RequestMapping(value = "/login",method = RequestMethod.POST)
    public String login(String username, String password, String code, boolean rememberme,
                        Model model, /*HttpSession session,*/
                        HttpServletResponse response,@CookieValue("kaptchaOwner") String kaptchaOwner){

        // 检测验证码
        //String kaptcha = (String) session.getAttribute("kaptcha");


        if (StringUtils.isBlank(kaptchaOwner)) {
            model.addAttribute("codeMsg","验证已失效!");
            return "/site/login";
        }

        // 从Redis中取出验证码
        String kaptchaKey = RedisKeyUtil.getKaptchaKey(kaptchaOwner);
        String kaptcha = (String) redisTemplate.opsForValue().get(kaptchaKey);


        if (StringUtils.isBlank(kaptcha) || StringUtils.isBlank(code) || !kaptcha.equalsIgnoreCase(code)) {
            model.addAttribute("codeMsg","验证码不正确!");
            return "/site/login";
        }


        // 检测账号,密码
        int expiredSeconds = rememberme ? REMEMBER_EXPIRED_SECONDS : DEFAULT_EXPIRED_SECONDS;
        Map<String, Object> map = userService.login(username, password, expiredSeconds);
        if (map.containsKey("ticket")) {
            Cookie cookie = new Cookie("ticket", map.get("ticket").toString());
            cookie.setPath(contextPath);
            cookie.setMaxAge(expiredSeconds);
            response.addCookie(cookie);

            return "redirect:/index";
        } else {
            model.addAttribute("usernameMsg", map.get("usernameMsg"));
            model.addAttribute("passwordMsg", map.get("passwordMsg"));
            return "/site/login";
        }

    }
7.2 使用Redis存登录凭证
最初,我们把登录凭证存到了MySQL数据库里,因为设置了拦截器查询登录状态,每次都要频繁的查询。现在使用Redis替换login_ticket表

- 在RedisUtil中定义可以
    private static final String SPLIT = ":";
    private static final String PREFIX_TICKET = "ticket";


    // 登录的凭证
    public static String getTicketKey(String ticket) {
        return PREFIX_TICKET + SPLIT + ticket;
    }
- 在LoginTicketMapper类上加@Deprecated注解,表示不推荐使用
package com.nowcoder.community.dao;

import com.nowcoder.community.entity.LoginTicket;
import org.apache.ibatis.annotations.*;

@Mapper
@Deprecated
public interface LoginTicketMapper {

    @Insert({
            "insert into login_ticket(user_id,ticket,status,expired) ",
            "values(#{userId},#{ticket},#{status},#{expired})"
    })
    @Options(useGeneratedKeys = true, keyProperty = "id")
    int insertLoginTicket(LoginTicket loginTicket);

    @Select({
            "select id,user_id,ticket,status,expired ",
            "from login_ticket where ticket=#{ticket}"
    })
    LoginTicket selectByTicket(String ticket);

    @Update({
            "<script>",
            "update login_ticket set status=#{status} where ticket=#{ticket} ",
            "<if test=\"ticket!=null\"> ",
            "and 1=1 ",
            "</if>",
            "</script>"
    })
    int updateStatus(String ticket, int status);

}
- 重构登录凭证相关的代码
UserService类中的login方法
        // 生成登录凭证
        LoginTicket loginTicket = new LoginTicket();
        loginTicket.setUserId(user.getId());
        loginTicket.setTicket(CommunityUtil.generateUUID());
        loginTicket.setStatus(0);
        loginTicket.setExpired(new Date(System.currentTimeMillis() + expiredSeconds * 1000));
//        loginTicketMapper.insertLoginTicket(loginTicket);
        String ticketKey = RedisKeyUtil.getTicketKey(loginTicket.getTicket());
        redisTemplate.opsForValue().set(ticketKey,loginTicket);

        map.put("ticket",loginTicket.getTicket());
        return map;

UserService类中的logout方法
    public void logout(String ticket) {
//        loginTicketMapper.updateStatus(ticket,1);
        String ticketKey = RedisKeyUtil.getTicketKey(ticket);
        LoginTicket loginTicket = (LoginTicket) redisTemplate.opsForValue().get(ticketKey);
        loginTicket.setStatus(1);
        redisTemplate.opsForValue().set(ticketKey,loginTicket);
    }

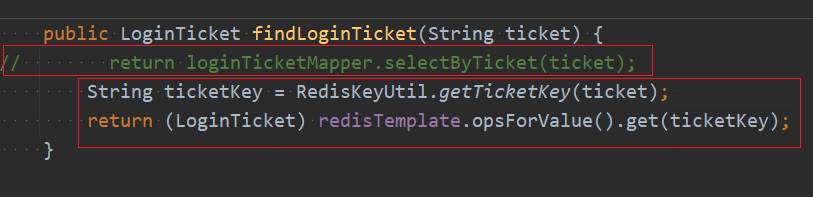
UserService类中的logout方法
    public LoginTicket findLoginTicket(String ticket) {
//        return loginTicketMapper.selectByTicket(ticket);
        String ticketKey = RedisKeyUtil.getTicketKey(ticket);
        return (LoginTicket) redisTemplate.opsForValue().get(ticketKey);
    }
7.3 使用Redis缓存用户信息
查询用户信息时,先从Redis中取,没有数据的话,再到MySQL数据库中取,然后也存放到Redis中。用户状态发送变化时,即用户信息发生变化时,直接删除Redis中的数据,修改MySQL中的数据
- 在RedisUtil中增加key
    private static final String SPLIT = ":";
    private static final String PREFIX_USER = "user";

    // 用户
    public static String getUserKey(int userId) {
        return PREFIX_USER + SPLIT + userId;
    }
- 在UserService中封装三个方法
- 从Redis中取数据
- Redis没有数据是,从MySQL数据库找数据,然后再写入Redis中
- 变更用户信息时,删除Redis中的数据
    // 1.优先从缓存中取值
    private User getCache(int userId) {
        String userKey = RedisKeyUtil.getUserKey(userId);
        return (User) redisTemplate.opsForValue().get(userKey);
    }

    // 2.取不到值时,初始化缓存数据
    private User initCache(int userId) {
        User user = userMapper.selectById(userId);
        String userKey = RedisKeyUtil.getUserKey(userId);
        redisTemplate.opsForValue().set(userKey,user,3600, TimeUnit.SECONDS);
        return user;
    }

    // 3.数据变更时,清除缓存数据
    private void clearCache(int userId) {
        String userKey = RedisKeyUtil.getUserKey(userId);
        redisTemplate.delete(userKey);
    }
- 在设计查询用户信息时,调用这三个方法


 1万+
1万+


 被折叠的 条评论
为什么被折叠?
被折叠的 条评论
为什么被折叠?
 到【灌水乐园】发言


