


MySQL主从服务器配置
前言
为了保障数据库的数据安全性和可靠性,MySQL提供了备份功能,通过MySQL主从备份机制,可以实现实时备份,确保数据的完整性和可恢复性。主从备份机制基于主服务器和从服务器之间的同步,主服务器为所有从服务器提供写操作的数据,而从服务器则只提供读操作,保证了主服务器和从服务器之间的一致性和可靠性。主从备份机制还可以通过设置备份间隔和备份方式来进行更精细的控制,确保备份数据的及时性和完整性。通过MySQL主从备份机制,用户可以更加安心地使用MySQL数据库,保障数据安全。
一、mysql M-S复制
通过构建多台服务器实现一主多从的数据备份方案,主服务器担任数据读写任务,从服务器承担同步主服务器数据以及部分读取用户数据的任务。这种架构模式旨在提高系统的可靠性和性能,同时减轻主服务器的负载压力,确保数据的完整性和安全性。
二、M-S复制原理
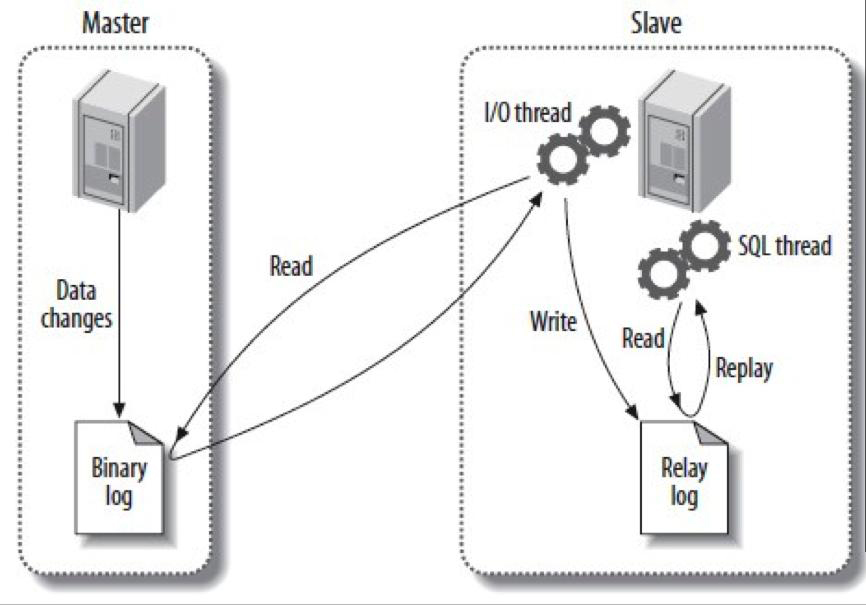
1、用户or web 对主服务器的所有修改操作都会记录在binary log日志
成功的修改操作【增加 修改 删除】 记录的是SQL语句 主上的一个线程
2、从 有两个线程
IO线程:负责连接主mysql【AB通信 A授权账号】提取binlog中的SQL语句到relay log
SQL线程:在本地执行relay log中新增的SQL语句
注意:AB是异步
三、master设置
实验主机信息
| 主机名 | IP | 运行服务 |
|---|---|---|
| master1 | 192.168.100.128 | MySQL5.9 |
| slave1 | 192.168.100.131 | MySQL5.9 |
实验步骤
-
安装mysql并启动
-
修改 mysql 默认密码
-
关闭防火墙,selinux
-
设置时间服务器
-
修改配置文件 设置server-id=N
-
master 主机开启二进制日志,slave 主机不需要开启
-
创建slave1 连接master1 的账号,用于读取SQL语句
3.1、安装mysql并启动
a、安装mysql
[root@master1 ~]# yum -y install mysql-server mysql
b、启动mysql
    [root@master1 ~]# systemctl enable mysqld
    [root@master1 ~]# systemctl start mysqld
c、查看默认密码root@localhost: AsNRTX;E3-8=, root@localhost:后面AsNRTX;E3-8=就是 mysql 随机生成的默认密码
    [root@master1 ~]# grep "password" /var/log/mysqld.log
    2023-08-17T00:23:58.583582Z 1 [Note] A temporary password is generated for root@localhost: AsNRTX;E3-8=
d、修改root密码
    [root@master1 ~]# mysqladmin -uroot -p'AsNRTX;E3-8=' password 'Admin@123'
    mysqladmin: [Warning] Using a password on the command line interface can be insecure.
    Warning: Since password will be sent to server in plain text, use ssl connection to ensure password safety.
mysqladmin: [Warning]这个错误提示是告诉你使用mysqladmin时不要在命令行中输入密码,因为这会导致密码被明文发送到服务器上,不安全。建议使用ssl连接以确保密码的安全性。
3.2、关闭防火墙,selinux
    [root@master1 ~]# systemctl disable firewalld
    [root@master1 ~]# systemctl stop firewalld
    [root@master1 ~]# sed -i -r '/SELINUX=/c\SELINUX=disabled' /etc/selinux/config
    [root@master1 ~]# reboot
3.3、修改配置文件,开启 binlog, 设置server-id=N
修改/etc/my.cnf 文件
    [root@master1 ~]# vim /etc/my.cnf
    #开启binlog
    log_bin
    #server-id的数字越小,优先级越高
    server-id=1
    #该属性自动记录position位置。不需要手动指定了。
    gtid_mode=ON
    enforce_gtid_consistency=1
3.4、创建并授权slave连接master的账号 slave
登录进入mysql:
[root@master1 ~]# mysql -u root -p'Admin@123'
创建 slave 账号用于取 sql 语句
    mysql> grant replication slave, replication client on *.* to 'slave'@'192.168.100.%'      identified by 'Mysql@123';
    Query OK, 0 rows affected (0.00 sec)
    mysql> select user,host from mysql.user;
    +---------------+---------------+
    | user          | host          |
    +---------------+---------------+
    | slave         | 192.168.100.% |
    | mysql.session | localhost     |
    | mysql.sys     | localhost     |
    | root          | localhost     |
    +---------------+---------------+
    5 rows in set (0.00 sec)
刷新用户权限
    mysql> flush privileges;
    Query OK, 0 rows affected (0.00 sec)
3.5、创建数据库
创建数据库 masterdb**,并创建 test1 表,添加测试数据**
    mysql> create database masterdb;
    Query OK, 1 row affected (0.00 sec)
    mysql> create table masterdb.test1(id int,name char(10));
    Query OK, 0 rows affected (0.02 sec)
    mysql> INSERT INTO masterdb.test1 (id, name) VALUES (1, 'John');
    Query OK, 1 row affected (0.07 sec)

    mysql> INSERT INTO masterdb.test1 (id, name) VALUES (2, 'Mary');
    Query OK, 1 row affected (0.00 sec)

    mysql> INSERT INTO masterdb.test1 (id, name) VALUES (3, 'Tom');
    Query OK, 1 row affected (0.01 sec)

    mysql>
备份当前数据
    [root@master1 ~]# mysqldump -p'Admin@123' --all-databases --single-transaction --master-data=2 --flush-logs > /tmp/`date +%F`-mysql-all.sql
    mysqldump: [Warning] Using a password on the command line interface can be insecure.
    Warning: A partial dump from a server that has GTIDs will by default include the GTIDs of all transactions, even those that changed suppressed parts of the database. If you don't want to restore GTIDs, pass --set-gtid-purged=OFF. To make a complete dump, pass --all-databases --triggers --routines --events.
    [root@master1 ~]# ls -lh /tmp/2023-08-17-mysql-all.sql
    -rw-r--r-- 1 root root 869K Aug 17 08:53 /tmp/2023-08-17-mysql-all.sql
发送备份数据到 slave
    [root@master1 ~]# scp -r /tmp/2023-08-17-mysql-all.sql 192.168.100.131:/root
    root@192.168.100.131's password:
    2023-08-17-mysql-all.sql                       100%  869KB  13.9MB/s   00:00
    [root@master1 ~]#
模拟数据变化向 master1 中的 masterdb 插入几条新数据
    mysql> INSERT INTO masterdb.test1 (id, name) VALUES (4, 'Lisa');
    Query OK, 1 row affected (0.00 sec)

    mysql> INSERT INTO masterdb.test1 (id, name) VALUES (5, 'Peter');
    Query OK, 1 row affected (0.00 sec)

    mysql> select * from masterdb.test1;
    +------+-------+
    | id   | name  |
    +------+-------+
    |    1 | John  |
    |    2 | Mary  |
    |    3 | Tom   |
    |    4 | Lisa  |
    |    5 | Peter |
    +------+-------+
    5 rows in set (0.00 sec)
四、slave设置
实验步骤
-
安装mysql并启动(同 master)
-
修改 mysql 默认密码(同 master)
-
关闭防火墙,selinux(同 master)
-
修改配置文件 设置server-id=N
-
测试同步
4.1、修改配置文件 设置server-id
server-id 的值越小代表的优先级越高,slave 服务器的优先级低于 master 服务器,一般设置为N+x,N 代表 master 服务器 server-id,x 代表 slave 服务器 server-id
    [root@slave1 ~]# vim /etc/my.cnf
    #开启binlog
    log_bin
    #server-id的数字越小,优先级越高
    server-id=2
    #该属性自动记录position位置。不需要手动指定了。
    gtid_mode=ON
    enforce_gtid_consistency=1
4.2、测试刚才 master 上创建的 slave 用户是否可以登陆
    [root@slave1 ~]# mysql -h 192.168.100.128 -uslave -p'Mysql@123'
    mysql: [Warning] Using a password on the command line interface can be insecure.
    Welcome to the MySQL monitor.  Commands end with ; or \g.
    Your MySQL connection id is 8
    Server version: 5.7.43-log MySQL Community Server (GPL)

    Copyright (c) 2000, 2023, Oracle and/or its affiliates.

    Oracle is a registered trademark of Oracle Corporation and/or its
    affiliates. Other names may be trademarks of their respective
    owners.

    Type 'help;' or '\h' for help. Type '\c' to clear the current input statement.

    mysql> show databases;
    +--------------------+
    | Database           |
    +--------------------+
    | information_schema |
    +--------------------+
    1 row in set (0.00 sec)

    mysql>
可以看到登陆成功
4.3、恢复手动同步数据
    [root@slave1 ~]# mysql -uroot -p'Admin@123' < /root/2023-08-17-mysql-all.sql
    mysql: [Warning] Using a password on the command line interface can be insecure.
    [root@slave1 ~]# mysql -uroot -p'Admin@123'
    mysql: [Warning] Using a password on the command line interface can be insecure.
    Welcome to the MySQL monitor.  Commands end with ; or \g.
    Your MySQL connection id is 4
    Server version: 5.7.43 MySQL Community Server (GPL)

    Copyright (c) 2000, 2023, Oracle and/or its affiliates.

    Oracle is a registered trademark of Oracle Corporation and/or its
    affiliates. Other names may be trademarks of their respective
    owners.

    Type 'help;' or '\h' for help. Type '\c' to clear the current input statement.

    mysql> show databases;
    +--------------------+
    | Database           |
    +--------------------+
    | information_schema |
    | masterdb           |
    | mysql              |
    | performance_schema |
    | sys                |
    +--------------------+
    5 rows in set (0.00 sec)

    mysql> select * from masterdb.test1;
    +------+------+
    | id   | name |
    +------+------+
    |    1 | John |
    |    2 | Mary |
    |    3 | Tom  |
    +------+------+
    3 rows in set (0.00 sec)

    mysql>
可以看到后面插入的 4,5 数据并没有插入
4.4、设置slave同步
    mysql> change master to master_host='192.168.100.128',master_user='slave',master_password='Mysql@123',master_auto_position=1;
    Query OK, 0 rows affected, 2 warnings (0.03 sec)

    mysql> select * from masterdb.test1;
    +------+------+
    | id   | name |
    +------+------+
    |    1 | John |
    |    2 | Mary |
    |    3 | Tom  |
    +------+------+
    3 rows in set (0.00 sec)

    mysql> start slave;
    Query OK, 0 rows affected (0.00 sec)
同步成功
    mysql> select * from masterdb.test1;
    +------+-------+
    | id   | name  |
    +------+-------+
    |    1 | John  |
    |    2 | Mary  |
    |    3 | Tom   |
    |    4 | Lisa  |
    |    5 | Peter |
    +------+-------+
    5 rows in set (0.00 sec)

    mysql>
4.5、查看 slave 状态
    mysql> show slave status\G;
    *************************** 1. row ***************************
                   Slave_IO_State: Waiting for master to send event
                      Master_Host: 192.168.100.128
                      Master_User: slave
                      Master_Port: 3306
                    Connect_Retry: 60
                  Master_Log_File: master1-bin.000003
              Read_Master_Log_Pos: 723
                   Relay_Log_File: slave1-relay-bin.000002
                    Relay_Log_Pos: 900
            Relay_Master_Log_File: master1-bin.000003
                 Slave_IO_Running: Yes
                Slave_SQL_Running: Yes
                  Replicate_Do_DB:
              Replicate_Ignore_DB:
               Replicate_Do_Table:
           Replicate_Ignore_Table:
          Replicate_Wild_Do_Table:
      Replicate_Wild_Ignore_Table:
                       Last_Errno: 0
                       Last_Error:
                     Skip_Counter: 0
              Exec_Master_Log_Pos: 723
                  Relay_Log_Space: 1108
                  Until_Condition: None
                   Until_Log_File:
                    Until_Log_Pos: 0
               Master_SSL_Allowed: No
               Master_SSL_CA_File:
               Master_SSL_CA_Path:
                  Master_SSL_Cert:
                Master_SSL_Cipher:
                   Master_SSL_Key:
            Seconds_Behind_Master: 0
    Master_SSL_Verify_Server_Cert: No
                    Last_IO_Errno: 0
                    Last_IO_Error:
                   Last_SQL_Errno: 0
                   Last_SQL_Error:
      Replicate_Ignore_Server_Ids:
                 Master_Server_Id: 1
                      Master_UUID: 5a45cbdc-3c94-11ee-af3a-00505626c7ed
                 Master_Info_File: mysql.slave_master_info
                        SQL_Delay: 0
              SQL_Remaining_Delay: NULL
          Slave_SQL_Running_State: Slave has read all relay log; waiting for more updates
               Master_Retry_Count: 86400
                      Master_Bind:
          Last_IO_Error_Timestamp:
         Last_SQL_Error_Timestamp:
                   Master_SSL_Crl:
               Master_SSL_Crlpath:
               Retrieved_Gtid_Set: 5a45cbdc-3c94-11ee-af3a-00505626c7ed:9-10
                Executed_Gtid_Set: 5a45cbdc-3c94-11ee-af3a-00505626c7ed:1-10
                    Auto_Position: 1
             Replicate_Rewrite_DB:
                     Channel_Name:
               Master_TLS_Version:
    1 row in set (0.01 sec)

    ERROR:
    No query specified

    mysql>
五、双主配置
在之前的实验中,主服务器被设置为单节点。如果主服务器发生故障,这将对全局的写入事件产生影响。因为主服务器在这种情况下将无法处理任何新的写入请求,这将导致数据的不可用性。为了确保系统的可用性和稳定性,我们建议使用多节点部署主服务器,这样即使某个节点发生故障,其他节点仍然可以处理写入请求,从而避免数据的丢失和不可用性。同时,还可以使用负载均衡器来分散流量和压力,提高系统的可靠性和性能。
设置 slave 1 为 master1 的主服务
创建 slave 账号用于取 sql 语句
    mysql> grant replication slave, replication client on *.* to 'slave'@'192.168.100.%'      identified by 'Mysql@123';
    Query OK, 0 rows affected, 1 warning (0.00 sec)

    mysql> select user,host from mysql.user;
    +---------------+---------------+
    | user          | host          |
    +---------------+---------------+
    | slave         | 192.168.100.% |
    | mysql.session | localhost     |
    | mysql.sys     | localhost     |
    | root          | localhost     |
    +---------------+---------------+
    5 rows in set (0.00 sec)
修改 slave 主机/etc/my.cnf 文件
    [root@master1 ~]# vim /etc/my.cnf
    #开启binlog
    log_bin
    #server-id的数字越小,优先级越高
    server-id=2
    #该属性自动记录position位置。不需要手动指定了。
    gtid_mode=ON
    enforce_gtid_consistency=1
设置 slave 同步
    change master to
    master_host='192.168.100.131',
    master_user='slave',
    master_password='Mysql@123',
    master_auto_position=1;
查看状态
    mysql> show slave status\G
    *************************** 1. row ***************************
                   Slave_IO_State: Waiting for master to send event
                      Master_Host: 192.168.100.131
                      Master_User: slave
                      Master_Port: 3306
                    Connect_Retry: 60
                  Master_Log_File: slave1-bin.000001
              Read_Master_Log_Pos: 154
                   Relay_Log_File: master1-relay-bin.000002
                    Relay_Log_Pos: 369
            Relay_Master_Log_File: slave1-bin.000001
                 Slave_IO_Running: Yes
                Slave_SQL_Running: Yes
                  Replicate_Do_DB:
              Replicate_Ignore_DB:
               Replicate_Do_Table:
           Replicate_Ignore_Table:
          Replicate_Wild_Do_Table:
      Replicate_Wild_Ignore_Table:
                       Last_Errno: 0
                       Last_Error:
                     Skip_Counter: 0
              Exec_Master_Log_Pos: 154
                  Relay_Log_Space: 578
                  Until_Condition: None
                   Until_Log_File:
                    Until_Log_Pos: 0
               Master_SSL_Allowed: No
               Master_SSL_CA_File:
               Master_SSL_CA_Path:
                  Master_SSL_Cert:
                Master_SSL_Cipher:
                   Master_SSL_Key:
            Seconds_Behind_Master: 0
    Master_SSL_Verify_Server_Cert: No
                    Last_IO_Errno: 0
                    Last_IO_Error:
                   Last_SQL_Errno: 0
                   Last_SQL_Error:
      Replicate_Ignore_Server_Ids:
                 Master_Server_Id: 3
                      Master_UUID: e97a373f-3c99-11ee-ac1a-0050562edcfa
                 Master_Info_File: /var/lib/mysql/master.info
                        SQL_Delay: 0
              SQL_Remaining_Delay: NULL
          Slave_SQL_Running_State: Slave has read all relay log; waiting for more updates
               Master_Retry_Count: 86400
                      Master_Bind:
          Last_IO_Error_Timestamp:
         Last_SQL_Error_Timestamp:
                   Master_SSL_Crl:
               Master_SSL_Crlpath:
               Retrieved_Gtid_Set:
                Executed_Gtid_Set: 5a45cbdc-3c94-11ee-af3a-00505626c7ed:1-12
                    Auto_Position: 1
             Replicate_Rewrite_DB:
                     Channel_Name:
               Master_TLS_Version:
    1 row in set (0.00 sec)
总结
这篇文章主要介绍了MySQL主从备份机制的原理和实践步骤。文章首先解释了主从备份机制的基本概念和架构模式,并说明了备份的原理和步骤。接着详细介绍了mysql的M-S复制实战,包括M-S复制的架构模式、原理以及主从备份的设置步骤。最后,文章介绍了Slave设置的实验步骤和测试方法,包括修改配置文件、授权用户、恢复数据同步和查看Slave状态等。
该文章提供了MySQL主从备份机制的相关知识和实践技巧,帮助用户更好地保障数据安全和可靠性。通过文章中的示例和步骤,用户可以更加深入地了解MySQL主从备份机制的实现原理和操作方法,并能够更加安心地使用MySQL数据库。


 1万+
1万+


 被折叠的 条评论
为什么被折叠?
被折叠的 条评论
为什么被折叠?
 到【灌水乐园】发言


