


首先准备一个新项目,这个项目是想要通过我们之前配置的oauth认证服务器进行单点登录的;
导入maven坐标:
基本坐标:
<dependency>
    <groupId>org.springframework.cloud</groupId>
    <artifactId>spring-cloud-dependencies</artifactId>
    <version>Greenwich.SR1</version>
    <type>pom</type>
    <scope>import</scope>
</dependency>
<dependency>
    <groupId>org.springframework.cloud</groupId>
    <artifactId>spring-cloud-starter-oauth2</artifactId>
    <version>2.0.1.RELEASE</version>
</dependency>
<dependency>
    <groupId>org.springframework.cloud</groupId>
    <artifactId>spring-cloud-starter-security</artifactId>
    <version>2.0.1.RELEASE</version>
</dependency>
<dependency>
    <groupId>io.jsonwebtoken</groupId>
    <artifactId>jjwt</artifactId>
    <version>0.9.1</version>
</dependency>
然后配置我们的项目配置文件
server.port=17998
#增加客户端辨识度设置前缀
server.servlet.context-path=/client01

#防止cookie冲突,
server.servlet.session.cookie.name=OAUTH-CLIENT01-DEMO-SESSION

#配置授权服务器地址,给下面调用的,封装一个规范地址
oauth2-server-url: http://localhost:18001

#与授权服务器对应的配置
#本客户端的id(需要授权服务器知道你,已注册在案)
security.oauth2.client.client-id = adevar
#本客户端的密码
security.oauth2.client.client-secret = 123456
#获取授权码的接口
security.oauth2.client.user-authorization-uri=${oauth2-server-url}/oauth/authorize
#获取令牌的接口
security.oauth2.client.access-token-uri=${oauth2-server-url}/oauth/token
#jwt令牌的端点
security.oauth2.resource.jwt.key-uri=${oauth2-server-url}/oauth/token_key

#验证流程,当访问17998资源的时候会去授权服务器18
001进行校验,校验通过以后正常访问17998服务资源
准备一个测试资源~
@RestController
@RequestMapping("/user")
public class UserController {
    @GetMapping("/getCurrentUser")
    public Object getCurrentUser(Authentication authentication){
        return authentication;
    }
}
1.然后我们回到授权服务器18001上(如果是基于db加载商户,则去修改商户数据库配置的重定向获取授权码的地址)
2.新增一个.autoApprove(true)自动授权,省略我们点击确认的步骤
@Override
public void configure(ClientDetailsServiceConfigurer clients) throws Exception {
    List<SabedoriaPartner> sabedoriaPartners = sabedoriaPartnerService.sabedoriaPartnersFindAll();
    InMemoryClientDetailsServiceBuilder icdsb = clients.inMemory();
    sabedoriaPartners.forEach(partner -> {
        String strTypes = partner.getAuthorizedGrantTypes();
        String[] tempTypes = strTypes.split(",");
        if (StringUtils.isBlank(strTypes)||tempTypes.length==0)
            throw new RuntimeException("有商家未配置验证模式请检查");
        icdsb.withClient(partner.getAppId())
                .secret(partner.getAppSecret())
                .authorizedGrantTypes(tempTypes)
                .scopes(partner.getScopes())
                .resourceIds(partner.getResourceId())
                .redirectUris(partner.getRedirectUris())
                //开启自动授权,可以在数据库中配置,也可以根据条件计算boolean
                .autoApprove(true);
    });
}
3.然后我们依然在这个类中重写传参为AuthorizationServerSecuritiConfigurer的configure方法,新增access表达式
/**
 * 配置验证策略的方法
 * @param security
 * @throws Exception
 */
@Override
public void configure(AuthorizationServerSecurityConfigurer security) throws Exception {
    //所有的客户端都要验证
    security.allowFormAuthenticationForClients().checkTokenAccess("permitAll()");
    //新增表达式,如果用户不是匿名则返回true,
    security.tokenKeyAccess("isAuthenticated()");
}
重要:
在要加入的客户端启动类上加上注解@EnableOAuth2Sso启动单点登录
整体流程:当我们登录的时候检测到没有登录状态就会跳转到我们配置的oauth认证服务器进行登录,登录以后建立会话,(我们和第三方服务器的,和授权服务器的通讯仅会进行一次)
会弹出登录窗口,等待用户登录(非商家,商家信息在配置文件里已经配置了),在前后端分离项目中则会通知前端进行登录,获取登录信息以后再进行尝试,就能获取到信息
完成;
坑1:
这里我使用的是前后端分离项目。我配置了一个未登录处理器,所以当用户在客户端未登录时跳转到oauth并且也未登录时,并不会像教程里的一样跳转到登录窗口,而是直接响应了我设置好的响应体,导致困惑了很久;
解决:
演示时我直接删除了未登录处理逻辑;
实际中在分离前端部分收到oauth未登录逻辑,跳转到oauth登录页面,完成oauth的登录,继续请求,完SSO认证;
同样的,如果配置了登录成功处理器也要进行相同配置
坑2:
OAuth Error
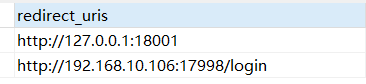
error="invalid_grant", error_description="Invalid redirect: http://localhost:17998/login does not match one of the registered values."
【正在解决】
找不到原因。。既然不能自定义。。那就固定写死吧。。这个路径必须是host:port/login
ip 端口 路径
严格要求一致,本地ip, localhost, 127.0.0.1;不可替代;必须和redirect_uris保持严格一致;
这里写入浏览器以后会变成这个ip开头的url路径去访问资源,如果和内存写入的内容不一致(估计是字符串对比)就会报错


用一致的ip可以访问

猜测:
可能这个登录只是获得了一个访问模板。指定人物访问指定ip的路径的模板。一旦发生变动就不可访问。即便你使用的是回环地址

发现,能正常访问的url修改ip以后会跳转到这个路径,说明访问的本质还是这个连接,你就理解为只是显示成这样。。但是如果在这个地方修改后面参数中的ip会显示404,也就是没有去往你来时的uri,你可以手动补全并使用一致的ip进行访问
额外补充:
发现上面出现当路径和当前内存中的路径不一致的时候,会跳转出一个新的连接。。。。其实并不是本质是这个连接。。。。。。可能是在内存保存了一个模板。当不一致的时候就去访问授权服务器查询,如果还是不一致就报错。。因为我发现停止授权服务器依然可以访问,但是如果停止的时候输入了别的地址,他会请求授权服务器,但是没响应就会报错;
但是格式必定是host:port:uri;
补充:
懂了这就是授权码固定的回调格式
如果商家密码没有在oauth备案注册会出现报错:
1.Error creating bean with name 'jwtTokenServices' defined in org.springframework.boot.autoconfigure.security.oauth2.resource
2.Error creating bean with name 'jwtTokenStore' defined in org.springframework.boot.autoconfigure.security.oauth2.resource
3.Failed to instantiate [org.springframework.security.oauth2.provider.token.TokenStore]: Factory method 'jwtTokenStore' threw exception;
4.Error creating bean with name 'jwtTokenEnhancer' defined in org.springframework.boot.autoconfigure.security.oauth2.resource
5.Could not extract response: no suitable HttpMessageConverter found for response type [interface java.util.Map] and content type [text/html;charset=UTF-8]


 147
147


 被折叠的 条评论
为什么被折叠?
被折叠的 条评论
为什么被折叠?
 到【灌水乐园】发言


