


Vue学习之旅 o( ̄▽ ̄)ブ
vue是一个渐进式框架
可以将vue作为应用的一部分嵌入其中
相关高级功能
解耦视图和数据
可复用的组件
前端路由技术
状态管理
虚拟DOM
引入方式
1、CDN直接引入
<!-- 开发环境版本,包含了有帮助的命令行警告 -->
<script src="https://cdn.jsdelivr.net/npm/vue@2/dist/vue.js"></script>
或者:
<!-- 生产环境版本,优化了尺寸和速度 -->
<script src="https://cdn.jsdelivr.net/npm/vue@2"></script>
2、下载和引入
开发版本:https://cn.vuejs.org/js/vue.js
生产版本:https://cn.vuejs.org/js/vue.min.js
3、npm安装
后续通过webpack和cli的使用
编程范式
以前原生js的方法的编程范式是:命令式编程
vue的编程范式是:声明式编程
创建VUE实例
传入一个对象
new Vue({
    el: '#app', //用于挂在要管理的元素
    data: { //定义一些数据
        message: 'hello',
        name: 'lsn'
    }
})

const app = new Vue({
    el: '#app', //用于挂在要管理的元素
    data: { //定义一些数据
        message: 'hello',
        name: 'lsn'
        //只要数据在html中是被双大括号声明在id为app的元素内的就能使用
    }
})
创建方法中的对象
el:String|HTMLElement
决定之后Vue实例会管理哪一个DOM
data:Object|Function(组件中data必须是一个函数)
Vue实例对应的数据对象
methods:{[key]: Function}
定义属于Vue的一些方法,可以在其他地方调用,也可以在指令中使用
生命周期函数
created、mouted…
挂载的对象
<div id="app">{{message}}
	<h1>
        {{name}}
    </h1>
</div>
页面
data中的内容变化会响应到页面中,无需操控dom,这也是Vue的响应式体现

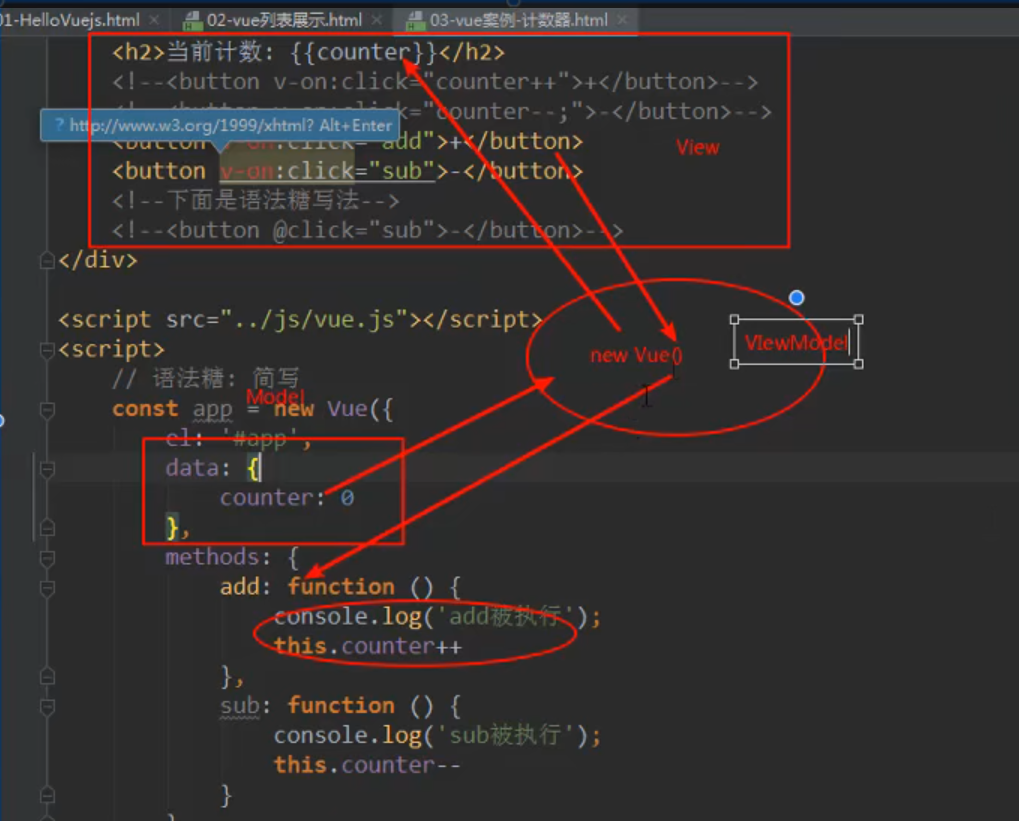
语法糖:就是简写的意思
比如v-on:click="" -> @click=""
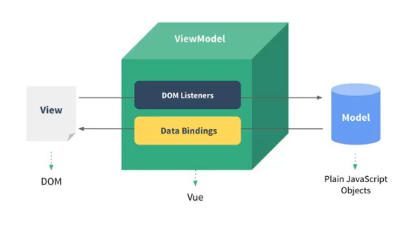
MVVM:Model ViewModel View
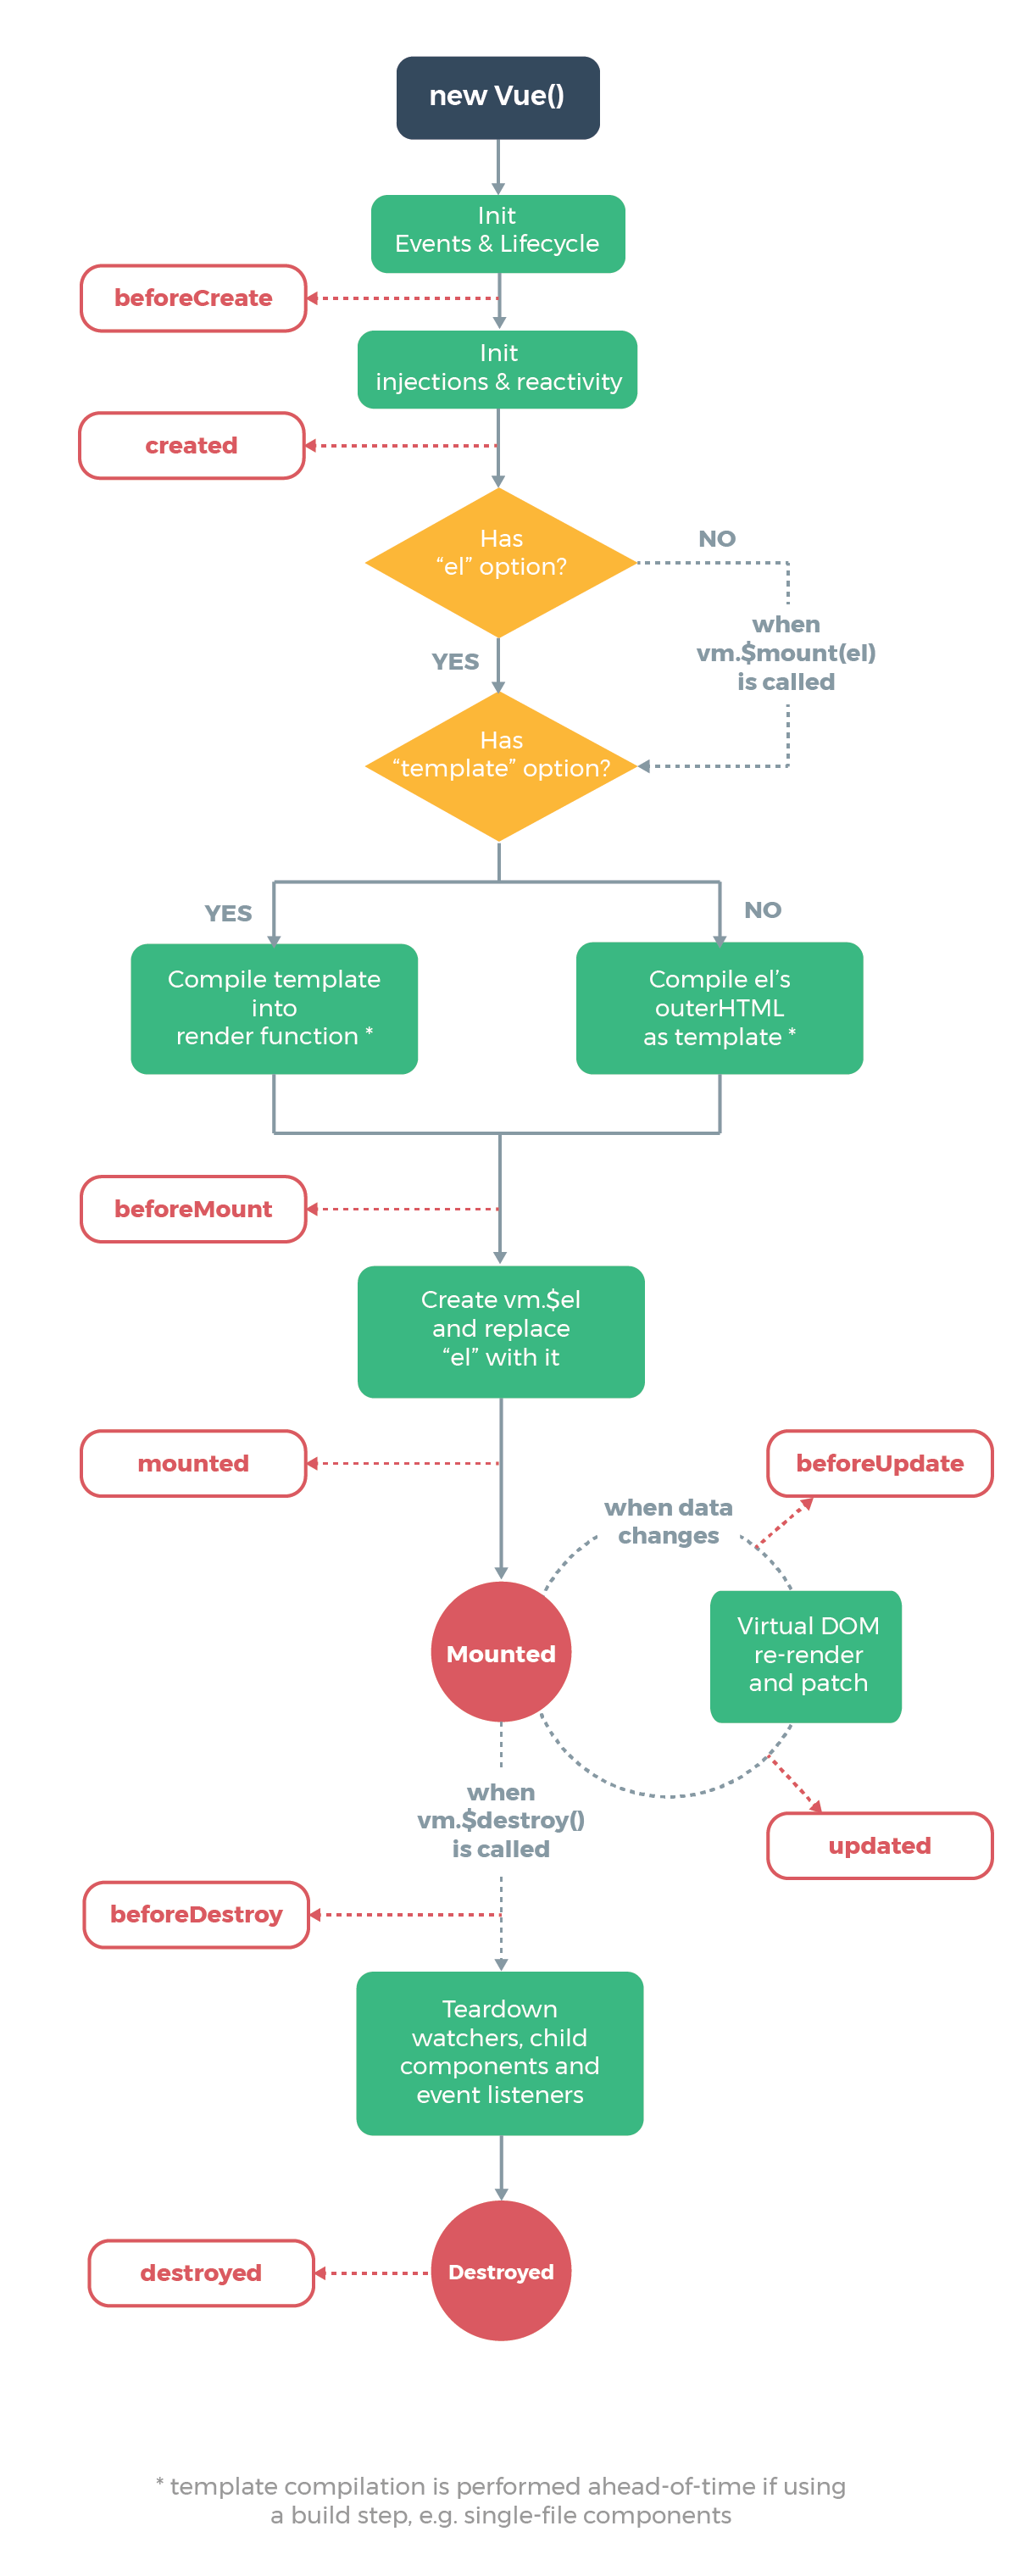
Vue生命周期
插值操作
Mustache语法
{{}}这种双大括号的语法叫Mustache语法
Mustache语法中可以写一些简单的表达式
只能在元素内部使用,不能在标签上使用
v-once
一个标记,后面无需赋值表达式
表示元素和组件只渲染一次,之后不会随着数据变化而改变
v-html
需要赋值 v-html="dom"
将赋予的对象当作html代码解析
v-text
需要赋值 v-text="str"
将赋予的对象当作文本解析,会覆盖掉元素内的文本,所以不常用
v-pre
不需要赋值
将元素内的所有东西当作普通字符串,不进行解析
v-cloak
解决Mustache语法闪烁问题
解析完后会将这个属性从元素中删除
在解析之前用CSS属性选择器将带有v-cloak属性的元素隐藏
[v-cloak] {
    display: none;
}
绑定属性
v-bind
在需要动态绑定的属性前加 v-bind:,这样后面给图片赋值时就可以使用data中的变量,例如:v-bind:src="URL"
语法糖::attribute=""
直接使用 : 可以代表 v-bind:
对象语法
对动态绑定的属性,赋值对象,可以由键值对来确定添加的属性值
放到method里由函数返回对象也可以,也可以放在计算属性(computed)中
数组语法
同样,向动态绑定属性时,可以传入数组,一般不用,很反人类
class-对象语法
:class="{className: boolean}"
对应的布尔值为true,则对应的键值就加入属性的属性值中,如果为false则相反
<div id="app">
  <div class="active">{{message}}</div>
  <div class="none" :class="active">{{message}}</div>
</div>

<script>
  const app = new Vue({
    el: '#app',
    data: {
      message: 'hello',
      active: {active: true, disActive: false}
    }
  })
</script>
改动data中的active,将会动态改变相关class值
而且动态绑定的class,和标签上静态class不会冲突,而是会合并
class-数组语法
:class="['a', 'b']"
不常用
style-对象语法
:style="{styleAttribute: value}"
键为属性名,值为属性值
键值可以采用驼峰法或连接符法(fontSize、font-size)
<div id="app">
  <h2 :style="active">{{message}}</h2>
</div>

<script>
  const app = new Vue({
    el: '#app',
    data: {
      message: 'hello',
      active: {fontSize: '50px', 'font-size': '50px'}
    }
  })
</script>
键值需要是字符串,不然会当成变量,解析会失败
键为连接符时,键需要括上单引号,不然无法解析 ‘ - ’
style-数组语法
:style="[{backGroundColor: 'red'}, {aa: 'bb'}]"
不常用
驼峰标识
.camel 修饰符允许在使用 DOM 模板时将 v-bind property 名称驼峰化
<svg :view-box.camel="viewBox"></svg>
计算属性
一些值需要经过计算拼接等操作后才能使用,那么这种值就是计算值
vue中提供计算属性,方便所有这种计算值的使用
计算属性其实是一个函数,vue会运行这个函数并且将这个值传给赋值给键
<div id="app">
  <h2>{{computed()}}</h2>

  <h2>{{fullName}}</h2>
</div>

<script>
  const app = new Vue({
    el: '#app',
    data: {
      firstName: 'l',
      lastName: 'sn'
    },
    computed: {
      fullName: function() {
        return this.firstName + ' ' + this.lastName
      }
    },
    methods: {
      computed: function() {
        return this.firstName + ' ' + this.lastName
      }
    }
  })
</script>
这里计算属性computed里的键可以在html中直接使用,不需要加括号
高级用法
<div id="app">
  <h2>总价格:{{allPrice}}</h2>
</div>

<script>
  const app = new Vue({
    el: '#app',
    data: {
      books: [
        {id: 11, name:'Unix', price: 110},
        {id: 11, name:'Unix', price: 110},
        {id: 11, name:'Unix', price: 110},
        {id: 11, name:'Unix', price: 110},
      ]
    },
    computed: {
      allPrice: function () {
        return this.books.reduce((pre, cur) => {return pre + cur.price}, 0)
      }
    }
  })
</script>
setter和getter
computed: {
    fullName: {
        get: function () {
            return this.firstName + this.lastName;
        },
        set: function () {

        }
    }
}
但是计算属性一般不设置set方法,因为把计算属性当作只读属性
所以干脆直接下面这样定义计算属性
computed: {
    fullName: function () {
        return ...;
    }
}
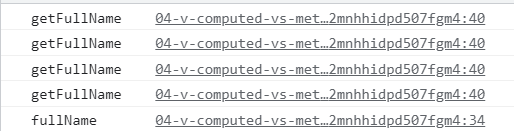
缓存
计算值中的变量如果未变化则会被缓存起来,多次调用其实只执行一次
<div id="app">
  <!-- 直接拼接 -->
  <h2>{{firstName}}{{lastName}}</h2>
  <!-- methods -->
  <h2>{{getFullName()}}</h2>
  <h2>{{getFullName()}}</h2>
  <h2>{{getFullName()}}</h2>
  <h2>{{getFullName()}}</h2>
  <!-- 计算属性 -->
  <h2>{{fullName}}</h2>
  <h2>{{fullName}}</h2>
  <h2>{{fullName}}</h2>
  <h2>{{fullName}}</h2>
</div>

<script>
  const app = new Vue({
    el: '#app',
    data: {
      lastName: 'sn',
      firstName: 'l'
    },
    computed: {
      fullName: function () {
        console.log('fullName');
        return this.firstName + this.lastName;
      }
    },
    methods: {
      getFullName: function () {
        console.log('getFullName');
        return this.firstName + this.lastName;
      }
    }
  })
</script>
这样子methods会调用多次,但是计算属性会缓存起来
事件监听
v-on
绑定事件监听器
<div id="app">
  <h2>{{counter}}</h2>
  <button v-on:click="counter++">+</button>
  <button v-on:click="counter--">-</button>

  <button v-on:click="increment">+</button>
  <button v-on:click="decrement">-</button>
</div>

<script>
  const app = new Vue({
    el: '#app',
    data: {
      counter: 0
    },
    methods: {
      increment() {
        this.counter++;
      },
      decrement() {
        this.counter--;
      }
    }
  })
</script>
语法糖:@click=""
如果事件监听时,调用的方法不需要传参数,则可以向上面代码一样省略();如果需要传参但是括号里什么也不传,则参数值默认undefined;如果需要传参但是却省略了括号,则vue会将事件对象传入监听函数中
如果需要event对象也需要自定义参数,则:
<div id="app">
  <button @click="btn1Click">t</button>
  <button @click="btn1Click()">t</button>
  <button @click="btn1Click(123)">t</button>
  <button @click="btn1Click(123, $event)">t</button>
</div>

<script>
  const app = new Vue({
    el: '#app',
    data: {
      message: 'hello'
    },
    methods: {
      btn1Click(a, event) {
        console.log(a, event);
      }
    }
  })
</script>
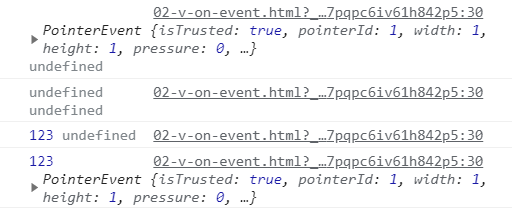
注意:$event === this.event; //true
修饰符
@click.stop=""取消冒泡的点击事件,调用event.stopPropagation()
@click.prevent=""取消默认事件,调用event.preventDefault()
@keyup.{keyCode | keyAlias}特定键位才能触发回调,例如@keyup.13=""; | @keyup.enter="";代表回车键
@click.native=""监听组件根元素的原生事件
@click.once=""支触发一次回调
所有修饰符可以连续使用:@click.stop.prevent=""
条件判断
v-if、v-else
属性值可以赋值true或false来决定当前元素及其子树是否渲染
v-if和v-else就和普通的if-else语句一样,不过是用在DOM元素渲染上
v-else-if
与else-if语句一样
<div id="app">
  <h2 v-if="score < 60">不及格</h2>
  <h2 v-else-if="score < 90">良好</h2>
  <h2 v-else>优秀</h2>
</div>

<script>
  const app = new Vue({
    el: '#app',
    data: {
      message: 'hello',
      score: 99
    }
  })
</script>
改变score后会根据判断条件来动态渲染页面元素
v-show
决定元素是否显式,属性值为Boolean类型
与if不同的是,isShow只是使用了display:none
除了需要安全性外,多次切换建议使用该属性
循环遍历
v-for
遍历数组
在标签上使用v-for="item of array",将会遍历这个数组并创建相应个数的该元素
<div id="app">
  <ul>
    <li v-for="item of message">{{item}}</li>
  </ul>
</div>

<script>
  const app = new Vue({
    el: '#app',
    data: {
      message: ['a', 'b', 'c']
    }
  })
</script>

还可以使用v-for="(item, index) of message"
也可以用 of 替代 in 作为分隔符,因为它更接近 JavaScript 迭代器的语法
遍历对象
<div id="app">
  <!--只取一个值-->
  <ul>
    <li v-for="value in message">{{value}}</li>
  </ul>

  <!--取value和key-->
  <ul>
    <li v-for="(value, key) in message">{{key}}-{{value}}</li>
  </ul>
</div>

<script>
  const app = new Vue({
    el: '#app',
    data: {
      message: {
        name: 'lsn',
        sex: 'male',
        age: 19
      }
    }
  })
</script>
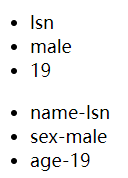
还能在循环时使用第三个值index获取属性顺序下标(value, key, index) in message
:key
vue官方建议使用v-for时,给对应元素加上:key
这个和vue中虚拟DOM的Diff(Difference)算法有关系
官方:
建议尽可能在使用 v-for 时提供 key attribute,除非遍历输出的 DOM 内容非常简单,或者是刻意依赖默认行为以获取性能上的提升
key 的特殊 attribute 主要用在 Vue 的虚拟 DOM 算法,在新旧 nodes 对比时辨识 VNodes。如果不使用 key,Vue 会使用一种最大限度减少动态元素并且尽可能的尝试就地修改/复用相同类型元素的算法。而使用 key 时,它会基于 key 的变化重新排列元素顺序,并且会移除 key 不存在的元素。
有相同父元素的子元素必须有独特的 key。重复的 key 会造成渲染错误。
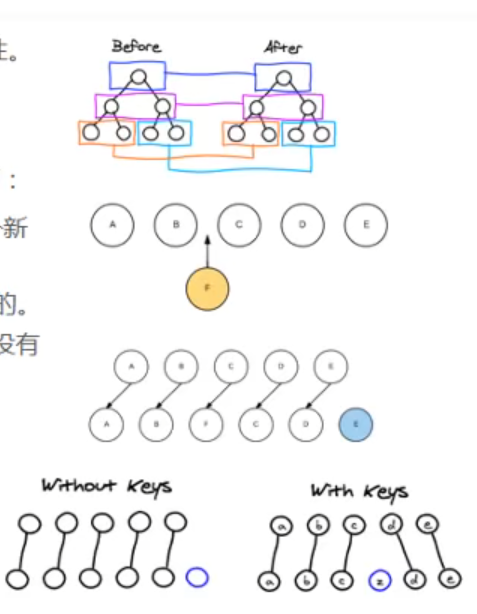
没有key的话,在对数组或对象做修改时,可能会影响后续一连串元素的修改;但是有了key,vue就能检测具体修改的元素,能优化渲染和修改速度(这些检测与修改都是在虚拟DOM上实现的,最后才会实现页面渲染)
key值可以直接赋值内容本身,因为这一般是不会重复的;但是数组里有相同元素时则会报错,因为key值会相同
<li v-for="item in message" :key="item">{{item}}</li>
哪些数组方法是响应式的
能改变数组本身的方法是响应式的
但是通过索引值修改数组不会触发页面刷新,因为vue没有监听这个事件
还可以用vue的set(要修改的对象, 索引值, 修改后的值)方法
Vue.set(this.letters, 0, 'bbb');
v-model
表单绑定v-model
可以实现表单元素和数据的双向绑定
任何一方数据修改,另一方也会更改
text
<div id="app">
  <input type="text" v-model="message">
  <!--手写v-model-->
  <input type="text" :value="message" @input="message = $event.target.value">
  {{message}}
</div>

<script>
  const app = new Vue({
    el: '#app',
    data: {
      message: 'hello'
    }
  })
</script>
radio
可以添加name来进行互斥,但是使用了v-model就不用name也可以互斥,而且在data中的sex可以初始化value值
<div id="app">
  <label for="male">
    <input type="radio" id="male" value="男" v-model="sex">男
  </label>
  <label for="female">
    <input type="radio" id="female" value="女" v-model="sex">女
  </label>
  <h2>sex:{{sex}}</h2>
</div>

<script>
  const app = new Vue({
    el: '#app',
    data: {
      message: 'hello',
      sex: '男'
    }
  })
</script>
checkbox
<div id="app">
  <!--checkbox单选框-->
  <label for="agreement">
    <input type="checkbox" id="agreement" v-model="isAgree">同意协议
  </label>
  <button :disabled="!isAgree">下一步</button>

  <br>

  <!--checkbox多选框-->
  <input type="checkbox" value="篮球" v-model="hobbies">篮球
  <input type="checkbox" value="足球" v-model="hobbies">足球
  <input type="checkbox" value="乒乓球" v-model="hobbies">乒乓球
  <input type="checkbox" value="羽毛球" v-model="hobbies">羽毛球
  <h2>your hobbies:{{hobbies}}</h2>
</div>

<script>
  const app = new Vue({
    el: '#app',
    data: {
      message: 'hello',
      isAgree: false,	//单选框
      hobbies: []	//多选框
    }
  })
</script>
select
可以选择默认值
多选框需要按住ctrl或shift
<div id="app">
  <!--单选-->
  <select name="a" v-model="fruit">
    <option value="apple" >apple</option>
    <option value="banana">banana</option>
    <option value="peal">peal</option>
  </select>
  <h2>{{fruit}}</h2>

  <!--多选-->
  <select name="b" v-model="fruits" multiple>
    <option value="apple" >apple</option>
    <option value="banana">banana</option>
    <option value="peal">peal</option>
  </select>
  <h2>{{fruits}}</h2>
</div>

<script>
  const app = new Vue({
    el: '#app',
    data: {
      message: 'hello',
      fruit: 'banana',
      fruits: []
    }
  })
</script>
值绑定
这个概念就是原始值不是规定死的,而是动态的绑定一些数据
修饰符
在v-model后加.XXX可以作用不同的v-model绑定方式
例如v-model.lazy=""
修饰符有如下几种:
lazy:让数据在失去焦点或者回车时才会更新
number:将输入框中输入的内容自动转换为数字类型
trim:过滤内容左右两边的空格
组件化
有组件构建的项目更加方便组织和管理
组件使用的三个步骤:
创建组件构造器
注册组件
使用组件

使用Vue.extend()创建组件构造器对象时需要传入一个参数对象,使用Vue.component()注册组件时需要传入组件名和组件构造器对象
<div id="app">
    <my-com></my-com>
</div>

<script>
    // 1、创建组件构造器对象
    const cpnC = Vue.extend({
        template: `
            <div>
                <h2>title</h2>
                <h2>content</h2>
            </div>`,
    });
    // 2、注册组件
    Vue.component('my-com', cpnC);

    const app = new Vue({
        el: '#app',
        data: {
            message: 'hello'
        }
    })
</script>
组件根元素
组件template必须使用使用一个div元素包裹,如:
<div>
    <h2>title</h2>
    <h2>content</h2>
</div>
全局组件和局部组件
全局组件
上面例子的代码注册的组件为全局组件
全局组件能够在多个vue的实例下使用
<script>
    const cpnC = Vue.extend({
        template:  `
            <div>
                <h2>title</h2>
                <p>content</p>
            </div>`
    })
    // 全局注册
    Vue.component('cpn', cpnC);
    const app = new Vue({
        el: '#app',
        data: {
            message: 'hello'
        }
    })
</script>
局部组件
局部组件在vue实例内部注册
只能在当前vue实例下使用
<script>
    const cpnC = Vue.extend({
        template:  `
            <div>
                <h2>title</h2>
                <p>content</p>
            </div>`
    })
    const app = new Vue({
        el: '#app',
        data: {
            message: 'hello'
        },
        // 局部注册
        components: {
            cpn: cpnC
        }
    })
</script>
父组件和子组件
可以在Vue.extend()传入对象中添加components属性,和局部注册一样
<div id="app">
    <cpn></cpn>
</div>

<script>
    const cpn2 = Vue.extend({
        template: `
            <div>
                <h2>title2</h2>
                <p>content2</p>
            </div>`
    })
    const cpn1 = Vue.extend({
        template: `
            <div>
                <h2>title1</h2>
                <p>content1</p>
                <cpn></cpn>
            </div>`,
        components: {
            cpn: cpn2
        }
    })

    const app = new Vue({
        el: '#app',
        data: {},
        components: {
            cpn: cpn1
        }
    })
</script>
可以将vue实例看作顶级组件
语法糖
对于全局组件,将创建组件构造器省略,直接放到注册组件的参数中
Vue.component('cpn1', {
    template: `<div><h2>hello</h2></div>`
})
对于局部组件,将组件构造器省略,直接放到属性值中
const app = new Vue({
    el: '#app',
    data: {
        message: 'hello'
    },
    components: {
        'cpn1': {
            template: `<div><h2>hello</h2></div>`
        }
    }
})
分离模板
可以将模板template代码写到带有特殊id的html标签内
有两种方法:
<div id="app">
    <cpn></cpn>
</div>

<!-- method one -->
<!-- type must be this one -->
<script type="text/x-template" id="cpn">
<div>
    <h2>title</h2>
    <p>hahaha</p>
</div>
</script>

<!-- method two -->
<template id="cpn">
    <div>
        <h2>title</h2>
        <p>hahaha</p>
    </div>
</template>

<script>
    Vue.component('cpn', {
        template: id = '#cpn'
    })

    const app = new Vue({
        el: '#app',
    })
</script>
动态组件数据
组件内部也应该拥有独立的data
组件内部不能访问vue实例的数据(即data)
组件内部的data属性必须是一个函数,而且得返回一个object对象
Vue.component('cpn', {
    template: id = '#cpn',
    data() {
        return {
            title: 'hello'
        }
    }
})
<template id="cpn">
    <div>
        <h2>title</h2>
        <p>hahaha</p>
        <h2>{{title}}</h2>
    </div>
</template>
为什么组件data一定要是函数
因为要保证多个component实例中绑定的data对象不是同一个,所以需要一个构建函数来创建新的data对象
<div id="app">
    <cpn></cpn>
    <cpn></cpn>
</div>

<template id="cpn">
    <div>
        <h2>clickNum: {{counter}}</h2>
        <button @click="increment">+</button>
        <button @click="decrement">-</button>
    </div>
</template>

<script>
    Vue.component('cpn', {
        template: id = '#cpn',
        data() {
            return {
                counter: 0
            }
        },
        methods: {
            increment() {
                this.counter++;
            },
            decrement() {
                this.counter--;
            }
        }
    })

    const app = new Vue({
        el: '#app'
    })
</script>
上面这个例子两个单点器中的counter不是同一个对象中的,所以不会互相影响
如果需要相互影响的话,可以将return返回的对象放到全局,这样多个component中的data就会指向同一个对象
父子组件通信
一般在vue实例中进行网络通讯,然后将数据传给下级组件
vue中有两种传递数据的方法:通过props向子组件传递数据、通过事件向父组件发送消息
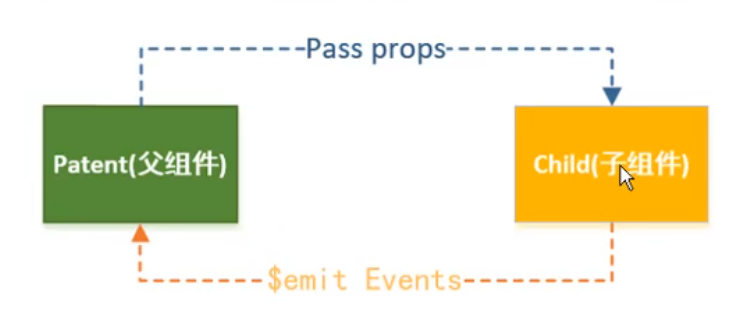
将vue实例看作成一个顶级组件是可以的
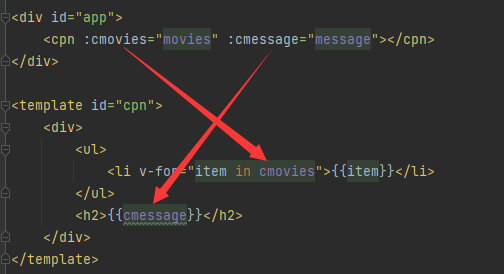
父传子
<div id="app">
<cpn :cmovies="movies" :cmessage="message"></cpn>
</div>
<template id="cpn">
<div>
<ul>
<li v-for="item in cmovies">{{item}}</li>
</ul>
<h2>{{cmessage}}</h2>
</div>
</template>
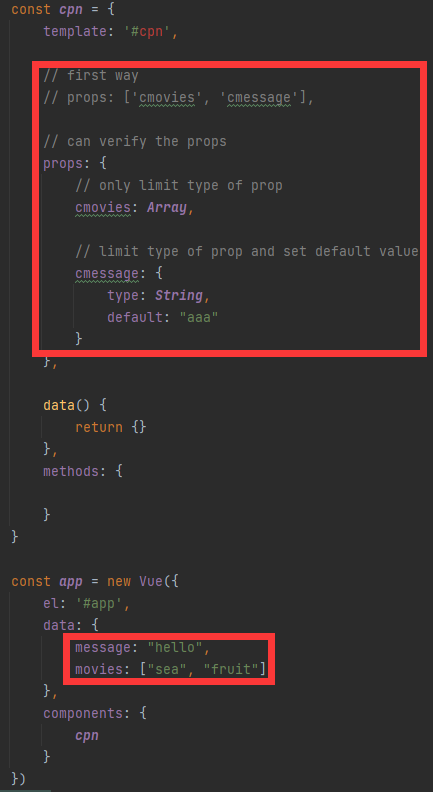
<script>
const cpn = {
template: '#cpn',
// first way
// props: ['cmovies', 'cmessage'],
// can verify the props
props: {
// only limit type of prop
cmovies: Array,
// limit lots of type
cmovies: [Array, String],
// limit type of prop and set default value and necessary
cmessage: {
type: String,
default: "aaa",
required: true // if the value is necessary? if true, null or undefined value will lead to throwing the Error
},
// if the value is Object or Array, you should use a factory function
cmovies: {
type: Array,
default() {
return [];
}
}
},
data() {
return {}
},
methods: {
}
}
const app = new Vue({
el: '#app',
data: {
message: "hello",
movies: ["sea", "fruit"]
},
components: {
cpn
}
})
</script>
template标签里的值如果是父组件传入的,需要在使用自定义组件的html标签时以属性方式传入,传入的属性名就是template标签内要用到的属性名,而属性值为父组件中的某个对象,并且可以在组件构造器内规定传入对象的类型(null匹配任何类型)和默认值以及该对象是否必传,看下面的图来理解:
验证支持类型

当有自定义构造函数时,验证也支持自定义的类型
驼峰标识
如果需要使用驼峰命名属性名,则需要这样定义:
<cpn :c-info="info"></cpn>
or
<cpn :c-info.camel="info"></cpn>
子传父
当子组件需要向父组件传递数据时,就要用到自定义事件了
在子组件中,通过$emit()来触发事件
在父组件中,通过v-on来监听子组件事件
<!-- father cpn template -->
<div id="app">
    <!-- you should use the emitting eventName as propertyName -->
    <cpn @item-click="cpnClick"></cpn>
</div>

<!-- son cpn template -->
<template id="cpn">
    <div>
        <button v-for="item in categories" @click="btnClick(item)">
            {{item.name}}
        </button>
    </div>
</template>

<script>
    // son cpn
    const cpn = {
        template: '#cpn',
        data() {
            return {
                categories: [
                    {id: 'aaa', name: 'popular suggestion'},
                    {id: 'bbb', name: 'phone'},
                    {id: 'ccc', name: 'home'},
                    {id: 'ddd', name: 'computer'},
                ]
            }
        },
        methods: {
            btnClick(item) {
                // this event is self-define event
                // the function is emitting a event
                // the function params are eventName and eventParameter
                this.$emit('item-click', item);
            }
        }
    }

    // father cpn
    const app = new Vue({
        el: '#app',
        data: {},
        components: {
            cpn
        },
        methods: {
            cpnClick(item) {
                console.log(item);
            }
        }
    })
</script>
注意小例子
vue不建议使用v-model绑定组件里传入的属性值,改值在父组件重新渲染时会被覆盖
<div id="app">
    <cpn :number1="num1" :number2="num2"/>
</div>

<template id="cpn">
    <div>
        <p>{{number1}}</p>
        <input type="text" v-model="number1">
        <p>{{number2}}</p>
        <input type="text" v-model="number2">
    </div>
</template>
<script>
    const app = new Vue({
        el: '#app',
        data: {
            num1: 1,
            num2: 0
        },
        components: {
            cpn: {
                template: '#cpn',
                props: {
                    number1: Number,
                    number2: Number
                }
            }
        }
    })
</script>
可以直接拆分v-model使用v-bind和v-on:input
<div id="app">
    <cpn :number1="num1" :number2="num2" @num1-change="num1Change" @num2-change="num2Change"/>
</div>

<template id="cpn">
    <div>
        <p>{{number1}}</p>
        <input type="text" :value="number1" @input="num1Input">
        <p>{{number2}}</p>
        <input type="text" :value="number2" @input="num2Input">
    </div>
</template>
<script>
    const app = new Vue({
        el: '#app',
        data: {
            num1: 1,
            num2: 0
        },
        components: {
            cpn: {
                template: '#cpn',
                props: {
                    number1: Number,
                    number2: Number
                },
                methods: {
                    num1Input(event) {
                        this.$emit('num1-change', parseInt(event.target.value));
                    },
                    num2Input(event) {
                        this.$emit('num2-change', parseInt(event.target.value));
                    }
                }
            }
        },
        methods: {
            num1Change(value) {
                this.num1 = value;
            },
            num2Change(value) {
                this.num2 = value;
            }
        }
    })
</script>
watch
上面的小例子完全可以用watch实现
<div id="app">
    <cpn :number1="num1" :number2="num2" @num1-change="num1Change" @num2-change="num2Change"/>
</div>

<template id="cpn">
    <div>
        <p>{{number1}}</p>
        <input type="text" v-model="dnumber1">
        <p>{{number2}}</p>
        <input type="text" v-model="dnumber2">
    </div>
</template>
<script>
    const app = new Vue({
        el: '#app',
        data: {
            num1: 1,
            num2: 0
        },
        components: {
            cpn: {
                template: '#cpn',
                props: {
                    number1: Number,
                    number2: Number
                },
                data() {
                    return {
                        dnumber1: this.number1,
                        dnumber2: this.number2
                    }
                },
                watch: {
                    dnumber1(value) {
                        this.$emit('num1-change', parseInt(value));
                    },
                    dnumber2(value) {
                        this.$emit('num2-change', parseInt(value));
                    }
                    // example
                    // name(newValue, oldValue) {
                    //
                    // }
                }
            }
        },
        methods: {
            num1Change(value) {
                this.num1 = value;
            },
            num2Change(value) {
                this.num2 = value;
            }
        }
    })
</script>
父子组件访问
父组件访问子组件
使用$children或$refs,这两个属性都在父组件上下文中,可以通过this访问
$children是一个类数组
一般我们用后者,因为children无法区分需要拿到的子组件,而refs可以像下面这样用
<div id="app">
    <cpn ref="bbb"></cpn>
    <cpn ref="aaa"></cpn>
    <cpn ref="aaa"></cpn>
    <button @click="btnClick">button</button>
</div>

<template id="cpn">
    <div>
        i'm son cpn
        <button @click="showMessage">showMessage</button>
    </div>
</template>
<script>
    const app = new Vue({
        el: '#app',
        data: {
            message: 'hello'
        },
        methods: {
            btnClick() {
                // console.log(this.$children);
                console.log(this.$refs);
            }
        },
        components: {
            cpn: {
                template: '#cpn',
                methods: {
                    showMessage() {
                        console.log(this.$parent);
                    }
                }
            }
        },
    })
</script>

ref 被用来给元素或子组件注册引用信息。引用信息将会注册在父组件的 $refs 对象上。如果在普通的 DOM 元素上使用,引用指向的就是 DOM 元素;如果用在子组件上,引用就指向组件实例。
上面的代码中,就是引用指向了组件实例,此时第二给相同的ref,相当于就改变了已有的注册信息,前面的 aaa 就被后面的覆盖了
子组件访问父组件
使用$parent或$root,这两个属性都在子组件上下文中,通过this可以访问
$root是访问根组件,一般会访问到vue实例,因为vue实例可以看做成一个顶级组件
插槽slot
让封装的组件更具有扩展性
在组建里预留一个位置,让使用者决定展示内容
在template中预留slot出来,还可以给slot赋一个默认值,也就是在slot标签中写入默认内容,在使用组件时传入内容会覆盖slot标签
<div id="app">
    <cpn></cpn>
    <cpn><span>hehehe</span></cpn>
</div>
<template id="cpn">
    <div>
        <h2>i'm cpn</h2>
        <p>hahaha</p>
        <slot><button>btn</button></slot>
    </div>
</template>
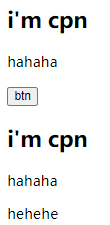
如果template里只有一个插槽的情况下,vue会将使用时组件标签内的所有元素全都放到该插槽位置
多个插槽(具名插槽)
当多个插槽不具备name时,使用时组件标签内的所有元素会重复放到三个插槽中
但是具名后,如果使用时组件标签内的内容没有指定具体插槽,则该内容将不会被显示
使用时组件标签内的内容应该使用 slot="name" 指定插槽
<div id="app">
    <cpn><span slot="center">title</span></cpn>
</div>

<template id="cpn">
    <div>
        <slot name="left"><span>left</span></slot>
        <slot name="center"><span>center</span></slot>
        <slot name="right"><span>right</span></slot>
    </div>
</template>
编译作用域
在哪个实例下的内容使用的就是哪个实例的作用域
官方给出了一条准则∶父组件模板的所有东西都会在父级作用域内编译;子组件模板的所有东西都会在子级作用域内编译
<div id="app">
    <cpn v-show="isShow"></cpn>	//true
</div>

<template id="cpn">
    <div>
        <h2>i'm son</h2>
        <p>i'm content</p>
        <button v-show="isShow">hello</button>	//false
    </div>
</template>

<script>
    const app = new Vue({
        el: '#app',
        data: {
            isShow: true
        },
        components: {
            cpn: {
                template: "#cpn",
                data() {
                    return {
                        isShow: false
                    }
                }
            }
        }
    })
</script>
作用域插槽
父组件替换插槽的标签,但是内容由子组件来提供
<!DOCTYPE html>
<html lang="en">
<head>
    <meta charset="UTF-8">
    <title>Title</title>
</head>
<body>

<div id="app">
    <cpn></cpn>
    <cpn>
        <!-- 2.5.X 以下版本必须使用template模板,但在以上版本中不需要 -->
        <!-- 以下是为了获取子组件中的数据 -->
        <template slot-scope="slot">
            <span v-for="item in slot.data">{{item}} - </span>
        </template>
    </cpn>

    <!-- 以下是为了获取子组件中的数据 -->
    <cpn>
        <template slot-scope="slot">
            <span>{{slot.data.join(" - ")}}</span>
        </template>
    </cpn>
</div>

<template id="cpn">
    <div>
        <!-- 这里可以使用任何属性名,不一定是data -->
        <slot :data="language">
            <ul>
                <li v-for="item in language">{{item}}</li>
            </ul>
        </slot>
    </div>
</template>

<script>
    const app = new Vue({
        el: '#app',
        data: {},
        components: {
            cpn: {
                template: "#cpn",
                data() {
                    return {
                        language: ["Python", "C++", "Java", "JavaScript"]
                    }
                }
            }
        }
    })
</script>

</body>
</html>
模块化开发
相关可以看js模块化开发
ES5需要结合webpack使用,webpack会解析
ES6可以支持export/import
Webpack
webpack是一个现代的JavaScript应用的静态模块打包工具
依赖于Node环境
Node.js是一个基于Chrome V8引擎的JavaScript运行时环境
配置
webpack.config.js
const path = require('path');

module.exports = {
    entry: './src/main.js',		//项目js入口
    output: {
        path: path.resolve(__dirname + '/dist'),		//输出目录
        filename: 'bundle.js'		//输出文件名
    }
}
package.json
{
  "name": "meetwebpack",
  "version": "1.0.0",
  "description": "",
  "main": "index.js",
  "scripts": {
    "test": "echo \"Error: no test specified\" && exit 1",
    "build": "webpack"		//命令脚本
  },
  "author": "",
  "license": "ISC",
  "devDependencies": {
    //你可以自己修改下面的依赖包版本,然后在命令行中使用npm install命令来重新加载这些依赖
    //~,^的区别是:
    //~的意思是匹配最近的小版本 比如~1.2.3将会匹配所有的1.2.x版本,但不匹配1.3.0,即1.2.0 <= ~1.2.3 <1.3.0
    //^的意思是最近的一个大版本 比如^1.2.3将会匹配所有1.x.x版本,包括1.3.0,但不包括2.0.0, 即1.0.0 <= ^1.2.3 < 1.x.x
    "@babel/core": "^7.15.5",
    "@babel/preset-env": "^7.15.6",
    "babel-loader": "^8.2.2",
    // ......
  },
}
package-lock.json
这个文件记录了当前项目安装依赖的真实版本
{
  "name": "meetwebpack",
  "version": "1.0.0",
  "lockfileVersion": 2,
  "requires": true,
  "packages": {
    "": {
      "name": "meetwebpack",
      "version": "1.0.0",
      "license": "ISC",
      "dependencies": {
        "vue": "^2.6.14"
      },
      "devDependencies": {
        "@babel/core": "^7.15.5",
        "@babel/preset-env": "^7.15.6",
        "babel-loader": "^8.2.2",
        // ......
      }
    },
    "node_modules/@babel/code-frame": {
      "version": "7.14.5",
      "resolved": "https://registry.nlark.com/@babel/code-frame/download/@babel/code-frame-7.14.5.tgz?cache=0&sync_timestamp=1623280639364&other_urls=https%3A%2F%2Fregistry.nlark.com%2F%40babel%2Fcode-frame%2Fdownload%2F%40babel%2Fcode-frame-7.14.5.tgz",
      "integrity": "sha1-I7CNdA6D9JxeWZRfvxtD6Au/Tts=",
      "dev": true,
      "dependencies": {
        "@babel/highlight": "^7.14.5"
      },
      "engines": {
        "node": ">=6.9.0"
      }
    },
    "node_modules/@babel/compat-data": {
      "version": "7.15.0",
      "resolved": "https://registry.nlark.com/@babel/compat-data/download/@babel/compat-data-7.15.0.tgz",
      "integrity": "sha1-Lbr4uFM0eWyvuw9Xk6kKL8AQsXY=",
      "dev": true,
      "engines": {
        "node": ">=6.9.0"
      }
    },
    // ......
}
生成Source Maps(使调试更容易)
开发总是离不开调试,如果可以更加方便的调试当然就能提高开发效率,不过打包后的文件有时候你是不容易找到出错了的地方对应的源代码的位置的,Source Maps就是来帮我们解决这个问题的
通过简单的配置后,Webpack在打包时可以为我们生成的source maps,这为我们提供了一种对应编译文件和源文件的方法,使得编译后的代码可读性更高,也更容易调试
在webpack的配置文件中配置source maps,需要配置devtool,它有以下四种不同的配置选项,各具优缺点,描述如下:
| devtool选项 | 配置结果 |
|---|---|
| source-map | 在一个单独的文件中产生一个完整且功能完全的文件。这个文件具有最好的source map,但是它会减慢打包文件的构建速度; |
| cheap-module-source-map | 在一个单独的文件中生成一个不带列映射的map,不带列映射提高项目构建速度,但是也使得浏览器开发者工具只能对应到具体的行,不能对应到具体的列(符号),会对调试造成不便; |
| eval-source-map | 使用eval打包源文件模块,在同一个文件中生成干净的完整的source map。这个选项可以在不影响构建速度的前提下生成完整的sourcemap,但是对打包后输出的JS文件的执行具有性能和安全的隐患。不过在开发阶段这是一个非常好的选项,但是在生产阶段一定不要用这个选项; |
| cheap-module-eval-source-map | 这是在打包文件时最快的生成source map的方法,生成的Source Map 会和打包后的JavaScript文件同行显示,没有列映射,和eval-source-map选项具有相似的缺点; |
全局和本地webpack安装
全局:npm install webpack@x.x.x -g
本地:npm install webpack@x.x.x --save-dev
只要是在终端中使用webpack都是使用全局webpack,但是使用npm run build命令则会先根据package.json中定义的使用本地或全局webpack
loader
loader是webpack中非常核心的概念
在开发中我们不仅仅有基本的js代码处理,我们也需要加载css、图片,也包括一些高级的将ES6转成ES5代码,将TypeScript转成ES5代码,将scss、less转成css,将.jsx、.vue文件转成js文件等等;
这些转换都需要使用npm安装对应的loader,然后在package.json中配置
css-loader、style-loader
安装命令npm install --save-dev css-loader、npm install --save-dev style-loader
webpack.config.js
module.exports = {
    module: {
        rules: [
            {
                test: /\.css$/i,
                // css-loader 只负责css文件的加载
                // style-loader 负责将样式添加到dom中,使其生效
                // 使用多个loader时,是从右向左读取下面数组的
                use: ["style-loader", "css-loader"],
            },
        ],
    },
}
main.js
// CSS
require("./css/normal.css");
less-loader
安装命令和上面css-loader一样
webpack.config.js
module.exports = {
    module: {
        rules: [
            {
                test: /\.less$/i,
                use: [
                    // compiles Less to CSS
                    'style-loader',
                    'css-loader',
                    'less-loader',
                ],
            },
        ],
    },
}
main.js
// less
require("./css/special.less");
url-loader
该方法可以指定一个limit(最大值),即小于此值的图片文件都会被编译成base64字符串形式
但是 v5 版本已经废弃,改成使用资源模块(asset module)了
如果在 v5 硬要用url-loader
module: {
        rules: [
            {
                test: /\.(png|jpg|gif)$/,
                use: [
                    {
                        loader: 'url-loader',
                        options: {
                            // 当图片小于limit时会将图片转换为base64格式
                            // 当图片大于limit时,需要使用file-loader模块进行加载
                            limit: 2000,
                            // 进行命名规范
                            name: 'img/[name].[hash:8].[ext]',
                            esModule:false	// v5
                        }
                    }
                ],
                type: 'javascript/auto'	// v5
            },
        ],
    },
注意
相应废弃的三个loader:、raw-loader、url-loader、file-loader
webpack5 已经支持资源模块,通过 type 参数进行配置,可选的参数有:asset/resource、asset/inline、asset/source、asset
module.exports = {
  module: {
    rules: [
      {
        test: /\.(png|jpg|gif)$/i,
        type: 'asset',
        parser: {
          dataUrlCondition: {
            maxSize: 8192
          }
        }
      },
    ],
  },
};
module.exports = {
  module: {
    rules: [
      {
        test: /\.png$/i,
        use: 'asset/resource'
      },
      {
        test: /\.ico$/i,
        use: 'asset/inline'
      },
      {
        test: /\.text$/i,
        use: 'asset/source'
      },
    ],
  },
};
相关文档查看:webpack asset model
babel(ES6 -> ES5)
Vue支持
在node_modules中需要vue的支持,以便于可以直接import 'vue';
npm安装Vue
与之前的npm安装相同
导入Vue
import Vue from "vue";
版本指定
如果不进行任何配置

vue有两个版本:runtime-only(代码中不可以有任何的template)、runtime-compiler(代码中可以有template,因为有compiler可以用于编译template)
可以进行如下配置:
module.exports = {
	// ...
    resolve: {
        // alias:别名
        alias: {
            'vue$': 'vue/dist/vue.esm.js'
        }
    }
}
Vue的使用方案
Vue中的el和template
当vue某一个组件(vue实例当成顶级组件)中同时出现el和template时,template中的内容会替换el挂载的节点
new Vue({
    el: '#app',
    template: `
        <div>
            <button @click="btnClick"></button>
        </div>
    `,
    data: {
        message: "hello webpack"
    },
    methods: {
        btnClick() {
            console.log('hello')
        }
    }
})
<div id="app"></div>

<!-- 这个元素会变成 -->

<div>
    <button @click="btnClick"></button>
</div>
抽离Vue中的template
main.js
import app from "./vue/app.vue";	//这里如果不加.vue的话打包能通过并且正常使用

new Vue({
    el: '#app',
    template: "<app/>",
    components: {
        app
    }
})
app.vue
<template>
  <div>
    <h2 class="title">{{message}}</h2>
    <button @click="btnClick">click</button>
  </div>
</template>

<script>
export default {
  name: "app",
  data() {
    return {
      message: "hello webpack"
    }
  },
  methods: {
    btnClick() {
      console.log('hello')
    }
  }
}
</script>

<style scoped>
  .title {
    color: green;
  }
</style>
配置vue-loader、vue-template-compiler、VueLoaderPlugin
.vue文件需要安装vue-loader、vue-template-compiler依赖包才能正确打包,不然webpack是不能识别的
前两者都可以使用前面npm方式安装,但是vue-loader在15版本中需要VueLoaderPlugin的支持,所以需要配置如下:
webpack.config.js
const path = require('path');
const VueLoaderPlugin = require('vue-loader/lib/plugin');

module.exports = {
    // ...
    plugins: [
        // make sure to include the plugin for the magic
        new VueLoaderPlugin(),
    ],
}
省略扩展名
配置之后的相关文件在使用或者引用时都可以省略文件扩展名
webpack.config.js
const path = require('path');
const VueLoaderPlugin = require('vue-loader/lib/plugin');
const webpack = require('webpack');

module.exports = {
	// ...
    resolve: {
        // 配置省略扩展名
        extensions: ['.js', '.vue'],
    }
}
版权声明——webpack.BannerPlugin
详情查看文档:webpack.BannerPlugin
打包HTML的plugin——HtmlWebpackPlugin
安装:npm install --save-dev html-webpack-plugin
该插件会执行以下工作:
1、自动生成—个index.html文件(可以指定模板来生成)
2、将打包的js文件,自动通过script标签插入到body中
由插件执行的工作2我们可以知道在开发目录的index.html中我们不需要引入bundle.js文件了
然后我们需要保留id位app的div标签来让vue正常运行,所以我们可以指定开发目录下的index.html作为模板
/index.html
<!DOCTYPE html>
<html lang="en">
<head>
    <meta charset="UTF-8">
    <title>Title</title>
</head>
<body>

<div id="app"></div>

</body>
</html>
webpack.config.js
const path = require('path');
const VueLoaderPlugin = require('vue-loader/lib/plugin');
const webpack = require('webpack');
const HtmlWebpackPlugin = require('html-webpack-plugin');

module.exports = {
    // ...
    plugins: [
        // ...
        new HtmlWebpackPlugin({
            template: 'index.html'
        }),
    ],
}
最后生成的部署目录下index.html文件:
<!DOCTYPE html>
<html lang="en">
<head>
    <meta charset="UTF-8">
    <title>Title</title>
	<script defer src="bundle.js"></script></head>
<body>

<div id="app"></div>

</body>
</html>
js压缩plugin——uglifyjs-webpack-plugin
由于webpack v5版本已经不支持了,所以这里我们使用terser-webpack-plugin
const TerserPlugin = require("terser-webpack-plugin");

module.exports = {
    // ...
    optimization: {
        minimize: true,
        minimizer: [new TerserPlugin()],
    },
}
本地服务器——webpack-dev-server
服务器中获取的相关网页内容都储存在内存里,而不会存储到磁盘里;也就是说dist里的文件并不会更新,所以需要在项目开发完成时进行webpack打包
官网的描述:
警告
webpack-dev-server 编译后不写入任何输出文件。相反,它将捆绑文件保存在内存中,并将它们视为安装在服务器根路径上的真实文件。如果您的页面希望在不同的路径上找到捆绑文件,您可以使用
devMiddleware.publicPath开发服务器配置中的选项进行更改。
输入安装命令后 v5 版本又是一堆报错:
npm WARN deprecated querystring@0.2.0: The
npm ERR! code 1
npm ERR! path D:\WebStorm\workspace\vue\II-04-webpack plugin\node_modules\utf-8-validate
npm ERR! command failed
npm ERR! command C:\WINDOWS\system32\cmd.exe /d /s /c node-gyp rebuild
npm ERR! gyp info it worked if it ends with ok
npm ERR! gyp info using node-gyp@7.1.2
npm ERR! gyp info using node@14.16.0 | win32 | x64
npm ERR! gyp info find Python using Python version 3.9.1 found at "D:\python\python.exe"
npm ERR! gyp ERR! find VS
npm ERR! gyp ERR! find VS msvs_version was set from command line or npm config
npm ERR! gyp ERR! find VS - looking for Visual Studio version 2017
npm ERR! gyp ERR! find VS VCINSTALLDIR not set, not running in VS Command Prompt
npm ERR! gyp ERR! find VS could not use PowerShell to find Visual Studio 2017 or newer, try re-running with '--loglevel silly' for more details
npm ERR! gyp ERR! find VS looking for Visual Studio 2015
npm ERR! gyp ERR! find VS - not found
npm ERR! gyp ERR! find VS not looking for VS2013 as it is only supported up to Node.js 8
npm ERR! gyp ERR! find VS
npm ERR! gyp ERR! find VS valid versions for msvs_version:
npm ERR! gyp ERR! find VS
npm ERR! gyp ERR! find VS **************************************************************
npm ERR! gyp ERR! find VS You need to install the latest version of Visual Studio
npm ERR! gyp ERR! find VS including the "Desktop development with C++" workload.
npm ERR! gyp ERR! find VS For more information consult the documentation at:
npm ERR! gyp ERR! find VS https://github.com/nodejs/node-gyp#on-windows
npm ERR! gyp ERR! find VS **************************************************************
npm ERR! gyp ERR! find VS
npm ERR! gyp ERR! configure error
npm ERR! gyp ERR! stack Error: Could not find any Visual Studio installation to use
npm ERR! gyp ERR! stack     at VisualStudioFinder.fail (D:\NodeJs\node_global\node_modules\npm\node_modules\node-gyp\lib\find-visualstudio.js:121:47)
npm ERR! gyp ERR! stack     at D:\NodeJs\node_global\node_modules\npm\node_modules\node-gyp\lib\find-visualstudio.js:74:16
npm ERR! gyp ERR! stack     at VisualStudioFinder.findVisualStudio2013 (D:\NodeJs\node_global\node_modules\npm\node_modules\node-gyp\lib\find-visualstudio.js:351:14)
npm ERR! gyp ERR! stack     at D:\NodeJs\node_global\node_modules\npm\node_modules\node-gyp\lib\find-visualstudio.js:70:14
npm ERR! gyp ERR! stack     at D:\NodeJs\node_global\node_modules\npm\node_modules\node-gyp\lib\find-visualstudio.js:372:16
npm ERR! gyp ERR! stack     at D:\NodeJs\node_global\node_modules\npm\node_modules\node-gyp\lib\util.js:54:7
npm ERR! gyp ERR! stack     at D:\NodeJs\node_global\node_modules\npm\node_modules\node-gyp\lib\util.js:33:16
npm ERR! gyp ERR! stack     at ChildProcess.exithandler (child_process.js:315:5)
npm ERR! gyp ERR! stack     at ChildProcess.emit (events.js:315:20)
npm ERR! gyp ERR! stack     at maybeClose (internal/child_process.js:1048:16)
npm ERR! gyp ERR! System Windows_NT 10.0.19042
npm ERR! gyp ERR! command "D:\\NodeJs\\node.exe" "D:\\NodeJs\\node_global\\node_modules\\npm\\node_modules\\node-gyp\\bin\\node-gyp.js" "rebuild"
npm ERR! gyp ERR! cwd D:\WebStorm\workspace\vue\II-04-webpack plugin\node_modules\utf-8-validate
npm ERR! gyp ERR! node -v v14.16.0
npm ERR! gyp ERR! node-gyp -v v7.1.2
npm ERR! gyp ERR! not ok

npm ERR! A complete log of this run can be found in:
npm ERR!     D:\NodeJs\node_cache\_logs\2021-09-26T07_47_37_070Z-debug.log
然后按照指引,我要下一个latest version of Visual Studio and including the “Desktop development with C++” workload
一顿操作之后,还要设置一个config配置npm config set msvs_version 2019;官网上是2017,但是我又报错了,然后按照报错我又改成了2019,然后就好了
最后为了执行我们最终的目的npm install --save-dev webpack-dev-server
wwbpack.config.js
module.exports = {
    // ...
    devServer: {
        static: './dist',	// This tells webpack-dev-server to serve the files from the dist directory on localhost:8080
        hot: true    // 是否实时更新
    },
}
然后使用命令webpack server --open,当然可以将这个命令放到package.json中
{
  // ...
  "scripts": {
    // ...
    "dev": "webpack server --open"
  },
  // ...
}
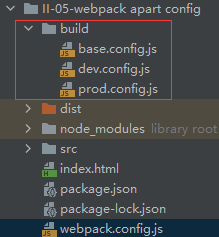
webpack配置文件的分离
大多数情况下开发环境和部署环境配置是不一样的,所以我们需要分离两个环境的配置文件
分成三个文件base(公共环境)、prod(生产环境)、dev(开发环境)
base.config.js
const path = require('path');
const VueLoaderPlugin = require('vue-loader/lib/plugin');
const webpack = require('webpack');
const HtmlWebpackPlugin = require('html-webpack-plugin');

module.exports = {
    // devtool: 'source-map',//配置生成Source Maps,选择合适的选项
    entry: './src/main.js',
    output: {
        path: path.resolve(__dirname + '/dist'),
        filename: 'bundle.js',
        // publicPath: 'dist/'
    },
    mode: 'development',
    module: {
        rules: [
            {
                test: /\.css$/i,
                // css-loader 只负责css文件的加载
                // style-loader 负责将样式添加到dom中,使其生效
                // 使用多个loader时,是从右向左读取下面数组的
                use: ["style-loader", "css-loader"],
            },
            {
                test: /\.less$/i,
                use: [
                    // compiles Less to CSS
                    'style-loader',
                    'css-loader',
                    'less-loader',
                ],
            },
            {
                test: /\.(png|jpg|gif)$/,
                use: [
                    {
                        loader: 'url-loader',
                        options: {
                            // 当图片小于limit时会将图片转换为base64格式
                            // 当图片大于limit时,需要使用file-loader模块进行加载
                            limit: 2000,
                            // 进行命名规范
                            name: 'img/[name].[hash:8].[ext]',
                            esModule: false
                        }
                    }
                ],
                type: 'javascript/auto'
            },
            {
                test: /\.m?js$/,
                exclude: /(node_modules|bower_components)/,
                use: {
                    loader: 'babel-loader',
                    options: {
                        presets: ['@babel/preset-env']
                    }
                }
            },
            {
                test: /\.vue$/,
                use: {
                    loader: "vue-loader"
                }
            },
        ],
    },
    plugins: [
        // make sure to include the plugin for the magic
        new VueLoaderPlugin(),
        new webpack.BannerPlugin({banner: '项目所有权益由Samuel-Luo拥有'}),
        new HtmlWebpackPlugin({
            template: 'index.html'
        }),
    ],
    resolve: {
        // 配置省略扩展名
        extensions: ['.js', '.vue'],
        // alias:别名
        alias: {
            'vue$': 'vue/dist/vue.esm.js'
        }
    }
}
prod.config.js
const TerserPlugin = require("terser-webpack-plugin");
const webpackMerge = require('webpack-merge');
const baseConfig = require('./base.config');

module.exports = webpackMerge(baseConfig, {
    optimization: {
        minimize: true,
        minimizer: [new TerserPlugin()],
    },
})
dev.config.js
const webpackMerge = require('webpack-merge');
const baseConfig = require('./base.config');

module.exports = webpackMerge(baseConfig, {
    devServer: {
        static: './dist',   // This tells webpack-dev-server to serve the files from the dist directory on localhost:8080
        hot: true    // 是否实时更新
    },
})
最后在package.json中配置命令
{
"scripts": {
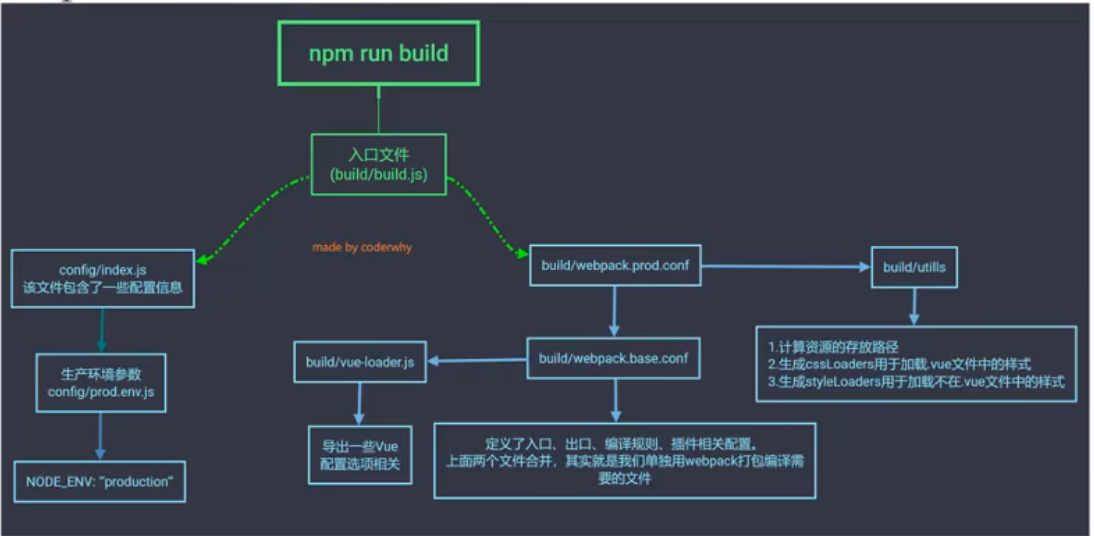
"build": "webpack --config ./build/prod.config.js",
"dev": "webpack server --open --config ./build/dev.config.js"
},
}
npm run build
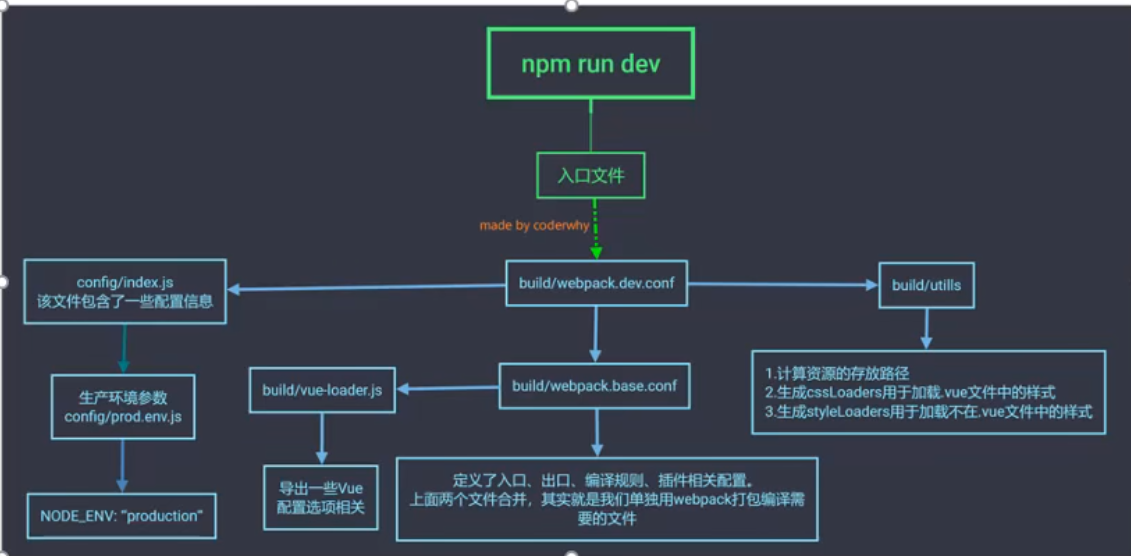
npm run dev
Vue-CLI
如果要开发一个大型项目,必然要使用Vue-CLI
它可以快速搭建Vue开发环境以及对应的webpack配置
它的使用前提为Node环境
ESLint(代码规范限制)——在编写代码时就检查代码规范格式
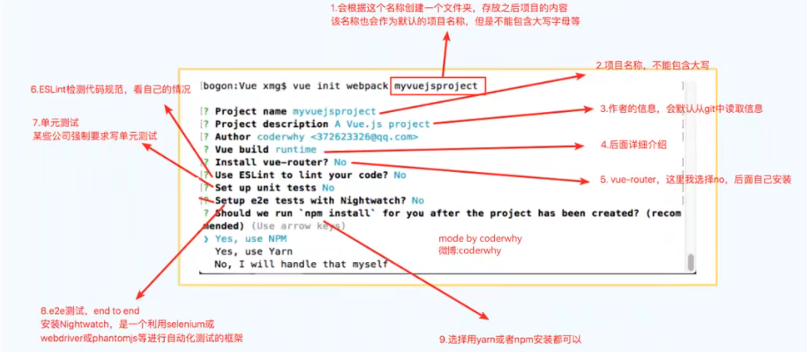
Vue-cli2
使用vue init webpack projectName创建项目
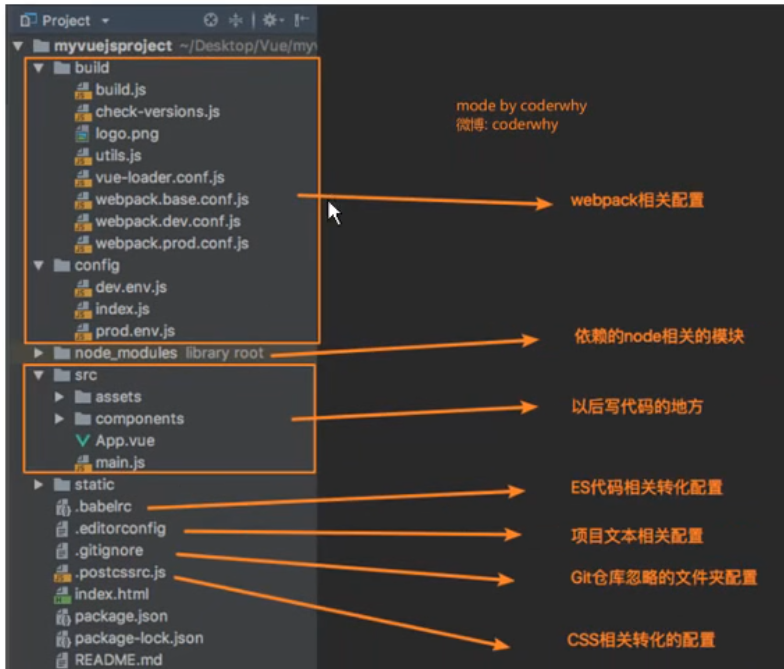
Vue-cli2相关配置
Vue-cli2目录
Vue-Eslint
会在代码保存后检查代码是否存在不规范的语法格式,并且会在控制台立即报错
在config文件夹中index.js里将useEslint设置为false就可以关闭
Vue-cli2 runtime-only、runtime-compiler

runtime-compiler:template -> ast(abstract syntax tree) -> render -> vdom -> UI
runtime-only:render -> vdom -> UI
runtime-only所需的Vue代码量更少,性能更高,因为减少了前端资源的大小
render
render: (createElement) => createElement(App);
// 1、这个函数的参数:标签,标签的属性,内容数组
createElement('h2', {class: 'box'}, ['hello world']);
// 2、这个函数的参数:组件
createElement(temp);

// 可以这样使用
new Vue({
  el: '#app',
  render: (createElement) => {
    return createElement('h2', {class: 'box'}, ['hello world']);
  }
})

const temp = {
    template: `<div>{{message}}</div>`,
    data() {
        return {
            message: "Hello World"
        }
    }
}
new Vue({
  el: '#app',
  render: (createElement) => {
    return createElement(temp);
  }
})
1、
2、
为什么render不用处理.vue文件中的template呢?
因为vue-template-compiler会将我们.vue文件中的template转换为render函数
console.log(temp); ->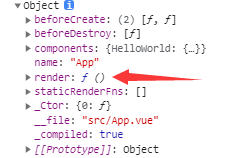
总结
前者在项目打包好后,直接调用render函数,适用于纯 .Vue 文件构建的项目

而后者在项目打包好后,需要进行解析再生成render函数再调用,适用初学者过渡

配置webpack.base.conf.js,起别名
在module.resolve.alias中配置一系列的目标路径
vue-cli2
module.exports = {
    resolve: {
        alias: {
            'vue$': 'vue/dist/vue.esm.js',
            '@': resolve('src'),
            'assets': resolve('src/assets'),
            'components': resolve('src/components'),
            'views': resolve('src/views'),
        }
    }
}
vue-cli3
module.exports = {
    resolve: {
        alias: {
            'vue$': 'vue/dist/vue.esm.js',
            '@': resolve('src'),
            'assets': resolve('@/assets'),
            'components': resolve('@/components'),
            'views': resolve('@/views'),
        }
    }
}
对于使用import导入的文件直接使用别名,然后对于src之类的路径在别名前面加~
例如 src="~assets/images/tabbar/1.png"、import TabBar from "components/tabbar/TabBar";
Vue-cli3
区别
1、vue-cli 3是基于webpack 4打造,vue-cli 2还是webapck 3
2、vue-cli 3的设计原则是“0配置”,移除的配置文件根目录下的,build和config等目录vue-cli 3提供了vue ui命令,提供了可视化配置,更加人性化
3、移除了static文件夹,新增了public文件夹,并且index.html移动到public中
4、使用指令vue create projectName创建项目
new Vue({
  render: h => h(App),
}).$mount('#app')

// 和 el: '#app' 没有区别,但是会优先执行 $mount,也就是 el 和 $mount 共存时,最终还是会执行 $mount
配置文件去哪了?
可以通过vue ui命令查看可视化vue界面,在导入项目后就可以
真正的config在node_modules -> @vue -> cli-service -> webpack.config.js
然后,在这个文件夹里又引入了./lib/Service.js
然后就可以找到./lib/config/下的prod.js、base.js
怎么设置自己的配置
在根目录下创建vue.config.js文件
module.exports = {
    // ...
}
这个文件名不能随意更改,因为vue会根据这个名字查找这个文件,然后将这个文件夹的配置自动合并(merge)到项目的webpack.config.js中
路由
路由(routing) 就是通过互联的网络把信息从源地址传输到目的地址的活动
外网数据是怎么识别并传输到内网ip的?

首先内网中的客户端将数据包传送给路由器,路由器解析数据包后发现,这个数据包是送给外网的。例如这个数据包的源IP:192.168.1.2,当路由器检测到这个数据包的目标IP是外网IP的时候,路由器中会生成一个唯一端口号对应192.168.1.2,再生成一个随机端口号对应这个唯一端口号,路由器会将数据包的源IP改成公网IP,发送到互联网上。接收数据时,会发送到路由器的随机端口号上,这时和原来生成的映射表进行匹配,再把数据包传送到内网客户端
阶段一:后端路由
早期的JSP就是典型的后端路由
优点
当我们页面中需要请求不同的路径内容时,交给服务器来进行处理,服务器渲染好整个页面,并且将页面返回给客户端,这种情况下渲染好的页面,不需要单独加载任何的js和css,可以直接交给浏览器展示,这样也有利于SEO的优化
缺点
一种情况是整个页面的模块由后端人员来编写和维护的
另一种情况是前端开发人员如果要开发页面,需要通过PHP和Java等语言来编写页面代码
而且通常情况下HTML代码和数据以及对应的逻辑会混在一起,编写和维护都是非常糟糕的事情
阶段二:前后端分离
后端只提供数据,前端负责渲染
随着Ajax的出现,有了前后端分离的开发模式
后端只提供API来返回数据,前端通过Ajax获取数据,并且可以通过JavaScript将数据渲染到页面中
这样做最大的优点就是前后端责任的清晰,后端专注于数据上,前端专注于交互和可视化上
并且当移动端(iOS/Android)出现后,后端不需要进行任何处理,依然使用之前的一套API即可
目前很多的网站依然采用这种模式开发
阶段三:前端路由(单页面富应用阶段)
整个网站只有一个html页面:SPA(single page web application)应用——单页应用
单页应用最主要的特点就是在前后端分离的基础上加了一层前端路由,由前端来维护一套路由规则
怎么改变URL而不发生页面刷新?
1、url的hash
window.location.hash = 'foo';
2、HTML5的history模式:pushState
window.history.pushState(data, title, url);
往历史记录堆栈顶部添加一条记录;data会在onpopstate事件触发时作为参数传递过去;title为页面标题,当前所有浏览器都会忽略此参数;url为页面地址,可选,缺省为当前页地址
window.history.replaceState(data, title, url);
替换当前记录
vue-router
vue-router是Vue.js官方的路由插件,它和vu的ejs是深度集成的,适合用于构建单页面应用
安装:npm install vue-router --save
router/index.js
// 配置路由相关的信息
import Router from 'vue-router'
import Vue from 'vue'
// 引入组件
import Home from "../components/Home";
import About from "../components/About";

// 1、通过Vue.use(插件)来安装插件
Vue.use(Router)

// 2、创建并导出VueRouter对象
export default new Router({
  // 配置路径和组件之间的映射关系
  routes: [
    {
      path: '/home',
      component: Home
    },
    {
      path: '/about',
      component: About
    }
  ]
})

// 3、将VueRouter对象传入到Vue实例中
main.js
import Vue from 'vue'
import App from './App'
import router from './router' //如果导入的路径是文件夹的话,会自动匹配该文件夹下的index.js

Vue.config.productionTip = false

new Vue({
  el: '#app',
  router,
  components: { App },
  template: '<App/>'
})
App.vue
<template>
  <div id="app">
    <router-link to="/home">首页</router-link>
    <router-link to="/about">关于</router-link>
    <router-view/>
  </div>
</template>

<script>
export default {
  name: 'App'
}
</script>
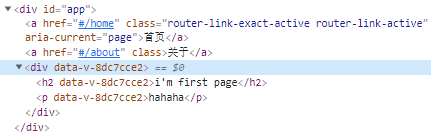
router-link是Vue注册的标签,默认最终会被渲染成a标签
router-view是相关路由渲染的结果,也就是对应组件div会替代router-view在页面上显示出来
重定向
routes: [
    {
        path: '/',
        redirect: '/home'
    }
    // 这样在页面加载之初就会自动跳转到/home路由
    // ...
]
路由模式
router/index.js
export default new Router({
  // 配置路径和组件之间的映射关系
  routes: [ /*...*/ ],
  // 配置路由模式(默认hash模式)
  mode: "history"
})
改成history模式后url链接就变得好看很多
router-link
该标签除了to属性,还有:
tag:规定最终渲染的元素标签类型,例如使用<router-link to="/about" tag="button">关于</router-link>最终这个标签会被渲染成button标签
replace:不会留下history记录,所以指定replace情况下,后退键不能返回上一个页面
active-class:给匹配成功路由的router-link渲染的元素设置一个class,如果不加则使用默认名称.router-link-active;如果不想在多个router-link上配置相同的active-class则可以在路由配置时添加linkActiveClass属性,然后赋值
router/index.js
export default new Router({
  // ...
  linkActiveClass: 'active'
})
通过代码修改路由
App.vue
<template>
  <div id="app">
    <button @click="homeClick">首页</button>
    <button @click="aboutClick">关于</button>
    <router-view/>
  </div>
</template>
<script>
export default {
  name: 'App',
  methods: {
    homeClick() {
      // 通过代码方式修改路由
      // 不要使用history.pushState(),因为会越过vue的检测,页面会跳转失败
      // 1. this.$router.push('/home');
      this.$router.replace('/home');
      console.log('homeClick');
    },
    aboutClick() {
      this.$router.push('/about');
      console.log('aboutClick');
    }
  }
}
</script>
this.$route
这个this.$route拿到的是routers数组中当前活跃的路由
routes: [
    {
        path: '/',
        redirect: '/home'
    },
    {
        path: '/home',
        component: Home
    },
    {
        path: '/about',
        component: About
    },
    {
        path: '/user/:uid',
        component: User
    }
],
this.$router
这个要与上面区分开来,这个拿到的是整个导出的Router对象
export default new Router({
  // 配置路径和组件之间的映射关系
  routes: [],
  mode: "history",
  linkActiveClass: 'active'
})
url带参(动态路由)
当我们url中需要带参数时,我们需要配置router中的path
router/index.js
export default new Router({
  // 配置路径和组件之间的映射关系
  routes: [
    {
      path: '/user/:uid',
      component: User
    }
  ]
})
动态路由传参
App.js
<template>
  <div id="app">
    <!-- 这里将data中的userid加到url后 -->
    <router-link :to="'/user/' + userid" tag="button">用户</router-link>
    <router-view/>
  </div>
</template>
<script>
export default {
  name: 'App',
  data() {
    return {
      userid: 'lisi'
    }
  }
}
</script>
获取动态路由中的动态参数
通过this.$router.params.uid可以拿到当前路由中的参数
同时也可以在template中直接获取
<h2>{{$route.params.uid}}</h2>
<!-- 在template中上下文默认为this,所以这里不用加this -->
路由的懒加载
业务代码常常会很多,这样加载会影响页面的加载
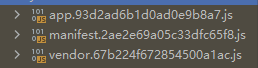
第一个文件:当前应用程序开发的所有代码(业务代码)
第二个文件:为打包的代码做底层支撑
第三个文件:vendor(提供商、第三方)
我们想做到用到时再加载(懒加载),也就是将不同的路由对应的组件分割到不同的代码块,当路由被访问时才加载对应的组件,这样子用户在初次进入web应用时不会在空白页面停留过长时间
路由懒加载使用方法:
router/index.js
routes: [
    {
      path: '/home',
      component: () => import('../components/Home')
    },
    {
      path: '/about',
      component: () => import('../components/About')
    }
  ],
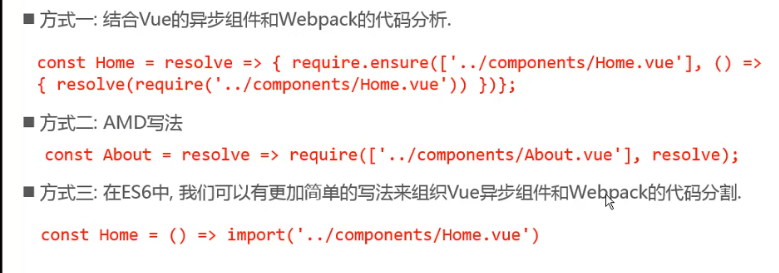
三种懒加载方式(建议第三种)
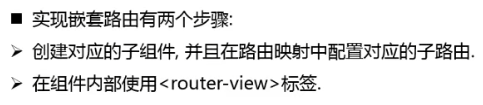
嵌套路由
比如在home页面中,还需要再细分出news和message路由,即/home/news、/home/message
router/index.js
routes: [
    // ...
    {
        path: '/home',
        component: Home,
        children: [
            {
              // 默认显示消息,如果要保留子路由在离开时的情况就要使用keep-alive
              path: '',
              redirect: 'news'
            },
            {
              path: 'news',
              component: () => import('../components/HomeNews')
            },
            {
              path: 'message',
              component: () => import('../components/HomeMessage')
            }
        ]
    }
],
Home.vue
<template>
  <div>
    <h2>i'm first page</h2>
    <p>hahaha</p>
    <router-view></router-view>
    <router-link to="/home/news" tag="button">news</router-link>
    <router-link to="/home/message" tag="button">message</router-link>
  	<!-- 这里的to属性最好使用绝对路由路径 -->
  </div>
</template>
传递参数的方式
params类型
这一方法在之前动态路由已经讲过
query类型:
对象中使用query的key作为传递方式,例如:
/router?id=123
App.vue
<template>
  <div id="app">
    <router-link to="/home" tag="button" replace>首页</router-link>
    <router-link to="/about" tag="button">关于</router-link>
    <router-link :to="'/user/' + userid" tag="button">用户</router-link>
    <router-link :to="{path: '/profile', query: {name: 'lsn', age: 18, sex: 'male'}}" tag="button">档案</router-link>
	<!-- 其实上面三个to也能使用obj方式跳转 -->

    <router-view/>
  </div>
</template>
Profile.vue
<template>
  <div>
    <h2>i'm profile</h2>
    <h2>{{$route.query}}</h2>
    <!-- 通过这个方法访问url中的query对象 -->
  </div>
</template>
URL
一个URL=协议:[//服务器地址[:端口号]][/资源层级UNIX文件路径]文件名[?查询][#片段ID]
一般我们服务器地址默认端口号为80
wikipedia
URI = scheme:[//authority]path[?query][#fragment]
authority = [userinfo@]host[:port]

userinfo子组件,它可能由用户名和一个冒号(:)再加可选密码组成,后面是一个at符号(@)。出于安全原因,不建议在userinfo子组件中使用username:password格式。应用程序不应该将userinfo子组件中第一个冒号(:)之后的任何数据呈现为明文,除非冒号之后的数据是空字符串(表示没有密码)
router和route的由来
通过源码可知,Vue.use(VueRouter)其实是调用了VueRouter.install()
并且可以知道router-link和router-view全都在vue-router源码下install.js文件里被注册在全局的Vue上
所有的组件都继承自Vue的原型
这样子后,可以知道所有注册在Vue原型上的内容都可以直在全局对象或组件中访问
全局导航守卫
我们可以通过在组件中created函数里使用document.title = "xxx";更改page的title;但是这样比较麻烦,所以我们使用全局导航守卫
可以在route定义时加入meta对象(表示元数据)
routes: [
    {
        path: '/',
        redirect: '/home'
    },
    {
        path: '/home',
        component: Home,
        meta: {
            title: 'home'
        },
        children: [
          // ...
        ]
    },
    {
        path: '/about',
        component: About,
        meta: {
            title: 'about'
        },
    }
],
然后我们在Router对象中使用beforeEach((to, from, next) => {...})函数
这个函数需要传入一个函数,传入函数的参数to、from都是Route对象,代表从from跳转到to
官方回答
每个守卫方法接收三个参数:
to: Route: 即将要进入的目标路由对象
from: Route: 当前导航正要离开的路由
next: Function: 一定要调用该方法来 resolve 这个钩子。执行效果依赖next方法的调用参数。
next(): 进行管道中的下一个钩子。如果全部钩子执行完了,则导航的状态就是 confirmed (确认的)。
next(false): 中断当前的导航。如果浏览器的 URL 改变了 (可能是用户手动或者浏览器后退按钮),那么 URL 地址会重置到from路由对应的地址。
next('/')或者next({ path: '/' }): 跳转到一个不同的地址。当前的导航被中断,然后进行一个新的导航。你可以向next传递任意位置对象,且允许设置诸如replace: true、name: 'home'之类的选项以及任何用在router-link的toprop 或router.push中的选项。
next(error): (2.4.0+) 如果传入next的参数是一个Error实例,则导航会被终止且该错误会被传递给router.onError()注册过的回调。确保
next函数在任何给定的导航守卫中都被严格调用一次。它可以出现多于一次,但是只能在所有的逻辑路径都不重叠的情况下,否则钩子永远都不会被解析或报错
这个时候我们需要访问meta数据了
vueRouter.beforeEach((to, from, next) => {
  // 从from跳转到to
  document.title = to.meta.title;
  next();	// next是一个函数,必须调用至少一次
})
因为如果存在子路由的话,title会在Router.matched中出现,不存在子路由则在Router.meta和Router.matched中都会出现;所以这里我们直接使用matched中的title
matched是一个数组:
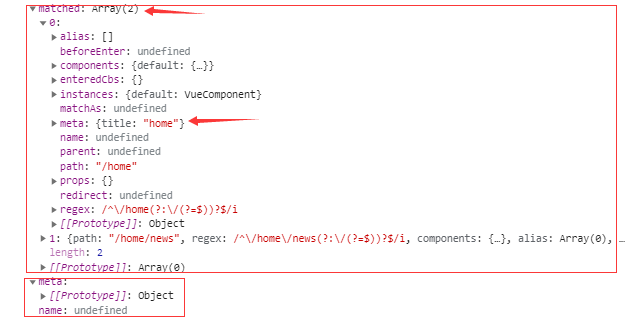
vueRouter.beforeEach((to, from, next) => {
  // 从from跳转到to
  document.title = to.matched[0].meta.title;
  console.log(to);
  next();
})
后置钩子
其实除了导航守卫(前置钩子),还有后置钩子
一个在跳转前触发,一个在跳转后触发
// 后置钩子
vueRouter.afterEach((to, from) => {
  console.log('---');
})
这些钩子不会接受
next函数也不会改变导航本身
路由独享的守卫
你可以在路由配置上直接定义 beforeEnter 守卫:
const router = new VueRouter({
  routes: [
    {
      path: '/foo',
      component: Foo,
      beforeEnter: (to, from, next) => {
        // ...
      }
    }
  ]
})
这些守卫与全局前置守卫的方法参数是一样的
组件内的守卫
最后,你可以在路由组件内直接定义以下路由导航守卫:
beforeRouteEnterbeforeRouteUpdate(2.2 新增)beforeRouteLeave
const Foo = {
  template: `...`,
  beforeRouteEnter(to, from, next) {
    // 在渲染该组件的对应路由被 confirm 前调用
    // 不!能!获取组件实例 `this`
    // 因为当守卫执行前,组件实例还没被创建
  },
  beforeRouteUpdate(to, from, next) {
    // 在当前路由改变,但是该组件被复用时调用
    // 举例来说,对于一个带有动态参数的路径 /foo/:id,在 /foo/1 和 /foo/2 之间跳转的时候,
    // 由于会渲染同样的 Foo 组件,因此组件实例会被复用。而这个钩子就会在这个情况下被调用。
    // 可以访问组件实例 `this`
  },
  beforeRouteLeave(to, from, next) {
    // 导航离开该组件的对应路由时调用
    // 可以访问组件实例 `this`
  }
}
beforeRouteEnter 守卫 不能 访问 this,因为守卫在导航确认前被调用,因此即将登场的新组件还没被创建
不过,你可以通过传一个回调给 next来访问组件实例。在导航被确认的时候执行回调,并且把组件实例作为回调方法的参数
beforeRouteEnter (to, from, next) {
  next(vm => {
    // 通过 `vm` 访问组件实例
  })
}
注意 beforeRouteEnter 是支持给 next 传递回调的唯一守卫。对于 beforeRouteUpdate 和 beforeRouteLeave 来说,this 已经可用了,所以不支持传递回调,因为没有必要了。
beforeRouteUpdate (to, from, next) {
  // just use `this`
  this.name = to.params.name
  next()
}
这个离开守卫通常用来禁止用户在还未保存修改前突然离开。该导航可以通过 next(false) 来取消
beforeRouteLeave (to, from, next) {
  const answer = window.confirm('Do you really want to leave? you have unsaved changes!')
  if (answer) {
    next()
  } else {
    next(false)
  }
}
完整的导航解析流程
- 导航被触发
- 在失活的组件里调用
beforeRouteLeave守卫 - 调用全局的
beforeEach守卫 - 在重用的组件里调用
beforeRouteUpdate守卫 (2.2+) - 在路由配置里调用
beforeEnter - 解析异步路由组件
- 在被激活的组件里调用
beforeRouteEnter - 调用全局的
beforeResolve守卫 (2.5+) - 导航被确认
- 调用全局的
afterEach钩子 - 触发 DOM 更新
- 调用
beforeRouteEnter守卫中传给next的回调函数,创建好的组件实例会作为回调函数的参数传入
keep-alive
keep-alive是Vue内置的组件,可以使被包含的组件保留状态,避免重新渲染
它有两个属性:
include、exclude(两个属性值都是字符串或正则表达式,一个是匹配需要被缓存的组件,一个是匹配不需要被缓存的组件)
router-view也是一个组件,如果直接被包在keep-alive里面,所有路由匹配到的视图组件都会被缓存
我们把router-view标签放到keep-alive中,这样就可以保存组件的状态
被keep-alive的组件里的created和destroyed两个生命周期函数只会触发一次
App.vue
<template>
  <div id="app">
	<!-- ... -->
    <keep-alive>
      <router-view/>
    </keep-alive>
	<!-- ... -->
  </div>
</template>
然后我们需要在Home组件中使用activated和beforeRouterLeave函数
Home.vue
<template>
  <div>
    <router-view></router-view>
    <router-link to="/home/news" tag="button">news</router-link>
    <router-link to="/home/message" tag="button">message</router-link>
  </div>
</template>
<script>
export default {
  name: "Home",
  data() {
    return {
      path: '/home/news'
    }
  },
  activated() {
    console.log('home activated');
    if (this.$route.path != this.path) this.$router.push(this.path);
    // 使用this.path将上次访问路由恢复,或者使路由进入默认状态
    // 使用if进行判断是因为:如果当前路由和push的路由相同的话Vue会报错(但不影响使用)
  },
  // deactivated() {
  //   console.log('home deactivated');
  //   this.path = this.$route.path;
  //   // 在调用这个函数时,$route已经改变了
  // },
  beforeRouteLeave(to, from, next) {
    console.log(this.$route.path);
    this.path = this.$route.path;
    // 记录离开时的路由
    next();
  }
}
</script>
activated和deactivated函数只有该组件被keep-alive保留状态时才能被调用
使用exclude排除组件(字符串中逗号后不要加空格)
App.vue
<template>
  <div id="app">
    <keep-alive exclude="Profile,User">
      <router-view/>
    </keep-alive>
  </div>
</template>
Vuex
Vuex是专门为Vue.js应用程序开发的状态管理模式
当多个组件需要共享状态或者组件树最底层组件需要修改顶层需要的状态时,我们需要一个公共的、实时的、响应式的状态对象
Vuex状态管理包含以下几个部分(单向数据流):
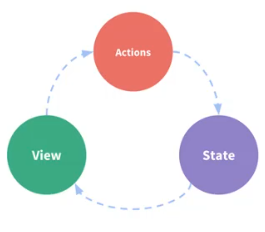
State定义的变量通过View展示,View中绑定的Actions又能对State中的变量进行操作;这样就能形成一个闭环
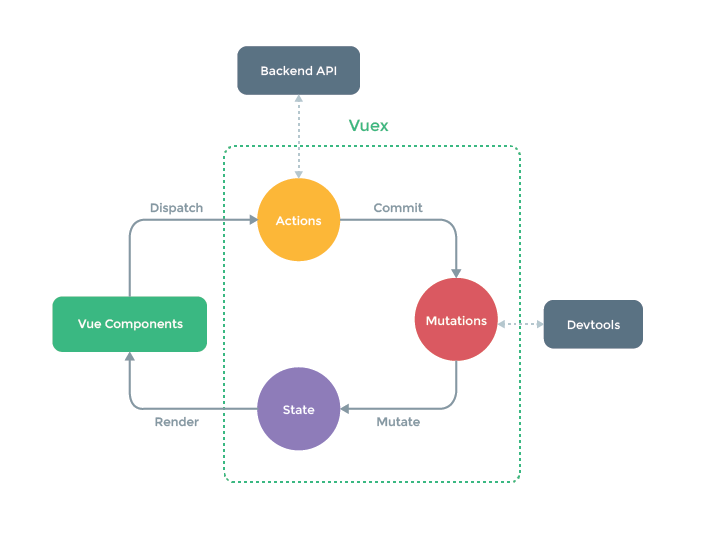
上面是官方给出的Vuex管理流程图,也是官方建议的使用方法
Devtools是Vue开发的一个浏览器组件(可以直接在Chrome商店中下载),用于跟踪记录图中Mutate行为,便于开发时调试和记录(所以不建议在VueComponent中直接操作State,而是通过Mutations操作State)
但是我们可以在VueComponent中操作Mutations或者Actions;前者是进行同步操作方法的集合,后者是进行异步操作方法的集合
图中Backend API意思是Actions一般用来和后台进行数据交互
Vuex安装和创建
我们需要使用webpack安装vuex,npm install vuex --save
然后在项目的src中创建store文件夹,在文件夹下创建index.js(和router目录一样)
然后文件内容也是按照router的方式
index.js
import Vue from 'vue'
import Vuex from 'vuex'

// 使用插件
Vue.use(Vuex);

export default new Vuex.Store({
  state: {},
  mutations: {},
  actions: {},
  getters: {},
  modules: {}
})
Vuex使用
这样子后我们就可以在main.js里引入这个store然后注册到Vue实例中
main.js
// ...
import store from './store'

new Vue({
  // ...
  store,
})
我们一般创建Vuex的Store对象,使用Vuex.Store()方法;这个方法接收一个对象,用来定义状态对象的
{
    state: {}	//保存状态
	mutations: {}	//操作方法(同步)
	actions: {}	//操作方法(异步)
	getters: {}	//类似于计算属性
	modules: {}	//模块
}
State
用于存储公共的状态的对象。这些对象都是响应式的,State中的数据发生改变时,Vue组件会自动更新
State单一状态树
Vuex提出使用单一状态树(单一数据源):即使用一个store对象,而不建议使用多个
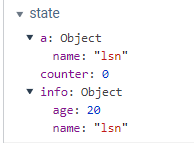
观察者模式
State中每个属性都对应了一个Dep,每个Dep对应了一些Watcher,当该属性变化后,Dep就会触发对应的每个Watcher引起组件中的内容改变
state: {
    info: {
        name: 'lsn', Dep -> [Watcher, Watcher]
        age; 20,	Dep -> [Watcher]
    }
}
Getters
获取异变后的state属性,类似于计算属性
和computed一样,使用一个函数并且返回值来设置getters
这里默认会传两个参数:state、getters(当前Getters对象)
getters: {
    powerCounter(state) {
      return state.counter**2;
    }
},
然后可以直接使用$store.getters.powerCounter访问改属性
如果想要动态一些逻辑的话需要返回一个函数
getters: {
    more(state) {
        return function (age) {
            return state.students.filter(s => s.age > age);
        }
    }
}
然后调用时直接使用就好了$store.getters.more(8)
Mutations
Vuex更新Store状态的唯一方式
用于存储操作状态对象的方法,在使用时默认会传入state对象
mutations: {
    increment(state) { state.counter++; }
}
在使用时我们不要直接访问mutations,而是使用commit函数
this.$store.commit('increment');
这样就会调用mutations里定义的increment函数了,而且commit函数可以相继传入额外的参数以供mutations里某一特定方法使用
this.$store.commit('increment', count);
mutations: {
    increment(state, count) {
        state.counter += count;
    }
}
这些额外的参数被称为payload(负载)
对于这些额外的参数,我们除了可以用上面的普通封装方法之外还能进行特殊封装
this.$store.commit({
    type: 'increment',
    count
})
这时候mutations中increment接收到的count就不一样了
mutations: {
    increment(state, payload) {
        console.log(payload);
    }
}
// { type: 'increment', count: 10 }
响应规则(添加、删除响应属性)
如果我们在Mutations函数中直接使用state添加属性,则添加的这个属性将不会被响应式的跟踪
所以我们需要使用Vue提供的Vue.set()函数来添加响应式属性,例如:
Vue.set(state.info, 'address', 'Los Angeles');
如果我们需要删除响应式的属性,可以使用Vue.delete();函数,例如:
Vue.delete(state.info, 'age');
常量类型
我们可以维护一个常量池来使用我们的Mutations函数
mutations.types.js
export const INCREMENT = 'increment';
export const DECREMENT = 'decrement';
store/index.js
import {DECREMENT, INCREMENT} from "./mutations.types";
mutations: {
    [INCREMENT](state) {
        state.counter++;
    },
},
App.vue
import {DECREMENT, INCREMENT} from "./store/mutations.types";
methods: {
    add() {
        // this.$store.commit('increment');
        this.$store.commit(INCREMENT);
    },
}
异步操作
在Mutations里的异步操作不会被DevTools跟踪到变化,但是被修改的对象确实改变了,而且会响应式的修改
所以我们需要使用Actions
Actions
和Mutations一样,不过是异步操作的方法集合
Actions函数接受的是一个context对象(上下文对象)
actions: {
    // context == store
    // 但是我们还是要使用Mutations去进行变量的修改
    updateInfo(context) {
        setTimeout(() => {
            context.commit('updateInfo');
        }, 1000)
    }
},
这样子就是严格按照Vue官网的Vuex流程来的
我们调用的时候需要使用dispatch()方法,和commit()方法一样
methods: {
    changeName() {
      this.$store.dispatch('updateInfo');
    }
}
如果想要传更多参数(负载),和commit()一样直接在后面依次加上就好了
如果想在Actions函数里使用回调:
updateInfo(context, payload) {
    return new Promise((res, rej) => {
        setTimeout(() => {
            context.commit('upodateInfo');
            console.log(payload);
            res('111');
        }, 1000);
    })
}
Modules
为了避免store对象在大型项目中变得十分臃肿,Vuex允许将store分割成很多模块
定义模块
const moduleB = {
    state: {},
    mutations: {},
    actions: {},
    getters: {}
}
modules: {
    a: {
        state: {},
        mutations: {},
        actions: {},
        getters: {}
    },
    b: moduleB
}
最终modules中的对象都会被放到store的相应对象中去
比如上面模块中的state就会被放到store中的state中,不过是以整个模块的名字作为键值
所以我们类比到其他的对象例如Mutations、Actions、Getters都会是这样,但是在commit的时候Vuex会优先查找store中的同名函数,如果没找到再会去modules中找
所以我们在调用模块中的Mutations函数时和我们store中Mutations对象的调用一样
this.$store.commit('updateName', '123');
在模块中的Getter有三个默认参数:state、getters、rootState(store中的state对象)
但是模块的Actions中commit方法只针对当前模块的mutations(不包括store对象),在其默认传参context中有很多参数包括:rootState、rootGetters…,值得去尝试一下
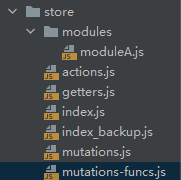
项目结构

目录结构优化后:
Axios
网络模块封装
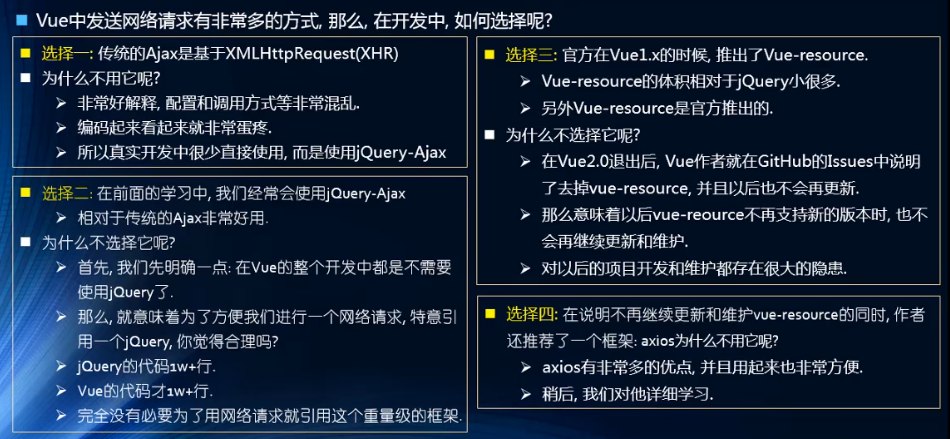
优点
- 在浏览器中发送XMLHttpRequest请求
- 在node.js中发送http请求
- 支持Promise API
- 拦截请求和响应
- 转换请求和响应数据
- …
使用
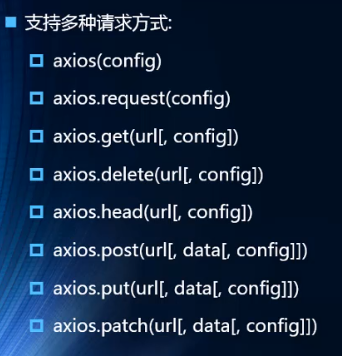
使用npm安装axios:npm install axios --save
导入axios后就可以使用了
import axios from "axios";

axios({
  // 默认get请求
  url: 'http://123.207.32.32:8000/home/multidata',
  // 和之前一样使用method修改请求方式
  method: 'get'
}).then(res => {
  console.log(res);
});
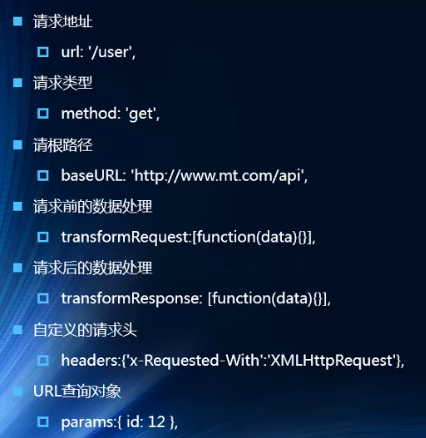
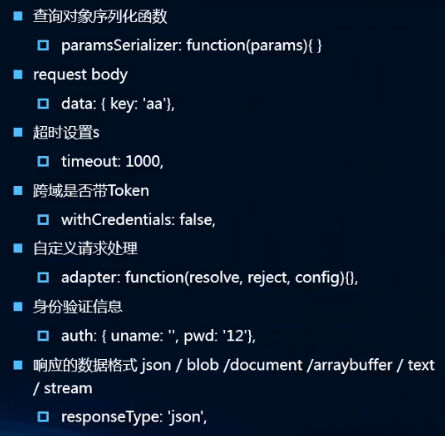
对于url上的参数既可以像以前一样放到url上,也可以放在params中
axios({
  url: 'http://123.207.32.32:8000/home/data',
  // 针对get请求参数的拼接
  params: {
    type: 'pop',
    page: 1
  }
}).then(res => {
  console.log(res);
});
发送并发请求
axios.all([axios({
  url: 'http://123.207.32.32:8000/home/multidata'
}), axios({
  url: 'http://123.207.32.32:8000/home/data',
  params: {
    type: 'sell',
    page: 5
  }
})]).then(results => {
  console.log(results);
})
axios.all()返回的是一个数组,使用axios.spread可以将数组展开为res1、res2
axios.all([axios({
  url: 'http://123.207.32.32:8000/home/multidata'
}), axios({
  url: 'http://123.207.32.32:8000/home/data',
  params: {
    type: 'sell',
    page: 5
  }
})]).then(axios.spread((res1, res2) => {
  console.log(res1);
  console.log(res2);
}))
BaseURL
可以使用baseURL规定请求url的根路径
const baseURL = "http://123.207.32.32:8000/";

axios.all([axios({
  baseURL,
  url: 'home/multidata'
}), axios({
  baseURL,
  url: 'home/data',
  params: {
    type: 'sell',
    page: 5
  }
})]).then(results => {
  console.log(results);
})
Timeout
设定请求超时时间
axios({
  baseURL,
  url: 'home/multidata',
  timeout: 5000
})
全局配置
axios.defaults.baseURL = "http://123.207.32.32:8000/";
axios.defaults.timeout = 5000;
创建axios实例
可以使用多个实例进行独立封装,优化了全局只有一个baseURL的缺点
const instance1 = axios.create({
  baseURL: "http://123.207.32.32:8000/",
  timeout: 5000
})
instance1({
  url: 'home/multidata'
}).then(res => {
  console.log(res);
});

const instance2 = axios.create({
  baseURL: '123',
  timeout: 10000
})
instance2({
  url: 'xxx'
}).then(res => {
  console.log(res);
})
模块封装
防止依赖第三方框架有依赖过高,我们需要封装一层
network/request.js
import axios from 'axios';

export function request(config, success, failure) {
  // 1、创建实例
  const instance = axios.create({
    baseURL: 'http://123.207.32.32:8000/',
    timeout: 5000
  })
  instance(config)
    .then(res => success(res))
    .catch(err => failure(err));
}
但是我们可以更好的封装
network/request.js
export function BeastRequest(config) {
  return new Promise((resolve, reject) => {
    // 1、创建实例
    const instance = axios.create({
      baseURL: 'http://123.207.32.32:8000/',
      timeout: 5000
    })
    instance(config)
      .then(res => resolve(res))
      .catch(err => reject(err));
  })
}
再优化一下
network/request.js
export function BBeastRequest(config) {
  return new Promise((resolve, reject) => {
    // 1、创建实例
    const instance = axios.create({
      baseURL: 'http://123.207.32.32:8000/',
      timeout: 5000
    })
    return instance(config);
  })
}
拦截器
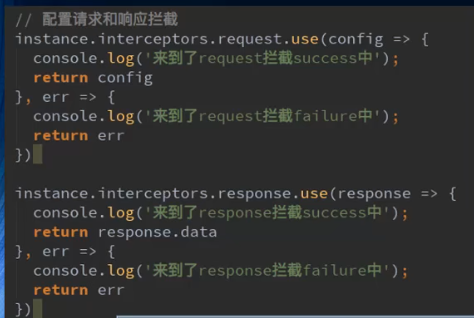
拦截器有两种:request拦截器、response拦截器
// 拦截器
instance.interceptors.request.use(config => {
    console.log(config);
    // 每次请求需要进行的一些预处理
    return config;
}, err => {
    console.log(err);
});

instance.interceptors.response.use(res => {
    console.log(res);
    return res;
}, err => {
    console.log(err);
});
在request拦截器的onFulfilled函数中,我们需要把config参数return回去,不然request请求将拿不到config信息;同理,response拦截器的onFulfilled函数中的res页要return返回
项目实战
TabBar封装
详情请看webstorm代码


 324
324


 被折叠的 条评论
为什么被折叠?
被折叠的 条评论
为什么被折叠?
 到【灌水乐园】发言


