


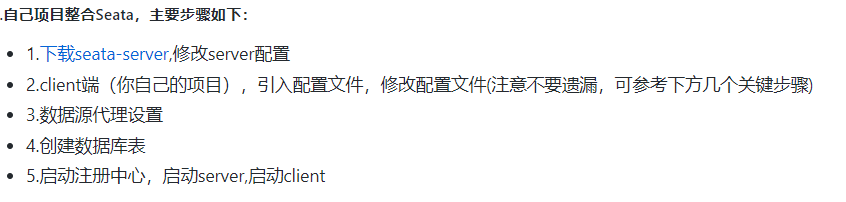
一、事务
1.1 概念
事务控制必须保证同一个连接,spring打个注解就解决了,但分布式里控制不住,可能是在自己微服务里同时调用三个微服务,不同数据库不同虚拟机不同ip地址,肯定控制不住。
解决方法:
1. 把关联性比较强的几个表放在一个微服务里,spring打个注解就可以用了

2. 分布式用seata解决
//seata中文网
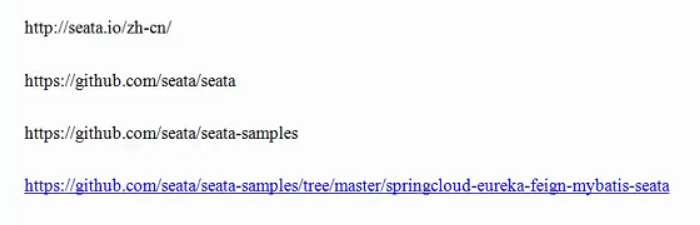
http://seata.io/zh-cn/
https://github.com/seata/seata
https://github.com/seata/seata-samples
//配置事务文档
https://github.com/seata/seata-samples/tree/master/springcloud-eureka-feign-mybatis-seata
1.2 准备工作
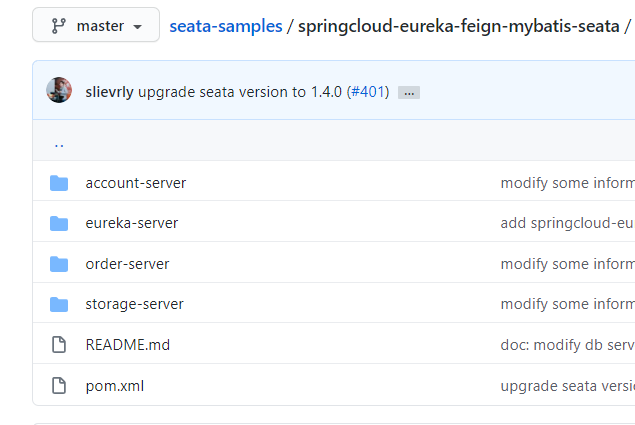
1.2.0 下载测试项目(网址在上面)
1.2.1 调试版本,加seata依赖

老版本的测试jar

要先把它的内置版本排除掉,再添加自己用的版本
 <dependency>
            <groupId>org.springframework.boot</groupId>
            <artifactId>spring-boot-starter-test</artifactId>
            <scope>test</scope>
            <exclusions>
                <exclusion>
                    <groupId>org.junit.vintage</groupId>
                    <artifactId>junit-vintage-engine</artifactId>
                </exclusion>
            </exclusions>
        </dependency>
改cloud的版本

1.2.3 调试环境
maven,bean自动注入error–>warning,jdk
1.2.4 修改springboot基本配置文件

1.2.5
把demo的每个微服务调通,每个操作一个dao
二、配置seata
2.1 术语
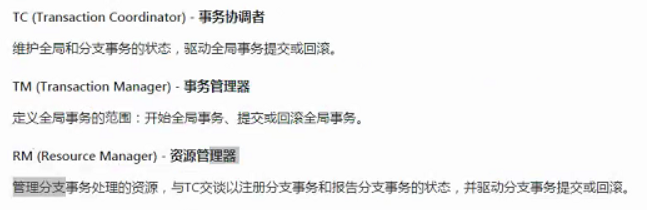
整个事务有一个XID编号,通过同一个XID在不同服务器里传播
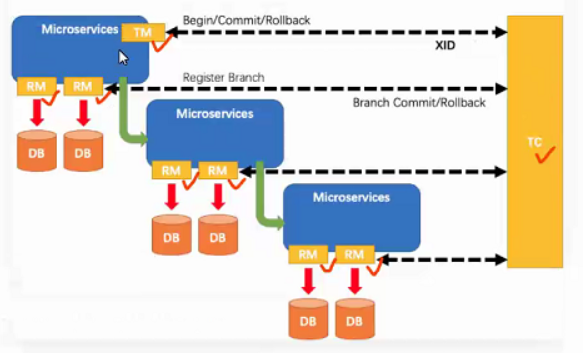
出现错误会真正的修改了数据库,只不过再进行反向操作,把数据库恢复原状态
2.2 seata server端配置信息修改
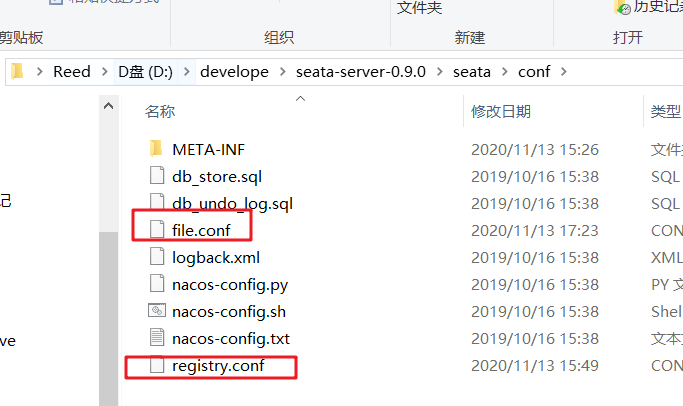
2.2.1 file.conf
里面有事务组配置,锁配置,事务日志存储等相关配置信息,由于此demo使用db存储事务信息,我们这里要修改store中的配置:
## transaction log store
store {
  ## store mode: file、db
  mode = "db"   修改这里,表明事务信息用db存储

  ## file store 当mode=db时,此部分配置就不生效了,这是mode=file的配置
  file {
    dir = "sessionStore"

    # branch session size , if exceeded first try compress lockkey, still exceeded throws exceptions
    max-branch-session-size = 16384
    # globe session size , if exceeded throws exceptions
    max-global-session-size = 512
    # file buffer size , if exceeded allocate new buffer
    file-write-buffer-cache-size = 16384
    # when recover batch read size
    session.reload.read_size = 100
    # async, sync
    flush-disk-mode = async
  }

  ## database store  mode=db时,事务日志存储会存储在这个配置的数据库里
  db {
    ## the implement of javax.sql.DataSource, such as DruidDataSource(druid)/BasicDataSource(dbcp) etc.
    datasource = "dbcp"
    ## mysql/oracle/h2/oceanbase etc.
    db-type = "mysql"
    driver-class-name = "com.mysql.jdbc.Driver"
    url = "jdbc:mysql://116.62.62.26/seat-server"  修改这里
    user = "root"  修改这里
    password = "root"  修改这里
    min-conn = 1
    max-conn = 3
    global.table = "global_table"
    branch.table = "branch_table"
    lock-table = "lock_table"
    query-limit = 100
  }
}
由于此demo我们使用db模式存储事务日志,所以,我们要在数据库seat-server中创建三张表:global_table,branch_table,lock_table,建表语句
-- the table to store GlobalSession data
drop table if exists `global_table`;
create table `global_table` (
  `xid` varchar(128)  not null,
  `transaction_id` bigint,
  `status` tinyint not null,
  `application_id` varchar(32),
  `transaction_service_group` varchar(32),
  `transaction_name` varchar(128),
  `timeout` int,
  `begin_time` bigint,
  `application_data` varchar(2000),
  `gmt_create` datetime,
  `gmt_modified` datetime,
  primary key (`xid`),
  key `idx_gmt_modified_status` (`gmt_modified`, `status`),
  key `idx_transaction_id` (`transaction_id`)
);

-- the table to store BranchSession data
drop table if exists `branch_table`;
create table `branch_table` (
  `branch_id` bigint not null,
  `xid` varchar(128) not null,
  `transaction_id` bigint ,
  `resource_group_id` varchar(32),
  `resource_id` varchar(256) ,
  `lock_key` varchar(128) ,
  `branch_type` varchar(8) ,
  `status` tinyint,
  `client_id` varchar(64),
  `application_data` varchar(2000),
  `gmt_create` datetime,
  `gmt_modified` datetime,
  primary key (`branch_id`),
  key `idx_xid` (`xid`)
);

-- the table to store lock data
drop table if exists `lock_table`;
create table `lock_table` (
  `row_key` varchar(128) not null,
  `xid` varchar(96),
  `transaction_id` long ,
  `branch_id` long,
  `resource_id` varchar(256) ,
  `table_name` varchar(32) ,
  `pk` varchar(36) ,
  `gmt_create` datetime ,
  `gmt_modified` datetime,
  primary key(`row_key`)
);
由于存储undo_log是在业务库中,所以在每个业务库中,还要创建undo_log表,建表sql
-- the table to store seata xid data
-- 0.7.0+ add context
-- you must to init this sql for you business databese. the seata server not need it.
-- 此脚本必须初始化在你当前的业务数据库中,用于AT 模式XID记录。与server端无关(注:业务数据库)
-- 注意此处0.3.0+ 增加唯一索引 ux_undo_log
drop table `undo_log`;
CREATE TABLE `undo_log` (
  `id` bigint(20) NOT NULL AUTO_INCREMENT,
  `branch_id` bigint(20) NOT NULL,
  `xid` varchar(100) NOT NULL,
  `context` varchar(128) NOT NULL,
  `rollback_info` longblob NOT NULL,
  `log_status` int(11) NOT NULL,
  `log_created` datetime NOT NULL,
  `log_modified` datetime NOT NULL,
  `ext` varchar(100) DEFAULT NULL,
  PRIMARY KEY (`id`),
  UNIQUE KEY `ux_undo_log` (`xid`,`branch_id`)
) ENGINE=InnoDB AUTO_INCREMENT=1 DEFAULT CHARSET=utf8;
由于我自定义了事务组名称,所以这里也做了修改:
service {
  #vgroup->rgroup
  vgroup_mapping.fsp_tx_group = "default"  修改这里,fsp_tx_group这个事务组名称是我自定义的,一定要与client端的这个配置一致!否则会报错!
  #only support single node
  default.grouplist = "127.0.0.1:8091"   此配置作用参考:https://blog.csdn.net/weixin_39800144/article/details/100726116
  #degrade current not support
  enableDegrade = false
  #disable
  disable = false
  #unit ms,s,m,h,d represents milliseconds, seconds, minutes, hours, days, default permanent
  max.commit.retry.timeout = "-1"
  max.rollback.retry.timeout = "-1"
}
其他的可以先使用默认值。
2.2.2 registry.conf
registry{}中是注册中心相关配置,config{}中是配置中心相关配置。seata中,注册中心和配置中心是分开实现的,是两个东西。
我们这里用eureka作注册中心,所以,只用修改registry{}中的:
registry {
  # file 、nacos 、eureka、redis、zk、consul、etcd3、sofa
  type = "eureka"  修改这里,指明注册中心使用什么

  nacos {
    serverAddr = "localhost"
    namespace = ""
    cluster = "default"
  }
  eureka {
    serviceUrl = "http://localhost:8761/eureka"  修改这里
    application = "default"
    weight = "1"
  }
  redis {
    serverAddr = "localhost:6379"
    db = "0"
  }
  zk {
    cluster = "default"
    serverAddr = "127.0.0.1:2181"
    session.timeout = 6000
    connect.timeout = 2000
  }
  consul {
    cluster = "default"
    serverAddr = "127.0.0.1:8500"
  }
  etcd3 {
    cluster = "default"
    serverAddr = "http://localhost:2379"
  }
  sofa {
    serverAddr = "127.0.0.1:9603"
    application = "default"
    region = "DEFAULT_ZONE"
    datacenter = "DefaultDataCenter"
    cluster = "default"
    group = "SEATA_GROUP"
    addressWaitTime = "3000"
  }
  file {
    name = "file.conf"
  }
}
其他的配置可以暂时使用默认值。
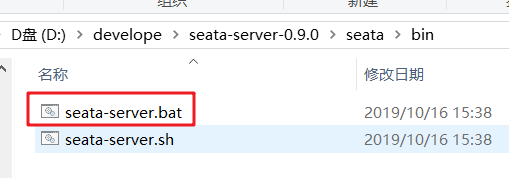
如果是在windows下启动seata-server,现在已经完成配置修改了,等eureka启动后,就可以启动seata-server了:执行/bin/seata-server.bat即可。
2.3 client端相关配置
2.3.1 普通配置
client端的几个服务,都是普通的springboot整合了springCloud组件的正常服务,所以,你需要配置eureka,数据库,mapper扫描等,即使不使用seata,你也需要做,这里不做特殊说明,看代码就好。
2.3.2 特殊配置
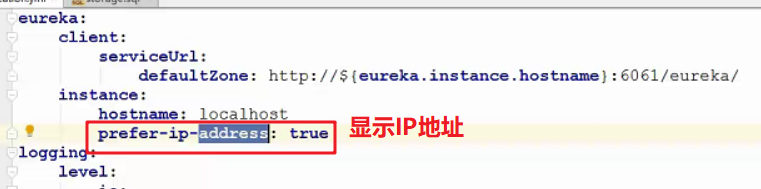
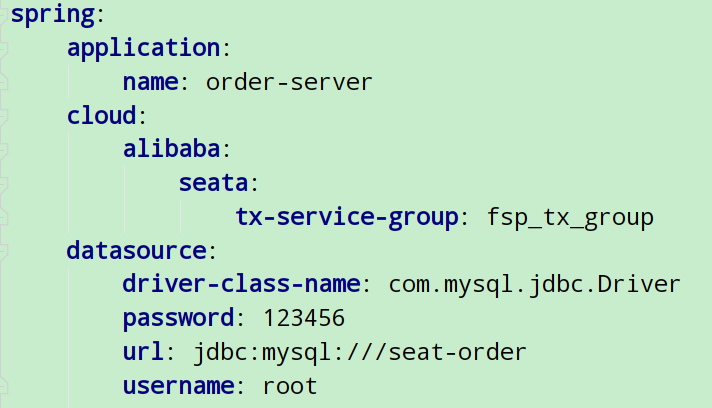
2.3.2.1 application.yml
以order服务为例,除了常规配置外,这里还要配置下事务组信息:
这个fsp_tx_group自定义命名很重要,server,client都要保持一致
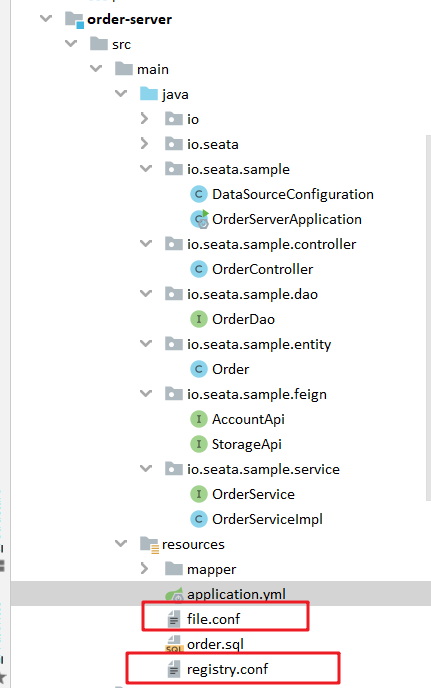
2.3.2.2 file.conf及registry.conf
刚才配置好了直接复制粘贴过来,每个需要控制事务的服务都需要这两个文件
2.3.2.3 数据源代理
这个是要特别注意的地方,seata对数据源做了代理和接管,在每个参与分布式事务的服务中,都要做如下配置:
/**
 * 数据源代理:这个是要特别注意的地方,seata对数据源做了代理和接管,在每个参与分布式事务的服务中,都要做如下配置:
 * @author ReedZhan
 */
@Configuration
public class DataSourceConfiguration {

    @Bean
    @ConfigurationProperties(prefix = "spring.datasource")
    public DataSource druidDataSource(){
        DruidDataSource druidDataSource = new DruidDataSource();
        return druidDataSource;
    }

    @Primary
    @Bean("dataSource")
    public DataSourceProxy dataSource(DataSource druidDataSource){
        return new DataSourceProxy(druidDataSource);
    }

    @Bean
    public SqlSessionFactory sqlSessionFactory(DataSourceProxy dataSourceProxy)throws Exception{
        SqlSessionFactoryBean sqlSessionFactoryBean = new SqlSessionFactoryBean();
        sqlSessionFactoryBean.setDataSource(dataSourceProxy);
        sqlSessionFactoryBean.setMapperLocations(new PathMatchingResourcePatternResolver()
        .getResources("classpath*:/mapper/*.xml"));
        sqlSessionFactoryBean.setTransactionFactory(new SpringManagedTransactionFactory());
        return sqlSessionFactoryBean.getObject();
    }

}
注意:启动类要排除默认数据源配置

三、启动事务控制
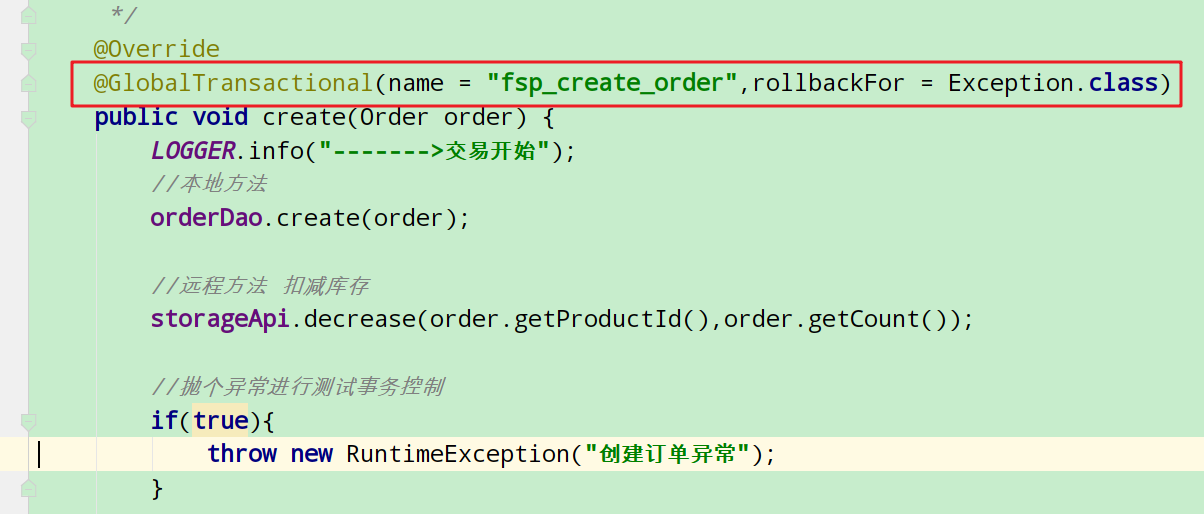
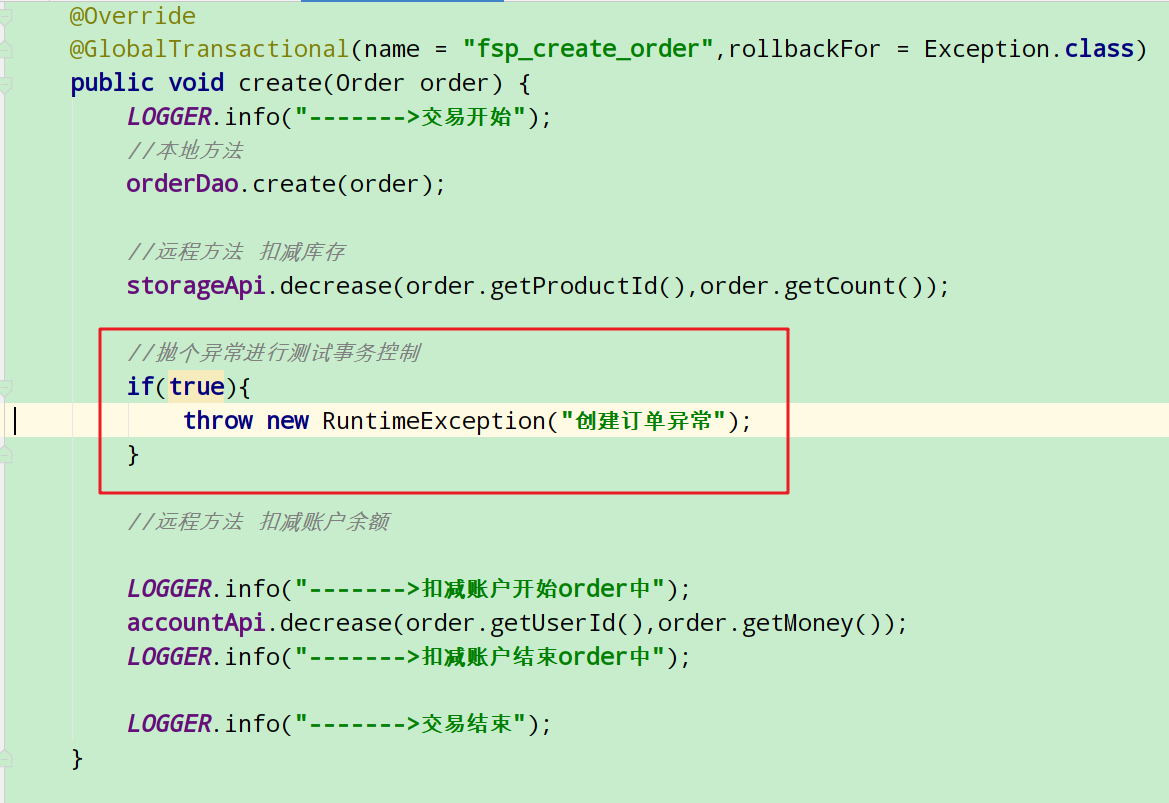
3.1 打注解
在需要控制事务的方法上打注解
name是自定义的,但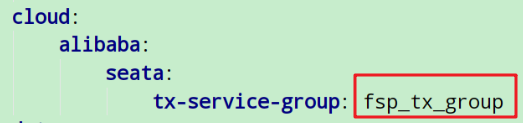 这个名字各个微服务必须保持一致
3.2 启动SeaTa服务
同时启动所有微服务,事务挂载成功DOS会显示204,success等字样,否则会报错
在方法中间抛个自定义异常,就可以判断事务是否控制成功了


 2309
2309


 被折叠的 条评论
为什么被折叠?
被折叠的 条评论
为什么被折叠?
 到【灌水乐园】发言


