


学习目标
1、 了解为什么要使用消息中间件
2、 属性RabbitMQ消息中间件的基本概念和工作原理
3、 属性Spring Boot与RabbitMQ的整合搭建
4、 掌握Spring Boot与RabbitMQ整合实现常用的工作模式
(一)为什么要用消息中间件
异步处理、应用解耦、流量削峰、分布式事务管理
消息中间件分别有:
ActiveMQ RabbitMQ kafka rocketMQ
(二)以RabbitMQ 为例深入学习
- 安装 erlang 、 RabbitMQ
- 配置
# ??RabbitMQ?????????
spring.rabbitmq.host=localhost
spring.rabbitmq.port=5672
spring.rabbitmq.username=guest
spring.rabbitmq.password=guest
#??RabbitMQ??????/???????
spring.rabbitmq.virtual-host=/
(三)发布订阅模式
新建User类
RabbitMQService 发布、订阅参考此类
@Service
public class RabbitMQService {
/**
* **使用基于注解的方式实现消息服务
* 1.1、Publish/Subscribe工作模式接收,处理邮件业务
* @param user
*/
@RabbitListener(bindings =@QueueBinding(value =@Queue("fanout_queue_email"), exchange =@Exchange(value = "fanout_exchange",type = "fanout")))
public void psubConsumerEmailAno(User user) {
System.out.println("邮件业务接收到消息: "+user);
}
/**
* 1.2、Publish/Subscribe工作模式接收,处理短信业务
* @param user
*/
@RabbitListener(bindings =@QueueBinding(value =@Queue("fanout_queue_sms"),exchange =@Exchange(value = "fanout_exchange",type = "fanout")))
public void psubConsumerSmsAno(User user) {
System.out.println("短信业务接收到消息: "+user);
}
//-----------------------------------------------------------------------------------------
/**
* 2.1、路由模式消息接收,处理error级别日志信息
* @param message
*/
@RabbitListener(bindings =@QueueBinding(value =@Queue("routing_queue_error"),exchange =@Exchange(value = "routing_exchange",type = "direct"),key = "error_routing_key"))
public void routingConsumerError(String message) {
System.out.println("接收到error级别日志消息: "+message);
}
/**
* 2.2、路由模式消息接收,处理info、error、warning级别日志信息
* @param message
*/
@RabbitListener(bindings =@QueueBinding(value =@Queue("routing_queue_all"),exchange =@Exchange(value = "routing_exchange",type = "direct"),key = {"error_routing_key","info_routing_key","warning_routing_key"}))
public void routingConsumerAll(String message) {
System.out.println("接收到info、error、warning等级别日志消息: "+message);
}
//------------------------------------------------------------------
/**
* 3.1、通配符模式消息接收,进行邮件业务订阅处理
* @param message
*/
@RabbitListener(bindings =@QueueBinding(value =@Queue("topic_queue_email"),exchange =@Exchange(value = "topic_exchange",type = "topic"),key = "info.#.email.#"))
public void topicConsumerEmail(String message) {
System.out.println("接收到邮件订阅需求处理消息: "+message);
}
/**
* 3.2、通配符模式消息接收,进行短信业务订阅处理
* @param message
*/
@RabbitListener(bindings =@QueueBinding(value =@Queue("topic_queue_sms"),exchange =@Exchange(value = "topic_exchange",type = "topic"),key = "info.#.sms.#"))
public void topicConsumerSms(String message) {
System.out.println("接收到短信订阅需求处理消息: "+message);
}
}
RbbitMqConfig 配置类
@Configuration
public class RbbitMqConfig {
@Bean
public MessageConverter messageConverter(){
return new Jackson2JsonMessageConverter();
}
/**
* 使用基于配置类的方式定制消息中间件
* @return
*/
// 1、定义fanout类型的交换器
@Bean
public Exchange fanout_exchange(){
return ExchangeBuilder.fanoutExchange("fanout_exchange").build();
}
// 2、定义两个不同名称的消息队列
@Bean
public Queue fanout_queue_email(){
return new Queue("fanout_queue_email");
}
@Bean
public Queue fanout_queue_sms(){
return new Queue("fanout_queue_sms");
}
// 3、将两个不同名称的消息队列与交换器进行绑定
@Bean
public Binding bindingEmail(){
return BindingBuilder.bind(fanout_queue_email()).to(fanout_exchange()).with("").noargs();
}
@Bean
public Binding bindingSms(){
return BindingBuilder.bind(fanout_queue_sms()).to(fanout_exchange()).with("").noargs();
}
}
(四)打包
1. jar包
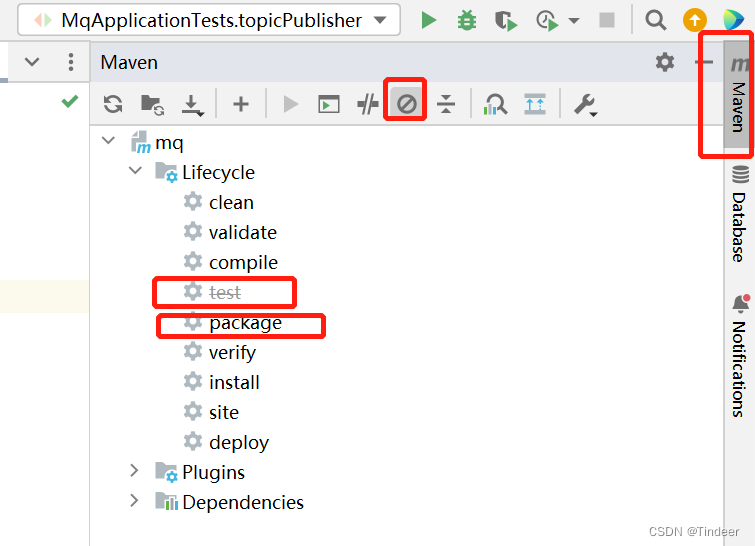
2. war包
2.1 设置打包模式
<!-- 将打包方式声明为war-->
<packaging>war</packaging>
<properties>
<java.version>1.8</java.version>
</properties>
2.2 配置引入tomcat依赖
<dependency>
<groupId>org.springframework.boot</groupId>
<artifactId>spring-boot-starter-tomcat</artifactId>
</dependency>
2.3 启动类的修改
启动类继承继承SpringBootServletInitializer,并重写configure
@SpringBootApplication
public class MqApplication extends SpringBootServletInitializer {
//继承SpringBootServletInitializer,并重写configure
@Override
protected SpringApplicationBuilder configure(SpringApplicationBuilder builder){
return builder.sources(MqApplication.class);
}
public static void main(String[] args) {
SpringApplication.run(MqApplication.class, args);
}
}
2.4 打包操作步骤同打jar。


 286
286


 被折叠的 条评论
为什么被折叠?
被折叠的 条评论
为什么被折叠?
 到【灌水乐园】发言


