


 本文介绍了SpringBoot的入门步骤,包括系统要求、创建Maven工程、编写主程序和业务代码。详细讲解了SpringBoot的自动配置原理,如依赖管理和自动配置Tomcat、SpringMVC。此外,还讨论了SpringBoot中组件的添加,包括@Configuration、@Bean、@ComponentScan等注解的使用,以及配置绑定和原生配置的引入。
01、入门
1、系统要求
Java 8 & 兼容java14 .
Maven 3.3+
idea 2019.1.2
1.1、maven设置
<mirrors>
      <mirror>
        <id>nexus-aliyun</id>
        <mirrorOf>central</mirrorOf>
        <name>Nexus aliyun</name>
        <url>http://maven.aliyun.com/nexus/content/groups/public</url>
      </mirror>
  </mirrors>

  <profiles>
         <profile>
              <id>jdk-1.8</id>
              <activation>
                <activeByDefault>true</activeByDefault>
                <jdk>1.8</jdk>
              </activation>
              <properties>
                <maven.compiler.source>1.8</maven.compiler.source>
                <maven.compiler.target>1.8</maven.compiler.target>
                <maven.compiler.compilerVersion>1.8</maven.compiler.compilerVersion>
              </properties>
         </profile>
  </profiles>
2、HelloWorld
需求:浏览发送/hello请求,响应 Hello,Spring Boot 2
2.1、创建maven工程
2.2、引入依赖
<parent>
        <groupId>org.springframework.boot</groupId>
        <artifactId>spring-boot-starter-parent</artifactId>
        <version>2.3.4.RELEASE</version>
    </parent>


    <dependencies>
        <dependency>
            <groupId>org.springframework.boot</groupId>
            <artifactId>spring-boot-starter-web</artifactId>
        </dependency>

    </dependencies>
2.3、创建主程序
/**
 * 主程序类
 * @SpringBootApplication:这是一个SpringBoot应用
 */
@SpringBootApplication
public class MainApplication {

    public static void main(String[] args) {
        SpringApplication.run(MainApplication.class,args);
    }
}
2.4、编写业务
@RestController
public class HelloController {


    @RequestMapping("/hello")
    public String handle01(){
        return "Hello, Spring Boot 2!";
    }


}
2.5、测试
直接运行main方法
2.6、简化配置
application.properties
server.port=88882.7、简化部署
 <build>
        <plugins>
            <plugin>
                <groupId>org.springframework.boot</groupId>
                <artifactId>spring-boot-maven-plugin</artifactId>
            </plugin>
        </plugins>
    </build>
把项目打成jar包,直接在目标服务器执行即可。
注意点:
取消掉cmd的快速编辑模式
02、了解自动配置原理
1、依赖管理
父项目做依赖管理
依赖管理
<parent>
        <groupId>org.springframework.boot</groupId>
        <artifactId>spring-boot-starter-parent</artifactId>
        <version>2.3.4.RELEASE</version>
</parent>

他的父项目
 <parent>
    <groupId>org.springframework.boot</groupId>
    <artifactId>spring-boot-dependencies</artifactId>
    <version>2.3.4.RELEASE</version>
  </parent>

几乎声明了所有开发中常用的依赖的版本号,自动版本仲裁机制
开发导入starter场景启动器
1、见到很多 spring-boot-starter-* : *就某种场景
2、只要引入starter,这个场景的所有常规需要的依赖我们都自动引入
3、SpringBoot所有支持的场景
https://docs.spring.io/spring-boot/docs/current/reference/html/using-spring-boot.html#using-boot-starter
4、见到的  *-spring-boot-starter: 第三方为我们提供的简化开发的场景启动器。
5、所有场景启动器最底层的依赖
<dependency>
  <groupId>org.springframework.boot</groupId>
  <artifactId>spring-boot-starter</artifactId>
  <version>2.3.4.RELEASE</version>
  <scope>compile</scope>
</dependency>
无需关注版本号,自动版本仲裁
1、引入依赖默认都可以不写版本
2、引入非版本仲裁的jar,要写版本号。
可以修改默认版本号
1、查看spring-boot-dependencies里面规定当前依赖的版本 用的 key。
2、在当前项目里面重写配置
    <properties>
        <mysql.version>5.1.43</mysql.version>
    </properties>
2、自动配置
自动配好Tomcat
引入Tomcat依赖。
配置Tomcat
<dependency>
      <groupId>org.springframework.boot</groupId>
      <artifactId>spring-boot-starter-tomcat</artifactId>
      <version>2.3.4.RELEASE</version>
      <scope>compile</scope>
    </dependency>
自动配好SpringMVC
引入SpringMVC全套组件
自动配好SpringMVC常用组件(功能)
自动配好Web常见功能,如:字符编码问题
SpringBoot帮我们配置好了所有web开发的常见场景
默认的包结构
主程序所在包及其下面的所有子包里面的组件都会被默认扫描进来
无需以前的包扫描配置
想要改变扫描路径,@SpringBootApplication(scanBasePackages="com.atguigu")
或者@ComponentScan 指定扫描路径
@SpringBootApplication
等同于
@SpringBootConfiguration
@EnableAutoConfiguration
@ComponentScan("com.atguigu.boot")
各种配置拥有默认值
默认配置最终都是映射到某个类上,如:MultipartProperties
配置文件的值最终会绑定每个类上,这个类会在容器中创建对象
按需加载所有自动配置项
非常多的starter
引入了哪些场景这个场景的自动配置才会开启
SpringBoot所有的自动配置功能都在 spring-boot-autoconfigure 包里
3、容器功能
3.1、组件添加
1.@Configuration
首先引出两个概念:Full 全模式,Lite 轻量级模式
package com.example.config;

import com.example.pojo.Student;
import com.example.pojo.Teacher;
import org.apache.catalina.User;
import org.springframework.context.annotation.Bean;
import org.springframework.context.annotation.Configuration;

/**
 * 1,配置类里面使用@Bean标注在方法上给容器注册组件,默认也是单实例
 * 2,配置类本身也是组件
 * 3,proxyBeanMethods:代理bean方法
     *
     * Full(proxyBeanMethods = true) :proxyBeanMethods参数设置为true时即为:Full 全模式。
     * 该模式下注入容器中的同一个组件无论被取出多少次都是同一个bean实例,即单实例对象,
     * 在该模式下SpringBoot每次启动都会判断检查容器中是否存在该组件
     * Lite(proxyBeanMethods = false) :proxyBeanMethods参数设置为false时即为:
     * Lite 轻量级模式。该模式下注入容器中的同一个组件无论被取出多少次都是不同的bean实例,
     * 即多实例对象,在该模式下SpringBoot每次启动会跳过检查容器中是否存在该组件
     *
     * 什么时候用Full全模式,什么时候用Lite轻量级模式?
     * 当在你的同一个Configuration配置类中,注入到容器中的bean实例之间有依赖关系时,建议使用Full全模式
     * 当在你的同一个Configuration配置类中,注入到容器中的bean实例之间没有依赖关系时,建议使用Lite轻量级模式,以提高springboot的启动速度和性能

     lite模式包含:
        没有被@Configuration修饰,被@Component修饰
        没有被@Configuration修饰,被@ComponentScan修饰
        没有被@Configuration修饰,被@Import修饰
        没有被@Configuration修饰,被@ImportResource修饰
        没有任何Spring相关注解,类里面有@Bean修饰的方法
        被@Configuration修饰,但是属性proxyBeanMethods = false
    full模式包含:
        被@Configuration修饰,且属性proxyBeanMethods = true(proxyBeanMethods 默认为true)
 */
@Configuration(proxyBeanMethods = true)  //告诉springboot这是一个配置类==配置文件(xml)
public class MyConfig {
    @Bean
    public Teacher teacher(){
        Teacher user=new Teacher();
        user.setName("周琼");
        user.setStudent(student());
        return user;
    }
    @Bean
    public Student student(){
       return new Student("李祖福",100);
    }
}
2.@Bean、@Component、@Controller、@Service、@Repository
1、@controller: controller控制器层(注入服务)
2、@service : service服务层(注入dao)
3、@repository : dao持久层(实现dao访问)
4、@component: 标注一个类为Spring容器的Bean,(把普通pojo实例化到spring容器中,相当于配置文件中的)
5、bean组件(定义在方法上的组件)
3.@ComponentScan、@Import
@Import({Student.class,Teacher.class})//给容器导入一个组件
/**com.example.pojo.Student
com.example.pojo.Teacher
给容器中自动创建出这两个类型的组件、默认组件的名字就是全类名
**/
@Controller
public class MyConfig {}
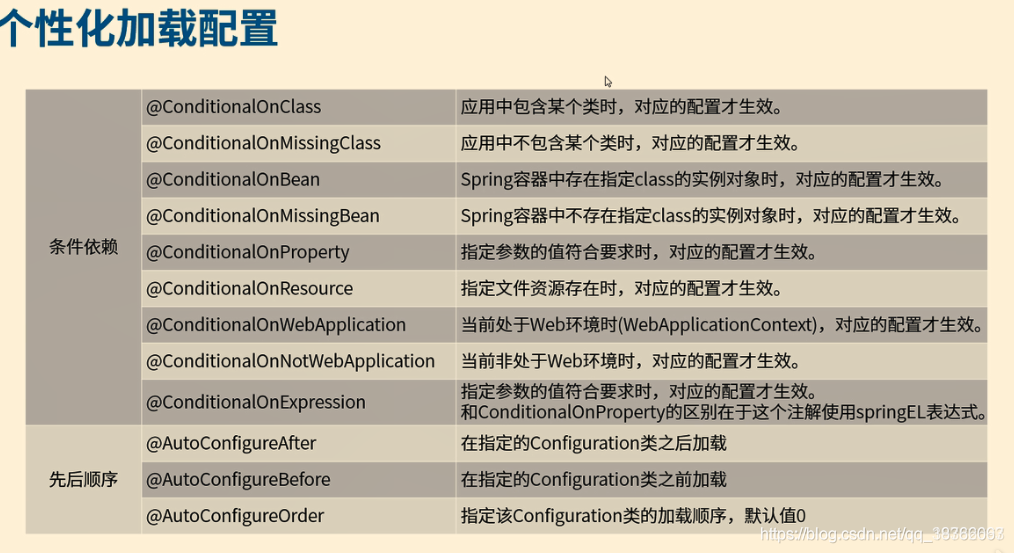
//@ComponentScan-自动扫描组件4.@Conditional
条件装配:满足Conditional指定的条件,则进行组件注入
@Import({Teacher.class,Student.class})
/**com.example.pojo.Student
 com.example.pojo.Teacher
 **/
@Configuration
//@ConditionalOnMissingBean(name="helloController") //不存在helloController生效(注入当前类组件)
@ConditionalOnBean(name = "helloController")//存在生效(注入当前类组件)
public class MyConfig {
}
3.2 原生配置引入
1.@ImportResource
<?xml version="1.0" encoding="UTF-8"?>
<beans xmlns="http://www.springframework.org/schema/beans"
       xmlns:xsi="http://www.w3.org/2001/XMLSchema-instance"
       xsi:schemaLocation="http://www.springframework.org/schema/beans http://www.springframework.org/schema/beans/spring-beans.xsd">
    <bean id="zhangSan" class="com.example.pojo.Student">
        <property name="name" value="小李子"></property>
    </bean>
    <bean id="teacherZhou" class="com.example.pojo.Teacher">
        <constructor-arg index="0" value="李老师"></constructor-arg>
        <constructor-arg index="1" ref="zhangSan"></constructor-arg>
    </bean>
</beans>
package com.example.config;
import org.springframework.context.annotation.Configuration;
import org.springframework.context.annotation.ImportResource;
import org.springframework.stereotype.Component;
@ImportResource("beans.xml")
@Configuration
public class Config {
}
public static void main(String[] args) throws InterruptedException {
ConfigurableApplicationContext run=SpringApplication.run(SpringSecurityDemoApplication.class, args);
String[]names=run.getBeanDefinitionNames();
for(String name:names){
System.out.println(name);
}
System.out.println(run.containsBean("zhangSan"));
System.out.println(run.containsBean("teacherZhou"));
}3.3配置绑定
properties配置文件如下:
human.name=Mr.Yu
human.age=21
human.gender=male如何把properties里面的配置绑定到JavaBean里面,以前我们的做法如下:
public class PropertiesUtil {
    public static void getProperties(Person person) throws IOException {
        Properties properties = new Properties();
        properties.load(new FileInputStream("src/main/resources/demo.properties"));
        //得到配置文件key的名字
        Enumeration enumeration = properties.propertyNames();
        while (enumeration.hasMoreElements()){
            String key =(String)enumeration.nextElement();
            String value = properties.getProperty(key);
            System.out.println("key="+key+"——————value="+value);
            //封装到JavaBean
            //以下内容省略
        }
    }
}
输出结果:
key=human.name——————value=Mr.Yu
key=human.age——————value=21
key=human.gender——————value=male
Process finished with exit code 0
可以看到这个过程十分繁杂,但是在SpringBoot中这个过程将会变得非常简单。
首先在yml中配置数据
server:
  port: 8080
spring:
  datasource:
    url: jdbc:mysql://localhost:3306/shop?characterEncoding=utf-8&servertimeZone=UTC
    password: 123456
    username: root
    driver-class-name: com.mysql.cj.jdbc.Driver
 #    配置绑定
person:
  name: 张三
  age: 100
在SpringBoot中有如下3种方法:
1.@ConfigurationProperties+@Component
package com.example.pojo;

import lombok.AllArgsConstructor;
import lombok.Data;
import lombok.NoArgsConstructor;
import org.springframework.boot.context.properties.ConfigurationProperties;
import org.springframework.stereotype.Component;

@Data
@NoArgsConstructor
@AllArgsConstructor
@Component
@ConfigurationProperties(prefix = "person")
public class Person {
    private String name;
    private int age;
}
2.@ConfigurationProperties+@import
package com.example.config;

import com.example.pojo.Person;
import org.springframework.context.annotation.Configuration;
import org.springframework.context.annotation.Import;
import org.springframework.context.annotation.ImportResource;
import org.springframework.stereotype.Component;
@Import(Person.class)
@Configuration
public class Config {
}
package com.example.pojo;
import lombok.AllArgsConstructor;
import lombok.Data;
import lombok.NoArgsConstructor;
import org.springframework.boot.context.properties.ConfigurationProperties;
import org.springframework.stereotype.Component;
@Data
@NoArgsConstructor
@AllArgsConstructor
@ConfigurationProperties(prefix = "person")
public class Person {
private String name;
private int age;
}3.@ConfigurationProperties+@EnableConfigurationProperties
package com.example.pojo;

import lombok.AllArgsConstructor;
import lombok.Data;
import lombok.NoArgsConstructor;
import org.springframework.boot.context.properties.ConfigurationProperties;
import org.springframework.stereotype.Component;

@Data
@NoArgsConstructor
@AllArgsConstructor
@ConfigurationProperties(prefix = "person")
public class Person {
    private String name;
    private int age;
}package com.example.config;
import com.example.pojo.Person;
import org.springframework.boot.autoconfigure.EnableAutoConfiguration;
import org.springframework.boot.context.properties.ConfigurationProperties;
import org.springframework.boot.context.properties.EnableConfigurationProperties;
import org.springframework.context.annotation.Configuration;
import org.springframework.context.annotation.Import;
import org.springframework.context.annotation.ImportResource;
import org.springframework.stereotype.Component;
@EnableConfigurationProperties(Person.class)
@Configuration
public class Config {
}4.@测试
package com.example.pojo;

import lombok.AllArgsConstructor;
import lombok.Data;
import lombok.NoArgsConstructor;
import org.springframework.boot.context.properties.ConfigurationProperties;
import org.springframework.stereotype.Component;

@Data
@NoArgsConstructor
@AllArgsConstructor
@ConfigurationProperties(prefix = "person")
public class Person {
    private String name;
    private int age;
}
package com.example;
import com.example.config.MyConfig;
import com.example.pojo.Person;
import com.example.pojo.Student;
import com.example.pojo.Teacher;
import org.springframework.boot.SpringApplication;
import org.springframework.boot.autoconfigure.SpringBootApplication;
import org.springframework.context.ConfigurableApplicationContext;
@SpringBootApplication
public class SpringSecurityDemoApplication {
public SpringSecurityDemoApplication() {
}
public static void main(String[] args) throws InterruptedException {
ConfigurableApplicationContext run=SpringApplication.run(SpringSecurityDemoApplication.class, args);
String[]names=run.getBeanDefinitionNames();
for(String name:names){
System.out.println(name);
}
Person person=run.getBean(Person.class);
System.out.println(person);
}
}
//打印结果 Person(name=张三, age=100)4、springboot Contrlloer学习
4.1、注解的学习
@Controller注解
一般应用场景跟thymeleaf作为开发模块需要从后台直接返回Model对象到前台,就需要使用@Controller注解。
mvc模式 m指(model模型),v指=(view视图jsp,html),c指(controller控制器)
@RestController注解
如果是接口使用@RestController来注解
如果前度页面使用了html,Jquery来开发,通过Ajax请求服务端口,那么接口就使用@RestController统一注解
@RequestMapping
 String name() default "";
	//请求的实际路径
    @AliasFor("path")
    String[] value() default {};

    @AliasFor("value")
    String[] path() default {};
	//指定请求的method类型,GET,POST,PUT,DELETE等
    RequestMethod[] method() default {};
   //指定request中必须包含某些参数值是,才让该方法处理。
    String[] params() default {};
    //指定request中必须包含某些指定的header值,才能让该方法处理请求。
    String[] headers() default {};
    //指定处理请求的提交内容类型(Content-Type),例如application/json, text/html;
    String[] consumes() default {};
    //指定返回的内容类型,仅当request请求头中的(Accept)类型中包含该指定类型才返回;
    String[] produces() default {};


 1080
1080

 被折叠的 条评论
为什么被折叠?
被折叠的 条评论
为什么被折叠?
 到【灌水乐园】发言


