


**Gin **框架入门实战系列教程
主讲教师:(大地)
在线文档:https://www.itying.com/gin
我的专栏:https://www.itying.com/category-79-b0.html
十六、**Gin **中使用 **GORM **实现表关联查询
https://gorm.io/zh_CN/docs/has_many.html
16.1 、一对一
:::info
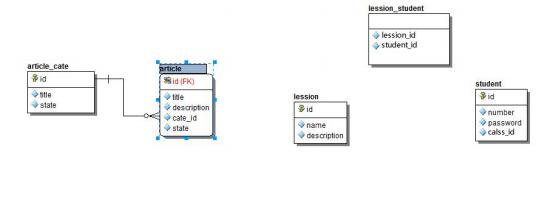
如上图所示,一个文章只有一个分类,article 和 article_cate 之间是 1 对 1 的关系。 文章表中的 cate_id 保存着文章分类的 id。
如果我们想查询文章的时候同时获取文章分类,就涉及到 1 对 1 的关联查询。
**foreignkey **指定当前表的外键、**references **指定关联表中和外键关联的字段
:::
Article
package  models

type  Article  struct  {
    ArticleCate  ArticleCate  `gorm:"foreignKey:CateId;references:Id"`
}

func  (Article)  TableName()  string  {
    return  "article"
}
ArticleCate
package  models

//ArticleCate 的结构体
type  ArticleCate  struct  {
    Id         int         `json:"id"`
    Title  string  `json:"title"`
    State  int         `json:"state"`
}

func  (ArticleCate)  TableName()  string  {
    return  "article_cate"
}
**1 **、查询所有文章以及文章对应的分类信息:
func  (con  ArticleController)   Index(c  *gin.Context)  {

    var  articleList   []models.Article
    models.DB.Preload("ArticleCate").Limit(2).Find(&articleList)

    c.JSON(200,  gin.H{
        "result" :  articleList,
    })
}
注意:Preload(“ArticleCate”)里面的 ArticleCate 为 Article struct 中定义的属性 ArticleCate
返回 **JSON **数据:
[
  {
    "id" :  1,
    "title" :  "8 月份 CPI 同比上涨 2.8% 猪肉价格上涨 46.7%",
    "description" :  0,
    "cate_id" :  " 1",
    "state" :  1,
    "ArticleCate" :  {
      "id" :  1,
      "title" :  " 国内",
      "state" :  1
    }
  },
  {
    "id" :  2,
    "title" :  " 中国联通与中国电信共建共享 5G 网络 用户归属不变",
    "description" :  0,
    "cate_id" :  " 1",
    "state" :  1,
    "ArticleCate" :  {
      "id" :  1,
      "title" :  " 国内",
      "state" :  1
    }
  }
]
**2 **、查询所有文章以及文章对应的分类信息 指定条件:
func  (con  ArticleController)   Index(c  *gin.Context)  {
  var  articleList   []models.Article
  models.DB.Preload("ArticleCate").Where("id>=?",  4).Find(&articleList)

  c.JSON(200,  gin.H{
    "result" :  articleList,
      })
}
返回数据:
[
  {
    "id" :  4,
    "title" :  "这些老师的口头禅,想起那些年“被支配的恐惧” 了吗",
    "description" :  0,
    "cate_id" :  "2",
    "state" :  1,
    "ArticleCate" :  {
      "id" :  2,
      "title" :  " 国际",
      "state" :  1
    }
  },
  {
    "id" :  5,
    "title" :  "美国空军一号差点遭雷劈,特朗普惊呼:令人惊奇",
    "description" :  0,
    "cate_id" :  "3",
    "state" :  1,
    "ArticleCate" :  {
      "id" :  3,
      "title" :  "娱乐",
      "state" :  1
    }
  }
]
16.2 、一对多
1 对多在实际项目中用的非常多
:::info
比如一个点餐系统:有菜品分类、有菜品。 菜品分类和菜品之间就是一对多的关系
订单表和订单商品表:订单表和订单商品表之间也是一对多的关系
如上图所示,一个分类下面有很多个文章,article_cate 和 article 之间是 1 对多的关系。
文章表中的 cate_id 保存着文章分类的 id。
如果我们想查询文章分类的时候获取分类下面的文章,这个时候就涉及到一对多的关联查 询。
:::
ArticleCate
//ArticleCate 的结构体
package  models

type  ArticleCate  struct  {
    Id              int                `json:"id"`
    Title       string         `json:"title"`
    State       int                `json:"state"`
    Article  []Article  `gorm:"foreignKey:CateId"`
}
func  (ArticleCate)  TableName()  string  {
    return  "article_cate"
}
Article
package  models
type  Article  struct  {
    Id                       int
    Title                string Description  int
    CateId              string State                int
}
`json:"id"`
`json:"title"`
`json:"description"`
`json:"cate_id"`
`json:"state"`
func  (Article)  TableName()  string  {
    return  "article"
}
1 、查找所有分类以及分类下面的文章信息
func  (con  ArticleController)   Index(c  *gin.Context)  {
    var  articleCateList   []models.ArticleCate
    models.DB.Preload("Article").Find(&articleCateList)

    c.JSON(200,  gin.H{
        "result" :  articleCateList,
    })
}
返回数据:
[
  {
    "id" :  1,
    "title" :  " 国内",
    "state" :  1,
    "Article" :  [
      {
        "id" :  1,
        "title" :  "8 月份 CPI 同比上涨 2.8%  猪肉价格上涨 46.7%",
        "description" :  0,
        "cate_id" :  " 1",
        "state" :  1
      },
      {
        "id" :  2,
        "title" :  " 中国联通与中国电信共建共享 5G 网络 用户归属不变",
        "description" :  0,
        "cate_id" :  " 1",
        "state" :  1
      }
    ]
  },
  {
    "id" :  2,
    "title" :  " 国际",
    "state" :  1,
    "Article" :  [
      {
        "id" :  3,
        "title" :  "林郑月娥斥责暴徒破坏港铁:不能因为没生命就肆意破坏",
        "description" :  0,
        "cate_id" :  "2",
        "state" :  1
      },
      {
        "id" :  4,
        "title" :  "这些老师的口头禅,想起那些年“被支配的恐惧” 了吗",
        "description" :  0,
        "cate_id" :  "2",
        "state" :  1
      }
    ]
  },
  ...
]
2 、查找所有分类以及分类下面的文章信息 指定条件
func  (con  ArticleController)   Index(c  *gin.Context)  {
    var  articleCateList   []models.ArticleCate
    models.DB.Preload("Article").Where("id>0").Offset(1).Limit(1).Find(&articleCateList)

    c.JSON(200,  gin.H{
        "result" :  articleCateList,
    })
}
[
  {
    "id" :  2,
    "title" :  " 国际",
    "state" :  1,
    "Article" :  [
      {
        "id" :  3,
        "title" :  "林郑月娥斥责暴徒破坏港铁:不能因为没生命就肆意破坏",
        "description" :  0,
        "cate_id" :  "2",
        "state" :  1
      },
      {
        "id" :  4,
        "title" :  "这些老师的口头禅,想起那些年“被支配的恐惧” 了吗",
        "description" :  0,
        "cate_id" :  "2",
        "state" :  1
      }
    ]
  }
]
3 、更多 1 对多的查询方法
地址: https://github.com/jouyouyun/examples/tree/master/gorm/related
4 、如果我们的程序中有如下需求
:::info
1 、查询文章获取文章分类信息
2 、查询文章分类获取文章信息
:::
这个时候可以这样定义 models
package  models

type  Article  struct  {
    Id                       int                    `json:"id"`
    Title                string              `json:"title"`
    Description  int                    `json:"description"`
    CateId              string             `json:"cate_id"`
    State                int                    `json:"state"`
    ArticleCate  ArticleCate  `gorm:"foreignKey:CateId;references:Id"`
}

func  (Article)  TableName()  string  {
    return  "article"
}
package  models

//ArticleCate 的结构体
type  ArticleCate  struct  {
    Id              int                `json:"id"`
    Title       string         `json:"title"`
    State       int                `json:"state"`
    Article  []Article  `gorm:"foreignKey:CateId"`
}

func  (ArticleCate)  TableName()  string  {
    return  "article_cate"
}
16.3 、多对多

1 、定义学生 课程 学生课程表 model
如果想根据课程获取选学本门课程的学生,这个时候就在 Lesson 里面关联 Student
Lesson
package  models

type  Lesson  struct  {
    Id              int                  `json:"id"`
    Name         string           `json:" name"`
    Student  []*Student  `gorm:"many2many:lesson_student"`
}

func  (Lesson)  TableName()  string  {
    return  "lesson"
}
Student
package  models

type  Student  struct  {
    Id                 int
    Number       string
    Password  string
    ClassId    int
    Name           string
    Lesson       []*Lesson  `gorm:"many2many:lesson_student"`
}

func  (Student)  TableName()  string  {
    return  "student"

}
LessonStudent
package  models

type  LessonStudent  struct  {
    LessonId  int
    StudentId  int
}

func  (LessonStudent)  TableName()  string  {

    return  "lesson_student"
}
2 、获取学生信息 以及课程信息
studentList  :=  []models.Student{}

models.DB.Find(&studentList)

c.JSON(http.StatusOK,  studentList)


lessonList  :=  []models.Lesson{}

models.DB.Find(&lessonList)

c.JSON(http.StatusOK,  lessonList)
3 、查询学生信息的时候获取学生的选课信息
studentList  :=  []models.Student{}

models.DB.Preload("Lesson").Find(&studentList)

c.JSON(http.StatusOK,  studentList)
4 、查询张三选修了哪些课程
studentList  :=  []models.Student{}

models.DB.Preload("Lesson").Where("id= 1").Find(&studentList)

c.JSON(http.StatusOK,  studentList)
5 、课程被哪些学生选修了
lessonList  :=  []models.Lesson{}

models.DB.Preload("Student").Find(&lessonList)

c.JSON(http.StatusOK,  lessonList)
6 、计算机网络被那些学生选修了
lessonList  :=  []models.Lesson{}

models.DB.Preload("Student").Where("id= 1").Find(&lessonList)

c.JSON(http.StatusOK,  lessonList)
7 、查询数据指定条件
lessonList  :=  []models.Lesson{}

models.DB.Preload("Student").Offset(1).Limit(2).Find(&lessonList)

c.JSON(http.StatusOK,  lessonList)
8 、关联查询指定子集的筛选条件
https://gorm.io/zh_CN/docs/preload.html
张三被开除了 查询课程被哪些学生选修的时候要去掉张三
用法:
access  :=  []models.Access{}
models. DB. Preload("AccessItem",  "status= 1").Order("sort  desc").Where(" module_id=?",  0).Fin d(&access)

lessonList  :=  []models.Lesson{}

models.DB.Preload("Student",  "id!= 1"). Find(&lessonList)

c.JSON(http.StatusOK,  lessonList)
lessonList  :=  []models.Lesson{}

models.DB.Preload("Student",  "id  not  in  (1,2)").Find(&lessonList)

c.JSON(http.StatusOK,  lessonList)
9 、 自定义预加载 SQL
查看课程被哪些学生选修 要求:学生 id 倒叙输出
https://gorm.io/zh_CN/docs/preload.html
注意:需要引入 gorm.io/gorm 这个包
lessonList  :=  []models.Lesson{}
models.DB.Preload("Student",  func(db  *gorm.DB)  *gorm.DB  {
    return  models.DB.Order("id  DESC")
}).Find(&lessonList)
c.JSON(http.StatusOK,  lessonList)
lessonList  :=  []models.Lesson{}

models.DB.Preload("Student",  func(db  *gorm.DB)  *gorm.DB  {
    return  models.DB.Where("id>3").Order("id  DESC")

}).Find(&lessonList)

c.JSON(http.StatusOK,  lessonList)
十七、**GORM **中使用事务
事务处理可以用来维护数据库的完整性,保证成批的 SQL 语句要么全执行,要么全不执行
17.1 、禁用默认事务
:::tips
为了确保数据一致性,GORM 会在事务里执行写入操作(创建、更新、删除) 。如果没有 这方面的要求,您可以在初始化时禁用它,这将获得大约 30%+ 性能提升。
:::
package  models

import  (
    "fmt"
    "gorm.io/driver/mysql"
    "gorm.io/gorm"
)

var  DB  *gorm.DB
var  err  error

func  init()  {
    dsn  :=  "root:123456@tcp(192.168.0.6:3306)/gin?charset=utf8mb4&parseTime=True&loc= L ocal"
    DB,  err  =  gorm.Open(mysql.Open(dsn),  &gorm.Config{

        SkipDefaultTransaction:  true,
    })
    DB.Debug()
    if  err   !=  nil  {
        fmt.Println(err)
    }
}
:::tips
GORM 默认会将单个的 create, update, delete 操作封装在事务内进行处理,以确保数据的完 整性。
如果你想把多个 create, update, delete 操作作为一个原子操作,Transaction 就是用来完成 这个的。
:::
17.2 、事务
https://gorm.io/zh_CN/docs/transactions.html
1 、事务执行流程
要在事务中执行一系列操作,通常您可以参照下面的流程来执行。
db.Transaction(func(tx  *gorm.DB)  error  {
    //  在事务中执行一些 db  操作(从这里开始,您应该使用 'tx'  而不是 'db')
    if  err   :=  tx.Create(&Animal{Name:   "Giraffe"}).Error;  err   !=  nil  {
        //  返回任何错误都会回滚事务
        return  err
    }

    if  err   :=  tx.Create(&Animal{Name:   "Lion"}).Error;  err   !=   nil  {
        return  err
    }

    //  返回 nil  提交事务
    return  nil
})
2 、事务(手动控制)
//  开启事务
tx := db.Begin()
//  在事务中做一些数据库操作 (这里应该使用 'tx'   ,而不是 'db')
tx.Create(...)
// ...
//  有错误时,手动调用事务的 Rollback()
tx.Rollback()
//  无错误时,手动调用事务的 Commit()
tx.Commit()
3 、张三给李四转账
package  admin

import  (
    "fmt"

    "gindemo13/models"

    "github.com/gin-gonic/gin"
)

type  TransitionController  struct  {
    BaseController
}

func  (con  TransitionController)   Index(c  *gin.Context)  {
    tx  :=  models.DB.Begin()
    defer  func()  {
        if  r  :=  recover();  r   !=  nil  {
            tx.Rollback()
            con.error(c)
        }
    }()

    if  err  :=  tx.Error;  err   !=  nil  {
        fmt.Println(err)
        con.error(c)
    }

    //  张三账户减去 100
    u1  :=  models.Bank{Id:  1}
    tx.Find(&u1)
    u1.Balance  =  u1.Balance  -  100
    if  err   :=  tx.Save(&u1).Error;   err   !=  nil  {
        tx.Rollback()
        con.error(c)
    }
    //  panic("遇到了错误")
    //  李四账户增加 100
    u2  :=  models.Bank{Id:  2}
    tx.Find(&u2)
    u2.Balance  =  u2.Balance  +  100
    //  panic("失败")
    if  err   :=  tx.Save(&u2).Error;   err   !=  nil  {
        tx.Rollback()
        con.error(c)
    }
    tx.Commit()
    con.success(c)
}
十八、**Gin **中使用 **go-ini 加载.ini **配置文件
18.1 、go-ini 介绍
go-ini 官方介绍,go-ini 是地表 最强大、最方便 和 最流行 的 Go 语言 INI 文件操作库。
Github 地址:https://github.com/go-ini/ini
官方文档:https://ini.unknwon.io/
18.2 、go-ini 使用
**1 **、新建 conf/app.ini
现在,我们编辑 my.ini 文件并输入以下内容
app_name    = itying gin
# possible values: DEBUG, INFO, WARNING, ERROR, FATAL
log_level = DEBUG
[mysql]
ip                = 192.168.0.6
port           = 3306

user           = root
password = 123456
database = gin
[redis]
ip       = 127.0.0.1
port = 6379
很好,接下来我们需要编写 main.go 文件来操作刚才创建的配置文件。
package  main
import  (

    "fmt"

    "os"

    "gopkg.in/ini.v1"
)

func  main()  {

    cfg,  err   :=  ini.Load("./conf/app.ini")
    if  err   !=  nil  {

        fmt.Printf("Fail  to  read  file:  %v",  err)

        os.Exit(1)

    }

    //  典型读取操作,默认分区可以使用空字符串表示

    fmt.Println("App  Mode:",  cfg.Section("").Key("app_name").String())

    fmt.Println("Data  Path:",  cfg.Section("mysql").Key("ip").String())


    //  差不多了,修改某个值然后进行保存

    cfg.Section("").Key("app_name").SetValue("itying  gin")
    cfg.SaveTo("./conf/app.ini")


}
18.3 、从.ini 中读取 mysql 配置
package  models
//https://gorm.io/zh_CN/docs/connecting  to  the_database.html
import  (
    "fmt"
    "os"
    "gopkg.in/ini.v1"
    "gorm.io/driver/mysql"
    "gorm.io/gorm"
)

var  DB  *gorm.DB

var  err  error

func  init()  {

    cfg,  err   :=  ini.Load("./conf/app.ini")

    if  err   !=  nil  {

        fmt.Printf("Fail  to  read  file:  %v",  err)
        os.Exit(1)

    }

    ip  :=  cfg.Section("mysql").Key("ip").String()

    port  :=  cfg.Section("mysql").Key("port").String()

    user  :=  cfg.Section("mysql").Key("user").String()

    password  :=  cfg.Section("mysql").Key("password").String()

    database  :=  cfg.Section(" mysql").Key("database").String()
    dsn  :=  fmt.Sprintf("%v:%v@tcp(%v:%v)/%v?charset=utf8mb4&parseTime=True&loc= Local ",  user,  password,  ip,  port,  database)

    fmt.Println(dsn)

    DB,  err  =  gorm.Open(mysql.Open(dsn),  &gorm.Config{
        QueryFields:  true,  //打印 sql

        //SkipDefaultTransaction:  true,  //禁用事务
    })

    if  err   !=  nil  {

        fmt.Println(err)

    }

}


 970
970


 被折叠的 条评论
为什么被折叠?
被折叠的 条评论
为什么被折叠?
 到【灌水乐园】发言


