


一、react的引入
需要引入三个文件
1.react.js
https://unpkg.com/react@17/umd/react.development.js
https://unpkg.com/react-dom@17/umd/react-dom.development.js
2.babel.js(因为react是xml编写的,所以需要用babel编译才不会报错)
https://unpkg.com/@babel/standalone/babel.min.js
以上都可以直接引入或者打开连接下载js代码,我是将代码下载本地做演示
<script src="./static/react.development.js"></script>
<script src="./static/react-dom.development.js"></script>
<script src="./static/babel.js"></script>
一定要按照上面的顺序,否则会报错
二、数据接收
1.constructor大体有两个作用
(1).初始化this.state
(2)纠正方法的this的指向
2.用到了constructor就必须写super(),是用来初始化this的,可以绑定事件到this上
<!DOCTYPE html>
<html lang="en">

<head>
    <meta charset="UTF-8">
    <meta http-equiv="X-UA-Compatible" content="IE=edge">
    <meta name="viewport" content="width=device-width, initial-scale=1.0">
    <title>Document</title>
    <link rel="stylesheet" href="./static/antd.css">
    <link rel="stylesheet" href="./style.css">
</head>

<body>
    <div id="app"></div>
</body>
<script src="./static/react.development.js"></script>
<script src="./static/react-dom.development.js"></script>
<script src="./static/babel.js"></script>
<script src="./static/antd.js"></script>
<script type="text/babel">
    // 父组件创建
    class Home extends React.Component {
        render() {
            return (
                // 组件嵌套最外层一定要加div
                <div>
                    <Header title={this.props.header}></Header>
                </div>
            )
        }
    }

    // 子组件创建
    class Header extends React.Component {
        //constructor大体有两个作用
        //1.初始化this.state
        //2.纠正方法的this的指向
        constructor(props) {
            //用到了constructor就必须写super(),是用来初始化this的,可以绑定事件到this上
            super(props);
            this.title = props.title;
        }
        render() {
            // react的class名一定要加Name,而且要驼峰式,等号后面引号内写class名
            return (
                <div >
                    <h1 className="styleClass">{this.title}</h1>
                </div>
            )
        }
    }

    ReactDOM.render(<Home header="我是参数传递的头部" />, document.getElementById('app'))

</script>

</html>
三、事件处理与绑定
1.数据的改变 要通过this.setState
this.setState({
属性名称:值
})
注意:
State 的更新可能是异步的
出于性能考虑,React 可能会把多个 setState() 调用合并成一个调用。
因为 this.props 和 this.state 可能会异步更新,所以你不要依赖他们的值来更新下一个状态。
例如,此代码可能会无法更新计数器:
this.setState({
  counter: this.state.counter + this.props.increment,
});
要解决这个问题,可以让 setState() 接收一个函数而不是一个对象。这个函数用上一个 state 作为第一个参数,将此次更新被应用时的 props 做为第二个参数:
this.setState((state, props) => ({
  counter: state.counter + props.increment
}));
上面使用了箭头函数,不过使用普通的函数也同样可以:
this.setState(function(state, props) {
  return {
    counter: state.counter + props.increment
  };
});
2.onClick:为点击事件标签
3.创建事件有两种方法
(1)需要在在constructor中bind来指定事件
this.start = this.start.bind(this);
<script type="text/babel">
// 父组件创建
class Home extends React.Component {
render() {
return (
// 组件嵌套最外层一定要加div
<div>
<Header title={this.props.header}></Header>
</div>
)
}
}
// 子组件创建
class Header extends React.Component {
constructor(props) {
super(props);
this.title = props.title;
this.state = {
date: new Date().toLocaleDateString(),
mytitle: props.title
}
//事件的创建需要先在constructor中加bind来指定
this.start = this.start.bind(this);
}
//创建事件
start() {
// 数据的改变 要通过this.setState({
// 属性名称:值
// })
this.setState({
mytitle: "66666"
})
}
render() {
// react的class名一定要加Name,而且要驼峰式,等号后面引号内写class名
// onClick:为点击事件标签
// this.start:为指向创建的事件进行调用
return (
<div >
<h1 className="styleClass">{this.state.mytitle}</h1>
<h2>{this.state.date}</h2>
<button onClick={this.start}>点我开始启动时间</button>
</div>
)
}
}
ReactDOM.render(<Home header="我是参数传递的头部" />, document.getElementById('app'))
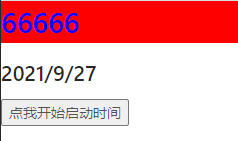
</script>点击前

点击后
(2)不想使用bind指定 可以使用箭头函数来处理this指向对象
<script type="text/babel">
    // 父组件创建
    class Home extends React.Component {
        render() {
            return (
                // 组件嵌套最外层一定要加div
                <div>
                    <Header title={this.props.header}></Header>
                </div>
            )
        }
    }

    // 子组件创建
    class Header extends React.Component {
        constructor(props) {
            super(props);
            this.title = props.title;
            this.state = {
                date: new Date().toLocaleDateString(),
                mytitle: props.title
            }
        }

        // 创建事件,命名为show
        show = () => {
            alert(this.title)
        }

        render() {
            // react的class名一定要加Name,而且要驼峰式,等号后面引号内写class名
            // onClick创建点击事件,this.show执行事件
            return (
                <div >
                    <h1 className="styleClass">{this.state.mytitle}</h1>
                    <h2>{this.state.date}</h2>
                    <button onClick={this.show}>点我开始启动时间</button>
                </div>
            )
        }
    }

    ReactDOM.render(<Home header="我是参数传递的头部" />, document.getElementById('app'))

</script>
点击前

点击后

4.参数的处理
(1)bind写法
将值传入事件中进行运行
创建事件,命名为show,(content)如函数取值
this.show.bind(this, "你好")传递数据需要加bind,括号内第一参数必须写this,第二参数传值
<script type="text/babel">
    // 父组件创建
    class Home extends React.Component {
        render() {
            return (
                // 组件嵌套最外层一定要加div
                <div>
                    <Header title={this.props.header}></Header>
                </div>
            )
        }
    }

    // 子组件创建
    class Header extends React.Component {
        constructor(props) {
            super(props);
            this.title = props.title;
            this.state = {
                date: new Date().toLocaleDateString(),
                mytitle: props.title
            }
        }

        // 创建事件,命名为show,(content)如函数取值
        show = (content) => {
            alert(this.title + "和" + content)
        }

        render() {
            // react的class名一定要加Name,而且要驼峰式,等号后面引号内写class名
            // onClick创建点击事件,this.show.bind(this, "你好")传递数据需要加bind,括号内第一参数必须写this,第二参数传值
            return (
                <div >
                    <h1 className="styleClass">{this.state.mytitle}</h1>
                    <h2>{this.state.date}</h2>
                    <button onClick={this.show.bind(this, "你好")}>点我开始启动时间</button>
                </div>
            )
        }
    }

    ReactDOM.render(<Home header="我是参数传递的头部" />, document.getElementById('app'))

</script>
点击后结果

(2)不写bind的简写方法
使用箭头函数可以省略bind和括号内第一参数this
        render() {
            // react的class名一定要加Name,而且要驼峰式,等号后面引号内写class名
            // onClick创建点击事件,使用箭头函数可以省略bind和括号内第一参数this
            return (
                <div >
                    <h1 className="styleClass">{this.state.mytitle}</h1>
                    <h2>{this.state.date}</h2>
                    <button onClick={() => this.show("你好")}>点我开始启动时间</button>
                </div>
            )
        }
5.最省略写法
创建事件直接像创建函数一样,不需要function和箭头
<script type="text/babel">
    // 父组件创建
    class Home extends React.Component {
        render() {
            return (
                // 组件嵌套最外层一定要加div
                <div>
                    <Header title={this.props.header}></Header>
                </div>
            )
        }
    }

    // 子组件创建
    class Header extends React.Component {
        constructor(props) {
            super(props);
            this.title = props.title;
            this.state = {
                date: new Date().toLocaleDateString(),
                mytitle: props.title
            }
        }

        // 创建事件直接像创建函数一样,不需要function和箭头
        start(id, content, e) {
            alert(e.target.innerHTML);//获取点击事件元素html
            this.setState({
                mytitle: '修改内容:' + content + 'id:' + id
            })
        }

        render() {
            // react的class名一定要加Name,而且要驼峰式,等号后面引号内写class名
            // onClick创建点击事件,使用箭头函数可以省略bind和括号内第一参数this
            return (
                <div >
                    <h1 className="styleClass">{this.state.mytitle}</h1>
                    <h2>{this.state.date}</h2>
                    <button onClick={(e) => this.start(1, "666666", e)}>事件绑定</button>
                </div>
            )
        }
    }

    ReactDOM.render(<Home header="我是参数传递的头部" />, document.getElementById('app'))

</script>
点击按钮前
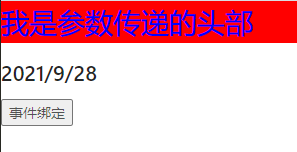
点击按钮后,弹出层显示按钮html内容

点击确认后,页面文本被修改

四、条件语句生成元素
这里做了几层数据传递,首先父组件将数据给到子组件
Content组价中子组件获取数据做判断
将DOM元素存入变量,使用{}可以动态展示
<script type="text/babel">
    // 父组件创建
    class Home extends React.Component {
        render() {
            return (
                // 组件嵌套最外层一定要加div
                // 这里做了几层数据传递,首先父组件将数据给到子组件
                <div>
                    <Header title={this.props.header}></Header>
                    <Content title={this.props.content} isLogin={this.props.isLogin}></Content>
                    <Footer title={this.props.footer}></Footer>
                </div>
            )
        }
    }

    // 子组件创建
    class Header extends React.Component {
        constructor(props) {
            super(props);
        }
        render() {
            return (
                <div >
                    <h1 className="styleClass">{this.props.title}</h1>
                </div>
            )
        }
    }
    class Content extends React.Component {
        constructor(props) {
            super(props);
        }

        render() {
            // 子组件获取数据做判断
            var button = null;
            if (this.props.isLogin == 1) {
                button = <button>已登录</button>
            } else {
                button = <button>未登录</button>
            }
            //将DOM元素存入变量,使用{}可以动态展示
            return (
                <div>
                    {button}
                    <h2>{this.props.title}</h2>
                </div>
            )
        }
    }

    class Footer extends React.Component {
        constructor(props) {
            super(props);
        }
        render() {
            return (
                <div >
                    <h1 className="styleClass">{this.props.title}</h1>
                </div>
            )
        }
    }

    ReactDOM.render(<Home header="头部描述" content='内容描述' footer='底部描述' isLogin='1' />, document.getElementById('app'))

</script>
页面显示结果

五、循环语句的生成
这里接上面代码在Footer组件中进行演示
使用map获取list中每个数据进行渲染
循环渲染一定要加key,否则或报错
<script type="text/babel">
    // 父组件创建
    class Home extends React.Component {
        render() {
            return (
                // 组件嵌套最外层一定要加div
                // 这里做了几层数据传递,首先父组件将数据给到子组件
                <div>
                    <Header title={this.props.header}></Header>
                    <Content title={this.props.content} isLogin={this.props.isLogin}></Content>
                    <Footer title={this.props.footer}></Footer>
                </div>
            )
        }
    }

    // 子组件创建
    class Header extends React.Component {
        constructor(props) {
            super(props);
        }
        render() {
            return (
                <div >
                    <h1 className="styleClass">{this.props.title}</h1>
                </div>
            )
        }
    }
    class Content extends React.Component {
        constructor(props) {
            super(props);
        }

        render() {
            // 子组件获取数据做判断
            var button = null;
            if (this.props.isLogin == 1) {
                button = <button>已登录</button>
            } else {
                button = <button>未登录</button>
            }
            //将DOM元素存入变量,使用{}可以动态展示
            return (
                <div>
                    {button}
                    <h2>{this.props.title}</h2>
                </div>
            )
        }
    }

    class Footer extends React.Component {
        constructor(props) {
            super(props);
            this.state = {
                list: [1, 2, 3]
            }
        }
        render() {
            // 使用map获取list中每个数据进行渲染
            // 循环渲染一定要加key,否则或报错
            var liList = this.state.list.map(function (item, index) {
                return <li key={index}>{item}</li>
            })
            return (
                <div >
                    <h1 className="styleClass">{this.props.title}</h1>
                    <ul>{liList}</ul>
                </div>
            )
        }
    }

    ReactDOM.render(<Home header="头部描述" content='内容描述' footer='底部描述' isLogin='1' />, document.getElementById('app'))

</script>
页面显示结果

五、插槽写法
使用Header组件演示
在子组件标签中写标签与内容,然后在子组件里用this.props.children接收渲染
<script type="text/babel">
    // 父组件创建
    class Home extends React.Component {
        render() {
            return (
                // 组件嵌套最外层一定要加div
                // 在子组件标签中写标签与内容,然后在子组件里用this.props.children接收渲染
                <div>
                    <Header title={this.props.header}>
                        <div>我是插槽1</div>
                        <div>我是插槽2</div>
                    </Header>
                    <Content title={this.props.content} isLogin={this.props.isLogin}></Content>
                    <Footer title={this.props.footer}></Footer>
                </div>
            )
        }
    }

    // 子组件创建
    class Header extends React.Component {
        constructor(props) {
            super(props);
        }
        // 创建标签,内容使用插槽this.props.children
        render() {
            return (
                <div >
                    <h1 className="styleClass">{this.props.title}</h1>
                    <h3>{this.props.children}</h3>
                </div>
            )
        }
    }
    class Content extends React.Component {
        constructor(props) {
            super(props);
        }

        render() {
            // 子组件获取数据做判断
            var button = null;
            if (this.props.isLogin == 1) {
                button = <button>已登录</button>
            } else {
                button = <button>未登录</button>
            }
            //将DOM元素存入变量,使用{}可以动态展示
            return (
                <div>
                    {button}
                    <h2>{this.props.title}</h2>
                </div>
            )
        }
    }

    class Footer extends React.Component {
        constructor(props) {
            super(props);
            this.state = {
                list: [1, 2, 3]
            }
        }
        render() {
            // 使用map获取list中每个数据进行渲染
            // 循环渲染一定要加key,否则或报错
            var liList = this.state.list.map(function (item, index) {
                return <li key={index}>{item}</li>
            })
            return (
                <div >
                    <h1 className="styleClass">{this.props.title}</h1>
                    <ul>{liList}</ul>
                </div>
            )
        }
    }

    ReactDOM.render(<Home header="头部描述" content='内容描述' footer='底部描述' isLogin='1' />, document.getElementById('app'))

</script>
页面结果


 1380
1380


 被折叠的 条评论
为什么被折叠?
被折叠的 条评论
为什么被折叠?
 到【灌水乐园】发言


