SpringBoot项目在不同环境下的配置以及打包方式

SpringBoot项目在不同环境下的配置以及打包方式

一、概述

在我们平时的开发中,一个项目因为要上线,会有很多种环境,在不同的环境中我们项目的配置文件往往都是不一样的,比如数据库Redis的那些配置,那我们怎么设置不用每次都进行修改呢?

由于上面的问题,我们直接配置三个配置文件,只需要打包的时候,根据不同环境打包不同的配置文件就好了,如下图
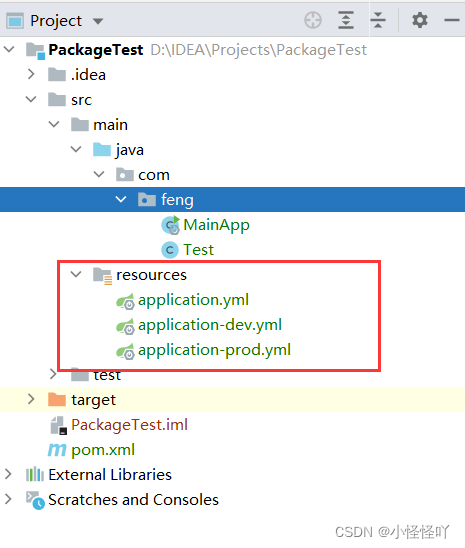
在这里插入图片描述
这三个文件中

application.yml 是启动服务时,Spring会自动加载的配置文件
application-dev.yml 代表的是开发环境时的配置文件
application-prod.yml 代表的是生产环境的配置文件

后面这两个文件在SpringBoot服务启动时,Spring不会自动加载他们,那么在不同的环境中时怎么加载不同的配置文件的呢?

二、配置文件的加载设置

因为在服务启动时,Spring会自动加载application.yml

所以我们只需在这个配置文件中设置,需要哪个就加载哪个就好了

在这里插入图片描述
如上图所示,在服务启动加载的时候,服务器就会加载application.yml文件,然后通过配置去调用application-dev.yml文件,选择开发环境。当然如此,当active: prod,那么服务在启动时,Spring就会调用application-prod.yml文件进入生产环境。

三、Maven不同环境的打包

首先我们进行动态的调用不同的配置文件,首先我们的前提条件是拥有上述的三个配置文件,然后根据这些文件的名字来进行下列配置,大家根据自己需求进行更改。

然后我们要这样配置我们的 pom.xml

      <profiles>
        <!--这是开发环境-->
        <profile>
            <id>dev</id>
            <properties>
                <!-- 环境标识,需要与配置文件的名称相对应 -->
                <activatedEnv>dev</activatedEnv>
            </properties>
            <activation>
                <!-- 默认环境 -->
                <activeByDefault>true</activeByDefault>
            </activation>
        </profile>
        <!--这是生产环境-->
        <profile>
            <id>prod</id>
            <properties>
                <activatedEnv>prod</activatedEnv>
            </properties>
        </profile>
    </profiles>

    <build>
        <!--最终 Jar 包的名字-->
        <finalName>Test</finalName>
        <!--Maven的打包插件-->
        <plugins>
            <plugin>
                <groupId>org.springframework.boot</groupId>
                <artifactId>spring-boot-maven-plugin</artifactId>
            </plugin>
            <!-- resource插件 -->
            <plugin>
                <groupId>org.apache.maven.plugins</groupId>
                <artifactId>maven-resources-plugin</artifactId>
                <executions>
                    <execution>
                        <id>test-resources</id>
                        <!--目标执行的阶段,具体值看Maven的生命周期列表;-->
                        <phase>compile</phase>
                        <!--一个plugin的execution的目标列表,也就是上面的id-->
                        <goals>
                            <goal>testResources</goal>
                        </goals>
                        <configuration>
                            <!-- 覆盖原有文件 -->
                            <overwrite>true</overwrite>
                            <outputDirectory>${project.build.outputDirectory}</outputDirectory>
                            <!-- 待处理的资源定义 -->
                            <resources>
                                <resource>
                                    <!-- 指定resources插件处理哪个目录下的资源文件 -->
                                    <directory>src/main/resources/${activatedEnv}</directory>
                                    <filtering>false</filtering>
                                </resource>
                            </resources>
                        </configuration>
                        <!--这个plugin是否应用到该POM的孩子POM,默认true;-->
                        <inherited>true</inherited>
                    </execution>
                </executions>
            </plugin>
        </plugins>
    </build>


然后在我们的 application.yml 配置动态的使用

spring:
  profiles:
    active: @activatedEnv@

这里的 @activatedEnv@ ,使用的就是我们在pom.xml里设置的<activatedEnv> ,当我们需要Maven打包时,他就会用这里的值来进行使用

然后在Maven打包时,我们只需要指定参数就好了

比如我们需要打包开发环境:

mvn clean package -P dev

打包生产环境

mvn clean package -P prod

我们只需要修改参数就行了!这样就会打包不同的配置文件!

  • 1
    点赞
  • 7
    收藏
    觉得还不错? 一键收藏
  • 0
    评论
使用Spring Boot Maven插件可以很方便地根据不同环境使用不同配置文件来打包WAR文件。 首先,在项目的资源目录下创建多个不同环境配置文件,如application-dev.properties、application-prod.properties、application-test.properties等。 然后,在pom.xml文件中,为每个环境配置一个profile,指定相应的配置文件。 ``` <profiles> <profile> <id>dev</id> <activation> <activeByDefault>true</activeByDefault> </activation> <build> <resources> <resource> <directory>src/main/resources</directory> <includes> <include>application-dev.properties</include> </includes> </resource> </resources> </build> </profile> <profile> <id>prod</id> <build> <resources> <resource> <directory>src/main/resources</directory> <includes> <include>application-prod.properties</include> </includes> </resource> </resources> </build> </profile> <profile> <id>test</id> <build> <resources> <resource> <directory>src/main/resources</directory> <includes> <include>application-test.properties</include> </includes> </resource> </resources> </build> </profile> </profiles> ``` 接下来,在插件配置中,使用resource元素来指定每个环境配置文件。 ``` <build> <plugins> <plugin> <groupId>org.springframework.boot</groupId> <artifactId>spring-boot-maven-plugin</artifactId> <configuration> <executable>true</executable> </configuration> </plugin> <plugin> <groupId>org.apache.maven.plugins</groupId> <artifactId>maven-assembly-plugin</artifactId> <executions> <execution> <id>make-assembly</id> <phase>package</phase> <goals> <goal>single</goal> </goals> <configuration> <finalName>my-project-${env}</finalName> <appendAssemblyId>false</appendAssemblyId> <descriptors> <descriptor>src/main/assembly/assembly.xml</descriptor> </descriptors> </configuration> </execution> </executions> </plugin> </plugins> </build> ``` 在上面的配置中,使用了一个单独的assembly.xml文件来定义如何打包WAR文件。在assembly.xml中,可以根据不同环境配置不同配置文件。 ``` <assembly xmlns:xsi="http://www.w3.org/2001/XMLSchema-instance" xmlns="http://maven.apache.org/ASSEMBLY/2.0.0" xsi:schemaLocation="http://maven.apache.org/ASSEMBLY/2.0.0 http://maven.apache.org/xsd/assembly-2.0.0.xsd"> <id>war</id> <formats> <format>war</format> </formats> <fileSets> <fileSet> <directory>${project.basedir}/src/main/resources</directory> <outputDirectory>/</outputDirectory> <includes> <include>application*.properties</include> </includes> </fileSet> </fileSets> </assembly> ``` 最后,使用命令mvn -P dev package可以选择不同的profile进行打包,生成的WAR文件会根据不同环境使用相应的配置文件。例如,使用mvn -P dev package会使用application-dev.properties配置文件进行打包,生成的WAR文件名为my-project-dev.war。

“相关推荐”对你有帮助么?

  • 非常没帮助
  • 没帮助
  • 一般
  • 有帮助
  • 非常有帮助
提交
评论
添加红包

请填写红包祝福语或标题

红包个数最小为10个

红包金额最低5元

当前余额3.43前往充值 >
需支付:10.00
成就一亿技术人!
领取后你会自动成为博主和红包主的粉丝 规则
hope_wisdom
发出的红包
实付
使用余额支付
点击重新获取
扫码支付
钱包余额 0

抵扣说明:

1.余额是钱包充值的虚拟货币,按照1:1的比例进行支付金额的抵扣。
2.余额无法直接购买下载,可以购买VIP、付费专栏及课程。

余额充值