


 使用mysqldump备份所有数据库并恢复。要求保持数据库的一致性的前提下尽量减少数据库的锁,然后用binlog前滚到指定时间点模拟:周一到周日每天晚上十点都会做一个全备,某天(周四)早上十点数据库down了。问怎么恢复到最新的时间点思路:周三晚上十点之前的通过全备来恢复,周三晚上十点之后到周四早上十点之间的通过binlog恢复条件:准备两台mysql服务器,且mysql服务都在开启的状态下,注意不要是主从服务器步骤:1、准备数据:(模拟周三晚上十点之前的数据)[root@lzl
使用mysqldump备份所有数据库并恢复。要求保持数据库的一致性的前提下尽量减少数据库的锁,然后用binlog前滚到指定时间点
模拟:周一到周日每天晚上十点都会做一个全备,某天(周四)早上十点数据库down了。问怎么恢复到最新的时间点
思路:周三晚上十点之前的通过全备来恢复,周三晚上十点之后到周四早上十点之间的通过binlog恢复
条件:准备两台mysql服务器,且mysql服务都在开启的状态下,注意不要是主从服务器
步骤:
1、准备数据:(模拟周三晚上十点之前的数据)
[root@lzl ~]# mysql -uroot -p
Enter password:
Welcome to the MySQL monitor. Commands end with ; or \g.
Your MySQL connection id is 2
Server version: 5.7.34 MySQL Community Server (GPL)Copyright (c) 2000, 2021, Oracle and/or its affiliates.
Oracle is a registered trademark of Oracle Corporation and/or its
affiliates. Other names may be trademarks of their respective
owners.Type 'help;' or '\h' for help. Type '\c' to clear the current input statement.
mysql> create database cool;
Query OK, 1 row affected (0.01 sec)mysql> use cool;
Database changed
mysql> create table y1(id int,name varchar(20));
Query OK, 0 rows affected (0.02 sec)mysql> insert into y1 values(1,'qq'),(2,'ww'),(3,'ee');
Query OK, 3 rows affected (0.05 sec)
Records: 3 Duplicates: 0 Warnings: 0mysql> commit;
Query OK, 0 rows affected (0.00 sec)
commit:提交的意思,通常用在对数据库和表做完修改之后,将修改之后的内容更新到磁盘
2、备份数据库(在gtid开启的前提下):(模拟每天都会做的全备)
[root@lzl tmp]# mysqldump -uroot -p -A --master-data=2 --single-transaction --set-gtid-purged=OFF >/opt/full.sql
开启gtid的方法:在/etc/my.cnf配置文件里添加以下几行内容,保存之后重启service mysql restart
server_id=8
gtid_mode=on
enforce_gtid_consistency=on
#binlog
log_bin=master-binlog
log-slave-updates=1
binlog_format=row#relay log
skip-slave-start=1
3、新建一个数据库及表:(模拟数据库down了之后做的新增的数据)
mysql> create database t1;
Query OK, 1 row affected (0.00 sec)mysql> use t1;
Database changed
mysql> create table t1(id int,name varchar(20));
Query OK, 0 rows affected (0.03 sec)mysql> insert into t1(id,name) values(1,'php'),(2,'java'),(3,'python');
Query OK, 3 rows affected (0.01 sec)
Records: 3 Duplicates: 0 Warnings: 0mysql> select * from t1;
+------+--------+
| id | name |
+------+--------+
| 1 | php |
| 2 | java |
| 3 | python |
+------+--------+
3 rows in set (0.00 sec)mysql> commit;
Query OK, 0 rows affected (0.00 sec)
4、删库:(模拟故障)
mysql> drop database t1;
Query OK, 1 row affected (0.04 sec)mysql> commit;
Query OK, 0 rows affected (0.00 sec)mysql> show databases;
+--------------------+
| Database |
+--------------------+
| information_schema |
| cool |
| mysql |
| performance_schema |
| sys |
+--------------------+
5 rows in set (0.00 sec)
5、查找binlog的起点及终点:
起点:vi /opt/full.sql
找到 -- CHANGE MASTER TO MASTER_LOG_FILE='master-binlog.000001', MASTER_LOG_POS=154;
找起点的时候注意往下找一下有没有建库建表的命令,以保证是否备好份了
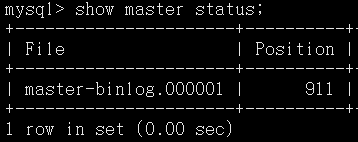
终点:
进数据库 show master status;
6、截取binlog起点及终点的日志:
[root@lzl ~]# mysqlbinlog --skip-gtids --start-position=154 --stop-position=911 /data/mysql/data/master-binlog.000001 > /opt/binlog.sql
7、临时库上恢复数据到最新的时间点:
在第一台服务器上(出故障的那台)复制日志到临时服务器上:
[root@lzl ~]# scp /opt/full.sql root@192.168.60.9:/opt
The authenticity of host '192.168.60.9 (192.168.60.9)' can't be established.
ECDSA key fingerprint is SHA256:yfhFf20ZhHOC8k7Gh0XWXpnCy90l99dVH07pbH+k8zw.
ECDSA key fingerprint is MD5:05:7c:5c:52:88:29:6e:9c:61:42:00:62:92:85:94:55.
Are you sure you want to continue connecting (yes/no)? yes
Warning: Permanently added '192.168.60.9' (ECDSA) to the list of known hosts.
root@192.168.60.9's password:
full.sql 100% 853KB 29.8MB/s 00:00
[root@lzl ~]# scp /opt/binlog.sql root@192.168.60.9:/opt
root@192.168.60.9's password:
binlog.sql 100% 2470 1.2MB/s 00:00
复制之前查看:
[root@hh ~]# ls /opt/
mysql-5.7.34-linux-glibc2.12-x86_64.tar.gz
复制之后查看
[root@hh ~]# ls /opt
binlog.sql full.sql mysql-5.7.34-linux-glibc2.12-x86_64.tar.gz
进数据库执行一下刚刚的文件并查看是否恢复数据:
mysql> source /opt/full.sql;
mysql> show databases;
mysql> source /opt/binlog.sql;
mysql> show databases;
练习:
1、创建一个数据库ceshi
2、在ceshi下创建一张表t1
3、插入5行任意数据
4、全备
5、插入两行数据,任意修改3行数据,删除一行数据
6、删除所有数据
7、在t1中又插入5行新数据,修改三行数据
8、现要求跳过6恢复表数据
1、
mysql> create database ceshi;
Query OK, 1 row affected (0.00 sec)mysql> show databases;
+--------------------+
| Database |
+--------------------+
| information_schema |
| ceshi |
| mysql |
| performance_schema |
| sys |
+--------------------+
5 rows in set (0.00 sec)
2、
mysql> use ceshi;
Database changed
mysql> create table t1(id int,name varchar(20));
Query OK, 0 rows affected (0.06 sec)
3、
mysql> insert into t1 values (1,'xiaoxiao'),(2,'lijia'),(3,'yueyue'),(4,'leilei'),(5,'yuge');
Query OK, 5 rows affected (0.06 sec)
Records: 5 Duplicates: 0 Warnings: 0
4、
[root@lzl ~]# mysqldump -uroot -p --set-gtid-purged=OFF --master-data=2 --single-transaction -A > /opt/full_2021-5-19.sql
Enter password:
[root@lzl ~]# ls /opt/
full_2021-5-19.sql –p
mysql-5.7.34-linux-glibc2.12-x86_64.tar.gz
5、
mysql> insert into ceshi.t1 values (6,'help'),(7,'type');
Query OK, 2 rows affected (0.00 sec)
Records: 2 Duplicates: 0 Warnings: 0mysql> select * from ceshi.t1;
+------+----------+
| id | name |
+------+----------+
| 1 | xiaoxiao |
| 2 | lijia |
| 3 | yueyue |
| 4 | leilei |
| 5 | yuge |
| 6 | help |
| 7 | type |
+------+----------+
7 rows in set (0.00 sec)mysql> update ceshi.t1 set name='aaa' where id=1;
Query OK, 1 row affected (0.00 sec)
Rows matched: 1 Changed: 1 Warnings: 0mysql> update ceshi.t1 set name='bbb' where id=3;
Query OK, 1 row affected (0.01 sec)
Rows matched: 1 Changed: 1 Warnings: 0mysql> update ceshi.t1 set name='ccc' where id=5;
Query OK, 1 row affected (0.00 sec)
Rows matched: 1 Changed: 1 Warnings: 0mysql> select * from ceshi.t1;
+------+--------+
| id | name |
+------+--------+
| 1 | aaa |
| 2 | lijia |
| 3 | bbb |
| 4 | leilei |
| 5 | ccc |
| 6 | help |
| 7 | type |
+------+--------+
7 rows in set (0.00 sec)mysql> use ceshi
Database changed
mysql> delete from t1 where id=4;
Query OK, 1 row affected (0.01 sec)mysql> select * from t1;
+------+-------+
| id | name |
+------+-------+
| 1 | aaa |
| 2 | lijia |
| 3 | bbb |
| 5 | ccc |
| 6 | help |
| 7 | type |
+------+-------+
6 rows in set (0.00 sec)
6、
mysql> truncate table t1;
Query OK, 0 rows affected (0.02 sec)mysql> select * from t1;
Empty set (0.00 sec)
7、
mysql> update t1 set name='dada' where id=11;
Query OK, 1 row affected (0.00 sec)
Rows matched: 1 Changed: 1 Warnings: 0mysql> update t1 set id=88 where name='zz';
Query OK, 1 row affected (0.00 sec)
Rows matched: 1 Changed: 1 Warnings: 0mysql> update t1 set name='xiaoxiao' where id=33;
Query OK, 1 row affected (0.01 sec)
Rows matched: 1 Changed: 1 Warnings: 0mysql> select * from t1;
+------+----------+
| id | name |
+------+----------+
| 11 | dada |
| 22 | ww |
| 33 | xiaoxiao |
| 88 | zz |
| 55 | cc |
+------+----------+
5 rows in set (0.00 sec)
8、
[root@lzl ~]# mysqlbinlog --start-position=154 --stop-position=2758
/data/mysql/data/master-binlog.000003 > /opt/binlog.sql
[root@lzl ~]# ls /opt/binlog.sql
/opt/binlog.sql
[root@lzl ~]# vi /opt/binlog.sql
[root@lzl ~]# scp /opt/full_2021-5-19.sql root@192.168.60.9:/opt/
The authenticity of host '192.168.60.9 (192.168.60.9)' can't be
established.
ECDSA key fingerprint is SHA256:yfhFf20ZhHOC8k7Gh0XWXpnCy90l99dVH07pbH
+k8zw.
ECDSA key fingerprint is
MD5:05:7c:5c:52:88:29:6e:9c:61:42:00:62:92:85:94:55.
Are you sure you want to continue connecting (yes/no)? yes
Warning: Permanently added '192.168.60.9' (ECDSA) to the list of known
hosts.
root@192.168.60.9's password:
full_2021-5-19.sql 100% 854KB
26.5MB/s 00:00
[root@lzl ~]# scp /opt/binlog.sql root@192.168.60.9:/opt/
root@192.168.60.9's password:
binlog.sql 100% 9888
94.1KB/s 00:00[root@hh ~]# service mysql start
Starting MySQL.. SUCCESS!
[root@hh ~]# mysql -uroot -p
Enter password:
mysql> source /opt/full_2021-5-19.sql;
mysql> show databases;
+--------------------+
| Database |
+--------------------+
| information_schema |
| ceshi |
| mysql |
| performance_schema |
| sys |
+--------------------+
5 rows in set (0.01 sec)mysql> use ceshi;
Database changed
mysql> select * from t1;
+------+----------+
| id | name |
+------+----------+
| 1 | xiaoxiao |
| 2 | lijia |
| 3 | yueyue |
| 4 | leilei |
| 5 | yuge |
+------+----------+
5 rows in set (0.00 sec)mysql> source /opt/binlog.sql;
mysql> select * from t1;
+------+----------+
| id | name |
+------+----------+
| 11 | dada |
| 22 | ww |
| 33 | xiaoxiao |
| 88 | zz |
| 55 | cc |
+------+----------+
5 rows in set (0.00 sec)


 1707
1707


 被折叠的 条评论
为什么被折叠?
被折叠的 条评论
为什么被折叠?
 到【灌水乐园】发言


