


Lab3 实验报告
一、实验要求
主要工作
- 第一部分: 了解LLVM IR。通过clang生成的.ll,了解LLVM IR与c代码的对应关系。完成1.3
- 第二部分: 了解LightIR。通过助教提供的c++例子,了解LightIR的c++接口及实现。完成2.3
- 第三部分: 理解Visitor Pattern。
- 实验报告:在 report.md 中回答3个问题。
编译与运行
在${WORKSPACE}/build/下执行:# 如果存在 CMakeCache.txt 要先删除 # rm CMakeCache.txt cmake .. make make install你可以得到对应
gcd_array_generator.cpp的可执行文件。
在完成2.3时,在${WORKSPACE}/tests/lab3/CMakeLists.txt中去掉对应的注释,再在${WORKSPACE}/build/下执行cmake ..与make指令,即可得到对应的可执行文件。验证
本次试验测试案例只有${WORKSPACE}/tests/lab3/c_cases中的4个样例。请大家自行验证。
助教会执行你们的代码,并使用diff命令进行验证。
二、实验难点
invalid use of function-local name
将
store i32 10, i32* getelementptr inbounds ([10 x i32], [10 x i32]* %1, i64 0, i64 0)改为
	%2 = getelementptr inbounds [10 x i32], [10 x i32]* %1, i64 0, i64 0
	store i32 10, i32* %2
即可
浮点数问题
尝试了很多修改,但都失败。
最后输入了
clang -S -emit-llvm if.c指令,看了一下样例,才发现要写成浮点数的机器表达形式。因此,修改方法为:
将
store float 5.555, float* %1改为
store float 0x40163851E0000000, float* %1跳转错误
代码形如此:
会报错:
因为实际上,代码并不会跳入基本块
8,而是会在store i32 0, i32* %2语句执行完毕后结束。因此,需要加跳转语句br label %8在其后,以确保能跳入基本块8,从而进行后续的跳转。但修改之后,还有错误:
因为寄存器的调用要按照顺序,因此,重新修改顺序即可。
实际上,修改寄存器的调用的这个步骤特别繁琐,经过了N久时间,才调整完毕。因此,在遇到有跳转的时候,先别写 br 语句中的 label 参数,先顺着下来,最后再补齐 label 参数。当然,最好先打草稿,再写代码。
调整后为:
可成功运行并得到正确结果。
浮点数比较问题
在编写 if_generator.cpp 时,对于代码
auto fcmp = builder->create_fcmp_gt(aAlloca, CONST_FP(1.00));所产生的 .ll 文件的对应代码%op2 = fcmp ugt float* %op1,float 0x3ff0000000000000会导致报错:
经过修改,发现是因为之前的代码:
导致了
create_fcmp_gt的前一个参数类型是float*,后一个才需要额外标志float。因此,只需要将第一个参数修改为
float类型,即可消除后一个参数的额外标志,从而通过编译。将代码修改为:
对应生成的 .ll 也为:
经过测试,结果正确。


三、实验设计
查看 LLVM 的版本
为 10.0.0(是按照助教提供的镜像文件,但 LLVM 和要求的 10.0.1 差了一点点,但并不影响)
生成 gcd 例子进行学习
输入
clang -S -emit-llvm gcd_array.c指令:
查看 gcd_array.ll 文件,并输入
lli gcd_array.ll; echo $?指令,验证 gcd_array.ll 的正确性:
可以看到,输出结果为
18。而通过查看 gcd_array.c 文件,可以得出其运行后,输出结果也为18。因此,可以验证 gcd_array.ll 文件正确地对应了 gcd_array.c 文件。编写 .ll 文件
assign
查看 assign.c 文件
int main(){
int a[10];
a[0] = 10;
a[1] = a[0] * 2;
return a[1];
}
参考语法规则和样例,编写对应的 assign_hand.ll 文件
; ModuleID = 'assign.c'
source_filename = "assign.c"
target datalayout = "e-m:e-p270:32:32-p271:32:32-p272:64:64-i64:64-f80:128-n8:16:32:64-S128"
target triple = "x86_64-pc-linux-gnu"

; main 函数
define dso_local i32 @main() #0 {
	; int a[10];
	%1 = alloca [10 x i32]	; 创建空间,并返回指针

	; a[0] = 10;
	%2 = getelementptr inbounds [10 x i32], [10 x i32]* %1, i64 0, i64 0	; 获取a[0]指针
	store i32 10, i32* %2	; 将10存入a[0]中

	; a[1] = a[0] * 2;
	%3 = load i32, i32* %2	; 取出a[0],存到%3中
	%4 = mul i32 %3, 2		; 将值乘以2,存在%4中
	%5 = getelementptr inbounds [10 x i32], [10 x i32]* %1, i64 0, i64 1	;获取a[1]指针
	store i32 %4, i32* %5	; 写入a[1]中

	; return a[1]
	ret i32 %4				; 将a[0]返回
}
结果验证
assign.c 运行的结果
为 20
assign_hand.ll 测试的结果
也为 20,结果正确。
fun.c
查看 fun.c 文件
int callee(int a){
return 2 * a;
}
int main(){
return callee(110);
}
编写对应的 fun_hand.ll 文件
; ModuleID = 'fun.c'
source_filename = "fun.c"
target datalayout = "e-m:e-p270:32:32-p271:32:32-p272:64:64-i64:64-f80:128-n8:16:32:64-S128"
target triple = "x86_64-pc-linux-gnu"

; callee 函数
define dso_local i32 @callee(i32 %0) #0{
	; return 2 * a
	%2 = mul i32 %0, 2		; 将参数%1乘以2存入%2中
	ret i32 %2				; 返回%2
}

; main 函数
define dso_local i32 @main() #0 {
	; return callee(110);
	%1 = call i32 @callee(i32 110)	; 调用函数callee,并将结果存到%1中
	ret i32 %1						; 返回%1
}
结果验证
fun.c 的执行结果
为 220
fun_hand.ll 的测试结果
也为 220,结果正确
if.c
查看 if.c 文件
int main(){
float a = 5.555;
if(a > 1)
 return 233;
return 0;
}
编写对应的 if_hand.ll 文件
; ModuleID = 'if.c'
source_filename = "if.c"
target datalayout = "e-m:e-p270:32:32-p271:32:32-p272:64:64-i64:64-f80:128-n8:16:32:64-S128"
target triple = "x86_64-pc-linux-gnu"

; main 函数
define dso_local i32 @main() #0 {
	; float a = 5.555;
	%1 = alloca float				; 创建空间,并返回指针
	store float 0x40163851E0000000, float* %1	; 将浮点数5.555存入%1所指向的空间中

	; if(a > 1)
	%2 = load float, float* %1		; 取出%1所指向的空间中的值
	%3 = fcmp ugt float %2, 1.000	; 将其和1进行比较,返回结果到%3中
	br i1 %3, label %4, label %5	; 如果大于,则跳转到%4,否则跳转到%5

4:	; return 233;
	ret i32 233		; 返回233

5:	; return 0;
	ret i32 0		; 返回0
}
结果验证
if.c 的执行结果
为 233
if_hand.ll 的测试结果
也为 233,结果正确
while.c
查看 while.c 文件
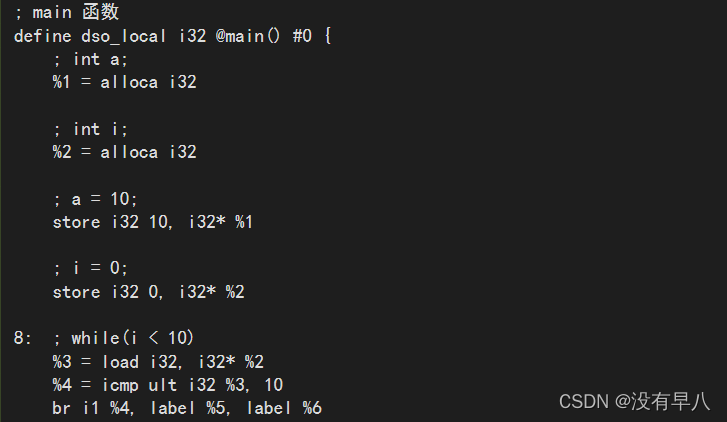
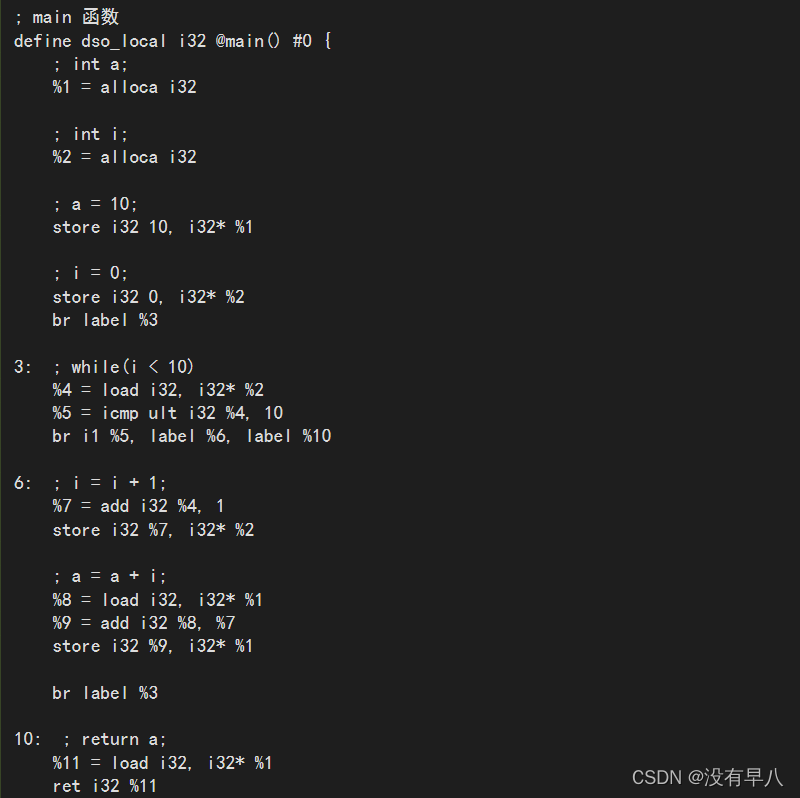
int main(){
int a;
int i;
a = 10;
i = 0;
while(i < 10){
 i = i + 1;
 a = a + i;
}
return a;
}
编写对应的 while_hand.ll 文件
; ModuleID = 'while.c'
source_filename = "while.c"
target datalayout = "e-m:e-p270:32:32-p271:32:32-p272:64:64-i64:64-f80:128-n8:16:32:64-S128"
target triple = "x86_64-pc-linux-gnu"

; main 函数
define dso_local i32 @main() #0 {
 ; int a;
 %1 = alloca i32         ; 申请空间,并保存返回地址给%1

 ; int i;
 %2 = alloca i32         ; 申请空间,并保存返回地址给%2

 ; a = 10;
 store i32 10, i32* %1   ; 将10赋值给%1指向的地址,即a

 ; i = 0;
 store i32 0, i32* %2    ; 将0赋值给%2指向的地址,即i
 br label %3             ; 跳转到循环判断语句,判断是否进入循环

3:  ; while(i < 10)
 %4 = load i32, i32* %2          ; 取出i
	%5 = icmp ult i32 %4, 10        ; 将i和10进行比较
	br i1 %5, label %6, label %10   ; 若i小于10,则跳转到%6;否则跳到%10

6:  ; i = i + 1;
 %7 = add i32 %4, 1      ; 将i+1的值存入%7
 store i32 %7, i32* %2   ; 将%7重新存入%2指向的地址,即i=%7

 ; a = a + i;
 %8 = load i32, i32* %1  ; 取出a
 %9 = add i32 %8, %7     ; 将a+i的值存入%9
 store i32 %9, i32* %1   ; 将%9重新存入%1指向的地址,即a=%9

 br label %3             ; 跳转到%3,判断是否继续循环

10:  ; return a;
 %11 = load i32, i32* %1 ; 若跳出循环,则取出a
 ret i32 %11             ; 返回a
}
结果验证
不附图了,结果是对的(发CSDN附图有点麻烦)
编写 generator 文件
assign
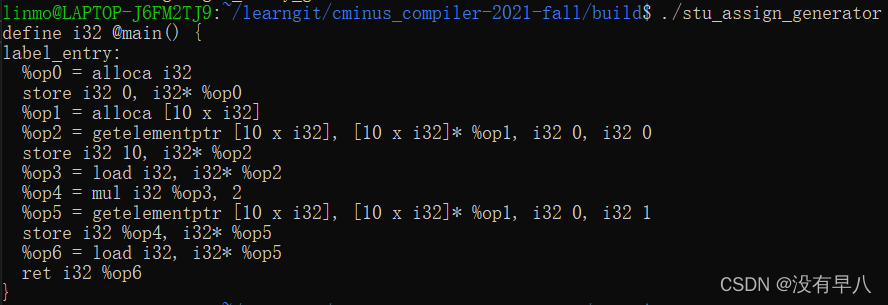
编写 assign_generator.cpp
#include "BasicBlock.h"
#include "Constant.h"
#include "Function.h"
#include "IRBuilder.h"
#include "Module.h"
#include "Type.h"

#include <iostream>
#include <memory>

#ifdef DEBUG  // 用于调试信息,大家可以在编译过程中通过" -DDEBUG"来开启这一选项
#define DEBUG_OUTPUT std::cout << __LINE__ << std::endl;  // 输出行号的简单示例
#else
#define DEBUG_OUTPUT
#endif

#define CONST_INT(num) \
 ConstantInt::get(num, module)

#define CONST_FP(num) \
 ConstantFP::get(num, module) // 得到常数值的表示,方便后面多次用到

int main() {
 auto module = new Module("Cminus code");            // module name是什么无关紧要
 auto builder = new IRBuilder(nullptr, module);      // 创建IRBuilder
 Type* Int32Type = Type::get_int32_type(module);

 // main函数
 auto mainFun = Function::create(FunctionType::get(Int32Type, {}),   /* 创建 main 函数 */
     "main", module);
 auto bb = BasicBlock::create(module, "entry", mainFun);             /* 创建基本块 */
 // BasicBlock的名字在生成中无所谓,但是可以方便阅读
 builder->set_insert_point(bb);                              /* 将基本块加入到builder中 */

 auto retAlloca = builder->create_alloca(Int32Type);         /* 创建返回默认量 */
 builder->create_store(CONST_INT(0), retAlloca);             /* 给默认量赋0,表示默认ret 0 */

 auto* arrayType = ArrayType::get(Int32Type, 10);            /* 申请10个int的内存空间,将地址指针存入arrayType中 */

 auto aAlloca = builder->create_alloca(arrayType);           /* 创建aAlloca数组,即a[10] */

 auto a0 = builder->create_gep(aAlloca, { CONST_INT(0), CONST_INT(0) }); /* 用变量a0存指向a[0]的指针 */
 builder->create_store(CONST_INT(10), a0);                               /* 将10存入a[0] */

 auto tmp = builder->create_load(a0);                        /* 取出a[0]的值存入变量tmp */
 auto mul = builder->create_imul(tmp, CONST_INT(2));         /* 将值乘以2存入变量mul中 */
 auto a1 = builder->create_gep(aAlloca, { CONST_INT(0), CONST_INT(1) }); /* 用变量a1存指向a[1]的指针 */
 builder->create_store(mul, a1);             /* 将结果mul存入a[1]中 */

 auto res = builder->create_load(a1);    /* 取出a[1]中的值作为返回结果,存到变量res中 */
 builder->create_ret(res);               /* 创建返回,将res返回 */

 std::cout << module->print();
 delete module;

 return 0;
}
验证
输入指令
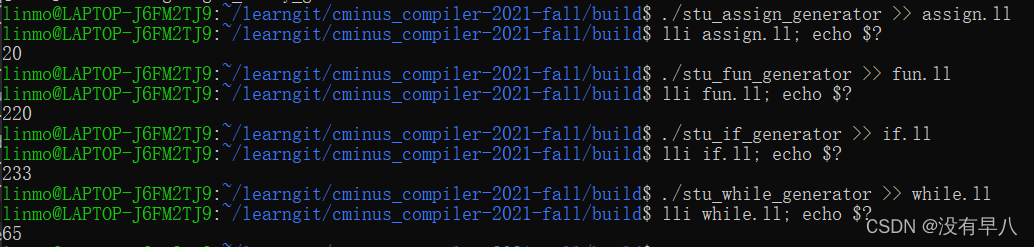
make,编译通过后输入指令./stu_assign_generator:
将输出的复制到 assign_hand.ll 文件中,保存,输入
lli assign_hand.ll; echo $?指令进行测试:
输出结果为 20,结果正确。
fun
编写 fun_generator.cpp
#include "BasicBlock.h"
#include "Constant.h"
#include "Function.h"
#include "IRBuilder.h"
#include "Module.h"
#include "Type.h"

#include <iostream>
#include <memory>

#ifdef DEBUG  // 用于调试信息,大家可以在编译过程中通过" -DDEBUG"来开启这一选项
#define DEBUG_OUTPUT std::cout << __LINE__ << std::endl;  // 输出行号的简单示例
#else
#define DEBUG_OUTPUT
#endif

#define CONST_INT(num) \
 ConstantInt::get(num, module)

#define CONST_FP(num) \
 ConstantFP::get(num, module) // 得到常数值的表示,方便后面多次用到

int main() {
 auto module = new Module("Cminus code");            // module name是什么无关紧要
 auto builder = new IRBuilder(nullptr, module);      // 创建IRBuilder
 Type* Int32Type = Type::get_int32_type(module);

 // callee函数,创建函数
 std::vector<Type*> Ints(1, Int32Type);                  /* 函数参数类型的vector,内含1个int类型 */
 auto calleeFunTy = FunctionType::get(Int32Type, Ints);  /* 通过返回值类型与参数类型列表得到函数类型 */
 auto calleeFun = Function::create(calleeFunTy,          /* 由函数类型得到函数 */
     "callee", module);
 auto bb = BasicBlock::create(module, "fun", calleeFun); /* 创建基本块,命名为fun */
 builder->set_insert_point(bb);                          /* 将基本块插入builder中 */
 // 传参
 auto aAlloca = builder->create_alloca(Int32Type);       /* 在内存中分配参数a的位置 */
 std::vector<Value*> args;                               /* 获取callee函数的形参,通过Function中的iterator */
 for (auto arg = calleeFun->arg_begin(); arg != calleeFun->arg_end(); arg++) {
     args.push_back(*arg);   // * 号运算符是从迭代器中取出迭代器当前指向的元素
 }
 builder->create_store(args[0], aAlloca);                /* 存储参数a */
 // 具体执行
 auto aLoad = builder->create_load(aAlloca);             /* 将参数a存到变量aLoad中 */
 auto res = builder->create_imul(aLoad, CONST_INT(2));   /* 将值乘以2存入变量res中 */
 builder->create_ret(res);                               /* 创建返回,将res返回 */

 // main函数
 auto mainFun = Function::create(FunctionType::get(Int32Type, {}),   /* 创建 main 函数 */
     "main", module);
 bb = BasicBlock::create(module, "main", mainFun);           /* 创建基本块,命名为main */
 builder->set_insert_point(bb);                              /* 将基本块加入到builder中 */
 // 设置默认返回
 auto retAlloca = builder->create_alloca(Int32Type);         /* 创建返回默认量 */
 builder->create_store(CONST_INT(0), retAlloca);             /* 给默认量赋0,表示默认ret 0 */
 // 具体执行
 auto call = builder->create_call(calleeFun, { CONST_INT(110) });    /* 调用函数calleeFun,将结果存到变量call中 */
 builder->create_ret(call);      /* 返回结果值 */

 std::cout << module->print();
 delete module;

 return 0;
}
验证
输入指令
make,编译通过后输入指令./stu_fun_generator:不附图了(CSDN附图好麻烦)
将输出的复制到 fun_hand.ll 文件中,保存,输入
lli fun_hand.ll; echo $?指令进行测试:不附图了(CSDN附图好麻烦)
输出结果为 220,结果正确。
if
编写 if_generator.cpp
#include "BasicBlock.h"
#include "Constant.h"
#include "Function.h"
#include "IRBuilder.h"
#include "Module.h"
#include "Type.h"

#include <iostream>
#include <memory>

#ifdef DEBUG  // 用于调试信息,大家可以在编译过程中通过" -DDEBUG"来开启这一选项
#define DEBUG_OUTPUT std::cout << __LINE__ << std::endl;  // 输出行号的简单示例
#else
#define DEBUG_OUTPUT
#endif

#define CONST_INT(num) \
 ConstantInt::get(num, module)

#define CONST_FP(num) \
 ConstantFP::get(num, module) // 得到常数值的表示,方便后面多次用到

int main() {
 auto module = new Module("Cminus code");            // module name是什么无关紧要
 auto builder = new IRBuilder(nullptr, module);      // 创建IRBuilder
 Type* Int32Type = Type::get_int32_type(module);

 // main函数
 auto mainFun = Function::create(FunctionType::get(Int32Type, {}),   /* 创建 main 函数 */
     "main", module);
 auto bb = BasicBlock::create(module, "main", mainFun);              /* 创建基本块,命名为main */
 builder->set_insert_point(bb);                              /* 将基本块加入到builder中 */
 // 设置默认返回
 auto retAlloca = builder->create_alloca(Int32Type);         /* 创建返回默认量 */
 builder->create_store(CONST_INT(0), retAlloca);             /* 给默认量赋0,表示默认ret 0 */
 // 具体执行
 Type* FloatType = Type::get_float_type(module);             /* 获取单个float类型的指针 */
 auto aAlloca = builder->create_alloca(FloatType);           /* 根据float类型的指针,申请一个float变量空间 */
 builder->create_store(CONST_FP(5.555), aAlloca);            /* 将值5.555存入该变量空间 */

 auto a = builder->create_load(aAlloca);                     /* 取出该变量空间内的值,即a的值 */
 auto fcmp = builder->create_fcmp_gt(a, CONST_FP(1.00));     /* 将其和1.00进行比较,返回结果存到fcmp中 */

 auto trueBB = BasicBlock::create(module, "trueBB", mainFun);/* 符合if条件的分支 */
 auto falseBB = BasicBlock::create(module, "falseBB", mainFun);  /* 不符合if条件的分支 */
 builder->create_cond_br(fcmp, trueBB, falseBB);             /* 根据fcmp创建跳转语句 */

 builder->set_insert_point(trueBB);      // if true; 分支的开始需要SetInsertPoint设置
 builder->create_ret(CONST_INT(233));    /* 创建返回,将值233返回 */

 builder->set_insert_point(falseBB);     // if false; 分支的开始需要SetInsertPoint设置
 builder->create_ret(CONST_INT(0));      /* 创建返回,将值0返回 */

 std::cout << module->print();
 delete module;

 return 0;
}
验证
输入指令
make,编译通过后输入指令./stu_if_generator:不附图了(CSDN附图好麻烦)
将输出的复制到 if_hand.ll 文件中,保存,输入
lli if_hand.ll; echo $?指令进行测试:不附图了(CSDN附图好麻烦)
输出结果为 233,结果正确。
while
编写 while_generator.cpp
#include "BasicBlock.h"
#include "Constant.h"
#include "Function.h"
#include "IRBuilder.h"
#include "Module.h"
#include "Type.h"

#include <iostream>
#include <memory>

#ifdef DEBUG  // 用于调试信息,大家可以在编译过程中通过" -DDEBUG"来开启这一选项
#define DEBUG_OUTPUT std::cout << __LINE__ << std::endl;  // 输出行号的简单示例
#else
#define DEBUG_OUTPUT
#endif

#define CONST_INT(num) \
 ConstantInt::get(num, module)

#define CONST_FP(num) \
 ConstantFP::get(num, module) // 得到常数值的表示,方便后面多次用到

int main() {
 auto module = new Module("Cminus code");            // module name是什么无关紧要
 auto builder = new IRBuilder(nullptr, module);      // 创建IRBuilder
 Type* Int32Type = Type::get_int32_type(module);

 // main函数
 auto mainFun = Function::create(FunctionType::get(Int32Type, {}),   /* 创建 main 函数 */
     "main", module);
 auto bb = BasicBlock::create(module, "main", mainFun);      /* 创建基本块,命名为main */
 builder->set_insert_point(bb);                              /* 将基本块加入到builder中 */
 // 设置默认返回
 auto retAlloca = builder->create_alloca(Int32Type);         /* 创建返回默认量 */
 builder->create_store(CONST_INT(0), retAlloca);             /* 给默认量赋0,表示默认ret 0 */
 // 创建基本块
 auto whileBB = BasicBlock::create(module, "whileBB", mainFun);  /* 进行while判断的基本块 */
 auto trueBB = BasicBlock::create(module, "trueBB", mainFun);    /* 符合判断条件的基本块分支 */
 auto falseBB = BasicBlock::create(module, "falseBB", mainFun);  /* 不符合判断条件的基本块分支 */
 // 具体执行
 auto aAlloca = builder->create_alloca(Int32Type);       /* 申请存a的空间,将地址赋值给指针aAlloca */
 auto iAlloca = builder->create_alloca(Int32Type);       /* 申请存i的空间,将地址赋值给指针iAlloca */
 builder->create_store(CONST_INT(10), aAlloca);          /* 将值10存入a的空间 */
 builder->create_store(CONST_INT(0), iAlloca);           /* 将值0存入i的空间 */
 builder->create_br(whileBB);                            /* 跳转到while循环条件判断,判断是否进入循环 */

 builder->set_insert_point(whileBB);                     /* while条件判断,设置SetInsertPoint */
 auto i = builder->create_load(iAlloca);                 /* 取出i */
 auto icmp = builder->create_icmp_lt(i, CONST_INT(10));  /* 判断i是否小于10,并将判断结果存到icmp中 */
 builder->create_cond_br(icmp, trueBB, falseBB);         /* 根据icmp创建跳转语句 */

 builder->set_insert_point(trueBB);                  // if true; 分支的开始需要SetInsertPoint设置
 i = builder->create_load(iAlloca);                  /* 取出i */
 auto tmp = builder->create_iadd(i, CONST_INT(1));   /* 将i加1,存到暂存变量tmp中,tmp=i+1 */
 builder->create_store(tmp, iAlloca);                /* 将tmp的值存到i中,i=tmp*/
 auto a = builder->create_load(aAlloca);             /* 取出a */
 i = builder->create_load(iAlloca);                  /* 取出i */
 tmp = builder->create_iadd(a, i);                   /* 将a加i的值存到tmp中,tmp=i+a */
 builder->create_store(tmp, aAlloca);                /* 将tmp存到a中,a=tmp */
 builder->create_br(whileBB);                        /* 跳转到while循环条件判断,判断是否继续循环 */

 builder->set_insert_point(falseBB);                 // if false; 分支的开始需要SetInsertPoint设置
 auto res = builder->create_load(aAlloca);           /* 取出a的值,存到res中,res=a */
 builder->create_ret(res);                           /* 将res返回,即return res */

 std::cout << module->print();
 delete module;

 return 0;
}
验证
输入指令
make,编译通过后输入指令./stu_while_generator:不附图了(CSDN附图好麻烦)
将输出的复制到 while_hand.ll 文件中,保存,输入
lli while_hand.ll; echo $?指令进行测试:不附图了(CSDN附图好麻烦)
输出结果为 65,结果正确。


四、实验结果验证
.c 源文件的编译执行的结果
.ll 文件的验证
generator 文件的验证
至此,代码编写正确,通过测试样例,结果正确!
![[外链图片转存失败,源站可能有防盗链机制,建议将图片保存下来直接上传(img-yIc7nn2P-1646219314581)(Markdown图片包/image-20211217153624977.png)]](https://i-blog.csdnimg.cn/blog_migrate/16f6d15f1d045524d2003f450e518112.png)

五、回答问题
问题1: cpp与.ll的对应
请描述你的cpp代码片段和.ll的每个BasicBlock的对应关系。描述中请附上两者代码。
代码
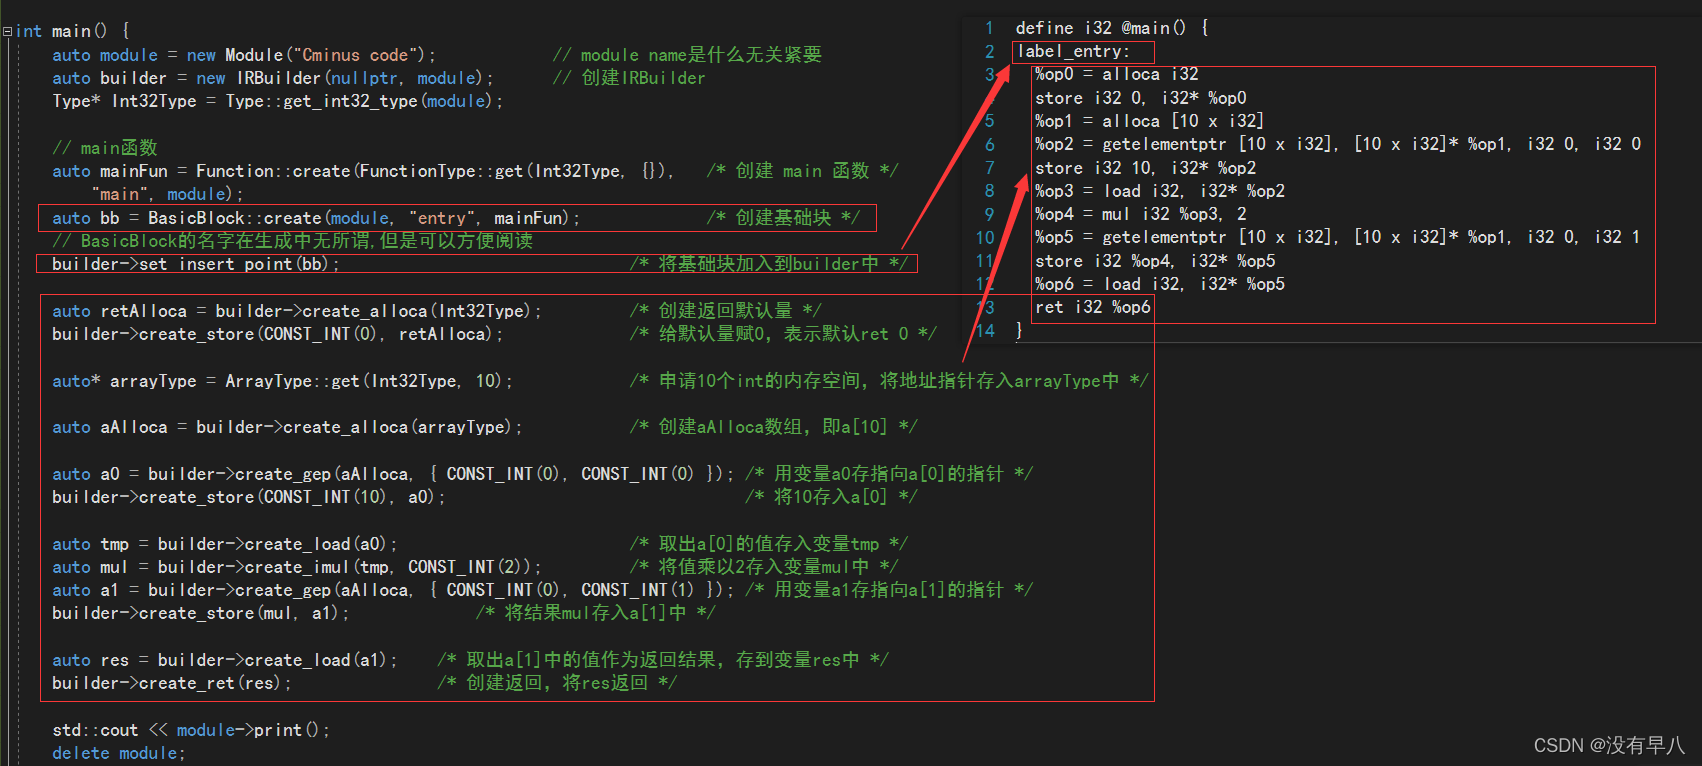
auto bb = BasicBlock::create(module, "entry", mainFun);创建名为entry的基本块,并将其存到变量bb中(在打印输出时,名字实际为laebl_entry)代码
builder->set_insert_point(bb);用于进行SetInsertPoint设置,即将bb加入builder中。而之后的代码,则是具体的基本块中的所需执行的语句,样例(assign)如下:
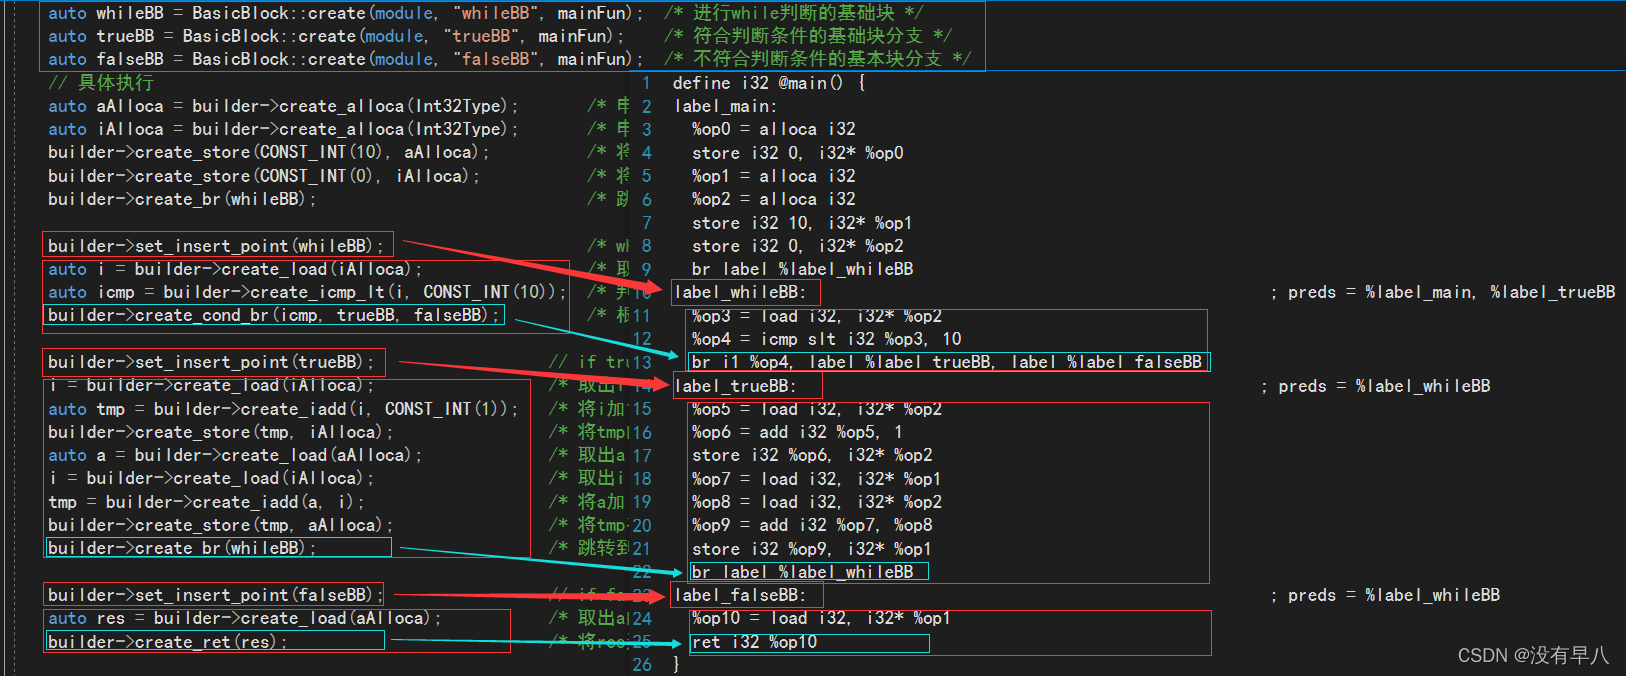
而在基本块之间的跳转时,用代码
builder->create_br(whileBB);进行直接跳转到名为whileBB的基本块;用代码builder->create_cond_br(icmp, trueBB, falseBB);进行按条件icmp跳转到trueBB基本块或是falseBB基本块。样例(while)如下:
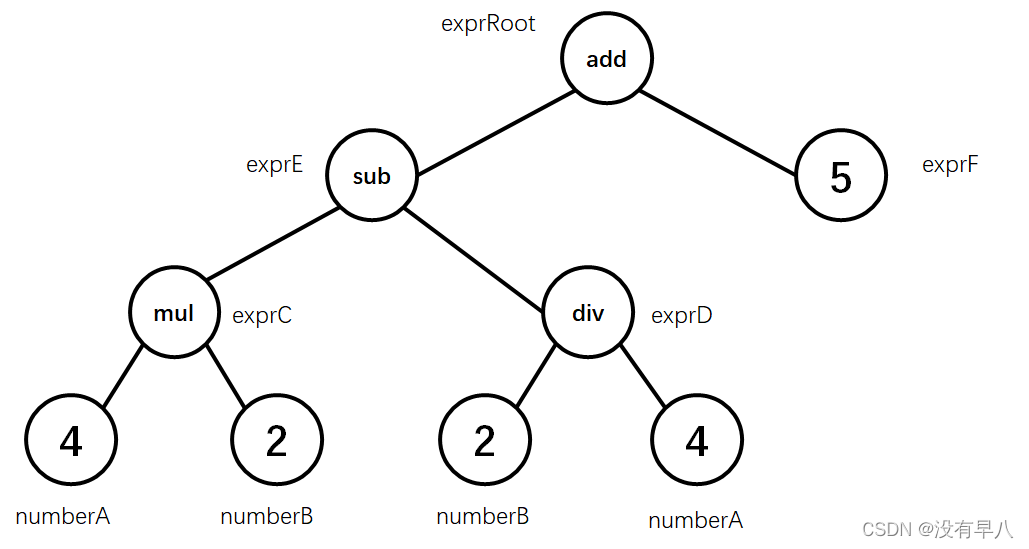
问题2: Visitor Pattern
请指出visitor.cpp中,
treeVisitor.visit(exprRoot)执行时,以下几个Node的遍历序列:numberA、numberB、exprC、exprD、exprE、numberF、exprRoot。
序列请按如下格式指明:
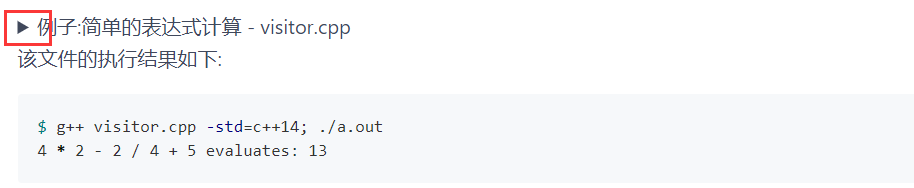
exprRoot->numberF->exprE->numberA->exprD实话讲,visitor.cpp 有一丢丢难找,原来不是在源代码的文件中,而是在网页里,属实有一丢丢离谱:
点击即可看到 visitor.cpp
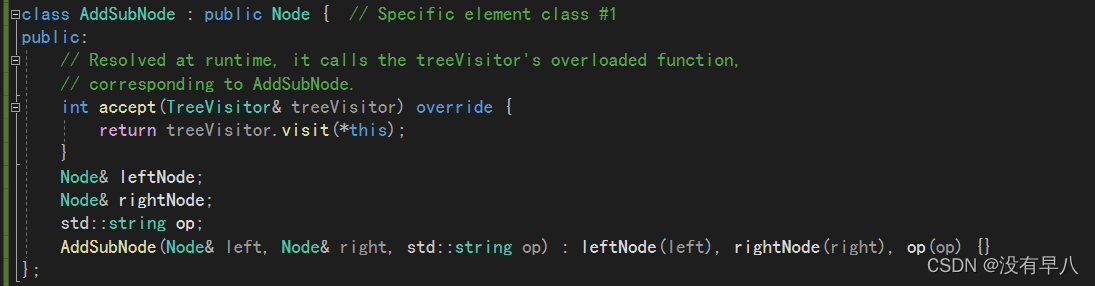
通过查看结点创建的代码:可以看出
对于加减结点,按照“左中右”的顺序为:左操作数(子结点),中间符号(当前结点),右操作数(子结点)。
对于乘除结点,按照“左中右”的顺序为:左操作数(子结点),中间符号(当前结点),右操作数(子结点)。
而数字结点仅自身。
因此,结合 main 函数中的代码:
可以看出,其创建了这样一颗计算树:
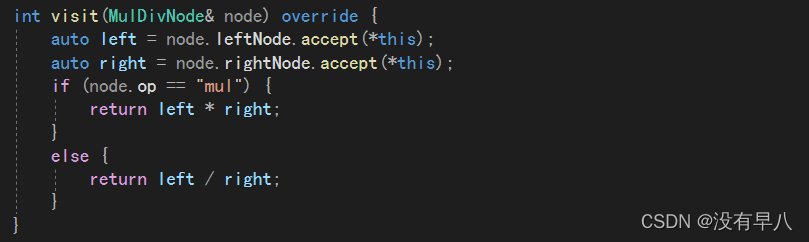
通过查看 visit 代码,可以看出:
在表示加减操作的结点,其先访问右分支,再访问左分支。
在表示乘除的结点,先访问左分支,再访问右分支。
而对于数字结点,则直接返回。
因此,其对应的遍历顺序为:
KaTeX parse error: No such environment: align at position 8: \begin{̲a̲l̲i̲g̲n̲}̲ \rm &exprRoot\…问题3: getelementptr
请给出
IR.md中提到的两种getelementptr用法的区别,并稍加解释:
%2 = getelementptr [10 x i32], [10 x i32]* %1, i32 0, i32 %0%2 = getelementptr i32, i32* %1 i32 %0对于前一种,指针的类型为
[10 x i32]*,代码中的第一个i32 0是指,对于指针所指向的[10 x i32]*这一数组([10 x i32][]),偏移量为0,即就是当前指向的地址(若不为0,例如为5,则其指向的地址是[10 x i32][5],也就是往后偏移5个单位的[10 x i32]);而第二个i32 %0,则是表示在[10 x i32]这一数组中,偏移量为%0,即指向的地址是[%0]。因此,若存在某二维数组,形如
i32 a[][10],则getelementptr [10 x i32], [10 x i32]* %1, i32 0, i32 %0取出的是a[0][%0];若存在某三维数组,形如i32 a[][20][10],则getelementptr [20 x [10 x i32]], [20 x [10 x i32]]* %1, i32 0, i32 0, i32 %0取出的是a[0][0][%0];同理,多维数组以此类推。对于一维数组
i32 a[10],则可通过置第一个偏移参数为0,置第二个偏移参数为所需要的%0,利用[10 x i32]*型的指针,取出a[%0](例如第一行代码所示)。而对于后一种,指针类型为
i32*,即可直接对应i32 a[]的数组,通过设置偏移量参数为%0,即可直接取出a[%0]中的值。因此,这两种
getelementptr实际上是针对不同的指针类型[10 x i32]*和i32*,同样取出a[%0]的方法。此外,这两种的用法实际上能算作是同一种用法,区别是在于前者是
[10 x i32]*型,指针所指向的地址仍旧可以视为指针,从而除指针自身以[10 x i32]为单位的偏移外,还有偏移单位为i32的偏移;而后者是i32*,仅存在i32这一单位的偏移。而且,这种不仅适用于数组的寻址,也适用于结构体、向量等数据组织方式的寻址,方法和数组的类似。
![[外链图片转存失败,源站可能有防盗链机制,建议将图片保存下来直接上传(img-azaewqdo-1646219314584)(Markdown图片包/image-20211217183839080.png)]](https://i-blog.csdnimg.cn/blog_migrate/2b70dfcd92cc4c4cd52d54019c3b9ab3.png)
![[外链图片转存失败,源站可能有防盗链机制,建议将图片保存下来直接上传(img-1vnZMXh5-1646219314584)(Markdown图片包/image-20211217183905907.png)]](https://i-blog.csdnimg.cn/blog_migrate/e6da9ed78617978df587d4c21fc18294.png)

![[外链图片转存失败,源站可能有防盗链机制,建议将图片保存下来直接上传(img-vDsY8vbw-1646219314586)(Markdown图片包/image-20211217183318428.png)]](https://i-blog.csdnimg.cn/blog_migrate/7e72d2e9a0eb0379f4855db67b6308f5.png)

六、实验反馈
实验很有意思,但下次请别把 visitor.cpp 藏起来了,好难找,枯了。
总体,认真阅读所给资料,然后反复看 gcd_array 的例子,就能大致写出代码。然后再结合 LightIR 文件以及 bug 的报错,就能把代码修改正确。


 992
992

 被折叠的 条评论
为什么被折叠?
被折叠的 条评论
为什么被折叠?
 到【灌水乐园】发言


