


上集唠到了四种非关系型数据库,然后引出了咱们最关键的一种人称“持久化的哈希Map”—键值对数据库Redis,聊了一下他的一些基本概念,优缺点,以及关键的配置文件里面的参数的介绍,这一集呢…,听说SSM很牛逼,那么我更牛逼的Redis在你这里…一山不容二牛逼…会发生什么呢?
在此之前呢,先看看Spring Data Redis && SpringBoot,当然还得看看人家官网咋玩的
- https://spring.io/projects/spring-data-redis
- 【springboot中用redis的string等值的对象类型时,对象类型的方法都需要opsForVal、opsForHash…opsForXxx先得到值的五种对象类型,然后才能调用每种类型的set、get等方法】
- https://docs.spring.io/spring-data/redis/docs/current/reference/html/#redis
PART1:Redis的核心功能:Redis作为K、V存储的高性能缓存时
PART1-0:先看看Github或者Gitee中成熟的开源项目中集成Redis后是怎么用的,再到下面扣扣细节,特此感谢eladmin的作者老师:
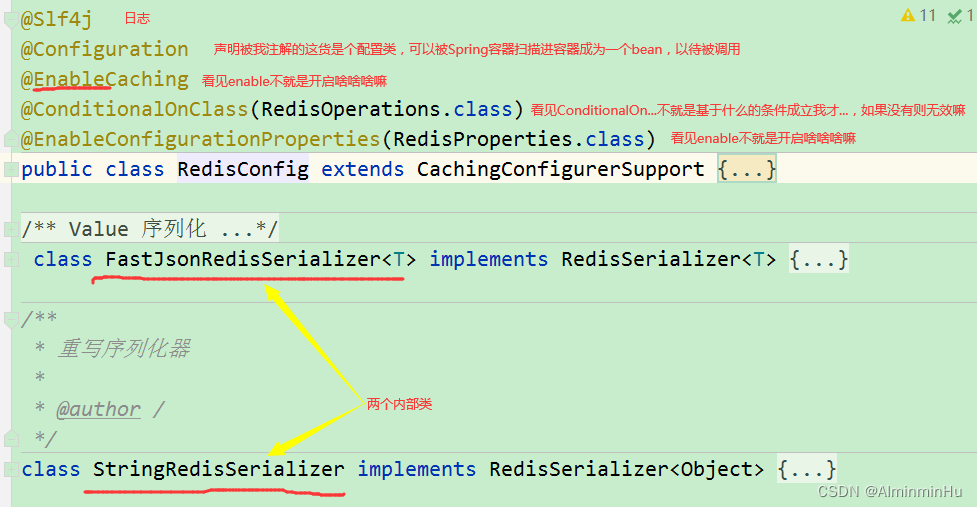
- class FastJsonRedisSerializer implements RedisSerializer{…}:自定义一个序列化类出来,对redis中的value压缩一下,其实不就和咱们的RPC中的Kryo、Hession、protobuf这些一样嘛,就是个工具而已。
/**
 * Value 序列化
 *
 * @author /
 * @param <T>
 */
 class FastJsonRedisSerializer<T> implements RedisSerializer<T> {

    private final Class<T> clazz;

    FastJsonRedisSerializer(Class<T> clazz) {
        super();
        this.clazz = clazz;
    }

    @Override
    public byte[] serialize(T t) {
        if (t == null) {
            return new byte[0];
        }
        return JSON.toJSONString(t, SerializerFeature.WriteClassName).getBytes(StandardCharsets.UTF_8);
    }

    @Override
    public T deserialize(byte[] bytes) {
        if (bytes == null || bytes.length <= 0) {
            return null;
        }
        String str = new String(bytes, StandardCharsets.UTF_8);
        return JSON.parseObject(str, clazz);
    }

}
class StringRedisSerializer implements RedisSerializer<Object> { private final Charset charset; StringRedisSerializer() { this(StandardCharsets.UTF_8); } private StringRedisSerializer(Charset charset) { Assert.notNull(charset, "Charset must not be null!"); this.charset = charset; } @Override public String deserialize(byte[] bytes) { return (bytes == null ? null : new String(bytes, charset)); } @Override public @Nullable byte[] serialize(Object object) { String string = JSON.toJSONString(object); if (org.apache.commons.lang3.StringUtils.isBlank(string)) { return null; } string = string.replace("\"", ""); return string.getBytes(charset); } }- 然后呢,就是
redis很重要的一点,设置redis数据默认过期时间,此处默认为2小时/** * 设置 redis 数据默认过期时间,默认2小时 * 设置@cacheable 序列化方式 */ @Bean public RedisCacheConfiguration redisCacheConfiguration(){ FastJsonRedisSerializer<Object> fastJsonRedisSerializer = new FastJsonRedisSerializer<>(Object.class); RedisCacheConfiguration configuration = RedisCacheConfiguration.defaultCacheConfig(); configuration = configuration.serializeValuesWith(RedisSerializationContext. SerializationPair.fromSerializer(fastJsonRedisSerializer)).entryTtl(Duration.ofHours(2)); return configuration; } - 还有
自定义缓存key生成策略,默认将使用该策略@Bean @Override public KeyGenerator keyGenerator() { return (target, method, params) -> { Map<String,Object> container = new HashMap<>(8); Class<?> targetClassClass = target.getClass(); // 类地址 container.put("class",targetClassClass.toGenericString()); // 方法名称 container.put("methodName",method.getName()); // 包名称 container.put("package",targetClassClass.getPackage()); // 参数列表 for (int i = 0; i < params.length; i++) { container.put(String.valueOf(i),params[i]); } // 转为JSON字符串 String jsonString = JSON.toJSONString(container); // 做SHA256 Hash计算,得到一个SHA256摘要作为Key return DigestUtils.sha256Hex(jsonString); }; }
- 然后呢,就是
PART1-1:Redis在SSM中.需要详细完整的图,评论留言,给你发哦
之前在SSM项目中集成使用Redis时,其实就是:
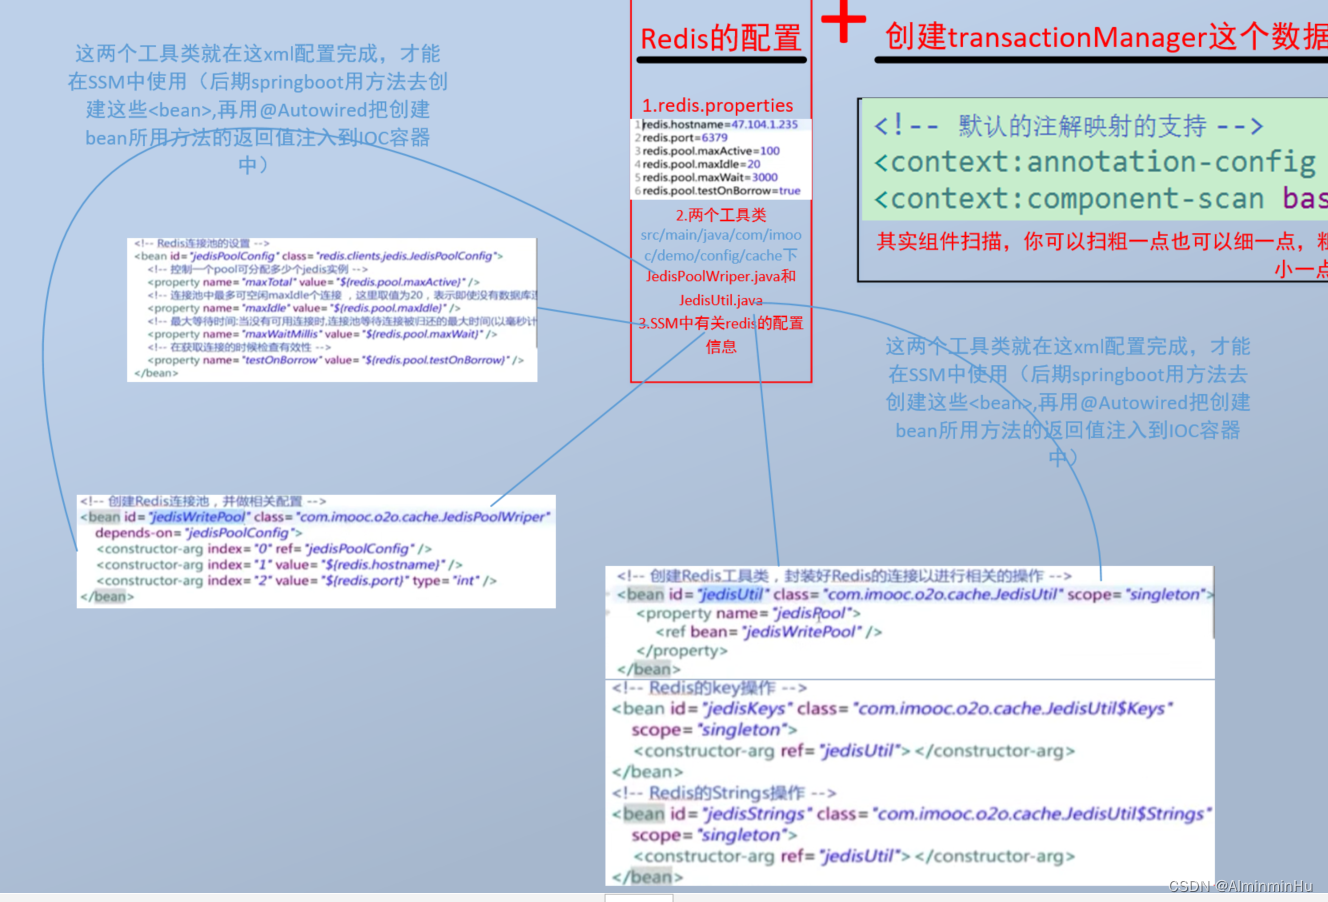
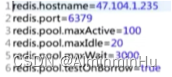
- 写了一个配置文件redis.properties
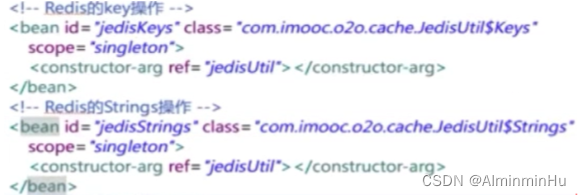
- 写了两个工具类,JedisPoolWriper.java和JedisUtil.java:这两个工具类就在这xml配置完成,才能在SSM中使用(后期springboot用方法去创建这些,再用@Autowired把创建bean所用方法的返回值注入到IOC容器中)
JAVA操作redis通常使用的是Jedis,通过java代码来操作redis的数据存储读取等操作
- Spring也为Redis提供了支持,就是在Spring-data模块中的Spring-Data-Redis(SDR),它一部分是基于Jedis客户端的API封装,另一部分是Redis对Spring容器的整合。
- 那肯定,咱们Spring在这,你写了两个类,也就是两个bean,我spring看见bean我能视而不见?
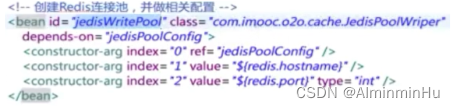

- 还有SSM配置文件中关于集成的那个东西的配置(在.xml文件中配置也行)
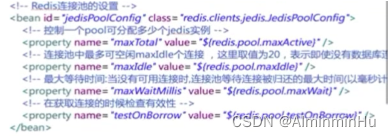
<?xml version="1.0" encoding="UTF-8"?>
<beans    xmlns="http://www.springframework.org/schema/beans"
          xmlns:xsi="http://www.w3.org/2001/XMLSchema-instance"
          xmlns:p="http://www.springframework.org/schema/p"
          xmlns:tx="http://www.springframework.org/schema/tx"
          xmlns:context="http://www.springframework.org/schema/context"
          xsi:schemaLocation="
      http://www.springframework.org/schema/beans
      http://www.springframework.org/schema/beans/spring-beans-3.0.xsd
      http://www.springframework.org/schema/tx
      http://www.springframework.org/schema/tx/spring-tx-3.0.xsd
      http://www.springframework.org/schema/context
      http://www.springframework.org/schema/context/spring-context-3.0.xsd">

    <context:property-placeholder location="classpath:*.properties"/>
    <!--设置数据池-->
    <bean id="poolConfig"  class="redis.clients.jedis.JedisPoolConfig">
        <property name="maxIdle" value="${redis.maxIdle}"></property>
        <property name="minIdle" value="${redis.minIdle}"></property>
        <property name="maxTotal" value="${redis.maxTotal}"></property>
        <property name="maxWaitMillis" value="${redis.maxWaitMillis}"></property>
        <property name="testOnBorrow" value="${redis.testOnBorrow}"></property>
    </bean>
    <!--链接redis-->
    <bean id="connectionFactory" class="org.springframework.data.redis.connection.jedis.JedisConnectionFactory">
        <property name="hostName" value="${redis.host}"></property>
        <property name="port" value="${redis.port}"></property>
        <property name="password" value="${redis.password}"></property>
        <property name="poolConfig" ref="poolConfig"></property>
    </bean>

    <bean id="redisTemplate" class="org.springframework.data.redis.core.RedisTemplate" p:connection-factory-ref="connectionFactory" >
        <!--以下针对各种数据进行序列化方式的选择-->
        <property name="keySerializer">
            <bean class="org.springframework.data.redis.serializer.StringRedisSerializer" />
        </property>
        <property name="valueSerializer">
            <bean class="org.springframework.data.redis.serializer.StringRedisSerializer" />
        </property>
        <property name="hashKeySerializer">
            <bean class="org.springframework.data.redis.serializer.StringRedisSerializer" />
        </property>
        <!--<property name="hashValueSerializer">
            <bean class="org.springframework.data.redis.serializer.StringRedisSerializer" />
        </property>-->
    </bean>
</beans>
- 还有SSM配置文件中关于集成的那个东西的配置(在.xml文件中配置也行)
- 然后在项目中,原本存到数据库的数据先存到Redis中,原本要从数据库取的数据先从Redis中取
再深扣一下:
- SpringData的另外一个关键特性,也就是面向模板的数据访问,能够在使用Redis的时候,为我们提供帮助。
SpringDataRedis包含了多个模板实现,用来完成Redis数据库的数据存取功能。但是为了创建SpringData Redis的模板,我们首先需要有一个Redis连接工厂。Spring Data Redis提供了四个连接工厂(Redis连接工厂会生成到Redis数据库服务器的连接。Spring Data Redis为四种Redis客户端实现提供了连接工厂,Redis连接工厂会以RedisConnection的形式生成到Redis key-value存储的连接。借助RedisConnection,可以存储和读取数据。**)**供我们选择。这些连接工厂在适用性上都是相同的。- JedisConnectionFactory
- JredisConnectionFactory
- LettuceConnectionFactory
- SrpConnectionFactory
- 选择好了要用哪一个连接工厂之后,
我们就可以将连接工厂配置为Spring中的bean。例如,我们选择了配置JedisConnectionFactory bean:Redis连接工厂会以RedisConnection的形式生成到Redis key-value存储的连接。借助RedisConnection,可以存储和读取数据。/** *通过默认构造器创建的连接工厂会向localhost上的6379端口创建连接,并且没有密码。 */ @Bean public RedisConnectionFactory redisCF() { return new Jedi sConnectionFactory() ; } ... /** *如果Redis服务器运行在其他的主机或端口在创建连接工厂的时候,可以这样配置从而设置这些属性。Redis服务器配置为需要客户端认证的话,那么可以通过调用setPassword()方法来设置密码:: */ @Bean public Redi sConnectionFactory redisCF() { Jedi sConnectionFactory cf = new Jedi sConnecti onFactory() ; cf.setHostName ("redis -server") ; cf.setPort(7379) ; cf.setPassword("qaaa"); return cf; } ...
- 有了Redis连接工厂后下来就可以使用Spring Data Redis模板了。Redis连接工厂会以RedisConnection的形式生成到Redis key-value存储的连接。借助RedisConnection,可以存储和读取数据。但是咱们存取数据总不能一直用字节数组去存去取吧。肯定不是。Spring Data Redis以模板的形式为咱们提供了两个数据访问方案或者叫模板。其实大白话就是,
这俩所谓的数据访问方案或者模板就是咱们用来保存、获取以及删除key-value的工具。- RedisTemplate:
RedisTemplate可以极大地简化Redis数据访问,能够让我们持久化各种类型的key和value,并不局限于字节数组。在认识到key和value通常是String类型之后,StringRedisTemplate扩展了RedisTemplate,只关注String类型。构建RedisTemplate的方式:- redisTemplate:用的是JDK自带的序列化,所以存进去的string值体积比较大(相当于除了值自身还有一些为了二进制安全而加进去的乱码字符)
- StringRedisTemplate
//注意,RedisTemplate使用两个类型进行了参数化。第一个是key的类型,第二个是value的类型。在这里所构建的RedisTemplate中,将会保存Product对象作为value, 并将其赋予-个String类型的key。 RedisConnectionFactory cf = ... RedisTemplate<String, Product> redis = new RedisTemplate<String, Product>(); redis.setConnectionFactory(cf); ... //如果你所使用的value和key都是String类型,那么可以考虑使用StringRedisTemplate来代替RedisTemplate: RedisConnectionFactory cf = ... StringRedisTemplate redis = new StringRedisTemplate(cf);- stringRedisTemplate:存进去的就是干净的值本身
- RedisTemplate:
通常咱们可以将RedisTemplate配置为bean然后注入到需要的地方
@Bean
public RedisTemplate<String, Product> redisTemplate(RedisConnectionFactory cf) {
	RedisTemplate<String, Product> redis = new RedisTemplate<String, Product>() ;
	redis.setConnectionFactory(cf) ;
	return redis;
}
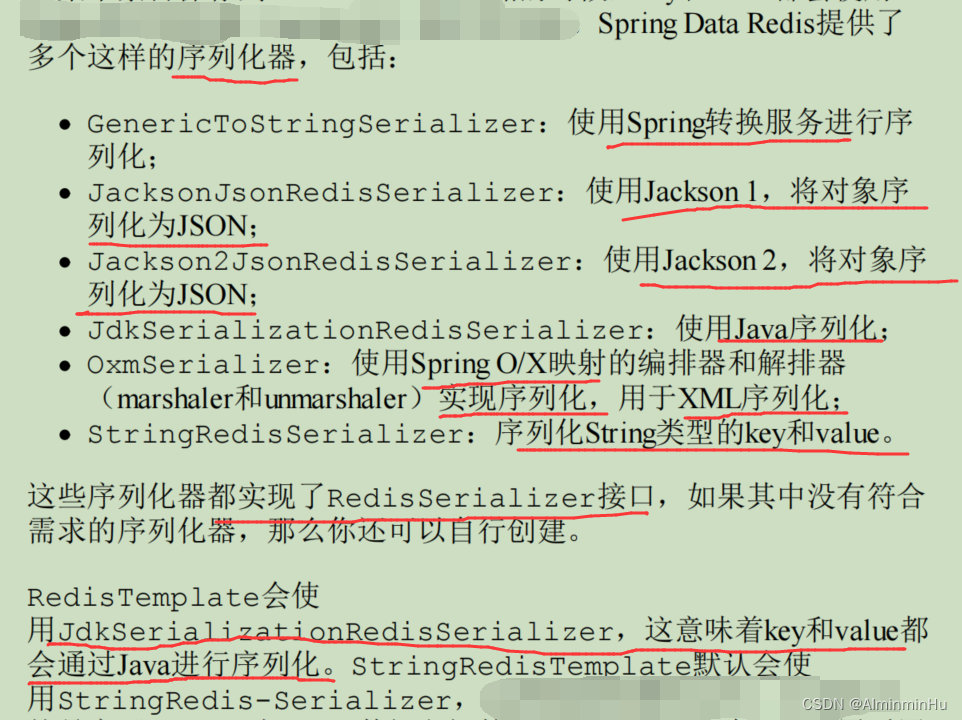
- 当某个条目保存到Redis key-value存储的时候,key和value 都会使用Redis的序列化器(serializer) 进行序列化。
- 集中式缓存Redis
- 在一些要求高一致性(
任何数据变化都能及时的被查询到)的系统和应用中得使用集中式缓存Redis就可以很好的解决缓存数据的一致性问题.- 在集群模式下时,各应用服务器之间的缓存都是独立的,因此在不同服务器的进程间会存在缓存不一致的情况。即使像EhCache提供了集群环境下的缓存同步策略,
但是同步依然是需要一定的时间,短暂的缓存不一致依然存在。
- 在集群模式下时,各应用服务器之间的缓存都是独立的,因此在不同服务器的进程间会存在缓存不一致的情况。即使像EhCache提供了集群环境下的缓存同步策略,
- 在一些要求高一致性(
PART2:Redis在SpringBoot中。需要详细完整的图,评论留言,给你发哦、
- 从SSM移植到SpringBoot可以说大概有以下几点:
- 将原来redis.properties中的配置信息转移到springboot自带的applicationproperties配置文件中
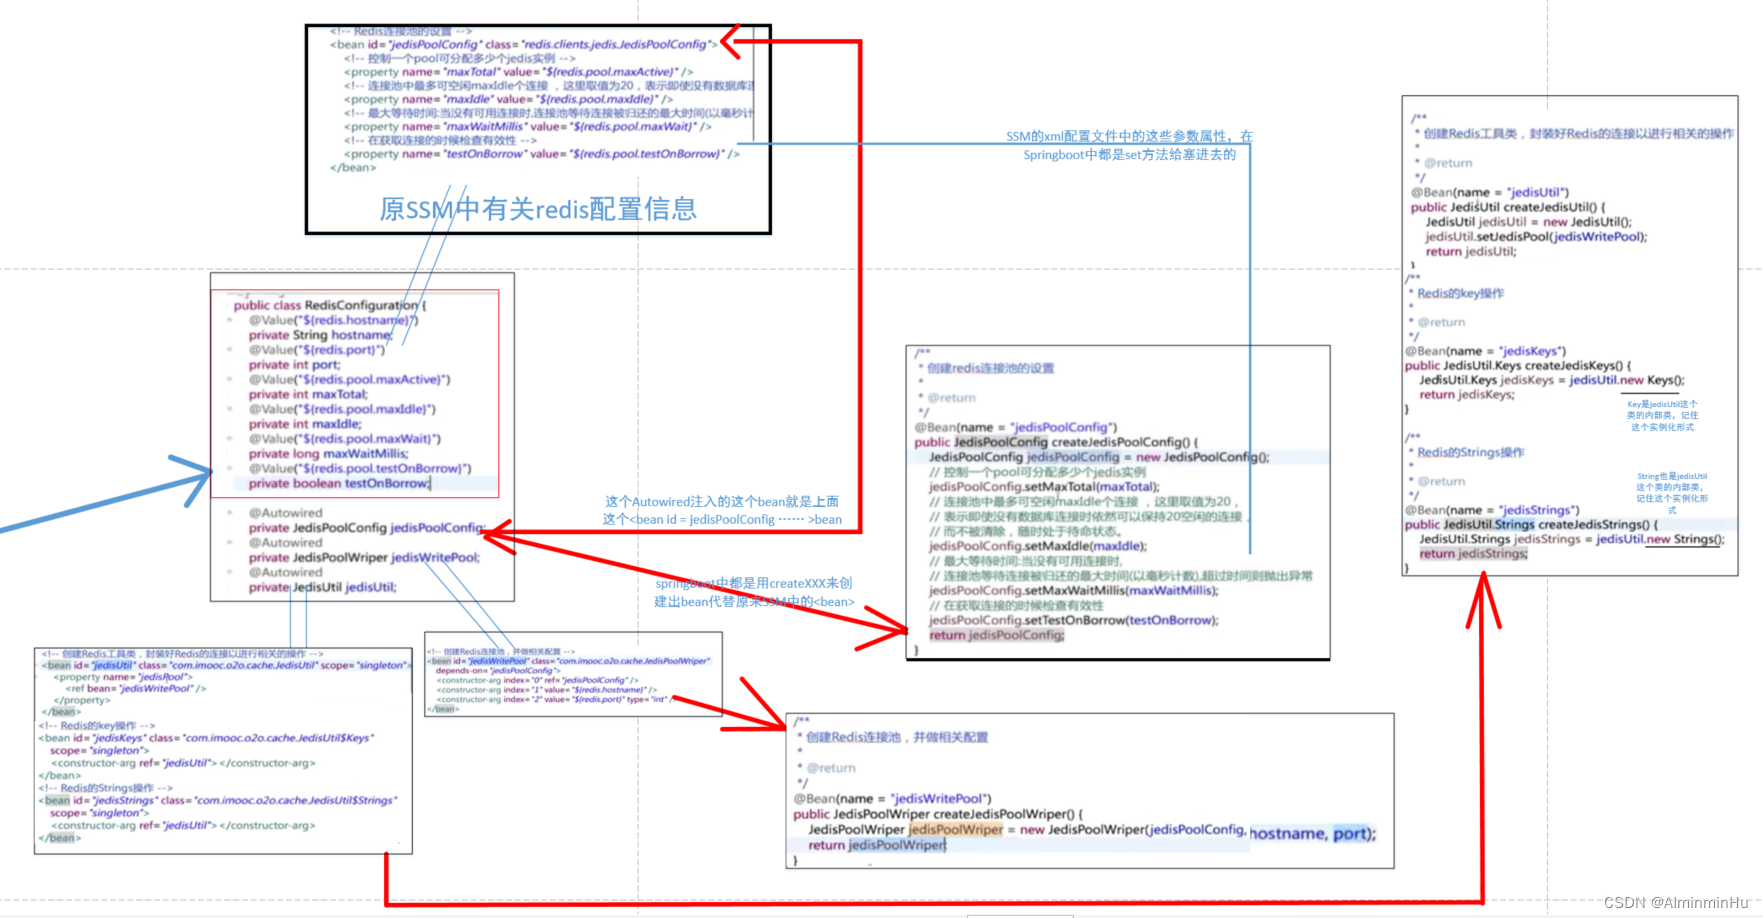
- 原来SSM的中有id,class,property,ref等,这些在springboot中,id就是我方法名加上create,即createXXX,就可以创建出原来SSM的XML中配置的id对应的bean呀,class就是springboot中@Bean下方法的返回值类型,property就是springboot中@Bean下方法的成员属性或者叫成员变量,ref在springboot中@Bean下方法中是一个引用,相当于对象一样,所以需要用@Autowired进行注入
- 将两个工具类src/main/java/com/imooc/demo/cache下JedisPoolWriper.java和JedisUtil.java转移到springboot的src/main/java/com/imooc/demo/config/cache下
- 在src/main/java/com/imooc/demo/config下新建一个RedisConfiguration.java来替换原SSM的.xml配置文件中这个配置信息
- 将原来redis.properties中的配置信息转移到springboot自带的applicationproperties配置文件中
但是话说回来,一个真正的SpringBoot项目相比较于SSM项目,可不止上面那些变化,还有比如说:
- 首当其冲的就是maven项目的pom.xml中的内容有大改动:但是,
第一步,依旧是导入依赖。<dependency> <groupId>org.springframework.boot</groupId> <artifactId>spring-boot-starter-data-redis</artifactId> </dependency> <dependency> <groupId>org.apache.commons</groupId> <artifactId>commons-pool2</artifactId> </dependency> - 然后,第二步就是配置连接,就是上面咱们图里面的配置文件等,如下:

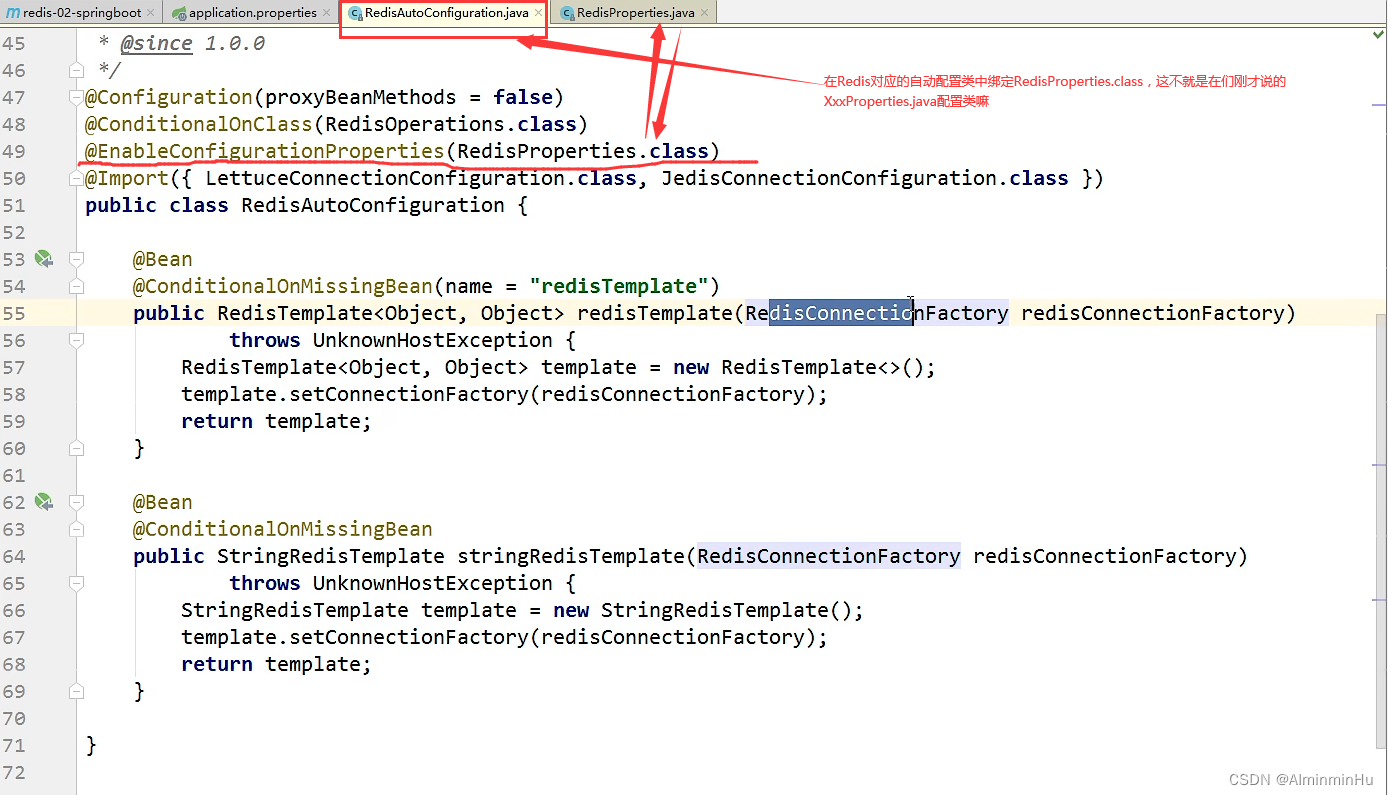
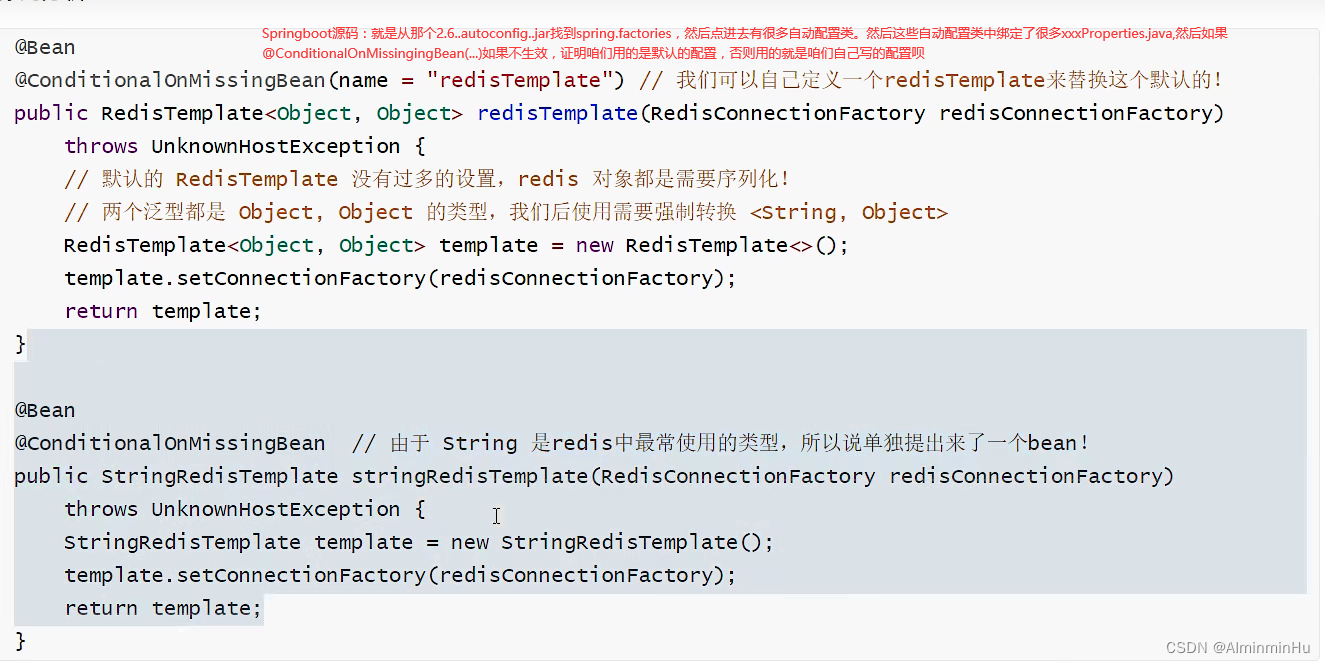
SpringBoot所有的配置类,都有一个XxxAutoConfiguration自动配置类:Redis对应的自动配置类就是RedisAutoConfigurationXxxAutoConfiguration自动配置类都会绑定一个XxxProperties配置文件:Redis对应的就是RedisProperties
- 配置文件中增加配置信息,以本地运行为例,比如:
- lettuce是个啥呢,其实lettuce也是个和咱们之前用的jedis一样的连接池,咱们前面不是已经有jedisPool…
- jedis :采用的直连,多个线程操作的话是不安全的,如果想要避免不安全的,使用jedis pool 连接池!更像BIO 模式
- lettuce :采用netty ,实例可以在多个线程中进行共享,不存在线程不安全的情况!可以减少线程数据了,更像NIO模式
spring.redis.host=localhost
spring.redis.port=6379
spring.redis.lettuce.pool.max-idle=8
spring.redis.lettuce.pool.max-active=8
spring.redis.lettuce.pool.max-wait=-1ms
spring.redis.lettuce.pool.min-idle=0
spring.redis.lettuce.shutdown-timeout=100ms
- lettuce是个啥呢,其实lettuce也是个和咱们之前用的jedis一样的连接池,咱们前面不是已经有jedisPool…
- 然后第三步,该用@AutoWired注入就用注解注入,然后调用redisTemplate中方法就行了呗
redisTemplate.xxx();//之前不是已经注入进来了吗,现在就直接调用呗 redisTemplate.opsForValue(); ... // redisTemplate操作不同的数据类型,api 和我们的指令是一样的 // opsForValue 操作字符串 类似String // opsForlist 操作List类似ist // opsForSet // opsForHash // opsForZSet // opsForGeo // opsForHyperLogLog- 上面也说过,真实开发中常用JSON来传递对象,
当用redis时如果传输对象时,不序列化会传输失败【因为不同客户端或者同一客户端的不同语言对各种数据类型的定义或者理解,也就是数据类型的大小是不一样,所以容易产生溢出失真等错误】。出于种种原因,我们一般开发会编写一个自己的RedisTemplate,然后直接用咱们自己写的这个RedisTemplate去调用Redis中的方法进行操作就行,下面举两种不同的例子,以FastJsonRedisSerializer和Jackson2JsonRedisSerializer为例分别看看:@Configuration //代表这个类是一个配置类,会被SpringBoot自动配置并使用 pub1ic class RedisConfig { //这是一个固定模板,在企业中拿去就可以直接使用! //自己定义了一个RedisTemplate @Bean @suppresswarnings ("a11") pub1ic RedisTemplate<String,object> redisTemplate (RedisConnectionFactory factory) { //我们为了自己开发方便,一.般直接使用<String, object> RediSTemplate<String,object> template = new RedisTemplate<String,object>(); template.setConnectionFactory(factory); //Json序列化配置 Jackson2JsonRedisSerializer jackson2JsonRedisserializer = new Jackson2JsonRedisSerializer(object.class); objectMapper om = new objectMapper(); om.setvisibility(PropertyAccessor.ALL,JsonAutoDetect.visibility.ANY); om.enab1eDefaultTyping(objectMapper.DefaultTyping.NON_ FINAL); jackson2JsonRedi sSerializer. setobjectMapper (om); // String的序列化 StringRedisSerializer stringRedisserializer = new StringRedisserializer(); // key采用String的序列化方式 template.setKeySerializer(stringRedisserializer); // hash的key也采用String的序列化方式 template.setHashKeySerializer(stringRedisSerializer); // value序列化方式采用jackson template.setvalueSerializer(jackson2JsonRedisSerializer); // hash的value序列化方式采用jackson temp1ate.setHashvalueserializer(jackson2JsonRedisserializer); template.afterpropertiesset(); return template; } }@Bean(name = "redisTemplate") @ConditionalOnMissingBean(name = "redisTemplate") public RedisTemplate<Object, Object> redisTemplate(RedisConnectionFactory redisConnectionFactory) { RedisTemplate<Object, Object> template = new RedisTemplate<>(); //序列化 FastJsonRedisSerializer<Object> fastJsonRedisSerializer = new FastJsonRedisSerializer<>(Object.class); // value值的序列化采用fastJsonRedisSerializer template.setValueSerializer(fastJsonRedisSerializer); template.setHashValueSerializer(fastJsonRedisSerializer); // fastjson 升级到 1.2.83 后需要指定序列化白名单 ParserConfig.getGlobalInstance().addAccept("me.zhengjie.domain"); ParserConfig.getGlobalInstance().addAccept("me.zhengjie.service.dto"); // 模块内的实体类 ParserConfig.getGlobalInstance().addAccept("me.zhengjie.modules.mnt.domain"); ParserConfig.getGlobalInstance().addAccept("me.zhengjie.modules.quartz.domain"); ParserConfig.getGlobalInstance().addAccept("me.zhengjie.modules.system.domain"); // 模块内的 Dto ParserConfig.getGlobalInstance().addAccept("me.zhengjie.modules.mnt.service.dto"); ParserConfig.getGlobalInstance().addAccept("me.zhengjie.modules.quartz.service.dto"); ParserConfig.getGlobalInstance().addAccept("me.zhengjie.modules.security.service.dto"); ParserConfig.getGlobalInstance().addAccept("me.zhengjie.modules.system.service.dto"); // key的序列化采用StringRedisSerializer template.setKeySerializer(new StringRedisSerializer()); template.setHashKeySerializer(new StringRedisSerializer()); template.setConnectionFactory(redisConnectionFactory); return template; }
- 上面也说过,真实开发中常用JSON来传递对象,
- 然后,咱们有自己写的更齐全更完整的RedisUtil.java【实际项目可以去github中找找看看人家咋用的,比如eladmin中,看看redisutils的写法,参考参考】,如下:然后注入:
@Autowired private RedisUtilredisUtil;,直接调用工具类里面的方法就行。import ... @Component public final class RedisUtil { //注入咱们自己写的redisTemplate @Autowired private RedisTemplate<String,0bject> redisTemplate; private static final Logger log = LoggerFactory.getLogger(RedisUtils.class); private RedisTemplate<Object, Object> redisTemplate; @Value("${jwt.online-key}") private String onlineKey; public RedisUtils(RedisTemplate<Object, Object> redisTemplate) { this.redisTemplate = redisTemplate; this.redisTemplate.setHashKeySerializer(new StringRedisSerializer()); this.redisTemplate.setKeySerializer(new StringRedisSerializer()); this.redisTemplate.setStringSerializer(new StringRedisSerializer()); } /** *指定缓存失效时间 * @param key 键 * @param time 时间(秒) */ public boolean expire(String key, 1ong time) { try { if(time > 0){ redisTemplate.expire(key, time, TimeUnit.SECONDS); } return true; } catch (Exception e) { log.error(e.getMessage(), e); return false; } } /** * 指定缓存失效时间 * * @param key 键 * @param time 时间(秒) * @param timeUnit 单位 */ public boolean expire(String key, long time, TimeUnit timeUnit) { try { if (time > 0) { redisTemplate.expire(key, time, timeUnit); } } catch (Exception e) { log.error(e.getMessage(), e); return false; } return true; } /** *根据key获取过期时间 * @param key键不能为null * @return 时间(秒) 返回e代表为永久有效 */ public 1ong getExpire(String key) { return redisTemplate.getExpire(key, TimeUnit.SECONDS); } /** *判断key是否存在 * @param key鍵 * @return true 存在false不存在 */ public boolean hasKey(String key) { try { return redisTemplate.hasKey(key); } catch (Exception e) { log.error(e.getMessage(), e); return false; } } /** * 查找匹配key * * @param pattern key * @return / */ public List<String> scan(String pattern) { ScanOptions options = ScanOptions.scanOptions().match(pattern).build(); RedisConnectionFactory factory = redisTemplate.getConnectionFactory(); RedisConnection rc = Objects.requireNonNull(factory).getConnection(); Cursor<byte[]> cursor = rc.scan(options); List<String> result = new ArrayList<>(); while (cursor.hasNext()) { result.add(new String(cursor.next())); } try { RedisConnectionUtils.releaseConnection(rc, factory); } catch (Exception e) { log.error(e.getMessage(), e); } return result; } /** *删除缓存 * @param key可以传-一个值或多个 */ public void del(String... key) { if (keys != null && keys.length > 0) { if (keys.length == 1) { boolean result = redisTemplate.delete(keys[0]); log.debug("--------------------------------------------"); log.debug(new StringBuilder("删除缓存:").append(keys[0]).append(",结果:").append(result).toString()); log.debug("--------------------------------------------"); } else { Set<Object> keySet = new HashSet<>(); for (String key : keys) { keySet.addAll(redisTemplate.keys(key)); } long count = redisTemplate.delete(keySet); log.debug("--------------------------------------------"); log.debug("成功删除缓存:" + keySet.toString()); log.debug("缓存删除数量:" + count + "个"); log.debug("--------------------------------------------"); } } } /** *普通缓存获取 @param key键 * @return 值 */ public object get(String key) { return key == nu11 ? nu11 : redisTemplate. opsForVa1ue().get(key); } /** * 批量获取 * * @param keys * @return */ public List<Object> multiGet(List<String> keys) { List list = redisTemplate.opsForValue().multiGet(Sets.newHashSet(keys)); List resultList = Lists.newArrayList(); Optional.ofNullable(list).ifPresent(e-> list.forEach(ele-> Optional.ofNullable(ele).ifPresent(resultList::add))); return resultList; } /** *普通缓存放入 @param key * @param value值 * @return true成功false失败 */ public boolean set(String key, object value) { try { redisTemplate.opsForVa1ue().set(key, value); return true; } catch (Exception e) { log.error(e.getMessage(), e); return false; } } /** * 分页查询 key * * @param patternKey key * @param page 页码 * @param size 每页数目 * @return / */ public List<String> findKeysForPage(String patternKey, int page, int size) { ScanOptions options = ScanOptions.scanOptions().match(patternKey).build(); RedisConnectionFactory factory = redisTemplate.getConnectionFactory(); RedisConnection rc = Objects.requireNonNull(factory).getConnection(); Cursor<byte[]> cursor = rc.scan(options); List<String> result = new ArrayList<>(size); int tmpIndex = 0; int fromIndex = page * size; int toIndex = page * size + size; while (cursor.hasNext()) { if (tmpIndex >= fromIndex && tmpIndex < toIndex) { result.add(new String(cursor.next())); tmpIndex++; continue; } // 获取到满足条件的数据后,就可以退出了 if (tmpIndex >= toIndex) { break; } tmpIndex++; cursor.next(); } try { RedisConnectionUtils.releaseConnection(rc, factory); } catch (Exception e) { log.error(e.getMessage(), e); } return result; } ......
PART3:Redis 官方可视化工具RedisInsight
- RedisInsight 是一个直观高效的 Redis GUI 管理工具,它可以对 Redis 的内存、连接数、命中率以及正常运行时间进行监控,并且可以在界面上使用 CLI 和连接的 Redis 进行交互(RedisInsight 内置对 Redis 模块支持)。详细情况可以看看芋道源码老师的这篇关于RedisInsight的文章
巨人的肩膀:
https://blog.csdn.net/u010690828/article/details/77141083
Spring实战
https://blog.didispace.com/spring-boot-learning-21-5-4/
高性能MySQL
mysql技术内幕
巨人的肩膀:https://www.javalearn.cn
B站各位大佬


 被折叠的 条评论
为什么被折叠?
被折叠的 条评论
为什么被折叠?
 到【灌水乐园】发言


